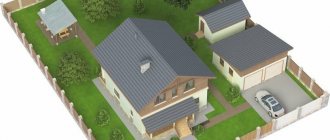
Having your own bathhouse is the dream of almost every owner of a private house or summer cottage. But it is obvious that construction requires money, so many believe that they cannot afford to build a bathhouse. There is also a cheaper option, which makes it possible to build a bathhouse without spending a lot of money - these are frame bathhouses. Projects and photos of this design are presented in a wide selection, so everyone can easily find an option that will satisfy their requirements.
Frame bath projects
The features of frame baths are visible both during the construction of the building and during its further operation.
For such buildings there is no need to prepare the foundation in a special way, because the frame itself and the wood facing materials are light enough not to sag even when installed on fairly loose ground. Frame baths are very popular due to their economy, compactness and practicality. A small room in a frame bath is usually divided into a compact steam room that can accommodate about four people, a shower room and a relaxation room. It is also necessary to have a small terrace or porch in the project.
Large baths are usually built in a more fundamental way using materials such as brick or timber, but, nevertheless, sometimes even two-story frame structures are found. Among the obvious advantages of this type of building are ease of installation, record speed of building assembly, and relatively low cost of building materials and work.
Thanks to all the above factors, Russians order frame bath projects much more often than the construction of brick bath structures.
Height
When it comes to the height of the roof of a bathhouse , you need to understand that we mean its angle of inclination .
And it is not an arbitrary value, but depends on what winds blow in your area and how much precipitation falls. ADVICE! Proceed from the fact that increasing the angle of inclination simultaneously increases the wind load and prevents the retention of precipitation on the roof surface.
The minimum angle of inclination at which a roof is considered pitched starts at 2.5 degrees . Less - flat roofs, and up to 10 degrees - pitched roofs, but even these will have problems with removing precipitation and will require manual cleaning. But the accumulated snow is hundreds of kilograms pressing on the roof!
The maximum angle of inclination will be considered equal to 60 degrees . It is believed that the maximum amount of snow will put pressure on a roof with a slope of 30 degrees, and with a slope of 45 degrees the snow will slide down on its own.
Another factor associated with the choice of angle of inclination is the technical characteristics of the roofing material. You can select the material for the optimal angle of inclination for your area, or you can rely on the material and look for a compromise with climatic optimum.
BY THE WAY! An increase in the angle of inclination will also entail an increase in cost.
Maps and explanations for them , as well as simplified calculation formulas, can be found in this article. We strongly recommend that you familiarize yourself with them and study the formulas that will determine the load and affect the calculation of the roof mass.
However, you can use a simple life hack: you are not the first to build, take a closer look at your neighbors’ buildings, talk to them about problems with the roof, if there were any, and the optimal degree of inclination will be determined without unnecessary hassle. And the material will also be clearer.
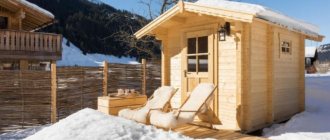
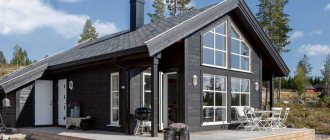
Frame bathhouse with terrace
A small terrace gives a special charm to the bathhouse built according to the presented project, making it look like a pretty village house.
In fact, inside the building there is not only a traditional steam room and a relaxation room, but also a separate bathroom and a bedroom, which makes such a bathhouse quite suitable for living.
A small structure like this can be built in just a few days, but will serve you for many years.
This project contains all the necessary components for a comfortable stay.
Making a choice
Now let’s try to answer the questions that often arise among bathhouse owners.
What is better to cover: corrugated sheeting or metal tiles
Above we have already described the properties of corrugated sheets and metal tiles. Now let's think about what is better to cover the roof of the bathhouse, if the choice is between these two.
Approximately, the price of metal tiles is two times higher than corrugated sheets (approximately). Consequently, its advantages should also be “twice” more noticeable.
Both materials, as mentioned, are susceptible to rust if they are not made of copper or aluminum, but the use of non-ferrous metals sharply increases the cost of the material.
Metal tiles usually have a well-protected top layer in contact with the atmosphere, but the bottom layer needs protection, so you need to do a good vapor barrier and ventilation to prevent condensation.
Installation of metal roofing. Cromwell Photos
Corrugated sheeting also has a coating, but, as you saw in the video, it is sold as “made in Italy”, and it begins to rust after the first condensation.
In essence, here both materials are equal and depend too much on the manufacturer and his honesty.
In both cases, by the way, the attachment because they are penetrating. Therefore, it would be a good idea to varnish them and cover them with wide fastener caps.
Both materials are noisy, this was also mentioned. Both have low thermal insulation . Both weigh little .
Actually, the whole difference comes down to one single subjective factor - beauty. Metal tiles look prettier and “richer” than corrugated sheets, which are traditionally used to cover garages, sheds and other outbuildings. If appearance does not matter, corrugated sheeting will cost less. Otherwise, rely on metal tiles.
How to cover inexpensively and efficiently
Here we dare to present our own vision of what can be used to cover the roof of a bathhouse inexpensively and with high quality.
Based on real budget savings, the optimal material can be called ondulin or economy-class bitumen (flexible) tiles. Both materials are bitumen based.
Ondulin costs approximately the same as corrugated sheeting, while flexible tiles cost the same as metal tiles. Of course, bituminous shingles come in very different prices, but they are cheaper than the tiled variety of ondulin - onduvilla.
It’s also convenient that if you have to make repairs, it’s much easier to replace a sheet of ondulin or flexible tiles than corrugated sheets (they try to take them in such a way that there are no horizontal joints, which increases the area of the sheet).
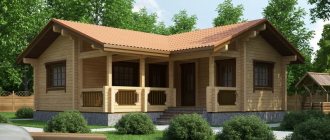
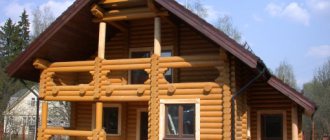
Frame bathhouse 5.25×5.25 m
A small frame bathhouse with a large porch or small terrace can serve as a real decoration for your yard.
The room consists of a relaxation room, a washroom and a steam room.
The beautifully highlighted foundation and natural wood paint color make this project especially attractive from the outside. Inside the bathhouse there is additionally a small vestibule that protects the room from frost.
The next option is especially notable for its double gabled roof. This structure provides the opportunity to equip a second additional attic floor.
Thanks to the compact size of the sauna, the sauna stove can cope with heating the entire room in any weather.
The height of the attic ceilings is acceptable even for a tall person, thanks to the special shape of the roof.
Wall assembly
The next stage in the construction of a frame bath will be the assembly of the walls. For these purposes, you will need an edged board with a size of 15x5 cm. The structure is assembled from it, as shown in the photo below.
The distance between the individual vertical posts is equal to the width of the insulation that will be used for the bath. When the assembly is completed, the wall frame for the bathhouse is installed. Individual elements are temporarily secured with jibs, as can be seen in the photo below.
The finished design looks similar to the one shown in the photo below.
It is worth noting that the places where window and door openings will be located are additionally reinforced with vertical and horizontal struts
DIY frame bath projects
Often construction is stalled due to the fact that you do not know how to properly plan a bathhouse to make it convenient and safe. Ready-made planning projects can help with this. Ideally, if one of them suits you completely: no need to rack your brains. Although you can make adjustments if necessary. And sometimes just an idea is enough for everything to “fall into place” for you and a plan for your frame bathhouse to emerge, which you will build with your own hands. To do this, we have selected several projects of frame baths of different sizes with different layouts of rooms.
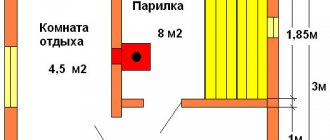
Bathhouse layout 4*5 m
This is a bathhouse with a large relaxation room, a small bathroom and a steam room of 4.8 m2. The foundation is a shallow strip foundation - depth 70 cm, plinth height 40 cm (total height of the foundation with plinth 110 cm), gravel bed 20 cm. There is a small porch, which, if used year-round, can be sheathed and turned into a vestibule. Then cold air will not enter the premises every time the doors are opened.
Finished drawing of a frame bath 4*5 m
Total area 20 m2, rooms and their dimensions:
- Rest room 8.5 m2;
- Steam room 4.8 m2;
- Bathroom 2.2 m2
Necessary materials to create the frame:
- racks, lower and upper trims are made of 100*50 mm boards;
- floor beams - from boards 150*50 mm with a pitch of 0.58 m;
- rafter system - from 150*50 mm boards with a pitch of 0.58 m.
This bathhouse project has a fairly spacious relaxation room, and with such small dimensions of the building - 5 by 4 meters, there is a fairly spacious steam room - a “pure” size of 4.8 square meters. According to the project, the stove is heated from a steam room, which is problematic for such a small room: there will not be very much oxygen anyway. In this option, you can leave it in the same place and install a sauna stove with an extended firebox. In this case, the firewood will be supplied from the rest room, and the heater and the main “body of the stove” will be located in the steam room. With this arrangement of the stove, the problem of heating the rest room is also solved.
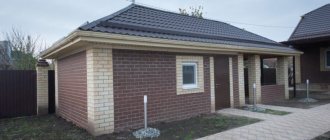
Project of a frame bath 6*6 m
The photo shows the layout of a fairly substantial bathhouse measuring 6 by 6 meters. There is a small veranda, a dressing room, and a full set of necessary premises.
6 by 6 bathhouse project using frame technology
This option is good because standard length lumber can be used in almost any room: 6 or 3 meters. This is convenient as there is little waste left. The foundation can be piled or columnar. A shallow tape or slab will do.
But there are some notes on the layout. The washing room for this frame bath project is spacious. This is an option for those who prefer to relax after the steam room not in a cool (relative to the steam room, of course) relaxation room, but continue to relax in the humid and warm atmosphere of the washing room. Then it maintains a temperature of about 30-35°C and fairly high humidity (due to the increased power of the oven and the open door to the steam room). They also install sun loungers,
Design features of a pitched roof
A pitched roof traditionally rests on two opposite walls of the building, which differ in height. If desired, you can build an attic, but then additional heat and waterproofing will be required.
The roof is sloped, the magnitude of which can vary: minimum 8 degrees. Typically the inclination angle is 20-30. It is needed so that snow rolls off the roof and does not accumulate on the surface.
The simplest and most economical option is a shed roof with a slope up to 3 meters long, because if it is larger, you will need to install additional supports to strengthen the roof frame, and this will increase the complexity of construction and the cost of the roof.
Where to start building a bathhouse
Before starting the construction of a frame bath, it is worth planning the placement of the building. Pay attention to the following features:
- It is important to determine where the bathhouse will be located - separately or near the selected building on the site.
- Choose a place to install a bathhouse, taking into account the location of utility networks, and also mark the routes for laying communications.
- Find out the soil characteristics on the site in order to choose a foundation.
- Develop a new or choose an existing bathhouse project, taking into account your own requirements.
Many organizations offer ready-made projects. You can also order an individual project from them. The minimum size is 3x4 m. The optimal aspect ratio of the bath is 5x5 m.
conclusions
It’s quite simple to build a 5x5 frame bathhouse on your site. A light columnar foundation is chosen as the base. The walls are made of beams and OSB panels. It is important to properly waterproof the grillage and roof elements. This will extend the life of the building. Based on ready-made projects, you can create your own drawing of a frame bathhouse that meets safety and cost-effectiveness requirements.
Recommended Posts
Decorating the inside of a bathhouse with your own hands
How to build a cellar under a barn with your own hands
Bathhouse project with a terrace or veranda
Arrangement of a cellar in the garage for storing vegetables
How to make shelves for a garage with your own hands
How to arrange a garage with your own hands
Own bathhouse project
In order not to waste time creating drawings, you can choose an already created project as a basis. In this case, the layout of the frame structure must correspond to the building area. Then it remains to make some amendments to it.
For a future frame building project, it is important to consider:
- layout - it is important for the rational distribution of space;
- costs for the construction and operation of a frame bath;
- terms of work;
- features of the foundation structure.
All interior spaces are arranged in accordance with the number of pieces of furniture and their sizes. For example, when creating a drawing of a frame structure, the length of the benches is taken into account. To make it comfortable to sit in the relaxation room after taking water procedures, a table, sofa and armchairs are installed in it.
It is important to correctly determine the location of the dressing room in the frame structure. It is designed in such a way that cold air does not enter the bathhouse when the doors are opened. In the washing compartment of the frame structure, a location for a water tank should be provided. The brooms are dried in a warm attic. Comfortable relaxation is possible by creating a veranda or terrace.
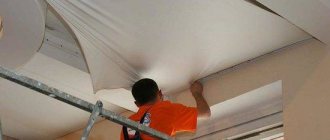
What is the sequence in laying the roof?
- We lay the film on the rafters, starting from the bottom. The film overlaps so that the top layer overlaps the bottom layer by 10-15 cm.
- Next, we place the main lathing 2 cm thick on the counter-lattice. We fill the boards with an offset. In the first row, the whole board goes, say, on the right side. In the second row she is on the left. This will strengthen the structure and add rigidity to it.
Important point
We will lay an OSB board on top. It measures 2.5 x 1.25 m.
It is very important that the joint between the slabs falls clearly on the sheathing board. I foresaw this and calculated at what intervals I should fill the sheathing
I foresaw this and calculated at what intervals I should fill the sheathing.
The same applies to the joint of the sheathing boards - they must be joined on a block.
OSB was installed.
We will lay a good thick lining carpet on top of it. And only on top of it will we lay soft tiles.
That is, the roofing “pie” itself - underlayment + soft tiles - turns out to be quite thick.
Before laying the carpet, we fill the drip lines.
Starting from the bottom we lay the lining carpet. They rolled out one path, nailed it down, and rose higher. And so on to the very top. Then on the other side.
The next step is to install the end strips and begin laying the tiles.
We coat the sides and bottom with bitumen and lay the tiles overlapping.
Be sure to make exits to the roof for the chimney and ventilation.
The sequence is as follows: we lay these elements on top of the roofing carpet, coat everything with mastic, and additionally screw it all down.
And it is very important that the topmost layer of the carpet (which comes from the ridge of the roof) overlaps these elements. And only after this we lay the roof, nail our tiles
Starting, again, from the bottom. We stretch the lace or fishing line so that everything goes exactly in a row, and slowly get to the top
And only after this we lay the roof and nail our tiles. Starting, again, from the bottom. We stretch the lace or fishing line so that everything goes exactly in a row, and slowly get to the top.
Advantages of frame structures
The construction of a frame bath requires compliance with certain rules. Such a structure consists of a supporting structure, which is covered with OSB panels. Insulation and vapor barrier are laid between the wall slabs.
A frame bath made of similar materials is light in weight and therefore does not require the creation of an impressive foundation. It is easy to build it yourself.
The obvious advantages of frame construction are:
- low costs for foundation construction;
- all work can be done independently, without using heavy equipment;
- short construction time.
Frame technology also has its disadvantages that require mention. The main disadvantage of such baths is their increased fire hazard. For this reason, it is better to carefully treat all structural elements with refractory compounds. For wiring in a frame structure, non-combustible casings should be selected.
Flaws
The increased fire hazard of frame buildings has already been written about. And this is the main disadvantage of houses built using this technology. Therefore, it is advisable to treat all materials with fire retardants (agents that reduce the flammability of materials).
The flammability of walls leads to the fact that all electrical wiring must be laid in metal boxes or special non-flammable corrugated sleeves. For this reason, electrical installation work becomes more complicated and more expensive - the cost of casings and corrugated hoses is added.
A frame bath has additional disadvantages: high humidity makes its own adjustments. You will have to pay increased attention to the vapor barrier of the walls. When using mineral wool, you will need to protect the insulation from moisture very carefully: when wet, it loses its properties. Moreover, when dried, it restores them only partially. If it freezes wet, it simply crumbles. Therefore, we choose a high-quality and reliable vapor barrier (not “hydro”, but “steam”). When laying, we follow the technology down to the smallest detail (overlaps, gluing joints and fastening points, etc.).
Ready-made baths
It is not always possible to start building a bathhouse with your own hands. In this situation, they buy a ready-made structure. The kit includes the following items:
- mounting beam - it is used to create a frame;
- fastening kit;
- flooring material;
- roofs;
- wall panels;
- documentation package.
The set of documents contains project drawings and a description of the assembly instructions.
Materials are prepared in advance so that there is no need to purchase them in addition. For any frame bath you need:
- Material for creating a frame. Often a beam with a cross section of 100x150 mm is chosen for it. Crossbars and slopes are created from 80x80 mm timber.
- The rafter system is erected from 150x150 mm timber. The finishing coating is made from soft tiles. It is important to choose a material that does not place a large load on the frame walls. For this reason, you should not pay attention to ceramic tiles.
- The sheathing of the roof and walls is created from 20 mm slats.
- OSB panels are used to cover the walls. They are also laid as a base under soft tiles.
- An edged board treated with antibacterial and fire-resistant compounds is suitable for the floor.
- Imitation of timber is often used for external cladding, and lining for internal cladding.
- The frame bath is insulated with mineral wool with fire-resistant properties. What the thickness of the layer will be depends on the climatic conditions of the region. It is best to choose basalt wool with a thickness of 15-25 cm.
You will also need to prepare nails and screws of various lengths. Given the high humidity inside the bathhouse, galvanized fasteners should be used.
Necessary materials
The basis of a frame house is frames assembled from wooden beams. Depending on the planned size of the bathhouse, timber 100*150 or 150*150 mm is used for their assembly. For jibs and crossbars that are nailed between vertical posts, thinner bars are suitable.
When installing a roof for the Mauerlat, you will need approximately the same timber - 150 * 150 mm or so. For rafter legs, the same bars 100*150 or 150*150 mm. Depends on the configuration of the selected roof and the weight of the roofing material. By the way, it is undesirable to use very heavy roofing material - such as ceramic tiles - for frames - the load on the walls is too great.
You will need a lot of different timber
You will also need slats to create lathing, counter laths, and all sorts of auxiliary work. Moreover, you will need a lot of them: lathing is needed both on the walls on both sides and on the roof. Although, in some versions, the outside of the boards is covered with plywood (as in the video above). There are a lot of construction options, as well as the materials used.
Read about how to make a rafter system for a gable roof with your own hands here.
You will also need subfloor material. What it will be - unedged or edged boards, plywood or other board material - is up to you to decide. But all the wood will need to be treated. And fire retardants - to reduce flammability, and protective antibacterial compounds. Read about how to treat wood inside a bathhouse here.
Frame cladding materials inside and outside are selected based on personal preferences or the purpose of the building. If we talk about frame baths, then usually everything inside is lined with clapboard (tiles are placed in the washing room), and outside with imitation timber or a blockhouse.
It is advisable to use mineral wool as insulation for a bath: they do not burn. The thickness of the insulation layer depends on the region. In central Russia, mainly basalt wool is used for baths, in a layer of 15-25 cm. If you are concerned about the possibility of formaldehyde release (a lot has been written about this), then you can use non-woven mats. The emission of harmful substances in them is minimal.
Frame baths are often insulated with mineral wool
It has proven itself well as insulation and polyurethane foam (not polystyrene foam). In addition to low thermal conductivity, it is also a sound insulator, which is important for frame construction. There are a few "buts":
- It cannot be used in a steam room - the temperature conditions do not allow it;
- it melts and supports combustion;
- This insulation costs a lot (we are talking about extruded polystyrene foam).
You will also need a lot of nails and screws. For the construction of bathhouses, it is advisable to use galvanized ones: so that they do not rust and do not leave unsightly streaks on the wood. They will be needed in different sizes and diameters - large frames for assembly, smaller frames for sheathing and cladding.
Read about what fasteners to use when building a bathhouse in the article “Fasteners for baths and saunas”
From all that has been said above, we hope you have concluded that you can build a frame bathhouse with your own hands. To make sure of this, watch the video. The house was built using frame technology with the participation of only one person. It describes in more detail the technology for constructing some units.
If you have selected a frame bath project and decided to build it yourself, but have no idea how to proceed, we recommend watching the video. In it, experienced American carpenter Larry Hohn explains and shows the technology for constructing the walls of a frame house. The video is very detailed and takes more than an hour, but by the end of watching the frame construction technology will be clear to you.
Algorithm for building a bathhouse
A column-type base is best suited for a frame bath. It can be built using asbestos-cement pipes. You will need elements with a diameter of 20 cm and a length of 2 m. They should be buried in the wells to 1.5 m and filled with concrete-crushed stone mortar. The number of pillars varies depending on the size of the structure. For a 3x4 m frame bath you will need 12 pieces. When building a 5x5 m bathhouse, you need to prepare 18 pillars.
After installing the bathhouse supports, a timber frame is attached to them. The elements are fastened with nails. Roofing material must be placed under the strapping beams to ensure waterproofing.
Logs from boards are laid on the frame - they will be the basis of the bathhouse floor. The frame is treated with an antiseptic and fire-resistant agent. The installation of bath walls is carried out in the following order:
- Supports are installed in the corners, between which intermediate posts are placed.
- The sauna wall cladding sheets are secured to the racks with self-tapping screws.
- After finishing the sewing of the walls, openings for doors and windows are formed.
The rafter system for a frame bath is assembled on the ground and then raised to the roof. Only then the sheathing is attached and the roofing is laid. After installing the main frame, doors and windows are installed. To build a frame bath yourself you will need:
- three days to install the foundation;
- three days to install the frame with the walls;
- two days for the rafter system;
- two days for laying the roof, installing windows and doors, as well as finishing.
Knowledge of these features helps to design and build a durable and practical bathhouse for the whole family.
Adviсe
When building a frame-type bathhouse, you should follow the advice of experienced builders. This will help build a durable building. It is important to follow these recommendations:
- It is worth very carefully securing the vapor barrier layer at the junction of the walls and floor of the bathhouse. This affects the durability of the building.
- Additionally, you can create reliable thermal insulation for a frame bath from the street side. To do this, additional layers of hydro- and thermal insulation are attached under the lining of the bathhouse.
- The inside of the bathhouse lining should not be painted or opened with varnish compounds. Such compounds can release toxic substances.
The ceiling and flooring in the bathhouse are insulated with special diligence. It is necessary to use the same materials that were used to insulate the walls. A frame bath is a profitable and forward-thinking solution. Its construction will not take much time. If you develop a bathhouse design in detail and prepare all the necessary materials, you will be able to build a bathhouse quickly and efficiently. Such an object will become a source of pride for the owners of the site.
Internal and external decoration of the bath
For the exterior finishing of frame baths, imitation timber or siding panels are used. Interior decoration requires special attention. First you should choose a lining. For the rest room and vestibule, you can choose pine. It requires no maintenance and looks quite impressive.
The steam room is decorated with linden or larch. These breeds are not afraid of high temperatures and are able to retain color. Sometimes other wood is chosen:
- Abashi is a tree from tropical forests that has low thermal conductivity;
- cedar – when heated, it begins to release essential compounds that are beneficial to the body;
- Aspen – this tree is resistant to rot and mold.