The steam room room should be small; the popularity of projects for small one-story bathhouses is often higher than for full-size buildings 5x7 m or even 8x12 m. According to many experts in bathing, comfort and free space in a small-sized sauna or bathhouse, you get less steam, but the steam produced is significantly greater hotter and richer.
Which bathhouse project to choose
If you do not go into the intricacies of the bathhouse process, but focus only on objective indicators, then the construction of a small one-story bathhouse looks more attractive from all points of view:
- Low costs for drawing up a project and erecting a one-story building;
- Minimum consumption of firewood or electricity;
- Long service life of a one-story bathhouse.
The last point has always remained a mystery for many customers, and for developers of standard projects for one-story baths, although there is nothing unusual about it. A small one-story building, in which a steam room or sauna takes up most of the usable space, warms up and dries many times faster, better and more efficiently than huge bath houses with billiards and a swimming pool.
But comfort remains comfort; even for a summer cottage as a temporary shelter, there is no point in choosing a project with a minimum level of comfort. At a minimum, even in a small bathhouse there are two compartments:
- Steam room, which is allocated at least 3 m2;
- Locker room or rest room for 2-3 m2;
- A small shower behind a partition, which in many small bathhouse designs replaces a suspended wooden bucket or tank of water.
For your information! In the project of a summer one-story bathhouse, instead of a locker room or rest room, a covered terrace or canopy can be used.
This does not mean that all winter bath projects are much more comfortable and convenient than summer ones. Often the sauna box itself is built a short distance from the house next to an artificial pond or swimming pool. According to the design, the one-story winter bathhouse contains nothing but a very hot Russian steam room, a brick heater that occupies half the building, and a small dressing room in which you can leave shoes and outerwear thrown over your shoulders.
According to the owners, all amenities are in the house. The steaming process is as close as possible to a Russian bath with short-term gatherings in a small, very hot steam room, plunging into an ice bath or dousing with water, followed by a long rest in comfortable conditions at home.
Summarizing
Summarizing the material presented, we can draw the following conclusions:
- If you decide to start building a bathhouse with your own hands, the first thing you need to do is draw up a project;
- Next, think through everything thoroughly and purchase the necessary material;
- You need to approach work carefully and carefully, but at the same time creatively;
- There is no need to rush in this matter, but you should not leave an unfinished bathhouse for the winter.
And if you follow these simple rules, then a mini sauna at the dacha will not only please the eye, but also soothe the soul, and give health and joy to you and your loved ones.
If you have any questions, have something to say on the topic, or you find an inaccuracy in the article, please write about it in the discussions below.
What material should I use for a bathhouse project?
The construction of even the smallest one-story bathhouse requires a very thoughtful and balanced calculation. If there is no ready-made sample, for example, from friends or neighbors, from which you can copy the solution, then it is best to order a layout or use one of the standard designs for small-sized one-story baths. Anything that is built at random, as a rule, heats poorly and does not last long.
In the vast majority of cases, small baths are built from wood; this can be a building project made of timber, logs, or even a frame version with double insulation and facade finishing with siding.
Ardent fans of Finnish saunas often order projects made from SIP panels or hollow red brick blocks. A small one-story building on stilts, depending on the design, can retain and maintain heat in a steam room for almost two days from the moment the electric heater is turned off or the stove is turned off.
Construction options
Types of buildings:
- frame building;
- plank construction;
- barrel bath.
Frame
Tools and consumables needed to build a steam room:
- Rafter beams, slats, beams, lining.
- Roofing material.
- Insulation. You can use mineral wool for the relaxation room, and foam glass for the steam room with washing area.
- Vapor barrier film.
- Impregnations for wood.
- Shovels, cement, crushed stone, sand.
- Hand drill (for columnar foundation).
- Metal piles (for pile foundation).
- Jigsaw, miter saw.
- Hand hacksaw for wood.
- Set of chisels.
- Screwdriver, drill.
- Hammer, mallet.
- Fastening elements.
- Metal corners.
Construction:
Drawing up a construction project. On the drawing you need to indicate the area of the rooms, the general dimensions of the building, the location of the stove, windows, doors, shelves. Preparing the site for construction. It is necessary to mark the boundaries of the building with pegs with a stretched thread, and remove all debris from the designated area. Construction of the foundation. Since the structure will have a small mass, a pile or columnar foundation is suitable. Assembling the binding crown. A timber with a section of 150x150 is suitable for it. It is recommended to soak the lumber in advance with used motor oil. In the corners, individual elements are connected using a half-beam system. Additionally, they need to be secured from the inside with metal corners. Assembling a frame from beams used for the rafter system
It is important that the material is dried in advance. For additional stability, they are secured with spacers diagonally. Connecting individual racks into a solid frame using the top strap. Assembling the rafter system
It is better to assemble a gable roof. Stuffing of batten sheathing. Fastening the vapor barrier film. Stuffing slats to form a counter-batten. Next, you can fasten the roofing material. Wall cladding with OSB boards. Formation of a “pie” from a layer of insulation, vapor barrier film. Installation of windows and doors. Wall covering with clapboard.
It is important to use wood paneling with the lowest thermal conductivity
Plank construction
The outside walls are covered with unedged boards. The finishing technology is the same as for the construction of a frame building. For compact structures, you can choose a pitched roof.
Buildings sheathed with boards have high heat loss. To level out this drawback, you need to use high-quality insulation materials and stuff the boards overlapping each other.
For the exterior cladding of a building, it is better to use aspen boards. This type of wood has a low thermal conductivity and retains heat inside better.
Barrel sauna
When building a bathhouse, a rectangular frame is first assembled, and semicircular arcs are formed for each of the partitions. Tongue boards are placed on top of the frame.
If you do not have the skills to work with hand and power tools, it is difficult to build a barrel sauna yourself. If there are no financial problems, you can purchase a ready-made barrel sauna. Manufacturers completely complete the mobile structure. The owner of the site will only have to prepare the foundation, install a barrel sauna, connect a water hose, and power supply (if the stove is electric).
Buy a ready-made mini-bath from a certain manufacturer or assemble it yourself using frame technology - the choice is only for the owner of the site
It is important to take into account the fact that purchased structures are standard and may not correspond to the personal wishes of the owner of the site regarding the internal arrangement of rooms, shelves, stove
Universal projects and solutions for one-story baths
The most budget-friendly option for a one-story steam room can be called a bath structure assembled in the form of a barrel on a low-power columnar foundation. Despite its apparent simplicity, the room has a small locker room and a dressing room, separated by a partition with a steam room.
In a small bathhouse, up to four people can steam at the same time, but the project is not very convenient for so many people due to the fact that you can only walk through the room along the center line of the room. If a fire or any emergency occurs, it will not be easy to quickly leave a small room. This type of bathhouse is convenient to use as a seasonal steam room in a suburban area.
Features and advantages of small bath buildings
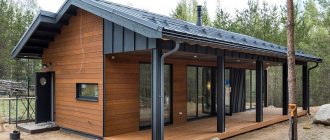
For a summer house you can build a small wooden bathhouse
The most popular material for building a bathhouse is wood, which is highly flammable. This imposes a number of fire safety restrictions: the need for treatment with fire retardant compounds, strict adherence to fire safety standards when installing the stove and chimney. When building any bathhouse, even when using non-combustible material, it is necessary to maintain the regulated distance to neighboring objects located on the site.
Construction of a steam room is a fairly simple and quick procedure. In most cases, small baths for a summer residence do not require a solid foundation and the purchase of a large volume of raw materials. In addition, in the process you can use up timber and other available materials left over from the construction of other structures.
The raw materials used should not have rotten areas, wormholes, cracks or other signs of destruction.
Other advantages include:
- no need to spend money on a massive foundation;
- speed of construction;
- small area occupied by the object, which is especially advantageous if the site is small;
- the ability to fit the building into different types of landscapes due to its compactness.
Classic log bathhouse
A real Russian bathhouse should be built from logs. A properly built log house can stand without repair for at least 15 years. Moreover, the walls of a one-story building are often not even insulated according to the design, only the facade is periodically updated, and the joints are minted on the windows and lower crowns of the building.
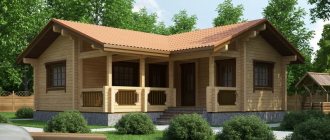
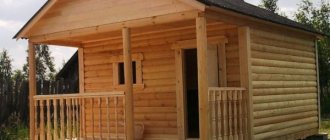
As an example of a project made from a 3x4 m bathhouse log, you can use the photo below.
This is exactly the case when the developer managed to invest in the project important construction solutions that are usually ignored by non-professionals:
- The entrance to the bathhouse, locker room and steam room are on the same line. There are small windows in each of the steam rooms and locker rooms, as well as in the entrance door. This means that in case of heavy smoke or gas poisoning, you can always leave the room without any problems;
- The roof of a one-story building was built according to all the rules of science. For bathhouses - log houses 3x3 m or more, the roof overhangs are made very long. This allows you to effectively retain heat, get rid of condensation and protect the building from rain and wind;
- At the entrance to the bathhouse there is a covered platform under a canopy. For a small bathhouse there is no point in building a full-fledged terrace, but a canopy over the entrance will help organize summer gatherings in the evening, after the steam room.
In general, the project turned out to be successful, durable and, like all good things, very expensive; on average, the construction of a small one-story log bathhouse will require at least 300 thousand rubles.
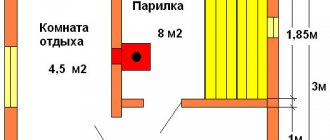
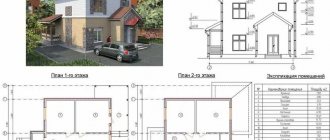
A more affordable project for a 3x3 m log bathhouse is shown in the diagram below.
As in the previous case, the box of a one-story building is assembled from 200 mm logs.
The room is divided in a classic way into three sections:
- A dressing room combined with a rest room;
- Small washing room;
- Steam room with an area of 3.5 m2.
The disadvantage of this one-story bathhouse project is the poor roof design. If you build a steam room, as they say, in an open field, then it is best to use a roof, as in the photo.
Construction of a budget bathhouse at the dacha using frame technology
Building a bathhouse in a country house with minimal investment is possible for any owner of a small plot; according to construction technology, all work is carried out step by step in the following order:
- Preparing the site for construction.
- Construction of the foundation.
- Tying a wooden frame.
- External wall cladding.
- Thermal insulation.
- Arrangement of communications.
- Installation of heating equipment and furniture.
Site preparation and foundation construction
At the initial stage, it is necessary to prepare the site for construction. The area is cleared of dirt and vegetation and leveled. Next, the foundation for the bathhouse is arranged.
A cheap option for a foundation for a frame bath is a columnar one; it is strong and durable. It is recommended to use asbestos cement pipes as supports.
The required number of recesses are prepared for the pipes around the perimeter and at the junctions of the walls.
The installation step of the supports is selected taking into account the type of soil and the maximum load exerted on the foundation.
Shrinkage of the supports is carried out to a depth of up to 150 cm, while a drainage (15 cm) cushion based on sand and fine crushed stone is first poured into the bottom of the pit.
The pipes are installed in a vertical position, with fittings placed in each. The cavity of the pipes is concreted, the area around each pipe is also filled with mortar.
After the concrete has hardened, a wooden or metal grillage under the frame is installed on each support.
Timber frame strapping
The frame for a budget wooden bath is made of timber 15x15 cm in size, dried and treated with moisture-proofing compounds. The initial crown is laid on the waterproofed base with alignment around the perimeter. Laying method - in the paw.
The walls are erected to the required height with the organization of door and window openings. The crowns are fixed to each other using wooden dowels. The beams are insulated with jute fiber or tow.
On the upper crown, the rafters are fixed to metal brackets, taking into account the configuration of the future roof. For a single-pitched roof, the rafters are fixed with external and internal supports; for a gable roof, the rafters are mounted at the bottom to the load-bearing walls, and at the top they are brought together in the form of a roof ridge.
Next, a lath is installed for installing steam, heat and waterproofing protection. Finally, the roofing material is installed.
External wall cladding and thermal insulation
Even a simple and compact bathhouse needs high-quality thermal insulation and external cladding. For the frame structure, you can use available and cheap materials - OSB and CSP (cement-bonded particle boards), moisture-resistant plywood and boards.
The sheathing is mounted on the finished frame using self-tapping screws, and the joints are filled with foam or sealant.
Reliable thermal insulation will provide additional protection for the wooden structure from increased moisture and temperature changes. Mineral and ecological wool, polystyrene foam sheets, reed boards and jute can be used as a heat insulator.
Thermal insulation materials are installed in the free space between the inner and outer cladding, preventing the formation of cracks that could lead to heat loss.
A vapor barrier layer made of glassine or polyethylene film is mounted on the insulation.
Arrangement of communications
At this stage, all main communications are laid - water supply (cold and hot), sewage and ventilation systems, electrical wiring.
The laying of the sewage system - the construction of a drainage well, a septic tank or a tie-in into the central sewer system - must be provided for at the stage of constructing the foundation.
Next, the bath floor is installed - concrete or wooden. An additional decorative cladding – porcelain stoneware or tiles – is additionally laid on the concrete base.
It is better to make a wooden base a leaky structure with a small hole for drainage. The floor is arranged with a minimum slope of 5 degrees.
Next, reinforced electrical wiring is laid. Afterwards, the wall and ceiling structures are insulated using available and moisture-resistant materials, and decorative finishing is done with clapboard or plywood. Finally, doors and windows, heating equipment and electrical appliances are installed.
Installation of heating equipment and furniture
For a frame country bathhouse in the country, it is recommended to choose a compact and economical heater - an electric stove or a wood stove with a metal body. Massive stoves require the construction of an additional foundation, which will entail an increase in the cost of construction and maintenance of the bathhouse.
Finally, a standard set of furniture is installed - shelves and benches for the steam room, a table, chairs and hangers for the dressing room (dressing room), benches and shelves for the shower room.
Timber bath projects
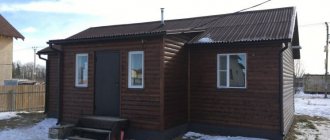
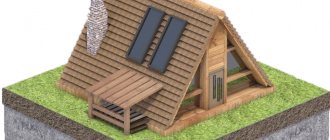
The construction of even a small one-story steam room is always associated with the problem of allocating a free local area. Therefore, we have to look for projects for the smallest bathhouse buildings. The timber has a remarkable property - it can be used to build an arbitrarily small bathhouse, down to the size of a doghouse. One of the options for a 2 by 2 m bath is shown below.
The steam room is assembled from logs, all other parts are from timber. The result is an inexpensive one-story sauna, warm and durable. Walls made of timber do not retain heat very well, so the room is traditionally lined with siding or upholstered with a block house.
A more civilized version of the previous project involves the arrangement of a canopy and a small summer terrace. Such designs are very popular for small country houses and dachas, where most of the site is occupied by beds, fruit trees and shrubs.
Any sauna or steam room in the yard is always fraught with problems with melted snow, the appearance of puddles and, as a result, the need to deal with groundwater. This problem cannot be neglected, otherwise the base part of the timber frame will rot in 3-5 years.
At a minimum, you will need to make a full foundation blind area, lay drainage and cast a concrete walkway. If you have to install a small bathhouse on an unprepared site, then it is best to immediately place the steam room box on a columnar foundation or piles.
Selection of building materials.
Below is a list of materials that will be needed to build a bathhouse from timber:
a) timber 150x150 mm, although it is possible to use timber with a cross-section of 100 mm or 200 mm;
b) floorboard (edged board 150x50 mm 4 meters long is excellent);
c) hardwood boards for ceiling construction (usually lining with a width of 100 mm and a thickness of 20 mm or more is used);
d) material for wall decoration (as a rule, the same lining is used);
e) material for vapor barrier (an excellent option would be to use a vapor barrier film);
e) waterproofing (it is advisable to use penofol, although polyethylene film is suitable);
g) ceiling insulation (mineral wool materials are a good option);
h) sheet asbestos for insulating wooden structures from temperature influences, including for walls near the stove and elements located next to the chimney;
i) cement, sand and crushed stone for foundation construction (recommendation - cement should be purchased before starting construction);
j) roofing material for the roof, which can be selected based on personal preferences and the main thing is that it fits seamlessly into the surrounding roofs of other buildings;
Thatched roof is comfortable unusual and cheap
Bathhouse roof made of shingles
Polycarbonate roof for a bathhouse
l) insulation for the inter-crown space (it is better to use jute, although moss or tow are perfect).
The best time to start construction is spring, since after completion of the main construction work it is necessary for the timber to dry and shrink. This requires at least 6 months.
Small bathhouse design projects
The most common planning is to divide the premises into three sections. The entrance to the building according to the project can be located from the front of the building or from the side.
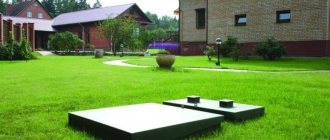
In the first case, the convenient location of the entrance door allows you to achieve maximum comfort for summer recreation on the site next to the steam room building.
In this case, the maximum space is allocated directly under the relaxation room and the attached terrace, usually its area is at least 4-7 m2, the rest of the interior space is given over to a steam room and a small sink.
The side entrance to the bathhouse is used mainly for bathhouse projects with a “carriage” layout of the room.
The design turns out to be quite simple to manufacture; you can use a shorter beam or log, which significantly reduces the cost of construction.
In practice, the tandem arrangement of rooms is considered a necessary measure. Such projects are used in cases where it was possible to inexpensively purchase material for construction, or the format of the site does not allow the construction of a more economical and warm bathhouse with a square layout.
The smallest baths 2x3 and 3x4 m can be built according to projects in which the room is divided into only two rooms - a steam room with a sink and a dressing room.
Such simplification in the project is also considered a necessary measure; an increase in the number of rooms has practically no effect on the level of comfort or atmosphere in the steam room, and additional partitions in a small bathhouse only lead to meaningless losses of usable space.
Useful tips
The construction of a small private bathhouse on a personal plot is a complex and responsible undertaking. To get a decent result of your work, experts recommend drawing up a detailed plan for the construction process. This will simplify the passage of the main stages of work and avoid serious mistakes.
Step-by-step instructions for building a mini-bath include the following steps:
- Choosing a location on a building site.
- Construction of a foundation for a bathhouse.
- Construction of walls, partitions and interfloor ceilings.
- Installation of the rafter system.
- Thermal insulation, waterproofing and vapor barrier of walls, ceilings and floors.
- External insulation and cladding.
- Installation of heating equipment and chimney.
- Laying floors, installing door and window structures.
- Communications supply.
- Internal cladding of premises.
- Selection and arrangement of furniture, bath accessories.
How to design a small bathhouse
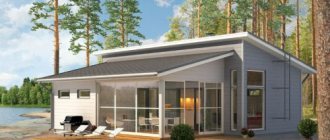
Experts consider the most practical and convenient project to be one with a small covered terrace at the entrance to the premises.
A project with a terrace can be developed and combined with a bathhouse with a gazebo under one roof.
The largest number of applications are received by projects of one-story bathhouses with an extension for a barbecue or fireplace.
In essence, this is a new format of a summer kitchen with a built-in small bathhouse for a country plot. The developers tried to create a one-story building made of timber that would best meet the needs of vacationers outside the city.
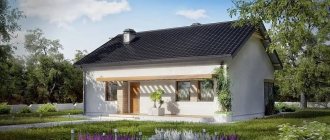
When drawing up a future sauna project, you don’t have to try to copy traditional shapes and designs; you can always find a more original design. For example, a small one-story sauna room with a gazebo can be built in the European style.
The most unusual design of a small bathhouse involves extensive use of brick, metal, timber and glass. The building looks quite unusual and attractive, and will certainly raise a lot of questions from neighbors and friends.
In essence, this is a new idea for drawing up projects, in which the bathhouse space looks less and less like an old wooden “birdhouse”.
General information
Consider the types of saunas for an apartment
Types of mini-saunas for city apartments
The sauna in apartments should not be full-size, but miniature. We briefly talk about the features of the most popular four types of mini-saunas, and the important fact is that this small sauna can even be bought ready-made.
With electric heater
The construction of a sauna in an apartment usually results in the re-equipment of the sanitary unit, since modernization of communications is important. Consequently, such an event will be accompanied by the collection of permitting documents. But installation can be greatly simplified by connecting using a flexible hose. In this case, running around to the necessary authorities can be avoided, and all responsibility in this case will fall on the manufacturer.
Phytobarrel
If you don’t have enough free space, a compact phyto-barrel is an excellent alternative to the classic options. Such a small sauna in the bathroom can be placed in any free corner. The area it occupies is approximately 1 m2. It is no more tall than a person, and the power of the heating device used in it is approximately 2 kW. The most popular models include barrels made of cedar and equipped with their own steam generator. Although such a mini-sauna is very simple and compact to operate, its installation should be entrusted to the manufacturer. The phytobarrel is easily controlled using a special remote control, and certain models have special devices that make the procedure even more enjoyable, for example, a sprayer for aromatic balm.
Portable sauna
This type of sauna is made of a frame covered with fabric. The principle of operation is similar to a phyto-barrel, and when the head is in it outside the heat zone, such a device is inexpensive, has a low weight and is compact. The main advantage of a portable sauna is that it is easy to use, and the only thing required for operation is an outlet.
Infrared sauna
From experience, we can say that this type of sauna is the optimal solution for indoor use, and it, like an important steam room, can remove toxins and excess fluid from the body, and can also activate the functioning of human organs.
Finnish type sauna
If there is enough space in the apartment, you can completely think about arranging a Finnish sauna. Even in 1 session it can accommodate a couple of people, and the steam in it is dry, it heats up to +100 degrees. This point is the main difference from the saunas listed above.
Turkish steam room
Selecting a location - pantry, bathroom or balcony
A sauna in an apartment with your own hands must be designed correctly, and the first thing to start with is selecting a location and developing a project. The following options can be considered for its placement:
- Combination of a corridor and a sanitary unit that leads to the kitchen. You can even add a bathroom here.
- Balcony or pantry in the case where the sauna will have infrared heating. By the way, a sauna on the balcony is beautiful because it will not reduce the living space of the apartment.
Naturally, the size of the sauna will depend on the number of people
When making the appropriate calculations, it is important to allocate at least 2 square meters of space for each person. The ceiling height in the room should be 2 meters or more
If you decide not to buy a ready-made miniature sauna, but to equip it yourself, then you can leave the one you have. An excellent option would be tiles, and the room for the sauna should be at least 1.8 * 2 meters. This makes it easy to place a bench, and such a sauna will become a practical and also convenient solution for an apartment.
Room decoration
Since we are talking about a bathhouse for a garden plot, we will not pay attention to expensive and luxurious materials. Let's talk about the simplest and most accessible ones.
If you look at the photo of the bathhouse inside, you can see that the best option for its design is wood, for example, lining. The lining has ideal properties and qualities for a bath and, in addition, gives it an aesthetic appearance.
How much firewood do you need for the winter?
In fact, calculating how much firewood is needed for a bathhouse in the winter depends on a couple of individual parameters, so it’s easier to describe the algorithm, and then do the math for your own case.
So, prepare according to how many times you plan to heat the bathhouse during the winter. If every week, then that’s 4 times a month.
Everyone's stove is different, so it would be good to know how much wood usually goes into heating the stove and maintaining the temperature.
IMPORTANT! In winter, the amount of firewood can be approximately doubled compared to summer heating.
This is what you start from - the approximate amount that goes away in the summer at a time, multiplied by two, and then multiplied again by the number of fires per season. Add another 10-15% to this amount and you will have a supply for the winter.
If you don’t know how often you will heat, take the maximum possible number.
Fill
A shallow strip foundation is suitable when the soil is dry, there is no moisture, there is little frost in winter, and the construction is not heavy.
To do it, you need:
- Conduct internal markings.
- It’s good to think in advance where the stove is located so that you can immediately lay the foundation for it too.
- To simplify the work, you can place wooden structures resembling benches in the corners. They are needed to attach the measuring cord.
- Get rid of the fertile layer of soil and make a trench. The clay obtained from it can be used as bedding later. The depth of the trench should reach a durable layer of clay. Most often, 50-60 centimeters are required.
- Level the bottom and cover the trench with a layer of sand, and then wet it with water and compact it. The thickness should be more than 15 centimeters.
- Fill in a new layer of crushed stone and compact it.
- Make formwork and cover it with polyethylene from the inside.
- Build a structure made of metal or plastic and lower it into the trench. To raise it above the topping, you can put granite pieces underneath.
- Fill the foundation with concrete and level the resulting area. The formwork can only be removed after at least a week.
Concrete becomes very strong after about a month, so it must be handled carefully at first. It’s better to wait a month before moving on to building a bathhouse.
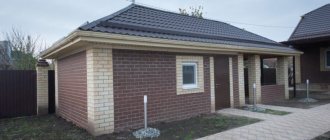
Walls
When building a brick, stone or block bathhouse, masonry always starts from the corners. A solution of cement and sand is created and blocks are laid on it.
You should also use stretched string to lay the material evenly.
Having made lintels on top of the doors and windows, you need to make formwork at the top and build an armored belt. It is needed to secure the bolts on which the Mauerlat board will be attached. When the mixture is completely dry, you can begin to make the roof.
Floors
A frame bathhouse requires only insulation of the floor and covering it with boards, but other buildings, on the contrary, require more difficult work:
- Installation of logs;
- Tricks of the subfloor;
- Securing the vapor barrier;
- Laying insulation;
- Performing waterproofing;
- Laying floor boards.
Buildings built with a columnar or pile foundation can only afford an insulated wooden floor.
Marking
After choosing a place to place the building, you need to mark the territory. To do this, you need to transfer the size of the building to the terrain.
Pegs that are driven into the future corners of the bathhouse will help with this. It is important to ensure that the angles are exactly right. Further actions depend on the foundation:
- Slab. Expensive, chosen only when absolutely necessary. They are marked either exactly in size, or a little wider so that the foundation extends beyond the building;
- Tape. The most used, relatively cheap, high quality. The marking is carried out so that the concrete tape runs along the perimeter and under the partitions;
- Columnar. Also popular, most often refers to buildings made of wood. They are marked based on the size of the bathhouse and the number of supports made;
- Screw. Some people think that this method is a recent development, but it is not. It has been serving in various buildings for many years and performs well. Its advantages are the ease and speed of installation, as well as the unnecessary need for earthworks. And such a foundation is not afraid of uneven terrain. The marking is carried out precisely, based on the number of piles.