Self-leveling mixtures are superior to other technologies for creating floor coverings in a whole range of parameters. They are easy to prepare, apply, and dry quickly. But at the same time, they have a noticeably higher cost compared to classic screed formulations, so the thickness of the self-leveling floor must be chosen carefully. The optimal algorithm of action is to form the layer required for leveling from several types of self-leveling compounds.
Fill
How does a self-leveling floor differ from a leveler?
When searching for “self-leveling floor,” the search results in bathrooms and toilets with images of the jungle, clouds, or seabed on the floor. In practice, instead of paintings, masters pour some kind of gray liquid mixture.
A self-leveling floor is usually called a method of leveling horizontal surfaces when the plane is filled with liquid cement-based binder. Since the mixture is liquid, it always forms horizontally. A perfectly flat surface subsequently allows you to perform any type of finishing from tiles to applying prints with images.
Manufacturers often name these materials differently, which gives rise to many misconceptions. For example, instead of the name “self-leveling floor,” the bag may say “self-leveling mixture,” “liquid leveler,” etc.
The Knauf company uses the name “self-leveling mixture”. Ceresit uses the phrase “thin-layer leveler”; Weber often uses the more familiar designation “ self-leveling floor ”.
Leveler is a broader concept; the word in the name can mean both a mixture for a self-leveling floor and a “classic” cement-sand screed.
What it is?
Not a single industrial building is built without concrete floors, and given that in production workshops and warehouses the load on the floor is usually very significant, its reinforcement is mandatory.
If we keep in mind the domestic use of concrete floors, then their scope of distribution is quite extensive. In apartment buildings, floor reinforcement is usually not practiced, since structures correctly designed for strength can cope with a given load.
In a private house, reinforcement is required in cases where thermal insulation materials are laid. In addition, reinforcement is necessary for stoves, fireplaces and other similar objects.
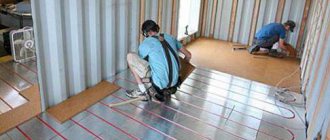
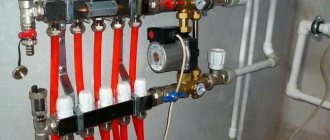
It is necessary to reinforce the floor even in cases where there is a loose substrate and soil prone to swelling. It is also necessary when installing a warm water floor, especially under tiles, since systematic temperature changes are additional causes of stress.
A reinforced floor is also needed in personal garages and workshops, since the load in such rooms, as a rule, is not always predictable.
How do self-leveling floors differ from screeds?
In order not to make a mistake when choosing a mixture, we will consider the main differences between the two technologies.
- Rough levelers (screeds) - in most cases they are a cement-sand mixture. They allow you to form a large layer from 3 – 5 cm to 15 cm. Leveling is done manually using a rule and steel beacons, so small errors may remain. The main advantage of screeds is the low price for the material; the disadvantages include high labor intensity and a long hardening time for the solution.
It takes 28 days for a “wet” screed to gain strength. During this period, you need to periodically moisten the surface and, if necessary, cover it with film. Otherwise, the coarse leveler will not be able to gain strength and will crack.
- Liquid levelers (self-leveling floors) are modified compositions based on a cement binder. They are always more expensive than a coarse leveler, but the pouring technology allows you to get a perfectly flat surface for any coating option. In addition, drying takes several days rather than a month. From a labor-intensive point of view, leveling with a self-leveling floor is easier.
In most cases, both technologies are used to level the floor; first, the floor is raised to the desired level using a screed, and then a smooth surface is formed for subsequent laying of the finishing coating.
Types of grids
Previously, metal mesh was used to reinforce the self-leveling floor. Its use allows you to significantly increase the strength characteristics of the base. Nowadays, the choice is not limited to this option, as technology develops, resulting in new opportunities. Recently, polymer mesh has been used more often. It is well suited for self-leveling floors of small thickness. And although it significantly improves the properties of the base, it does not affect the appearance in any way.
Depending on the type of device, the mesh can be welded or knitted. Cell sizes may vary. The most commonly used options are 10x10 mm or 15x15 mm. When selecting a material, the application and upcoming loads should be taken into account.
The use of mesh material helps prevent cracking of the base, while it is able to withstand heavy loads. Well suited for areas with high loads. To achieve the maximum effect, it is necessary to lay the mesh before pouring the solution, although the execution of the work has its own nuances.
Foundation assessment
- Before using self-leveling floor technology, you need to correctly assess the base on which the leveler is to be poured.
- If the repair is being carried out in a new building, where there is already a “rough” screed, then you need to check its quality: look at the level and tap for the presence of internal voids. Grease and bitumen stains must be washed off the surface.
- If the new building does not have a “rough” screed, but the floor level is satisfactory, then you can immediately pour the finishing leveler.
- In houses with an old foundation, it is better to remove the covering and make a new screed. After such preparation, you can begin pouring the self-leveling mixture.
If the time for carrying out work is limited, then quick-hardening mixtures should be used. Otherwise, you will have to wait a month for the screed to gain brand strength.
- Also at this stage, the possibility of installing sound insulation and insulation should be taken into account. In this case, the thickness of the floor “pie” will need to take into account the thickness of the EPS boards.
Thick Layers
When making a thick layer, experts recommend using leveling mixtures rather than self-leveling floors. It is worth noting that, depending on the manufacturer, the compositions may have different properties. For example, one company may produce products that can be installed as thick as 80mm. And another may offer seemingly similar materials, but they can be used to make a layer of 100 mm without any problems.
If possible, use concrete mortar to level large differences. Leveling mixtures are not suitable for finishing coats.
Experts do not recommend making the thickest possible coating - the floors will take a very long time to harden. To achieve high quality, you will need to maintain constant temperature and humidity. To make a self-leveling floor with your own hands, step-by-step instructions are given a little higher. It is enough to adhere to the work algorithm to get a high-quality layer.
Calculation of the amount of material for self-leveling floor
All work on pouring self-leveling mixtures is carried out in one day. This means that you need to immediately calculate the correct amount of solution for the room, since there will be no opportunity to buy more and fill it later. It is also not very good if the mixture was prepared with reserve and was not completely worked out.
Errors in calculations are especially critical if the floor in the room is adjusted to the level of coverings in other rooms.
Consumption is usually indicated on the bag per 1 square meter of coating with a layer thickness of 1 mm. Usually this value is given with an error, so it is advisable to check it on a small portion of the solution. To do this, you will need scales, water, a bag of dry mixture, a plastic cup, a mixer and several containers for weighing.
We need to convert the values of the ratios on the bag into a volume convenient for us. For example, if 20 kg of leveler is diluted in 5 liters of water, then we need to convert this value into grams. For convenience, let's convert liters to kilograms, we get 5 kg of water. Accordingly, the ratio is 1:4. If we take 1 kg of solution, then it will require 250 grams of liquid.
We weigh the resulting amount of liquid on a scale, then reset the device and add 1 kg of solution. Mix the solution with a mixer as required by the instructions.
With self-leveling floor mortar, it is better to use a tool that can operate at reduced speed. This mixing ensures a minimum amount of bubbles in the mixture.
To check the spreading of the mixture, you can pour 250 grams of the finished solution onto a smooth surface and wait a minute. The spread of the spot should be 25 cm.
Now you need to calculate the density of the resulting mixture. To do this, divide the volume of the container with the solution by its weight. To do this, you can use a measuring cup, the volume of which we know. Since this result was obtained for a solution and not a dry mixture, we need to exclude water from the result (with 125% water). To do this, we divide the resulting density by 1.25 (if the initial ratio of water and material was 1:4), this way we will find out the real consumption of the mixture and can compare it with the data on the bag.
If you don’t have a measuring container at hand, you can take a regular plastic cup, pour water into it and weigh it - this will be the volume of the glass.
We multiply the resulting consumption by the thickness of the floor, we will understand how much mixture will be used per 1 square meter.
Required Tools
- Mixer with the ability to operate at reduced speeds
- Long bubble level or laser level
- Brush, brush, brush or roller
- Large container for preparing the mixture (if two people are doing the work, you will need a second bucket)
- Small water container
- Needle roller
- Wide spatula
- Beacons for self-leveling floors
- Roulette
- Scales
- Pencil or marker
- Masking tape
- Rule
Instructions for creating a decorative coating
This task in itself is simpler, since a self-leveling floor made from polymer mixtures can only be poured onto an already leveled base. Otherwise, you will have to make a thick layer, which will lead to unreasonably high costs. In other words, a decorative self-leveling coating is created after all the steps described above have been completed.
If you need a single-color colored floor, then the selected and tinted mixture is simply poured over the primed surface and rolled with a needle roller. Since it is laid in a thin layer and has good fluidity, you can do without beacons. To ensure that the solution penetrates into corners and hard-to-reach places, immediately after pouring it, you can use a spatula or squeegee to initially distribute the mixture.
The plastic mixture itself spreads over the surface Source viprusstroy.ru
Work progress
Primer
At the first stage, the surface should be thoroughly cleaned and dust-free. Poor cleaning may lead to cracks in the future.
Apply primer to the cleaned coating. Preference should be given to special floor products. The soil should strengthen the surface and reduce moisture absorption by the base. If a universal product is used, then the dry residue in it should be at least 14%.
There are two approaches to applying primer; you can use a roller with a long handle and a ditch; you can pour the product over the floor and distribute it with a brush. In the first case, it is important to additionally cover certain areas with a brush or brush (near walls, corners, recesses, etc.), since they cannot be processed properly with a roller. If a brush is used, primer should not leak through the ceilings.
Carefully read the instructions on the primer; the indoor conditions must meet the manufacturer's requirements. Air humidity should be 60%, optimal temperature 10 - 20 degrees. Avoid direct sunlight and close the windows to prevent drafts.
We wait for the primer composition to dry (see the instructions for the time) and begin placing the beacons.
Display of beacons
This is the most difficult stage of the work; here it is important not to make a mistake so that the floors in all rooms have the same height.
Search for the "zero mark". In this place the floor will have the smallest thickness. There are many methods to accomplish this task. In small rooms (toilet, shower) you can use a long bubble level. By applying it in different directions, you can determine which corner is more tilted relative to the horizon.
Now let's consider a more complex situation, when the floor is leveled in a large room or in an entire apartment. In this case, we place the laser level in the center of the room and project a horizontal beam onto the walls at an arbitrary height.
It is better to choose the installation height of the laser level so that you do not have to bend when taking measurements. In this case, it is advisable to select an integer height value: 50 or 100 cm.
We walk around the room and measure the distance from the beam to the floor at different points. The place with the smallest value will be the “zero mark” or the highest point.
You can use improvised means as beacons or buy ready-made plastic ones. They are made in the form of small vertical posts with markings and adhesive soles.
We install a beacon at the highest point. If we use plastic, then it is cut to the thickness of the future floor. We measure the distance from the beacon to the laser. If the level was initially set at 50 cm, then with a floor thickness of 3 cm, the distance to the beam will be 47 cm.
At other points we cut the beacons so that the distance to the laser is the same as at the “zero mark”, in our case 47 cm. For example, if from the beacon to the beam is 51 cm, then we need to cut 4 cm from it. Stands should be installed on every square meter.
In order not to check each beacon with a tape measure after installation, it is convenient to make a template. To do this, let's take a rule that matches in length. In order not to spoil the instrument, stick a piece of masking tape and make a mark with a marker or pencil.
A self-leveling floor in a separate room can be poured without beacons; in this case, the desired floor height is marked using a laser level on the wall.
Damper tape. A damper tape made of foam material is glued around the perimeter of the room. If the floor thickness is less than 1.5 cm, it is not required, but in other cases it is mandatory.
Preparing the mixture
- We open the bags with the leveler and prepare the water. To ensure accurate proportions, we use scales. Avoid mixing by eye.
- To mix, use a construction mixer or a drill with a whisk at low speed.
- It is recommended to work together, so that one person kneads and the other pours. In this case, you need to prepare two containers for the solution in advance.
Do not mix a large amount of solution at once, as it will be impossible to lift a heavy bucket.
- After mixing, it is advisable to check the spread. We wrote above about how to do this.
Fill
Filling the surface with the solution itself usually does not cause difficulties. You should move from the far corner to the exit. The leveler will not always flow, so you can spread it using a wide spatula. The mixture is then spread using a needle roller.
After pouring, the window should be closed and the curtains drawn. After a day, the windows can be opened to remove excess moisture from the room. It is necessary to apply the topcoat within 3 weeks so that moisture does not have time to leave the solution.
The article was prepared jointly with specialists from the company Construction Yard .