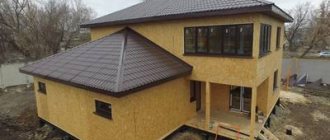
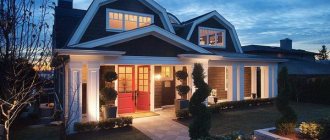
Such roofs are used in the construction of garages, utility and service outbuildings, small workshops and other structures, including private houses.
In order for the structure to fully perform its functions and remain in good condition for a long time, you need to approach its design and installation with all responsibility.
Criterias of choice
Many owners of country and country houses choose pitched roofs. They are selected according to several criteria:
- Construction costs . Unlike gable roofs, shed roofs are less material-intensive. Much less money is spent on their construction, so this option is optimal for developers with a limited budget.
- Aesthetics . A roof with a visor looks more original and presentable than a standard one. This is a win-win architectural solution that will go perfectly with the appearance of a private home.
- Functionality .
One of the main advantages of a pitched roof with a canopy is that it can protect the entrance to the building from precipitation and bright sunlight. A canopy protruding beyond the plane of the adjacent wall creates a shaded area in front of the front door and creates additional convenience. For example, when it rains, you can stop under it, fold your umbrella and dry your wet shoes before entering the house. - Safety . Single-pitched roofs weigh less than double- and multi-pitched roofs. Accordingly, they place less load on the walls and foundation of the structure, thereby reducing the risk of their premature destruction and the subsequent transition of the building to an emergency condition.
But it is necessary to take into account that such roofs also have some disadvantages . These include the following nuances:
If the roof has a slight angle of inclination, snow will accumulate on it in winter, and tree leaves and small branches will accumulate on it in autumn.- There is less space between the pitched roof and the ceilings of the premises than in the case of a gable structure.
Accordingly, the volume of the air gap, which performs a thermal insulation function, will be smaller. - Under such a roof it is difficult to organize additional space - for example, a usable attic. This is only possible if the structure has a large slope.
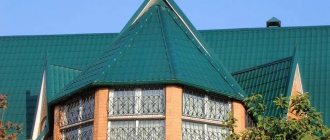
Canopies made of metal tiles
The canopy over the porch made of metal tiles matched to the color of the roof looks impressive. Such a canopy will delight you with a long service life, durability and ease of maintenance . The material is lightweight and highly resistant to mechanical loads and temperature changes.
However, its disadvantages include the fact that they get too hot in the sun and do not provide adequate sound insulation. Moreover, from the point of view of its decorative function, it is not suitable for all buildings, and sometimes looks overly heavy.
Experts recommend building a canopy at the same time as installing metal tiles on the roof of the home itself. The materials remaining after installation will reduce the cost of manufacturing the visor.
Device options
Based on the presence of ventilation, pitched roofs are divided into two categories:
- Ventilated . In such roofs, there is an internal air gap between the vapor barrier layer and the waterproofing coating. The presence of internal voids allows for effective air circulation, thereby preventing excessive moisture accumulation inside the structure. Ventilated roofing is best suited for terraces, verandas and other rooms where it is necessary to maintain certain microclimate conditions.
- Not ventilated . Such roofs have a simpler design, so their construction requires less time, material and labor resources. All elements of the roofing pie are located close to each other, there is no air gap between them.
Also, roofs of this type are divided into two groups depending on their design:
- Unsupported . Most often these are small roofs up to 4.5 meters wide. Due to their small size, they do not require additional reinforcement. Such roofs are mounted on mauerlats made of two logs, fixed to the walls of the building.
- Reinforced . If the roof width exceeds 4.5 m, it is advisable to strengthen it. For this purpose, beds, struts or rafter legs can be used.
- On hanging rafters . Such structures are used in cases where it is not possible to secure additional support elements between the side posts.
- Sliding . These systems are good because they do not collapse due to minor deformations that occur when the building shrinks on soft soil. Excess stress in roof structures is compensated by the mobility of the rafters.
Forged visors
Forged visors are the most expensive and spectacular of all types. They look luxurious and elegant in homes designed in a classic style, and emphasize the status and good taste of the owner.
You can combine the desire for such luxury and the opportunity to save money if you use separate forged elements instead of a completely forged canopy. They will add nobility to the appearance of the building without depleting the construction budget.
When making such a canopy, you should remember that you won’t be able to mount it yourself; you will definitely need the help of a specialist who will make the fixation reliable.
Whatever canopy you choose, your home will be protected from bad weather in any case.
Materials and tools
To make the frame of a pitched roof, a profile pipe, channels or wooden beams can be used. The first material is more durable and reliable, but is heavier and more expensive. Wood, in turn, is lighter, cheaper and easier to process, but at the same time it is more vulnerable to moisture.
As a roofing sheet, you can choose any material suitable for price, design and properties. The design of a pitched roof allows the use of almost any covering in the roof: slate, metal tiles, profiled sheets, etc.
If you have enough budget, you can even cover the roof with solar panels, which will provide additional benefits to the residents of the house.
To connect individual elements of the truss structure, you will need various fasteners: bolts, rivets, nails, metal corners, etc. If the structure is designed on profile pipes, their installation will require argon, carbon dioxide or conventional welding.
When building a garage or outbuilding with a pitched roof, you need to build a strong and reliable foundation. This will require a sufficient amount of concrete mixture of sand, cement, crushed stone and water. If necessary, frost-resistant modifiers can be added to it.
The following working tools and equipment will be required:
- Wrenches and wrenches - if the metal elements of the roof frame will be fastened with bolted connections.
- Welding machine - if welded connections will be used instead of threaded ones.
- Electric jigsaw, circular or hand saw - for sawing wooden beams, plywood or OSB boards in the rafter system and sheathing.
- Laser or water level - for leveling horizontal and vertical elements.
- Fastening material – for connecting structural elements.
Canopy over the porch made of polycarbonate
A nice feature of canopies made from this material is the variety of sheet thicknesses and colors, among which you will find transparent ones. The advantage of polycarbonate is flexibility, which will allow you to make a canopy of the most non-standard configuration.
The advantages of the material include strength, fire resistance and long service life. The material gives the structure stability in strong gusts of wind, does not allow the formation of mold and fungi, and is resistant to corrosion and rotting.
The disadvantages of a canopy over a polycarbonate porch include its instability to UV radiation, which leads to clouding and loss of strength. To prevent this, apply a protective agent to the surface.
Design and calculations
When drawing up drawings and carrying out calculations, you need to pay attention to many important points:
Tilt angle .
This parameter directly depends on what material will be used for the roofing. The minimum value for slate, corrugated sheets, metal and ceramic tiles is 6 degrees, for bitumen tiles - 12.Copper and galvanized sheets must be positioned at an angle of at least 17 degrees.
- Visor length .
It is calculated in such a way that this structural element reliably protects the adjacent wall from precipitation. In windy weather, raindrops fall at an angle to the vertical; this must be taken into account when designing the overhang. On average, its length is 600 mm for one-story private houses. For two-story cottages and mansions - about 1000-1200 mm. - The pitch of the rafter legs . These structures are laid in a transverse position with a pitch of 500-750 mm. This value largely depends on the roofing material. If a heavy coating is used, a lower value should be selected. If the roofing material is relatively light, the pitch can be increased.
- Thickness of wooden load-bearing beams . It must be at least 50 mm. In this case, it is necessary that the wood be of high quality, without visible defects: cracks, knots, etc., since the beams bear a significant part of the load.
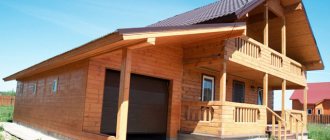
Canopy over the entrance made of wood
If you gravitate towards rustic-style buildings, you will love a wooden canopy. In fact, in such a structure, often only the frame is made of wood, and the roofing material is chosen from tiles, slate or roofing felt. However, you can also construct a wooden canopy. The main thing in this case is to soak it before installation with a special liquid that protects it from rot, insects and mold.
Wood opens up unlimited possibilities for creativity. The visor can be decorated with wood carvings, tinted, giving different colors, or left as natural as possible, protecting it from moisture.
DIY construction
The process of erecting a frame shed roof occurs in the following sequence:
- First, you need to cut the beams and boards into fragments of the required length, based on calculations.
- Horizontal beams are laid on the walls of the building. To protect them from the harmful effects of moisture, it is advisable to place sheets of roofing material under them. The beams are located in increments of 500-800 mm. A mauerlat is mounted on the rear lower wall - a thick wooden beam that will serve as a support for the entire roof structure.
- Next, the gable wall is erected. For its construction, the same material is used from which the walls of the building itself are made - for example, brick or aerated concrete. The gable structure is erected to the required height, based on calculations and the specifics of the project.
- Floor beams are treated with waterproofing and embedded in the walls.
- A second mauerlat is fixed on the pediment, which should be located parallel to the first, but at a higher height.
- Marks are made on the lower wall at the points where the rafter legs will be attached. To securely fix them, it is necessary to make grooves in them at the top and bottom - this is necessary so that the rafters are securely connected to the Mauerlat. It is also possible to install them without groove connections.
The upper fastenings of the rafter legs must be rigid and motionless. The lower ones can be made either fixed or sliding.
It is better to fasten the rafters in the direction from the side parts of the roof to its center. By stretching the rope between the outer elements, it can be used as a guide for installing subsequent rafters. The step of their location must coincide with the step of installation of the floor beams.
- The installed rafters are fixed with racks, struts or other supporting structures. You can use angles or metal brackets to connect to the beams.
- Next, the finished rafter system is equipped with sheathing, hydro-, steam- and thermal insulation, counter-lattice and the roofing itself.
Read more about the construction of a single-pitched roof in this article. And here we compared a shed roof with a gable roof.
Types of structures
In accordance with the configuration of the slope, wooden canopies can have the following designs:
- simplest flat;
- in the form of a gable surface;
- atypical three-slope shape;
- in the form of an arch or tent.
In addition, their design can be open (without side walls) and partially closed, that is, with fences on the sides. The latter design provides good protection of the porch area from wind, precipitation and summer heat. The dimensions of the canopy are determined by the chosen version of its design and the preferences of the home owner.
In general, its height should correspond to the average height of a person (so that he can sit quite comfortably on the entrance platform). In this case, the roof slope angle is selected somewhere in the region of 25–35 °. When choosing the width of a structure, it is usually assumed that it overlaps the doorway with a margin, that is, it is about 60–65 cm wider than it.
Common mistakes and tips for beginners
Many novice builders who do not have sufficient experience often make mistakes when creating pitched roofs:
A typical example is the use of untreated wood.
Many people install wooden rafters and supporting elements made of timber that has not been treated with antiseptics or moisture-proofing compounds.This reduces the service life of the roof several times.
- When arranging large roofs, the width of which exceeds the length of the existing boards and beams for the rafters, the following mistake is often made: the wooden elements are joined together with too little overlap (less than 0.5 m), and their connection points are left hanging.
As a result, they can sag in weak spots and collapse. To avoid this, you need to place the joints on the support beams. - Also, do not lay the rafters directly on the walls. Such a structure will be unstable. Mauerlats must be used.
- Another common mistake is the lack of a vapor barrier layer in the roofing pie.
Many people believe that waterproofing performs the same functions, so they limit themselves only to it. A high-quality and reliable roof must contain both a vapor and waterproofing layer.
How to fix if the wall is multi-layered
Recently, more and more buildings have multi-layered external walls - ventilated facades, insulation... The load-bearing part of the wall turns out to be covered with a couple of layers of materials, the load-bearing capacity of which is only enough to hold its own weight. You won't be able to attach anything to them. The entire load must fall on the load-bearing wall.
How to attach a canopy over the front door to a three- or two-layer wall
Even if the outer layer is a finishing brick, it costs nothing to attach to it. Masonry is usually carried out in half a brick. So it only looks durable on the outside. Even the smallest and lightest canopy cannot support the weight, and the supporting columns do not help either.
Therefore, with any multi-layer wall, holes are made in all finishing/insulating layers, and the structural elements are attached to the load-bearing wall.