Have you finally decided to make a garage floor but don't know where to start? Don't know which floor is best? We will help you and tell you everything simply and clearly. You will do your job one hundred percent. Of course, if this is a construction project from scratch, you can start right away with the screed, but the floor can also be made after the walls have already been erected.
Arrangement of the floor in the garage is one of the main elements during its construction. After all, a lot depends on this. The floor must be strong and reliable as it will have to withstand heavy loads during operation. Usually in the garage you take care of the car, use various aggressive technical fluids, which fall on the floor and again for him this is a high mechanical load from the weight of the car. Therefore, when concreting the floor in the garage, it is necessary to follow all technical recommendations. And most importantly, the floor in the garage requires a lot of your attention; approach its equipment seriously and correctly. May it serve you for many years.
In order to properly concrete a garage screed, it is necessary to follow technology and use high-quality materials for a durable floor structure. Let's take a closer look at what requirements and qualities a screed in a garage must meet and have.
- The surface and internal structure of the concrete floor base must be strong and reliable. This is necessary so that cracks do not form on the screed and it does not collapse under the pressure of loads. To achieve such qualities, consider the weight of your car for which you are making a screed. Use modern materials to strengthen the floor and its external covering.
- The floor covering in the garage must withstand flammable, aggressive liquids and various cleaning agents.
- The floor must be moisture resistant and even cope with excess liquids, reducing it.
- The floor must be level or sloped so that liquid does not collect on the concrete surface and can drain away.
- Try to keep the surface of the concrete screed in the garage as smooth as possible, this will help you reduce cleaning time.
- The floor must be fire resistant. Since there are flammable materials both in the car and directly in the garage.
- Use a facing material designed to withstand high loads to cover the surface of the screed.
Preparing the base
The advantages of a concrete floor are obvious, which is why it is preferred:
- It is highly resistant to static load.
- It has a durable coating.
- It is very resistant to chemical influences, because in the garage you often use various liquids and oils.
- The concrete floor is fireproof.
- Resists temperature changes.
- It will last a long time if construction work is carried out properly and carefully.
The disadvantages of this coating are the labor-intensive process and dust. You can get rid of the latter by laying floor tiles on top of the concrete. And you can make the process of construction work easier by first carefully studying the recommendations with all the subtleties of preparing the base for a concrete floor and its direct pouring.
Concrete floor base.
The simplest concrete floor in a garage consists of the following balls:
- priming;
- crushed stone;
- sand;
- waterproofing;
- insulation;
- concrete;
- metal reinforcements;
- tiles (if you want to get rid of dust).
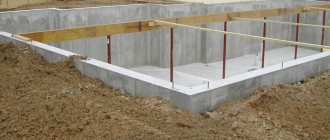
To concrete a garage floor, first of all, you need to prepare the base for pouring. To do this, you need to dig a hole around the entire perimeter of the garage with a depth of 25 cm or more. With this procedure, it is very important to remove the fertile layer down to clean soil. This way you will avoid the destruction of the material in the future due to sprouting rocks.
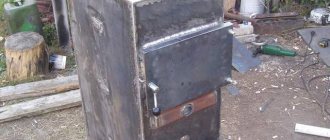
If you plan to have an inspection hole in the garage, you need to dig an area sufficient for it and install a metal box in there, which is supplemented with boards on top. The metal box also needs external thermal insulation made of polystyrene foam.
Next, we arrange the formwork for the inspection pit, the upper level of which should be level with the future garage floor. Also take care of the plastic pipe through which you will later run the electrical cable for lighting into the inspection hole. You can also take brick as the main material for the pit.
Having prepared the base for the concrete floor, you can proceed to the main measurements.
Zero level mark
To create the most correct concrete floor, consisting of layers of different building materials, it is necessary to accurately carry out all measurements. First of all, this concerns the main indicator - floor level. It should be the same at all points in the garage.
When carrying out calculations, it is recommended to ensure that the floor is at the level of the gate threshold. If it is lower, consider a water drainage system, since in winter it will form on the floor in large quantities.
Measurements can be made with a laser level, which is much more convenient, or, if it is not available, with a water level. In the second case, you and your assistant will need to move around the garage and make marks at the required level.
Marking
I foresee the disagreement of skeptics: why, they will say, are markings needed at all if the dimensions are four by six meters? My answer is: markup really simplifies your work and prevents you from making mistakes. Imagine: you prepared the foundation, started pouring concrete, and the floor goes downhill. Everything seemed to be smooth, but the whole mess went to one wall. You'll have to buy everything again, spend money, pour a new layer, and smooth out the flaws.
If you do everything by eye - scatter crushed stone, fill it with sand and fill it with concrete, then you may be in for an unpleasant surprise - the floor will be below the level of the threshold and the street. And this is fraught. A relative of mine in St. Petersburg bought a garage where the floor was the same level as the street. In winter, he had to abandon his car on the street - rain, melted snow flooded the gates, then the frost set in, and he was exhausted in clearing off this ice. We had to make drainage ditches. Therefore, in cold regions the zero level is usually raised. But if you live in the south, then maybe nothing, lower it as you see fit. The classic is considered to be a floor level with the threshold. I advise everyone to measure five times, and only then do everything else.
Now about how to measure it. Of course, not with a ruler in your hands and without putting the mark off the floor - it will be crooked even if it seems that you have a diamond eye. If it goes mowed, then you will be tortured to level out potholes in the concrete. The zero level is displayed along the perimeter of the walls, regardless of the floor level - don’t even look at it, like the ceiling and other landmarks. This seems to be clear now.
How to build a garage: from what, with your own hands and inexpensively
There are special construction levels for marking; any store will offer a ton of them. Do not rush to the most expensive ones, although you will be praised for their characteristics. But you don’t need to lay a concrete track; a more modest level is enough. An inexpensive plane builder—an electronic level—is ideal. Although many people use a water level the old fashioned way - it is cheaper.
Yes, I almost forgot. There are also rotary levels for geodetic work and construction, but they are expensive and have no use for you.
Calculation of the thickness of PGS layers
Insulating layer under the screed.
The average thickness of the layers of material that are involved in creating a concrete floor is 25 centimeters, excluding floor tiles (if you want to lay one, add the required height to the calculations). With this calculation, the thickness of the concrete floor in the garage will be 10 cm, crushed stone will take you the same amount, and for sand we will allocate no less than 5 cm.
Thus, the depth of the excavated pit should be 25 centimeters or more. Using these calculations, you will be able to purchase the necessary building materials to begin work.
Layers of materials must be laid gradually: first crushed stone, and then sand. The concrete layer will be the final one. For convenience, mark the height of each layer on the walls and control this when performing work.
Waterproofing
A flooring with moisture-proof properties is necessary to prevent capillary rise of moisture to the concrete slab.
A waterproofing agent can be:
- hydroisol;
- P/E film – 250/300 microns;
- roofing felt;
- folgoizol;
- glass roofing material
Recommendations for work:
- regardless of what material is chosen for the work, it is laid with an overlap;
- the overlap should be 10-15 cm, it extends onto the walls and remains at the height of the future floor;
- joints must be sealed with construction tape;
- the material should be applied smoothly, without folds;
- The material is carefully folded in the corners; it cannot be cut.
The overlap provides a decoupling between the concrete monolith and the walls and allows you to obtain the required thermal compensation gap.
Materials for backfill
When choosing a material for a concrete floor, we recommend choosing crushed stone. The fact is that rounded gravel will never compact to the desired level, but crushed stone will create a reliable fixed layer for you. It is better to take medium and fine crushed stone in a ratio of 60/40 or 70/30.
Sand should not contain clay, and must be sifted before use.
As for cement - a key component of concrete flooring - it is recommended to use durable one, for example, the grade of concrete for pouring a floor in a garage should be M200 or M300.
How to repair damage
There are several ways to repair damage to the base and repair a concrete garage floor:
- Grinding. This method is used to mechanically eliminate irregularities, as well as to remove the excess layer to the required thickness.
- Milling. Used for deeper processing compared to grinding.
- Puttying. All irregularities and cracks are filled with special mixtures. Recommended only for minor damage.
- Filling. The most labor-intensive and reliable method of repair. The entire surface is filled with construction mixture.
Making a pillow for a concrete floor
It is very important to use a vibrator or rammer when installing a concrete floor in a garage. First of all, it is necessary to compact the soil. Then we pour crushed stone over the entire floor area. However, this should be done in stages: a small layer of a few centimeters, after which it should be compacted, and then we add the next layer of crushed stone a few centimeters in size and compacted again.
Next, pour sand onto the compacted layer of crushed stone. A mandatory requirement for sand is that it must be moistened. We lay the sand in the same way as crushed stone, dividing it into 2-3 portions, carefully tamping each ball. This creates the necessary cushion of crushed stone and sand.
At this stage, you can also begin to push out the walls of the inspection pit, if provided for in the plan.
The next layers will be hydro- and thermal insulation materials, and after that - concrete pouring using reinforcement. However, first you need to take care of the joints around the perimeter of the floor.
Damper gap
Concrete floor installation.
The concrete floor on the ground is “floating”. Walls and floors can sag and rise. How to make a screed to maintain the integrity of the structure? To do this, between the vertical and horizontal ceilings along the entire perimeter, it is necessary to lay a damper tape or thin sheets of foam plastic 10 millimeters thick.
They should rise above the final floor level. Afterwards, the excess height is cut off to a level with the flooring.
Reinforcement
Since the concrete floor in the garage must support the weight of your car, it must be reinforced. To do this, you need to purchase a wire mesh with a cage size of 15 centimeters and a material thickness of 7-8 mm. Layers of mesh are laid overlapping on the floor, secured together with clamps.
However, do not rush to place the mesh directly on the waterproofing. For the reinforcement to be of high quality and reliable, it must be inside the concrete layer. Therefore, the mesh should be raised to the middle of the thickness of the concrete coating and bricks or other fasteners placed under it over the entire area so that when the floor is poured with concrete, it does not move from the markings.
Garage floor covering.
If the concrete layer is 10 centimeters, then the mesh needs to be raised 5-6 centimeters from the waterproofing level. In this case, you will make reliable reinforcement for the floor in your garage.
Thermal insulation
Floor insulation
The garage is not a heated building, and many will decide that thermal insulation is something they can save on. However, there is one factor in favor of thermal insulation. Car breakdowns happen at any time of the year, and warming a frozen garage in winter will be more expensive than repairing it. Thermal insulation provides up to 20% savings in energy costs for heating. For thermal insulation of the floor, a special material is used - polystyrene foam. The plates, whose thickness is about 20 mm, are tightly laid on the waterproofing layer. The top layer is covered with film.
Thermal insulation is needed to reduce heat loss and energy consumption during forced and rapid heating of the garage during the cold season.
Installation of beacons
In order for the floor to be level, you need to install beacons ─ straight long strips or metal tubes that are fixed in cement, according to the concrete floor pouring level marks that you previously applied to the walls of the garage.
As a rule, the planks are laid along the long wall of the garage, leading from the wall opposite the gate ─ to the exit. The beacons are fixed on islands of a thickly mixed solution.
Next, using these planks, using a tool called a “rule,” you should level the concrete floor in the motorhome. The width between the slats should be less than the width of the rule. The first plank should be placed 30 centimeters from the garage wall, and the next one according to the dimensions of your rule.
When building a floor in a private garage, experts recommend making a slight slope from the rear garage wall towards the gate so that liquids that fall on the floor flow to the exit. The level of such a slope is from 1 to 2 degrees no more.
The next day, when the floor is dry, the beacons are removed, and the resulting voids are filled with mortar and rubbed into a level.
Problems often encountered
There are a number of issues that novice craftsmen should pay attention to to help them avoid mistakes:
- Subsidence of floor areas. Most likely, there were gaps in the preparation or the preparation itself was not done thoroughly enough.
- Cracks (mesh of small or deep). The technology was violated: the choice of the water-cement ratio was incorrect, the load was applied before the onset of setting of the mixture (28 days), the work was carried out at subzero temperatures.
- The difference in elevation marks in the corners, sides, and a recess (protrusion) in the center of the slab is visually noticeable. The beacons were placed incorrectly or the concreting was done without them; the mixture was not leveled after laying.
- In some places, voids have formed under the hard top layer. The mixture did not vibrate, causing the crushed stone to fill the formwork unevenly.
Compliance with technology requirements and strict adherence to installation rules will allow you to obtain a high-quality, reliable floor that will last a long time.
Insulated garage floor
Insulating your garage will save you 20% of resources in the future. How to insulate a concrete floor in a garage?
There are two options:
- Insulate the floor before pouring concrete.
- Place the insulation on a concrete surface.
In the first option, the insulation is laid directly on the hydraulic material, after which one should proceed to reinforcement and directly to pouring concrete. Extruded polystyrene foam with a thickness of 5 to 8 mm has proven to work well as insulation.
It can withstand high loads and is resistant to moisture. Sometimes a layer of geotextile is laid on top of the insulation - a special membrane that distributes the load. It is used in the construction of highways.
Curing
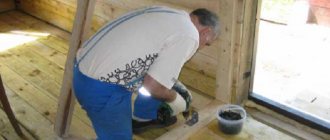
Caring for a concrete garage floor is possible with your own hands. There is nothing complicated about this, but it is very important because when the concrete dries, the water evaporates and cracks appear. To avoid them, after pouring a concrete floor in a garage at hot outside temperatures, you should close the windows and gates, and cover the floor itself with plastic film or burlap.
Over the course of a week, you should irrigate the surface of the concrete with water, first lifting the film or watering directly over the burlap. For irrigation, use a nozzle with a large number of holes.
The concrete finally dries and sets in 7 to 20 days.
Bottom line
As you can see, making a concrete floor with your own hands in the garage is quite possible. The most important thing in this work is correct calculations and selection of quality material. Before you begin installing your garage floor, carefully consider whether you need insulation, an inspection pit, and what type of flooring you will use.
Carefully carry out all the necessary measurements and calculations.
Carry out construction work slowly and step by step, paying attention to compliance with technology. For the main stage ─ pouring the concrete floor ─ get the support of a team, since concrete hardens quickly and you need to distribute the material evenly along the entire perimeter of the garage in a short time.
Select high-quality material for finishing concrete work, cover it with paint or lay tiles.
Preparatory work
Preparation includes excavation or removal of the old floor (earth, wood). The main guidelines at this stage will be the following requirements: work carefully, in accordance with the predetermined thicknesses of the bedding/floor layers, be sure to use a level.
It is extremely undesirable to “hack”: mistakes made at the initial stage will require adjustments at subsequent stages. For example, an error in calculating the coating or careless digging will cause excess consumption of concrete, and the need to level the level of the finished floor by increasing the amount of mixture.
Level marking
Includes placing lines on walls and installing high-altitude beacons to make work easier. The ideal option is to mark using a level, but as a compromise, using a level - laser or water level - is also suitable. The goal is to balance the bubble exactly in the middle, which means that the planned surface (line) is horizontal.
To make your task easier, the marks are made with a bright marker that will be visible against the background of the wall. It is permissible to stretch a thin cord (for example, white) over the driven nails.
Soil preparation
It consists of cleaning from contamination (oil spills, debris), excavating the top layer of soil and deepening it to the required, predetermined level. The roots of plants, trees, grass, and any foreign matter are also removed. They will remain under the coating, may begin to destroy it and will not allow the work to be completed with good quality.
The root system of flowers is capable of breaking through dense structures such as concrete and asphalt, so it is very important to completely get rid of their presence.
Backfilling the sand and gravel cushion
In fact, the layers of gravel and sand are not mixed, like ingredients in cooking, but are laid alternately on the ground. It is recommended to level the “floor” of the mini-pit in order to then carefully and accurately distribute the components of the pillow. Sometimes it is advised to soak and compact the sand to increase the density of the layer and fill all the voids at the bottom of the hole.
Regarding crushed stone: professionals prefer to use not just one fraction, but a mixed one - up to 2/3 medium, the rest - fine. Such proportions will ensure the required rigidity of the layer so that it does not “play”, and the individual particles fit tightly to each other. Crushed stone is also compacted using a manual or mechanized tamper. Waterproofing is installed on top of it.
Waterproofing
Modern technologies make it possible to use cheap and effective methods to ensure waterproofing of the future coating and prevent its contact with the soil and aquifers. For example, ordinary polyethylene film used for greenhouses and greenhouses. There are also more “serious” compositions - polymer and bitumen-based. They need to be applied to the finished preparation, wait until it dries, and then proceed to the next stage - laying the reinforced frame.
Reinforcement
Opinions differ regarding the need to reinforce concrete with steel rods or mesh: on the one hand, such a step increases the strength of the slab, on the other, it increases the cost of the work. Concrete itself tolerates distributed and point compression loads well, but with a sudden change in pressure it can burst.
The reinforcement in the body of the slab absorbs external influences and allows them to be dispersed throughout the entire plane of the structure. Mesh and frames are used to strengthen the floor, increase its strength and reliability. In this case, the metal is laid with a small gap (not closely) to form a protective layer of concrete (usually 2-3 centimeters).