To properly build a country house, cottage or other domestic building, work must begin with pouring the foundation. This operation can be performed on your own, without involving hired workers, which will allow you to save a significant amount of money and be completely confident in the quality of the work performed.
Strictly relying on and following the rules for pouring the foundation, everyone will be able to cope with the procedure quite successfully.
Please note that on the website: riggingservice.ru you can learn more about rigging services in St. Petersburg.
Type of foundation
The type of foundation to be poured is selected individually in each case and depends on external factors, design features, labor intensity and costs, namely:
- The type of building being planned, its size, weight and the presence of underground premises, such as a deep cellar or garage, impose certain requirements on the foundation.
- The composition and main characteristics of the soil impose their own characteristics. The predominance of rocky soil does not affect its saturation with groundwater and melt water, which ensures immobility and the absence of risks of rupture of the foundation both in height and in the longitudinal direction. Clay or peat soils are susceptible to heaving, which can damage the constructed structure.
- The presence and level of groundwater determines the laying depth.
Depending on the above factors, all types of foundations are divided into the following:
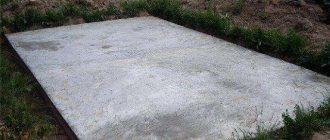
Slab foundation
Used as a foundation for large houses built of brick, timber or building blocks. Depending on the planned location of the underground premises, it is divided into shallow and buried.
The main advantage of this technology is that they do not depend on the characteristics of the soil and ensure the safety of the building. However, it is quite expensive; special equipment must be used for filling.
Is it possible to fill in parts?
The technological requirements in this matter are unanimous - filling must be done simultaneously. The presence of sections in the tape with different pouring times is considered defective and is not allowed for use.
The concept “at once” in this case is understood as the absence of breaks for more than a day. You can often find recommendations about pouring in layers, creating “cold joints” and other bad advice.
Indeed, private developers are often forced to fill in parts due to the inaccessibility of equipment, the remoteness of the site from the concrete manufacturer, etc. It is necessary to understand that they act at their own peril and risk, creating a layered structure of the tape, forming vertical joints that weaken the foundation.
The danger of destruction is too great and real; it is better to consider the possibility of delivering and pouring the finished material.
Strip foundation
It is a monolithic reinforced concrete slab that runs in the ground under all the load-bearing walls of the building being constructed. Currently, this technology is the most in demand; it does not require the use of special machines, and if you strictly follow the detailed instructions on how to properly pour a foundation, you can do it yourself.
Reinforcement
Reinforcement is an important procedure that allows you to preserve the tape when bending loads occur. Concrete tolerates pressure well, but axial tensile loads are dangerous for it .
Installing a reinforcement cage inside the tape allows you to transfer unwanted stresses to it, which ensures the integrity and durability of the foundation. The reinforcement cage consists of horizontal rods (working) and vertical (auxiliary), which are needed only to support the working rods in the desired position until pouring.
The frame is a spatial lattice with the working rods located at a depth of 2-5 cm under the outer surface of the belt. Assembly is carried out by welding or by knitting rods with soft steel wire.
The assembly of the frame parts is usually carried out next to the trench, after which the belt fragments are installed in the trench, aligned along the axis and other parameters, and connected.
Self-filling foundation technology
Before starting the work itself, it is necessary to accurately determine the dimensions and parameters of the planned house and building, the location of not only external, but also internal walls, which will be load-bearing.
After this, you can proceed to the following procedures.
Information about the soil and nearby buildings
Starting to do something without prior preparation is simply unwise. The beginning of all beginnings in construction is the preparation of project documentation; and designing a house and foundation, in turn, can only be done based on the results of a geological examination of the site, which will reveal the individual characteristics of the soil and take into account the relief.
The lowest freezing point of the soil in winter will allow you to determine the type of foundation and its depth. It is better to entrust a detailed analysis of the soil and the choice of foundation type to qualified specialists.
Landscape design will help you choose the most convenient location of the house, auxiliary buildings, paths and gazebos. Modern technologies allow you to see your future home from all angles.
The linear dimensions of the base are only part of the foundation design Source moifundament.ru
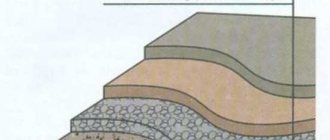
Making a sand pillow
In order to reduce the load on the foundation, the bottom of the dug trench is covered with a layer of sand, the so-called sand cushion. This, in turn, will allow you to save on building materials and significantly reduce construction costs.
As the name implies, coarse sand is usually used for such a cushion; in industrial construction, the use of medium-sized crushed stone or boiler slag is also acceptable.
The thickness of the sand layer should be about twenty centimeters. After this, the surface of the pillow should be tightly compacted, and the horizontalness should be verified with a level gauge. When all the necessary actions have been carried out, the sand cushion is filled with the required amount of water, which will allow it to shrink and be well compacted.
The top layer is covered with gravel or coarse crushed stone.
Preparing the trench
Preparatory work requires the availability of construction equipment. It is possible to do them manually, but it will require a significant investment of time and labor. In the end, it always turns out to be faster and cheaper to pay for the work of a bulldozer and excavator.
Procedure:
- Removing topsoil and unnecessary vegetation, site planning.
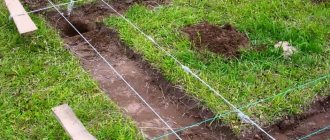
- Marking using wooden pegs. It is recommended to install them outside the perimeter of the future trench, and mark the boundaries and intersections with cords stretched between the stakes. This will allow you to save them and clarify the contours of the trench if doubts arise about the correctness of the actions.
- Digging a trench to a certain depth. The excavated soil is placed on the outside or transported outside the site.
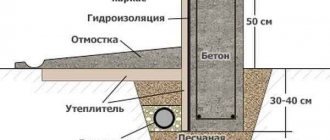
- Backfilling the sand cushion. The classic option is the sequential laying of 20 cm of sand, 20 cm of crushed stone and a leveling sand layer of 5 cm. Each of them is carefully compacted. The immobility of the future tape depends on the density of the pillow. Settlement threatens to destroy the building, so the quality of the compaction should be taken seriously.
- Laying a double layer of waterproofing on top of the pillow. Typically, roofing felt is used, which is laid without gaps or gaps.
Upon completion of these actions, you can proceed to the next stage of work.
NOTE!
Sometimes a layer of the so-called is poured on top of the pillow. footings - about 5 cm of concrete, forming a flat and dense platform. It allows you to keep the waterproofing intact and prevents the pillow from being pressed through by the rods of the armored belt.
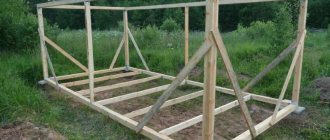
Fastening the formwork
The formwork, covered with plastic film, is installed along the edge of the dug trench along the outer and inner perimeter, and its lower edge should be in close contact with the ground, without cracks or irregularities. This position of the boards will help prevent the solution from leaking out when pouring the foundation.
The shields are supported by prepared bars driven into the ground, along the outer perimeter - from the outside, from the inside - from the inside. The formwork panels should be positioned strictly vertically, this will avoid further deformation of the entire foundation as a whole.
Ballast
This is the name given to the additional components of a mixture of water and cement in concrete. They are not only cheap fillers for cement mortar, but also perform important functions. Crushed stone increases strength and water resistance, reduces shrinkage and creep. Sand is added to prevent cracking.
Assembling a frame from reinforcement
Using the existing reinforcement, a frame mesh is assembled, having square cells measuring 30 by 40 centimeters. The joints of the rods are twisted with knitting wire; for better tightening, it is preferable to use pliers.
If there are holes for support pillars, three or four twisted reinforcement rods are also placed in them, which will give additional strength to the entire structure; their ends should be about thirty centimeters above the bottom of the trench.
After this, two reinforcing rods must be placed on the sand cushion along the walls, at a distance of 5 centimeters from them, on which the mesh will subsequently be held.
It is knitted by fastening vertical rods every 30 centimeters (welding in this case is unacceptable, since it will subsequently lead to corrosion at the joints, only knitting wire). Vertical reinforcement bars should rise 25 centimeters above ground level.
After installing vertical rods of reinforcement along the entire perimeter, the next horizontal layer is attached after 40 centimeters, which makes it possible to form a mesh with the required cell size.
Such a frame is assembled both directly inside the dug trench, and separately from it, and then placed inside.
After all the preparations have been made, the level to which the foundation should be poured is marked on the inside of the formwork and the string is pulled. It is necessary to ensure that its height is strictly at the same level along the entire perimeter.
Preparatory work
The preparatory work stage occupies an important place in the process of building a house. First of all, it is necessary to clear the area of construction debris, cut down excess trees and uproot stumps, and remove dry grass.
Preliminary zoning of the site will allow you to effectively use every corner during operation. It is best to level the surrounding area before starting construction work and laying the foundation. This will not only give the site an attractive appearance, but will greatly facilitate construction work at all stages. The terrain with large differences requires stepwise leveling of the territory.
Next, the exact location of the house is determined and the foundation is marked. To do this, pegs are installed in all corners of the future building. If the house is a standard rectangular shape, the result should be a figure with perfectly equal angles of 90°. If the angle is not maintained, it is necessary to achieve this result by moving the limit cord in one direction or another.
Along the future walls, at the same distance from each other, pegs are also installed and a rope or cord is pulled between them. The diagonals drawn between the corners of the building must be exactly equal to each other.
An example of checking angles in markings - if the diagonals are equal, then all angles are 90° Source homeframe.ru
When marking for a strip foundation, it is necessary to retreat from the walls of the house at a distance equal to the width of the foundation. Most often this figure is no more than 20 cm.
You can dig a trench either by hand or using specialized equipment. It is formed at least 20 cm below the freezing point of the ground, characteristic of the area in winter. It is necessary to dig a trench strictly following the markings and forming a flat bottom.
Pouring the foundation
In order to properly fill the foundation with your own hands, you must try to do it at once, since interruptions in work can lead to cracking of the poured concrete and a decrease in the strength of the entire structure.
The best method for pouring the foundation is to order ready-mixed concrete, which can be purchased at the factory. Otherwise, given the required volume of the mixture, there is a need for a concrete mixer.
In order to correctly calculate the required quantity, the depth of each segment is multiplied by its length and width. Taking into account that each corner of the house is taken into account twice in such a calculation, there is no need to order all the components with a reserve.
To fill the foundation of a private house, you need to purchase the following ingredients:
- Dry cement M500, which is characterized by the absence of additives (the main composition is calcium silicate, minerals and gypsum), rapid thickening and setting;
- Fine sand;
- Fine crushed stone;
- Water
The dry mixtures are mixed according to the proportion 1:3:4, after which water is added in small portions in an amount half the resulting volume of the dry mixture and mixed thoroughly.
It is highly advisable to carry out all of the above procedures in the warm season, since low temperatures have an extremely negative effect on the setting time of concrete, as well as on its strength characteristics.
It is preferable to carry out all work on pouring the foundation at the same time, since adding a new portion of the solution to the existing hardened concrete can lead to the formation of air cavities and subsequent cracking of the structure.
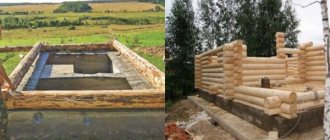
Features of arranging a columnar base
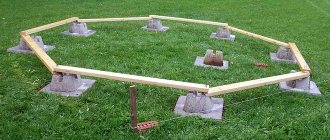
A structure of this type consists of support pillars sunk into the ground from various materials, on top of which a grillage or frame is made. The design is easy to construct and highly economical, suitable for wooden buildings without basements.
The pillars can be monolithic - then the work is carried out according to the same algorithm as pouring the foundation of a strip or tiled house. You need to dig holes, pour a sand cushion, install formwork with reinforcement, and pour concrete. You can reduce costs by making the supports prefabricated from the following materials:
Brick.
A parallelepiped is laid out on a pre-poured reinforced concrete base about 25 cm thick (the best option is half a brick with a void in the middle). To strengthen it, you can pour a concrete mixture inside or lay a reinforcing mesh after 3-4 rows.
Stone.
It usually means rubble, which can be purchased cheaply or extracted from a block yourself. Unlike brick masonry, rubble masonry requires a lot of time, since you need to select and adjust each stone, holding them together with cement. In this case, reinforcement is not done; the base is durable and resistant to high loads.
Basalt.
The most common igneous rock, widely used in construction. For the construction of a strong columnar foundation, piece stone is suitable, which is laid using cement mortar.
Cobblestones.
A free natural building material of high strength, from which you can also make support posts using the same technology as from rubble. However, to increase the strength of the base, it is better to use cobblestones as a filler when pouring concrete.
Reinforced concrete blocks.
Inexpensive building material with excellent technical characteristics. Installs quickly and easily, similar to brick.
Prefabricated pillars must be erected on a wide concrete base, with a layer of waterproofing material between them. The side edges should also be protected from moisture by treating with bitumen.
Gradual or partial pouring of concrete
In cases where it is not possible to immediately pour the entire foundation for certain reasons, gradual pouring of concrete is allowed, subject to certain requirements:
Each subsequent portion of concrete can be mixed with the previous one, however, the time interval between pouring must be strictly observed, which should not be more than two hours in warm ambient air and four in cool air;
If there is a forced long break in work, it should not exceed sixty-four hours. At the same time, the already hardened preliminary layer of concrete is thoroughly cleaned of all kinds of contaminants, dust and drops of moisture. The use of a stiff brush helps to level the top layer and increase the coefficient of adhesion between surfaces.
If you comply with all the above requirements, partial pouring will not affect the quality of the finished foundation and will allow you to save on the purchase of expensive equipment, such as a concrete mixer.
DIY device
Installation of a columnar foundation
First, make a drawing of the location of the pillars on paper. They are installed in places of the greatest load-bearing load: at corners, at the intersection of external and load-bearing walls, under the fireplace, columns. A grillage is installed on top of the supports, which serves to evenly distribute the load from the house and transfer it to the pillars and ground.
The pillars are mounted from brick, concrete, stone, reinforced concrete pillars.
Stages of installation of a reinforced concrete columnar base:
- Clear the construction site of debris. Sometimes it is necessary to dig a pit and fill it with dense soil: on sandy loam, quicksand, and other unstable soil.
- Mark the site, marking the locations of the pillars with stakes.
- According to the marks, pits are dug to a depth of more than a meter. Pour sand and gravel onto the bottom, wet them and compact them well.
- Formwork is installed to fill the pillars. If the soil is dense and the walls do not crumble, you can do without installing formwork.
- Install metal rods with a diameter of 12 mm and fasten them with clamps.
- Concrete is poured in layers 300 mm thick and the solution is compacted well.
- After pouring to the desired height, leave until completely dry. Cover with polyethylene and moisten regularly.
- A month later the grillage is installed.
To prevent moisture and debris from penetrating into the base, a boundary wall is erected between the pillars.
How to pour the foundation of a house in winter
Sometimes a situation arises when all the preliminary calculations have already been made, the trench is dug, the formwork is prepared, but the weather brings its own surprises, and the ambient temperature drops to below zero.
In the winter season, it is also possible to fill the foundation with a concrete mixture, however, it should be remembered that the influence of negative temperatures has an extremely negative effect on the quality of the concrete mixture, since the water quickly freezes before the setting process itself.
Prevention of this phenomenon is achieved by using antifreeze additives and heating the finished mixture. It is advisable to secure a tent from available materials over the site of the proposed work, and maintain a positive air temperature inside using heat guns (electric or gas).
In winter, polystyrene foam formwork is often used, which does not require subsequent removal. This will help maintain the thermal conductivity of the structure and will contribute to the slow hardening of the concrete mixture, which is extremely important.
At any time of the year, regardless of the ambient temperature, the foundation should be poured gradually, in layers, since simultaneous placement of the entire amount of the available mixture into the formwork will lead to the appearance of air bubbles and subsequent cracking after hardening.
After laying each layer about twenty centimeters thick, its surface must be pierced in several places, carefully leveled and compacted using a construction vibrator.
The height of the last layer should not exceed the level of the pre-tensioned twine. After all work is completed, the formwork is tapped from the outside with a hammer, and the concrete surface is leveled.
The finished poured foundation is covered with polyethylene. Periodically, the film is removed and the surface is moistened with water, this will avoid the appearance of cracks.
Two weeks after all work, the formwork can be dismantled. Further construction of the house itself can be continued no earlier than a month after the foundation has been poured.
Taking into account all the above nuances, it is possible to carry out all the work on your own. To complete the picture, there are currently many photographs on the Internet that show step by step how to lay a foundation without the help of professional builders.
Waterproofing
Waterproofing is the procedure of applying a cutting layer to the surface of a concrete strip.
There are two types:
- Horizontal waterproofing. It is performed from below and above the tape and allows you to eliminate the process of capillary absorption of moisture by the concrete tape from the lower soil layers or to cut off the walls from the concrete, preventing the penetration of water. Usually a double layer of roofing material is used, coated with hot bitumen or mastic.
- Vertical waterproofing. This is the process of applying insulator to the side walls of the tape. Various materials are used, roll, liquid or impregnation.
There are opinions that waterproofing is not necessary. Some experts are inclined to believe that moisture does not pose a serious danger to concrete. However, in regions with severe frosts, wet concrete can be destroyed by water expanding during freezing, so waterproofing should be taken as responsibly as possible.