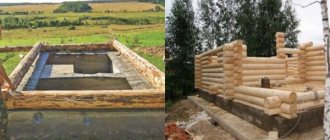
The foundation is an integral part of any construction of houses or buildings. If it is done incorrectly, the erected structure may soon begin to deform or even collapse. The choice of foundation type depends on the type of structure, as well as the type of soil on the site, and if the soil is heaving, then a foundation slab is most often used. It is a fairly reliable foundation for a building, but quite often construction companies demand unheard-of sums for its construction, which reach a third of the cost of the building. But everything is not as bad as it might seem at first glance; you can make a slab foundation yourself.
List of required materials and tools
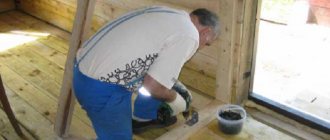
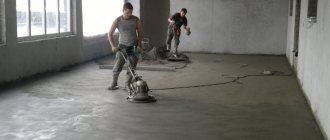
Before pouring concrete, you need to prepare a flat area and compact it properly with a special machine (vibrating plate). Do-it-yourself vibrating plate: (read more)
List of materials required for constructing the foundation:
- medium sand;
- medium-sized crushed stone;
- geotextiles;
- extruded polystyrene foam 100 mm thick;
- drainage pipes;
- wooden boards;
- reinforcement bars;
- knitting wire;
- pipes of different diameters for utilities and water heated floors;
- nylon clamps;
To work you will need the following tools:
- scoop and bayonet blades;
- wheelbarrow;
- level;
L-blocks are lined with flat slate for laying the foundation.
- building level;
- screwdriver;
- knife;
- Bulgarian;
- vibrating plate;
- deep vibrator;
- hacksaw;
- concrete mixer;
- trowel;
- protective clothing.
Advantages of a slab base
The strength and solidity of the structure is achieved through the use of reinforcement technology
Professionals prefer to work with slab foundations due to its advantages. These are:
- Strength and solidity of the structure, which are achieved through the use of reinforcement technology. That is, concrete is made rigid by pouring steel knitted mesh.
- A house on a slab foundation can last up to 100 years without visible or hidden structural damage.
- The negative impact of groundwater and heaving soils on the foundation is reduced to zero, provided that the base installation technology is followed.
- The speed of constructing a slab foundation is several times higher than the work required to install a strip frame. Here it is quite possible to complete it in 2-3 days with an integrated approach.
- And the high load-bearing capacity of the foundation allows you to build on it both the simplest frame houses and stone cottages of 1-2 floors.
But a slab foundation also has some disadvantages that have nothing to do with the strength of the foundation. The disadvantages include:
- Quite a large consumption of building materials, and accordingly increased financial costs. The slab foundation is considered the most expensive of all available types of frames. As a percentage, installation of a slab foundation can amount to about 30% of the cost of the entire house in general.
- When installing a recessed type of slab, the cost will also be in favor of renting special equipment, without which it will be difficult to dig a pit and mix the required amount of concrete.
- Inability to arrange a basement, cellar or underground garage in the house. A monolithic slab simply will not allow this.
Installation technology
With your own hands - How to make it yourself How to make a cornice invisible, hidden Invisible curtain rod with your own hands
The technology for installing a foundation using ready-made slabs is similar to the construction of a slab foundation. But in the first case, factory products are laid on the prepared base, and in the second, formwork and reinforcement cage are installed and poured with concrete. For a prefabricated structure, panels are required to create a screed over the foundation surface.
Installation of slabs
The scheme of a prefabricated slab foundation generally consists of the following elements:
- sand and crushed stone cushion;
- layers of waterproofing and insulation;
- reinforced concrete slabs;
- screeds.
The technology is implemented in practice in the following sequence:
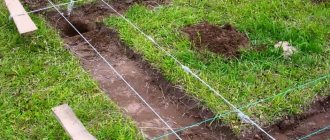
- mark the construction site using rope and wooden pegs;
- dig a pit up to 0.5 m deep (depending on the thickness of the pillow and slabs);
- level its bottom;
- pour a sand-crushed stone cushion, compacting it well;
- a waterproofing coating is laid, and insulation is placed on it;
- install the slabs;
- connect them using reinforcing bars;
- mix the working solution;
- seal existing joints;
- install formwork on the sides of a structure of small height;
- pour the screed with a layer of approximately 3-5 cm, leveling the concrete as a rule;
- After the monolith reaches the required strength, the shields are removed.
Rolled materials (for example, roofing felt) are often used as waterproofing, and extruded polystyrene foam or polystyrene is used for insulation. The ends of the products are also thermally insulated.
You can buy concrete ready-made or prepare it yourself. It is recommended to use brands from M300.
The screed setting process takes up to a month and is determined by the climatic characteristics of the region. Before pouring the screed, you can lay reinforcement mesh on top of the slabs. This will strengthen the created structure.
When working, you should control the evenness of the resulting surface of the screed in the horizontal plane, so as not to perform further leveling. Also, the diagonals of the constructed base must be equal to each other.
For outbuildings and garages, insulation is not required in most cases. On hard soils, under such lightweight buildings, slabs can even be laid directly on the ground without digging a pit or backfilling with a sand cushion. But waterproofing is always recommended.
The characteristics of floor slabs are presented in the following video.
The installation of slabs on a plinth is shown in the following video.
Construction of a slab foundation is cheaper than pouring a monolithic structure and is completed in a shorter time. Due to the fact that the final structure is prefabricated, relatively light buildings are erected on it. The choice of products for building houses should be approached correctly: purchase certified products from trusted manufacturers. The durability and reliability of the supporting structure will depend on the quality of the reinforced concrete products. For garages and sheds, you can use used materials, which will reduce costs.
What it is?
The reinforced concrete slab type base is a cast reinforced structure made of concrete mortar poured in one plane.
Scope of application
Reinforced concrete slab foundations have sufficient performance characteristics to be used in construction:
- brick,
- wooden,
- frame-panel one-story houses,
- buildings made of foam concrete,
- garages,
- summer kitchens and other lightweight structures.
Due to the large supporting area, the foundation remains stable against subsidence on almost all types of soil and at any level of underground sources.
Correct filling.
When pouring a slab with concrete mortar, it is better to use one pass. For some builders, this process is divided into several operations and half of the foundation is poured first. This will require the creation of vertical partitions.
A prerequisite is to fill the full height of the formwork.
It is believed that an inclined seam is necessary. For this purpose, a corner partition is made. When constructing low-rise buildings, the partial filling method can be used. In these cases, special stability of the foundation structure is not required.
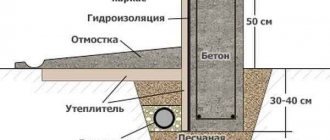
Diagram of the foundation slab for the foundation.
It is not recommended to make horizontal joints next to horizontal reinforcement. Ideally, the metal should not be located at the joint. If filling is carried out in small areas, the presence of vertical seams should be provided.
Types of reinforced concrete foundation slabs, arrangement of flat and ribbed
The main criterion for distinguishing reinforced concrete slab foundations is their internal structure. On this basis, power structures are divided into two types:
- Monolithic.
- Prefabricated monolithic.
The first technique is a classic sequence of technological operations for pouring concrete into formwork onto a prepared base of non-metallic materials. In this case, the slab is poured with reinforcement to increase the rigidity and resistance of the foundation to tensile and other moments.
The technology for constructing a prefabricated monolithic base involves the use of ready-made reinforced concrete slabs, which are laid on a sand and crushed stone substrate and then filled with concrete mortar. The strength and load-bearing capacity of the foundation in this case is ensured by factory blocks.
The surface shape of the slabs can be flat or ribbed.
The construction of a slab ribbed base with your own hands involves additional digging of trenches. The space that is formed between the relief bends is filled with a mixture of non-metallic materials.
Walls made of cellular concrete
For the construction of houses, cellular concrete with a density of 400-500 kg/m3 is used. The thermal conductivity of blocks made of cellular concrete is 4 times lower than that of brick, so the required wall thickness can be achieved by laying just one block. Walls made of cellular concrete are warm, light and vapor-permeable. You can build with them all year round. The blocks are easy to process. When cutting with a hacksaw, they can be given the desired shape. This allows you to build buildings of any configuration, create rounded surfaces and arches, and when installing windows and doors in openings, it is easy to select a quarter. The blocks are laid on a special glue - a dry mixture with mineral fillers and polymer water-retaining additives. They make the seam thin and the masonry thermally homogeneous.
Scope and calculation features
The main purpose is to use it as a foundation on soft soils with a maximum load-bearing capacity of up to 2.5 kg/cm2. This includes sands - silty and medium density, clays and plastic loams, peat and moist soils. Moreover, it is the level of soil moisture that largely determines its load-bearing capacity - when wet, it literally “floats”, losing its strength properties. Therefore, drainage, waterproofing and blind areas play an important role in the arrangement of this type of foundation.
Reliable waterproofing is an important component of any foundationSource olestnicah.ru
One of the advantages is often given the argument that you can make a monolithic slab with your own hands. But even if we do not consider the issues of choosing the type of concrete and the parameters of the reinforcement frame, such an important stage remains as calculating the dimensions of the slab. And if there is a certain clarity with the area (the size of the house plus a small margin on each side), then the thickness of the slab is not easy to calculate.
But this range also includes “light construction” in the form of a garage or summer kitchen, and a two-story house with an attic. If you make the slab not “thick” enough or choose the wrong thickness of the reinforcing rod (or cell size), then it will not be able to withstand the total load. An excessive margin of safety leads to an increase in the cost of an already expensive foundation, and an excessive amount of concreting will make the entire structure heavier, and the soil may not be able to withstand the total load.
There is another option with a diametrically opposite scope of application - the slab is installed on rocky and coarse soils with very high load-bearing properties. In this case, it rather levels the construction site rather than redistributing the load from the structure.
Another feature of this foundation is that the laying of pipelines must be done at the zero cycle stage. Source xpcenter.ru
Advantages and disadvantages
When choosing a foundation for a house, you should pay attention to the following advantages of a tiled structure:
- Possibility of installation in the above difficult conditions, incl. on unstable soils.
- Increased reliability due to the monolithic structure and reinforced reinforcement. High resistance to temperature changes.
- Possibility of arrangement with high groundwater and severe flood conditions, with frequent flooding.
- Simplicity of technological methods. Possibility of construction with your own hands without the use of special equipment.
- Minor amount of excavation work. The foundation pit for the slab is shallow, which speeds up construction work.
- Possibility of use as a concrete floor screed.
The prevalence of the reason under consideration is limited by the following disadvantages :
- high requirements for construction site preparation. It should be perfectly flat, i.e. no slope;
- increased consumption of materials, because the slab covers the entire area under the structure, which makes the foundation quite expensive;
- limiting the number of floors (height) of a structure;
- problems with arranging a cellar inside the house.
Analyzing all the pros and cons of a tiled foundation, it is not difficult to come to the conclusion that its choice is most often determined by specific circumstances. It is erected in cases where the strip base is unreliable.
We recommend reading: Scheme and methods of planning a construction site for a private house
Advantages and disadvantages
Experts note the growing popularity of the USP foundation, which is due to the advantages it provides:
- Utilities, depending on the technology and type of soil, are laid either under the slab or directly in the concrete pour. As a result, there is no need for additional insulation of pipelines and protective equipment for cable networks.
- The presence of a thermal insulation layer under the main load-bearing foundation prevents the effects of freeze-thaw cycles on the concrete. This significantly increases the durability of the structure.
- The use of a variety of waterproofing materials and barriers (sand and gravel cushion, drainage systems) at different stages of foundation construction has a complex positive effect. Increases the durability and stability of the load-bearing base, maintains heat-holding capacity, and completely eliminates the destructive effects of moisture on the structure.
- Thermal insulation in combination with a heated floor system reduces energy costs to maintain a comfortable temperature in the room, which provides significant financial savings.
L-blocks are a type of permanent formwork used for installation of USHP source lblock.ru
- The plate is characterized not only by its great strength. A common monolith of the base with reinforcement over the entire area and the presence of additional stiffening ribs provide high load-bearing capacity. This ensures the versatility of the foundation, removing almost all restrictions on the use of building materials and technologies for constructing walls, floors and roofs.
- The concrete base, after leveling during pouring and subsequent finishing sanding, is completely ready for laying the final floor covering. For technical rooms, it is allowed to use a concrete surface as a working floor after ironing (topping). This saves not only money, but also time for arrangement.
- The materials necessary for the construction of the USHP can be delivered to the construction site by conventional freight transport. The exception is the delivery of ready-mixed concrete, for which concrete mixers are used. The specifics of the slab arrangement are such that all building materials are delivered in small batches and used immediately, so there is no need to organize storage areas.
- The installation of utilities, the initial installation of main networks and the construction of the foundation are carried out simultaneously, which significantly saves time.
Heated floor pipeline installed on special plastic holders so that the pipes are buried in concrete when poured. Source domoproekt.com
There are certain technical limitations and disadvantages for USP:
- The need for careful calculations, design studies and strict adherence to the sequence of work.
- Absence of a ground floor and basement"
- Increased costs when constructing a slab foundation on a relief site.
- Difficulties in accessing utilities if repairs are necessary.
How to make a slab foundation
Do-it-yourself - How to do it yourself How to properly paint the wooden facade of a house Beautifully painted and decorated facade with your own hands
First of all, the necessary calculations are made. It is at the stage of foundation calculations that mistakes can be made that subsequently cannot be corrected. If you do not have a construction education, it will be quite difficult to make the calculation yourself. It will be necessary to take into account many different factors, such as possible deformations, rolls, shrinkages, load distribution over the entire area of the slab and a number of others.
However, in most cases, this stage is skipped altogether, and the calculation is made “by eye”, or the foundation is made by analogy with the already finished one next door. This approach is somehow justified when building a garage or a very small house, but in the case of larger buildings it is worth resorting to the help of specialist designers.
Listed below are the main steps and operations for making a foundation slab with your own hands:
- Construction site marking and soil excavation.
- Forming a flooring from geotextile materials, such as Dornit, in order to create a barrier that prevents the subsequent transition of sand into the clay located below (this stage is optional, but highly desirable).
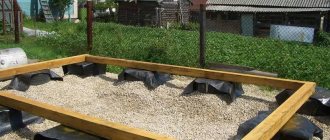
- Organization of a sand cushion, which consists of filling the site with crushed stone and sand and compacting them using a vibrating plate or manually. It is recommended to pour clean sand and compact it in layers 10 cm thick.
- Laying communications such as water supply, sewerage and others.
- Construction of concrete preparation. The preparation is a 10 cm screed cast from m-100 cement mortar on top of a sand cushion. The solution is prepared using dry mixtures, for example sand concrete m300.
- A layer of waterproofing roll materials is laid on the resulting concrete slab, the seams of which are necessarily soldered using a propane torch or blowtorch. The size of the waterproofing flooring should be slightly larger than the size of the future foundation, which will allow you to subsequently turn up the edges of the flooring, soldering them to the end of the foundation slab.
- A layer of thermal insulation made of extruded polystyrene foam is laid on top of the waterproofing. This stage is not mandatory, but in the future it will provide a warm floor in the basement and significant savings in money spent on heating the home.
- A frame made of reinforcement is mounted on a “sandwich” formed by layers of sand, sand concrete, waterproofing and insulation. This frame consists of two grids of 12-16 mm rods, with a cage size of approximately 20x20-30x30 cm. The first grid is installed in the lower part of the foundation under construction (at a distance of 5 cm from the polystyrene foam), the second - in the upper part (5 cm below the upper plane of the future foundation).
- Upon completion of these stages, formwork is installed around the perimeter of the slab and secured well (the concrete pressure is very high!).
- Concrete is poured and compacted manually or using deep vibrators.
- After compaction, the surface of the concrete in the mold is carefully leveled and smoothed.
- The poured slab is covered with a film to prevent premature drying and then left until the design strength is reached (3-4 weeks) with daily moistening with water in the first week.
- After the concrete has hardened, the excess waterproofing along the edges is turned up and soldered with a torch to the ends of the slab (or treated with polymer waterproofing, if used).
Requirements for the foundation slab
In order for the entire structure to be strong and reliable, the slab foundation must meet the following requirements:
Have a high permissible load limit. Despite the light weight of aerated concrete, the design takes into account the weight of people, furniture, snow layers, roofing, etc. During operation, the owner may decide to increase the load on the foundation by adding an additional floor or attic, which also needs to be taken into account before starting construction.
Be able to withstand the bending forces associated with the reaction of the soil when it freezes
For this purpose, special attention is paid to calculating the optimal slab thickness and the quality of reinforcement of the concrete screed.
Designing according to current standards and using high-quality materials will allow the foundation to have all the necessary performance characteristics.
Methods for covering large openings without slabs
Very often, in the process of laying floor slabs on the foundation, you may encounter a situation where a large space remains uncovered, and there is no desire or opportunity to cut the slab. In this case, you can use two methods.
The first method is considered simpler and involves performing the following steps:
- Determine the approximate distance that will remain without overlap and divide it in half.
- When laying the first slab, retreat the resulting value from the edge.
- Lay the remaining slabs. Upon completion of the work, you can see that the last slab also does not reach the same distance.
- Next, the space between the slabs and the walls is filled with cinder blocks, placing them with the end part facing the floor slab. During the installation process, you need to ensure that the holes in the blocks point to the side.
Covering large openings
The second method requires concentration and a lot of labor. The process involves uniform distribution of slabs over the entire covered area. For this purpose, you should also determine the distance that will remain uncovered and divide it by the number of expected gaps between the slabs.
I close such gaps as follows:
- A board is tied between the slabs, which will act as formwork.
- Reinforcement bars are installed between the slabs.
- Fill the space with concrete mortar.
Types of slab foundation
The monolithic pillow-slab has an average thickness of up to 50 cm and is poured from concrete mortar along the entire perimeter of the pit
In construction all over the world, there are three types of slab monolithic foundations:
- Monolithic pillow-slab. It has an average thickness of up to 50 cm and is poured with concrete mortar along the entire perimeter of the pit. Most often, such slabs are used in the construction of private houses with one or two floors. Moreover, the building can be built from any materials from wood to brick.
- The slab foundation is reinforced concrete with stiffening ribs. This more complex design solution is used in industrial or urban construction. Here, either a foundation is assembled from monolithic floor slabs using a rigid bond, or it is poured into a special formwork that has stiffening ribs. This design is thick (up to 1.2 meters) and is able to withstand soil heaving in seismically active zones.
- Box-shaped monolithic slab. The most complex of all types of slab foundations. Such a foundation is mounted from specially produced concrete boxes, which are fastened together according to the principle of increased rigidity. Such slab foundations are rarely used and only in industrial construction.
Sequence of installation work
In addition to following the rules for laying floor slabs, it is necessary to follow a certain sequence in work:
Installation work
- First, it is necessary to fill the voids of the reinforced concrete slabs in those places that will rest on the foundation.
- Next, concrete mortar of a grade not lower than M100 is applied to the areas of the foundation that will come into contact with the floor slabs.
- Now you can begin directly laying the floor slabs on the foundation. It is important not to turn the slabs over to prevent elements from breaking due to improper installation.
- Installation work should be performed by 3-4 people. One worker, using a special sling consisting of four branches, secures the slab to the hook of a construction crane. For convenience, the plates have special mounting loops. Two more workers regulate the work process, laying the slab in the designed position. They also perform the detachment of the sling. If there is no eye contact between the crane operator and the workers, an additional person is hired to give commands to the crane operator. During the installation process, it is necessary to ensure that the slabs fit tightly to each other.
Basic mistakes and tips for construction
In order for a house made of aerated concrete on a slab foundation to last at least 100 years, an individual developer needs to sort out common mistakes in advance:
- Refusal of reinforcement or selection of reinforcement of inappropriate diameter. Houses made of aerated concrete do not withstand deformation loads that may arise due to the destruction of the foundation. The latter is possible if the concrete monolith is not sufficiently resistant to deforming loads. To eliminate this possibility, the reinforced frame is made according to established rules in relation to the given conditions.
- Deep penetration of the slab in unstable soils. You can protect fragile concrete from loads in such a way that the base rises and falls along with the movements of the soil masses. This option is possible if you build a shallow “floating” foundation.
- The slab is too thick. Increasing this parameter leads to additional costs, therefore, if according to the project the house is massive or has more than two floors, then choose a subtype of slab foundation - a foundation with stiffeners.
Step-by-step layout of work on the construction of the foundation slab
Slab foundation technology includes several stages:
- Layout of the area for construction.
- Construction of a shallow pit.
- Installation of sand bedding 10 cm thick.
- Installation of the footing (supporting part under the main slab). Mixture brand B7.5.
- Installation of formwork to the calculated height of the slab and laying reinforcement into it. The diameter of the main rods is 12 mm. The knitting wire for connecting the rods and forming a common frame has a cross-section of 8 mm.
- Pouring the main concrete mixture.
The technology seems very simple, but you shouldn’t pretend to be a genius who can do everything at once. It is always better to study the topic of concreting thoroughly. View a cross-section of a slab foundation. The location of the reinforcement, the order of tying with wire.
Don’t forget to mark and draw expansion joints in the concrete. Perhaps this will be the first, but not the last, useful experience for anyone.
Pouring the slab under the foundation using a ready-made mixture in mixers.
The fastest pouring option, which, among other things, ensures very good quality concrete, is to order delivery of concrete from a local construction company. Delivery is carried out in mixers. Typically, about 6-8 cubic meters of ready-mixed concrete can be delivered at a time. In this case, the foundation for the house can be poured within a few hours. The work will require about 4-5 people. From the mixer, concrete is fed into a trench, which is about 1.2-1.5 m long. If the mixture is fed into one place, it will then be very difficult to rake it throughout the entire formwork. Secondly, the concrete may begin to delaminate: the more liquid mixture will begin to penetrate into the farthest areas of the formwork, and the more rocky, dense part will settle in the pouring area.
Therefore, you need to direct the mixture to different places on the formwork to make it easier to distribute over the entire surface. To do this, it must be possible to allow the mixer to approach from all sides of the foundation being created. If this cannot be done, then a long trench is made in advance to supply the concrete mixture from the mixer to different points of the foundation. You can put it together from boards. Linoleum or plastic film is laid inside the gutter. By alternately moving this trench to different corners of the foundation, you can ensure uniform filling of the formwork with concrete mixture. This option for pouring a slab is the most acceptable for most independent builders and has an average cost: not too much and not too little.
Construction of a slab foundation: installation of a heat-insulating layer
Insulation of the foundation is an important measure, thanks to which heat does not escape from the building into the ground, and cold does not penetrate from the soil into the room. The insulation must have high strength. Therefore, in USP technology it is recommended to use slabs made of extruded polystyrene foam, which (due to the presence of graphite in their composition) are characterized by increased compressive strength.
Note! Expanded polystyrene can harbor ants and other insects. Therefore, the material needs additional protection
Here it is recommended to use broken glass, metal mesh or ceramic foam slabs. Extruded polystyrene foam slabs for the blind area were laid and covered with film.
The material in the form of slabs 10 cm thick must be laid in two layers. The first should cover the entire perimeter of the base and the blind area. The second layer should be laid offset from the edge by at least 45 cm, which will create stiffening ribs. In the middle of the slab, in the thermal insulation layer, grooves 20-30 cm wide are made for future load-bearing walls, under which the insulation does not fit.
When using flat sheets of insulating material, special plastic nails with wide heads are used to fasten them. The contact points can be treated with an adhesive composition. It is recommended to arrange the elements in a checkerboard pattern, which will help to avoid the formation of cold bridges at their junction points. You can also use l blocks for USHP, which are mounted at the ends of the structure. Having a special design, they do not require additional fastening during installation.
Read the continuation of the article on the next page. To move to the next part of the article, use the page navigation numbers.
Carrying out preparatory work
Preliminary measures are intended to create conditions for further productive work and adherence to technology. The process begins with preparing the slabs and base surface.
The panels are first inspected for chips, protrusions, and compliance with geometric parameters. Detected defects are eliminated before installation work begins.
Then the ends are processed. Existing holes are closed in two ways:
- by laying bricks followed by filling with cement;
- filled with insulation, covering it with plaster.
Filling holes with bricks and cement mortar
The foundation is prepared as follows:
- using a level, determine the curvature of the base surface;
- Based on the magnitude of the differences, select the appropriate alignment option;
- when the discrepancies do not exceed 5 cm, then use a cement screed laid on a reinforcing mesh;
- for large differences, leveling is done using bricks.
The foundation assembled from blocks, before laying the slabs on it, is combined using a reinforced concrete belt.
The slabs are placed on a flat surface to minimize further costs of leveling the floor of the structure and to facilitate further construction work.
Design and calculation of the reinforcing frame
Concrete has excellent resistance to compressive loads, but poor resistance to bending and tension. If we talk about building a house on a foundation slab, then it is subject to:
- the occurrence of a constant bending moment due to uneven load on different parts of the structure;
- periodic exposure associated with soil movements.
It is possible to actively resist alternating soil pressure using a metal frame. The so-called reinforcement belt copes well with bending and tensile forces, while concrete actively resists compression.
Reinforcement of a slab foundation is carried out unevenly, with additional reinforcement around the perimeter, as well as in the areas where walls and columns are located (experts call these areas squeeze-out zones). A slab of minimal thickness (up to 150 mm) requires single-layer reinforcement, while more massive structures require the construction of a reinforcing frame.
When determining the cell size, they rely on the design load. Thus, for brick walls, the reinforcement is fastened in increments of 200 mm, while when constructing lighter wooden or frame houses, the rods are knitted at a distance of 250–400 mm. At the same time, the width of the cell should not exceed the thickness of the foundation slab by more than 1.5 times. As for the pitch of the rods in the punching zones, there it is reduced by half. Such reinforcement of the frame helps prevent the appearance of cracks at the junction of load-bearing walls and columns.
The distance between the frame rods can be different and depends on the area that the slab covers
If, when installing an armored belt, the length of the rod is not enough to cover the longitudinal or transverse dimensions, then it is increased by rolling stock of the same diameter. The connection is made with an overlap of 40 rod diameters in length, that is, for reinforcement Ø14 mm, the joint will be 40x14 = 560 mm.
With frame reinforcement, the rods are mounted in two tiers, attached to vertical rods. The pitch between these structural elements may differ from the cell width by 1.5–2 times.
The ratio of the cross-sectional area of the foundation and steel reinforcement laid in the longitudinal or transverse direction is 0.3%. The minimum diameter of the rods is 10 mm - such rods are used for slabs with a side of up to 3 m. For larger structures, rolled sections with a cross section of 12, 14 and 16 mm are used. For vertical rods, rods with a minimum diameter of 6 mm are used, taking into account the method of fastening - welding or wire.
Reinforcement errors: 1 - it is prohibited to use stones as frame supports (spacers); 2 - vertical rods stuck into the ground will contribute to the spread of corrosion into the slab; 3 - there is no waterproofing that prevents the absorption of cement laitance into the soil
Adjusting the dimensions of the floor slab
A decrease in the length or width of a reinforced concrete slab cannot be called a rare occurrence, since it is almost impossible to accurately select the material. To change the size of the slab, you need to cut it lengthwise or crosswise.
Cross section
The cross section makes the reinforced concrete slab shorter by a certain amount. To do this you need to do the following:
Cross cutting of slab
- Mark the cutting line with chalk or marker.
- Lay the slab on pads on the ground, and the pad should exactly coincide with the cutting line. This is necessary for more convenient cutting of material.
- Make a cut on the top of the slab using a grinder or concrete disc.
- Next, you need to make several blows with a sledgehammer or fist at the location of the voids. You should focus on the blows so that they land into the void and not into the rib. In this case, 3-4 hits will be enough. In a similar way, all voids in the slab are broken through.
- After this, you need to knock down the ribs, for which you hit them with a fist from the side.
- Having punched through the voids and knocked down the ribs, they begin to punch through the lower part and free the reinforcement bars.
- The cleaned rods are cut using a grinder.
Lengthwise cut
To reduce the width of the floor slab, it is necessary to cut the product lengthwise. This process is a little easier, but may require much more time. This is explained as follows: the length of the slab is most often 6 meters, and the width is no more than 1.5 meters.
In principle, similar work is performed. A grinder is used to cut through the upper part, and then using a cam, the slabs are punched over the voids. Next, a crowbar is used to pierce the bottom of the slab through its entire length. If reinforcement bars get in the way, make a cut with a grinder.
Slab foundation - what is it?
The basis of this type of foundation is a reinforced concrete monolith, made by pouring concrete under the base area of the structure being designed. During the concreting process, the slab is reinforced with a load-bearing frame, which consists of steel reinforcing bars connected into a single pattern.
Due to the fact that the foundation is a solid structure, it can rise and fall evenly as the soil masses located on it move. Due to this quality, the base is called a “floating slab”.
In order for the finished load-bearing structure to guarantee the integrity of the building, and during its operation there is no risk of cracking or damage, the construction and design of the foundation must be carried out strictly in accordance with the current standards for SNiP and SP, namely:
- SNiP 2.02.01-83 – foundations of buildings;
- SP 50-101-2004 – design and construction of foundations of various structures;
- SP 63.13330.2018 – construction of reinforced concrete structures.
Ribbon
A strip foundation is a buried reinforced concrete structure that is laid under the external and load-bearing walls of a building. The width, height and depth of depth may vary. The strength, stability and reliability of the foundation depend on these indicators.
Advantages and disadvantages
The strip foundation is considered universal. It is suitable for construction on different soils and for various architectural structures.
It has the following advantages:
- high construction speed;
- the ability to build the foundation of a house without the use of special construction equipment;
- efficiency (due to the fact that the foundation is laid only under the walls, and not under the entire building);
- possibility to build a ground floor or basement;
- high strength (a massive tape can become a reliable support for a three-story brick house).
This foundation option also has its disadvantages:
- This option is not suitable for construction on peat and subsidence soils;
- accurate preliminary calculations are required.
Area and conditions of application
This base option is suitable for the construction of buildings made of any materials up to 3 floors high. Moreover, it is possible to build using it under almost any site conditions. Tapes are used on sites with pronounced relief, with a predominance of rocks, with high occurrence of underground flows and increased heaving of the soil.
According to the standards laid down in SNIP, classic strip foundations can be used without restrictions on coarse clastic and rocky soils. When erecting buildings on other, less stable soils, careful calculations are required, and sometimes reinforcement of the structure is required.
On biogenic soils, the construction of a strip foundation is considered irrational. However, even in these cases it applies. But certain preparatory work is needed - strengthening the soil using bulk methods, replacing weak soils with dense bulk materials, installing piles under the belt.
Main stages of laying slabs
Installation of a strip foundation begins with laying cushions - shoes at the corners and only then along the entire perimeter of the building in longitudinal and transverse dimensions. The blocks are laid using a crane. After completing this stage, the correctness of the angles is checked using plumb lines and preliminary drawings.
The next stage is laying the wall blocks; a crane is also used to transport them. To lay blocks without gaps, slabs of different sizes are used; correct calculations eliminate the appearance of voids in the rows of the constructed base.
When laying blocks, you should take into account not only the condition of the soil, but also the depth of its freezing. Increasing the step between blocks is possible only after careful calculations.
Saving materials and time in the future can negatively affect the condition of the main building and lead to its distortion and deformation of the floors. You should also take special care to tie the slabs together using concrete mortars. After installing the base, for better hydro- and thermal insulation, the structure is reinforced using gas blocks or other insulating materials.
Properly constructed strip foundation slabs do not lose their properties for up to 150 years and provide reliable thermal insulation and a long service life of the main structure.
Kinds
So, how to make a monolithic foundation? There are three main types of slab foundations:
- Classic construction technology: on a sand and gravel cushion, backfilled into 2/3 of the pit. Its thickness depends on the height of the fertile layer.
- High-strength Russian: a foundation slab with stiffeners that are located under the load-bearing walls. Used for massive buildings and on soils with severe frost heaving; since the bearing capacity of such a foundation is quite high. When erecting lighter buildings, it is allowed to reduce its thickness to 10 - 15 cm.
- Swedish slab with insulation: formwork is prepared for it from permanent polystyrene foam blocks with low thermal conductivity. A warm floor is laid on top, then reinforcement, and this entire structure is filled with a 10-centimeter concrete solution. Communications are located under the sand cushion. Since correcting their condition in an already poured foundation and breaking the slab will no longer be possible, it is better to entrust all calculations and construction to specialists. Water supply, sewer pipes and other types of communications are selected the most expensive, since their repair and maintenance will be impossible.
When using stiffeners, they can be positioned up or down. In the first case, they strengthen the structure and act as a base. Foundations with downward stiffening ribs make it possible to reduce the thickness of the concrete and raise the slab above the ground level.
What is taken into account when calculating the foundation
When calculating a monolithic slab foundation, the total load is taken into account, which includes:
- weight of the building, including finishing materials;
- the weight of the plate itself;
- engineering systems equipment;
- communications;
- furniture and household appliances;
- wind and snow pressure.
Atmospheric loads are temporary, but they are taken into account as permanent. They are defined as statistical characteristics given for each region in the tables of regulatory documents. They cannot be neglected - in some areas, wind loads and snow pressure are large, and in terms of per square meter of the foundation they are comparable to the specific gravity of equipment, household appliances and furniture.
Such a layer of snow is a serious test for any home Source bgderab.ru
“Amateur” developers use a simpler method of calculating slab thickness. He proceeds from the position that a low-rise building requires a reinforcing frame made of double mesh. The distances from the bottom and top surfaces of the slab to the reinforcement are taken to be 50 mm, the distance between the chords is more than 70 mm, the rod diameter is in the range of 12-16 mm. And the calculation formula comes down to the following amount: 2x50+70+4x(12-16)=218-234 mm. And since the thickness is rounded up in multiples of 50 mm, it turns out that it is equal to 250 mm. The bearing capacity of the foundation is finally “regulated” by choosing the diameter of the reinforcement and the grade of concrete.
But it must be emphasized once again that this is a very approximate method, and in some cases it may not “work”, so all calculations must be carried out by specialists.
Features of strip foundation
The tape type base is a tape closed along the contour. The installation of a strip foundation is carried out along the perimeter of the future building and under all walls. It is usually built on soils with good bearing capacity and is not suitable for swampy soils. Under the tape it is necessary to arrange a cushion of medium-sized sand with layer-by-layer (every 100 mm) vibration compaction.
Appearance of the strip base
On soils with high soil strength characteristics, a strip foundation can be constructed even for the construction of multi-story buildings - up to 9-12 floors.
The depth of the strip foundation is determined individually depending on the characteristics of the building being erected on it, the expected loads, the level of soil freezing on the building site, the presence of basements, etc.
Scope of application of slab foundation
Considering a slab foundation in comparison with a pile or strip foundation, we can conclude that it is advisable to use the former in the following situations:
- when carrying out work on difficult soils;
- in houses where there is no provision for a basement or a high ground floor;
- in buildings in which the foundation serves as the base of the floor. In this case, it is necessary to organize reliable heat and waterproofing under the foundation slab.
In areas of severe soil freezing, frost-resistant slab foundations are an excellent alternative to foundations of other designs (including pile foundations). That is why this solution is often used in the countries of the Scandinavian region. The decoupling of the slab from the frozen soil is achieved using thermal insulation. We can say that the foundation slab is located on a “mattress” made of a material with thermal insulation properties.
In the past, high-density foam was used for thermal insulation; today it has been replaced by a more advanced material - extruded polystyrene foam. In Russia, the most common domestically produced polystyrene foam is Penoplex. Among foreign brands, the most popular are Ursa and Basf.
This insulation option is more practical and modern. Expanded polystyrene is durable, does not rot, and has high strength indicators. This material is used mainly for insulating the outside of floors and walls of basements, and as a heat-insulating mattress for slab foundations. A layer of polystyrene foam and waterproofing is placed on a sand bed or concrete preparation, then the monolithic foundation slab is concreted.
Drainage and waterproofing
The main reason for the soil getting wet and losing its load-bearing properties is not groundwater, which lies much deeper than the base of a shallow foundation, but in the perched water. This includes precipitation, seasonal snow melting, as well as water infiltration from nearby bodies of water if their “mirror” is at the same level as the slab. To a lesser extent, but the capillary rise of water in some types of soil also has an effect.
The nature of drainage measures depends on the characteristics of the region and site. If the house is located on a slope, then it is possible to install a cut-off drainage. On flat areas, it is possible to install a comprehensive storm drainage system, including drainage of water from platforms and paths outside the site. But in any case, below the level of the concrete foundation slab, along the perimeter of the blind area, drainage pipes are laid, which are led with a slight slope into a drainage well.
Laying a drainage pipe Source katlavan.ru
Waterproofing is complex. To briefly formulate the essence of the technology, it lies in the fact that the slab is literally wrapped in two layers of rolled insulation. The full list of works looks like this:
- After carrying out the zero cycle and backfilling the sand and gravel cushion, two layers of rolled bitumen insulation sheets are laid on the leveled area.
- All sheets are laid overlapping, and the top layer relative to the bottom is shifted by a width of half a sheet.
- Along the entire perimeter, roll waterproofing should be laid with a margin sufficient to bend the edges towards the end of the slab.
- After pouring and curing the concrete, the protruding edges of the waterproofing are glued with bitumen to the end of the base.
- Carry out waterproofing work to protect the top and side surfaces of the foundation