When it comes to the so-called. At the “zero” stage of building a country house - digging a pit or trenches and building a foundation, many inexperienced developers make a lot of mistakes. This could be littered geometry, collapsed walls, digging or under-digging of the foundation, mountains of unremoved soil around the pit, etc. As a result, the site turns into a real obstacle course for the passage of heavy construction equipment, and work on installing formwork, knitting reinforced frames, pouring concrete, etc. inside the pit become much more complicated. All this leads to loss of time, money and nerves. Moreover, any serious mistake made at the stage of building the foundation is a time bomb planted under the cottage. Therefore, in this article we will tell you how to dig the right pit.
Construction of a foundation pit
A pit is dug for a large monolithic building using special equipment.
The construction of a pit consists of several stages:
- performing calculations, choosing a form and parameters;
- preparatory work;
- excavation;
- strengthening slopes if the foundation pit is deeper than 125 cm.
In order to correctly determine the appropriate type of pit, it is necessary to conduct a geodetic study of the site and draw up a building design and calculate the load on the foundation. Based on the information received, the shape and depth of the excavation are selected. Having assessed the amount of work, the builders draw a conclusion about how the digging will proceed:
- With the involvement of large or small equipment (excavator), this option allows you to complete the work quickly and without the physical effort of digging and loading soil.
- Manually is a labor-intensive method, but the price is cheaper than ordering an excavator. It is recommended for the preparation of shallow and pile foundations. It is important to properly organize people’s work and observe safety measures.
Even if you dig pits with an excavator, there is still a lot of work that will have to be done manually. This includes leveling and strengthening the walls, tamping the bottom, and backfilling.
A significant preparation factor is the choice of time of year to start work. The first months of summer are the most successful period. The ground is dry, excavation is easy, equipment arrives without problems. In spring and autumn, when the soil is damp, the risk of ground movement increases. In winter, excavation is complicated by freezing. Prices for work and the overall estimate are increasing.
Time for work
Beginning builders often think about what time is best to carry out work on digging a pit. There is only one obvious fact on the surface - this should not be done in winter, since digging frozen ground is extremely difficult. However, this does not mean that all other seasons of the year are suitable for work.
A good specialist will answer that there are two suitable seasons: summer and autumn. This type of work cannot be carried out in the spring. At this time of year, the processes of thawing of the earth begin, resulting in the release of a large amount of water that will need to be pumped out. Consequently, additional costs will be required for specialized equipment.
The autumn season is not entirely suitable for this activity. You can only work in its first, warm part. In late autumn, frosts already begin, the soil behaves unstable - it freezes at night and thaws during the day. This can leave an imprint on the progress and quality of work.
Of course, it is impossible to unequivocally prohibit digging a pit in the cold season. If there is an irresistible need for its urgent creation, it is possible. However, you have to take into account that this “pleasure” will cost you one and a half to two times more.
If you want to make a pit for the basement or the foundation of an ordinary house with your own hands, first of all, you need to prepare a drawing and a work plan.
Shape and dimensions of the pit
Trenches for strip foundations
The configuration of the pit depends on the type of foundation chosen. Common forms:
- rectangular pit for a monolithic slab;
- square or round holes for pillars or piles;
- trenches around the perimeter and for internal walls - under a strip base.
Its size corresponds to the dimensions of the future home. Along the perimeter, soil is removed at the rate of plus 30-40 cm to the parameters of the building. This distance will be required to carry out work on insulation and waterproofing of the base.
When determining the depth of the pit, several factors are taken into account:
Soil type:
- sand or gravel - at least 1.1 m;
- sandy loam – from 1.3 m;
- loam and clay – from 1.4 m;
- rocky dense rocks – 1.8 m.
Foundation depth depending on the soil
The level of groundwater affects the permissible depth of the foundation. The structure should be 40-50 cm above the water layer.
In the reference literature, the soil freezing indicator for a specific region is found. According to building codes, the depth of the base should be 30-40 cm below the specified value.
When constructing a shallow foundation for a house, different rules apply. Deepening is carried out at 40-70 cm.
When calculating the pit parameters, use the data specified in the building drawing.
The length and width must exceed the specified values by 20 cm on each side. The width is also affected by the excavation depth. At a significant depth, slopes are formed and the trench profile takes on the appearance of a trapezoid expanding upward. At the bottom, the dimensions of the pit will correspond to the dimensions of the building, and the upper part will be larger.
Briefly about the main thing
Before digging a trench or pit to construct a foundation, you must first perform all the calculations. Their parameters depend on the characteristics of the soil, the depth of soil freezing and the level of load from the load-bearing structures of the building.
To carry out excavation work, you can use an excavator or dig everything by hand. The choice of method depends on the volume of soil excavation, the need to load it for further removal and other nuances.
When constructing a pit for a foundation slab, soil development is carried out in stages. The soil is dug out layer by layer, taking into account recommendations for strengthening the walls.
Ratings 0
Preparatory process
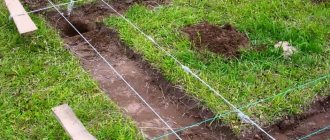
Before digging a pit, markings are made.
For safety reasons, it is necessary to conduct an inspection of the site. Before starting excavation work, you should make sure that power lines, gas or water pipes will not be damaged. After inspection, a layer of turf up to 20-30 cm is removed, bushes and other vegetation are removed.
Markings of soil excavation directions are applied to the site. The scheme must be in accordance with the master plan. The correct application is checked by measuring the diagonals. The permissible error is 2 cm. At the work site, marking is done with a construction cord stretched between pegs. Then chalk paths are laid along it. If necessary, drainage is provided to drain water.
Digging features for different types of foundations
There are certain requirements for foundation pits for buildings. They must comply with the size and load of the house, building codes, and not change the established parameters and shape. To complete the last point, you must follow the digging technology. According to the standards, the size of the steps and the slope angle are selected, and the walls of the pit are fastened. Features of the development depend on the type of foundation of the house.
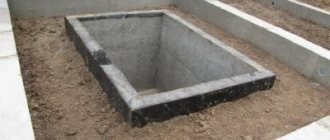
Tape
The foundation pit for the strip foundation is dug in the form of a trench. The design of slopes depends on the type of soil. On clay soil, the formation of vertical walls is allowed. In deep trenches with wet or sandy-gravel soil, slopes are arranged with different inclination angles - from 45 to 63°. When calculating the width, the need to install formwork holding reinforced concrete is taken into account. An additional 50 cm is allowed; the maximum size is not standardized.
Pegs are driven in at the corners of the perimeter of the house and at the intersection of the internal walls and markings are made. The width of the trench is indicated by two parallel lines. Excavation begins from the highest angle, following the outlined perimeter line. During the digging process, the depth is controlled by milestones.
If necessary, a tape trench is secured against shedding from wooden panels, boards, and slate. Spacers are installed between opposite edges for reliability. After the foundation hardens, the shields are dismantled. Part of the soil is not removed, but is left for backfilling. It is better to use sand. After digging, the bottom of the trench is compacted under the backfill.
Monolithic
Soil compaction with a vibrating plate.
Due to the large volume of excavation work, a foundation pit for a house with a monolithic slab foundation is dug using an excavator. If the depth is 40-50 cm, then you can dig manually. The soil is removed in parts, each layer is 50 cm, gradually forming steps of 25 cm in size. The soil is removed starting from the center. Then the site is leveled and the next layer is started.
Drainage pipes are laid along the perimeter of the pit, below the general level. This is a necessary measure for wet soils. Development is carried out taking into account the characteristics of the soil:
- The sand compacts well and holds the load, but crumbles when digging. It will be necessary to form slopes and strengthen the side walls.
- Clay and loam swell in winter as a result of freezing moisture. A competent calculation is required when arranging a slab foundation on such soil.
After the technician’s work, the bottom is leveled manually. Often it is necessary to carry out additional excavation of soil in a layer of up to 10 cm. After leveling the bottom, backfill with clean sand. The layer is spilled with water and compacted.
Columnar
A hole for a columnar foundation
You can dig the ground for a columnar foundation yourself. The work begins with clearing the site from the top layer of soil and marking the ground. You will need to draw a diagram of the perimeter of the house, in the form of two parallel cords. Places for holes for poles are marked in corners and on spans in increments of 1.6-2.5 m.
To do the work manually you will need:
- shovels (bayonet and shovel);
- pickaxe or crowbar;
- wheelbarrow for removing soil.
Pits up to 1 m deep can be dug with vertical walls; as the depth increases, slopes are built so that the soil does not crumble. The width of the pits is 20-40 cm larger than the size of the pillars in each direction. This distance is necessary for installing the formwork. Depth is calculated according to general rules.
Soil development methods.
The choice of a specific method for carrying out excavation work depends on a number of factors, including the properties of the soil, the volume of work, the type of earthen structure and hydrogeological conditions on a particular land plot.
Excavation work can be carried out in two ways:
- manually using physical labor and hand tools;
- using mechanization means.
As a rule, the method is chosen that, with maximum economic feasibility, allows it to be completed within the given time frame. Practice shows that the more excavation work required at a site, the more profitable its mechanized implementation is, provided that normal and productive operation of special equipment is possible.
Manual soil development.
Excavation work foundation.
This approach is mainly in demand for relatively small volumes of excavation work, as well as where it is not possible to use special equipment. Most often, trenches and holes are dug manually for pile foundations, as well as for laying some types of communications.
The main tools for manual excavation are shovels and spades. You can increase productivity by using small-scale mechanization tools, such as electric and pneumatic shovels, jackhammers, crowbars, etc. These tools are especially relevant when excavating dense soils, which must first be loosened before mining. It is worth noting that loosening approximately triples the speed of soil removal. If it is not possible to use pneumatic tools for loosening, they can be replaced with traditional crowbars, wedges, picks and sledgehammers.
Excavation work for the foundation.
Mechanized soil development.
Mechanized soil development is economically feasible for large volumes of excavation work.
To achieve the highest speed of their implementation, the following types of special equipment are used:
- single-bucket construction excavators;
- continuous excavators (chain or rotary multi-bucket, scraper, etc.);
- bulldozers;
- graders;
- scrapers;
- rippers;
- drilling machines.
Also included in the technique of mechanization of soil development are auxiliary machines designed for its transportation.
Slope fastening technology
Fastening pit slopes
Collapse of pit walls can be caused by various factors: precipitation, low density and high soil moisture, vibration. To prevent collapse, the walls of the pits are strengthened. The method depends on the excavation depth and geodetic data of the site. The walls are fenced around the perimeter with the following materials:
- pipes;
- tongue and groove of various types (Larsen, flat);
- piles;
- rolled metal;
- reinforced concrete structures.
Sheet piling is more economical than constructing a concrete structure. Metal fencing is quicker to construct and can be dismantled and reused. A common option is to install pipes. They are hammered around the perimeter with a diesel hammer or a hydraulic hammer installation.
When strengthening pits with pipes, if necessary, they are filled with boards (so that the soil does not spill out). When using lumber, fewer metal products are required; part of the walls is covered with boards. In narrow trenches, the sheet pile is strengthened with spacers. Larsen sheet pile creates an airtight barrier and is recommended when there is a threat of groundwater flooding.
For small houses or outbuildings that require a shallow foundation, you can build a trench yourself. Buildings with several floors and a basement require complex calculations and large-scale work at the stage of soil development. It is better to contact specialists who know how to dig pits correctly.
Choosing the time of year to dig a pit or trench
Experts recommend planning the development of soil for the foundation in the summer or autumn. At this time, the soil is as soft as possible and lends itself to digging.
In winter, foundation construction is impossible due to frozen soil. If you plan work for a given period, their cost increases several times. Also, constructing a trench or pit in winter becomes more difficult due to the need to complete the laying of foundation blocks or pouring a monolithic structure as soon as possible. They should not freeze, which will negatively affect their load-bearing capacity.
Also in winter, it is important to immediately provide for the process of removing excess soil. Otherwise it will freeze and it will be very difficult to remove it.