Its construction will be inexpensive, but it will be possible to store materials and harvests in the room. We will tell you more about the construction of a cellar (basement) in a house with a strip foundation in the article.
Construction of a foundation for a house with a basement
The basement structure is actually the foundation for the entire house. The load is transferred through the walls to the soil foundation. Before construction begins, engineering surveys are carried out to determine the type of soil, its bearing capacity, and the depth of groundwater.
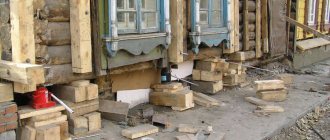
The last characteristic is fundamental for deciding to build a basement. With a high groundwater level, its construction is a risky undertaking. No matter how well and correctly the waterproofing is done, there is a high probability of leaks after some time from the start of operation. It is recommended to raise the ground floor level above the groundwater level by at least 0.5 m.
Strip foundation with basement Source analytspectr.ru
Construction of a foundation for a house with a basement includes the following steps:
- Preparatory work - cleaning, leveling the site, cutting and transferring the fertile soil layer to a dump for composting, moving communications, purchasing and storing materials.
- Marking the house plan on the ground, laying out the axes, installing cast-offs.
- Excavation work - digging a pit, transporting earth, backfilling.
- Construction work - laying out the foundation for the basement, erecting walls, installing floors.
- Drainage device.
- Waterproofing.
- Insulation, vapor barrier.
- Laying of communications, ventilation device.
- Interior finishing, staircase installation.
- External cladding, blind area.
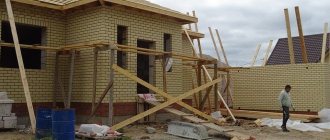
The construction of a basement under a house is equal in labor intensity and cost to the construction of a foundation with an above-ground floor. It can be located under the entire structure or part of it.
Excavation and drainage
After marking the foundation, they begin to dig a pit. Most often this is done mechanized - with an excavator or front loader. Manually digging and removing large volumes of soil is very labor-intensive.
Excavation work and the subsequent construction of the foundation should be carried out, if possible, without a temporary break in order to avoid the entry of surface water into the pit. Rain or melting snow leads to soaking of the soil, erosion of the pit walls, and flooding of the already installed reinforcement frame. A continuous border of earth 30-50 cm high is formed around the perimeter so that rainwater does not drain from the surrounding area.
Pit for the basement Source ko.decoratex.biz
If possible, dig a drainage channel 6-7 m long and an acceptance volume, and drill absorption wells. This will help prevent the base from getting wet.
The pit is dug to the depth of the basement floor mark (-1.2 or -1.5 m) plus the thickness of the sand or sand-gravel cushion and reinforced concrete base. Using a level, check the horizontalness of the bottom. After digging, it is compacted, covered with a layer of sand and gravel 20-25 cm thick, moistened, and compacted.
If necessary, retaining walls are installed to prevent soil collapse.
Drainage
The external drainage system is designed to drain water as it approaches the foundation. This is especially important if the soil on the site is clayey, there are ponds nearby, the house is on a slope, or the bottom of the foundation is buried 1.3 meters below ground level.
Wall foundation drainage Source zen.yandex.ru
See also: Catalog of companies that specialize in foundation repair and design.
External drainage redirects soil water to a wall or ring contour located at a distance of 1.5-2 meters from the foundation. It is advisable to carry out drainage in parallel with excavation work.
The ring system is a closed pipeline laid around the perimeter of the building, with a slope towards the storage well or collector. Water enters the pipes through the perforated walls. From the reservoir, the liquid enters the sewer system, or it is pumped off site or into a sewer truck. It is possible to drain water by gravity into a drainage ditch below the foundation level.
Calculation of foundation and wall thickness
Foundations and basement walls experience not only vertical loads from the house and their own weight, but also lateral soil pressure. Therefore, the work of the structure cannot be considered in the same way as in ordinary houses without basements.
All calculations must be carried out in advance Source vashdomnn52.ru
As a result of lateral impact, if the wall thickness and foundation width are insufficient, deformations, shift and tilt of the base, and subsidence of the soil under the supporting part are possible. This will lead to loss of stability of the structure and its destruction.
The calculation of the foundation of a house with a basement is described in detail in the “Manual for the Design of Buildings and Structures”, which provides examples of an algorithm for determining the optimal dimensions and reinforcement schemes for basement structures. If geological studies have not been carried out, the calculated soil resistance is taken with a large margin. Accordingly, the elements will have not only a significant reserve of strength, but also an overconsumption of materials. A rational solution is when the supporting part is wider than the foundation wall.
Online foundation calculator
To find out the approximate cost of a foundation for a house with a basement, use the following calculator:
Construction works
In private construction, strip and slab foundations with a basement are most common. The walls are erected from monolithic concrete or prefabricated elements - bricks, blocks.
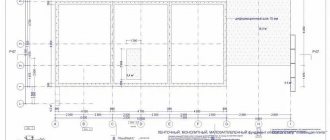
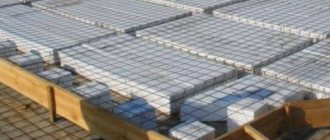
Foundation reinforcement project with basement Source builderclub.com
Construction works include:
- Construction of a reinforced monolithic slab or tape.
- Walling.
- Installation of floors made of wooden beams or reinforced concrete panels.
The slab is reinforced with one or two rows of mesh, the tape is reinforced with frames according to calculation. Concrete grade not lower than M200 is used. Monolithic walls are reinforced with vertical steel rods; in block or brick walls, wire or reinforcement is laid horizontally every 300-400 mm in height. L- and U-shaped metal elements are installed in corners and joints to absorb multidirectional stresses.
Floor installation Source 3.com.ua
Reinforced concrete slabs are supported on 2 opposite walls to a depth of 70-120 mm. Wooden floor beams are mounted in “sockets” or end-to-end using overhead elements. Wood is treated with antiseptics to prevent rotting.
Pile and strip foundations are suitable for constructing small cellars. In this case, the underground room is located under the house at some distance from the supports, so that the weakening of the soil thickness and the load from the walls do not lead to distortion or collapse of the foundations.
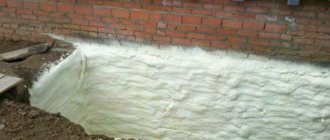
Waterproofing
Protection from moisture is the most important part of the work when building a basement. The joints of the walls and slabs are sealed with expanding tapes and special solutions.
Waterproofing Source custom-concrete.biz
Room arrangement
The arrangement of this type of room depends on its purpose . This will also depend on:
- base tape height,
- the presence of openings for technological purposes,
- the need to install embedded parts or enhanced waterproofing, as well as insulation.
The first stage of building a cellar is creating a pit. For basement floors, the ceiling height is 2.5-3 m. For a cellar, it is permissible to reduce this value to 1.8 meters, since it is a non-residential, semi-basement room.
To properly install a cellar with your own hands, you need to create a sketch of the building on a strip foundation. The following calculation conditions must be adhered to:
To calculate the total area of the formwork, you need to multiply the outer perimeter of the future building by the height of the walls. The resulting figure must be multiplied by 2 and added 10% for ties, spacers and other elements.- The presence of a reinforcing frame depends on the expected loads that will be exerted on the foundation.
- The strip foundation design must have at least 3 pairs of reinforcement bars that are laid along the perimeter of the cellar.
- To calculate the amount of concrete mixture required, it is necessary to calculate the volume of internal space inside the formwork and add 5% to the value.
Recommendations
Advice for developers from specialists with experience in the construction and operation of basements:
- For interior decoration, materials are used that are not afraid of dampness or have been treated against rotting.
- To go down to the basement you need to arrange a comfortable, non-steep staircase.
- It is recommended that the first floor floor be heated over the ceiling with full thermal insulation.
- It is advisable to insulate the blind area and drain surface water into a drainage ditch or perforated pipe.
A properly equipped basement will be a great place to relax Source mysticirelandusa.com
Features of the basement
SNiP from 1989, which contained the term “ground floor”, is no longer valid. However, the fundamental difference between this part of the house and the basement indicated in it is still “alive”.
It lies in the height of the underground part. So, the basement can be almost completely below ground level. When constructing a basement floor, it is possible to deepen it to no more than ½ the height of its walls. This determines the characteristic features of its construction.
The ground floor or ground floor , as it is often called, should be:
- Insulated. Otherwise, when the soil freezes, significant heat loss will occur.
- Protected from moisture. Foundation walls buried in the ground experience its constant destructive effects. Groundwater, precipitation, snow melting - you can’t do without high-quality waterproofing.
- Well ventilated. Ventilation can be natural or supply and exhaust. Provides normalization of the microclimate in the premises of the ground floor.
- Illuminated. We are talking about windows. They not only make the interior more comfortable, but also provide additional ventilation to the underground part of the house.
If all these requirements are met, the ground floor can become residential, comfortable for a long stay.
Construction over part of the house and over the entire area
A strip foundation allows you to create a basement both under the entire house along the perimeter of the external walls, and under part of it.
There are individual cases of constructing underground premises that exceed the size of the above-ground part of the house, but they require separate consideration due to the complexity of calculations and construction .
In most cases, when the size of the basement is smaller than the total area of the base, the depth of the tape is taken according to the conditions of the building parameters. For the basement, a separate pit is dug with a deeper foundation, creating a sufficient height for the room
The pit is inscribed in the general perimeter of the belt. This option is used in cases where it is possible to use a shallow version of the tape .
If it is necessary to build a full-fledged buried foundation, the basement is formed by removing soil in the desired section of the tape.
Groundwater
If building a cellar on a plot allows you to choose its location, then building under an existing house, for obvious reasons, gives a minimum of freedom. The choice comes down to a simple “to dig or not to dig.”
What might influence the decision?
- Soil type . If the house is on a rocky foundation, digging a cellar is an almost hopeless undertaking. We are not talking about bringing in heavy equipment: you can’t drive an excavator into the room.
- Groundwater height . No matter how high-quality the waterproofing is, sooner or later, if the level is high, the basement will begin to flood.
Please note: Generally, the height of groundwater varies throughout the year and reaches its maximum level in winter. It is desirable that the bottom of the cellar be at least half a meter higher than the top mark.
How do you know how high the water rises?
- Interview your neighbors. Perhaps some of them have a well or water well.
- Conduct test drilling.
- A simple experiment will give a rough estimate. After several days of dry weather, it is enough to cover the area of soil near the house with plastic film at night. The appearance of condensation on its lower surface will indicate the proximity of water; if the film remains dry, you can safely dig.
It's definitely not worth digging a cellar here.
Storage floor
The most common option is to install a concrete floor. Arranging such a surface, of course, will not provide 100% waterproofing of the room, although concrete has many advantages over a ground floor, which are visible already at the construction stage:
After the reinforcing mesh is assembled, concrete can be poured.
- Anaerobic bacteria can emit gases that are potentially dangerous to humans, which will never enter the cellar through the concrete floor.
- A variety of pests will also not be able to enter the storage facility through the concrete surface, so installing such a floor is the right solution if you are concerned about this problem.
- Even large rodents cannot destroy a concrete floor.
- During high water, when the dirt floors simply begin to slip away from under your feet, the concrete surface will remain in place.
The construction of a concrete floor in a cellar in a private house involves the following steps:
- The first step is to dig a pit, decide on the size of the cellar and level the bottom of the hole.
- Next, you need to make a sand cushion, the thickness of which should not exceed 20 cm. It is compacted using available tools and water. The cushion must be firm and level, otherwise the concrete floor will undergo deformation in the future.
- Then it is recommended to lay a layer of gravel, which also needs to be thoroughly compacted and made as even as possible. The arrangement of this layer will ensure high reliability of the surface and the cellar under the house will not be subject to deformation.
- Waterproofing material is laid overlapping on the gravel-sand cushion (special polyethylene or roofing felt can be used). This is necessary not only as a barrier from groundwater, but so that the cement laitance does not go into the lower layers after pouring the solution. Thanks to this approach, concrete gains maximum strength. Of course, this will not provide an absolute guarantee against moisture penetration into the premises, but at least it will reduce the risks as much as possible.
- A stack of reinforcement is placed on the waterproofing layer. The thickness of the reinforcement bars should be 5 mm or more. Reinforcement of the floor surface ensures the resistance of the surface and its durability during operation.
- Finally, the floor is poured with cement mortar about 10-15 cm thick. You need to understand that the coating will gain working strength only after a few weeks. For the first days after completion of work, walking on such a floor is prohibited.
General installation diagram
The construction of basements is carried out simultaneously with the construction of the general foundation. This allows you to obtain a strong, monolithic base with maximum load-bearing capacity and resistance to external loads.
There is a technique for constructing prefabricated belts with basements that uses foundation blocks (FBS), but this technology is mainly used for the construction of massive multi-story buildings.
Let's consider the procedure for pouring a monolithic concrete strip:
- Preparing the site, marking, digging a pit.
- Preparing a trench for the tape at the bottom of the pit.
- Creating a layer of sand backfill.
- Laying a layer of waterproofing.
- Installation of formwork.
- Creation of a reinforcing frame.
- Pouring concrete.
- Allow the concrete strip to cure until the material hardens completely.
- Stripping, applying waterproofing.
- Further work.
The procedure is indicated schematically, without details . Details depend on specific conditions, hydrogeological conditions, soil composition, etc.
Several additional actions may be necessary - drainage, insulation or other operations that are applied as necessary and according to design data.
Installation of formwork
The construction of the formwork is usually carried out directly on site. The material is wood (edged board 25-40 mm thick) or plywood .
Shields are assembled, the width of which corresponds to the height of the tape with some technological margin. The assembled panels are installed in their places, aligned along the axes of the tape and fixed with stops in increments of 0.7-1.2 m. The distance between them determines the thickness of the tape and is fixed with crossbars. When assembling, it is necessary to ensure maximum density.
Gaps or gaps larger than 3 mm are not permitted . If large gaps appear, use tow or fill the gaps with wooden slats. The installation of the formwork is carried out carefully and firmly so that when pouring it is possible to withstand the loads and weight of the concrete.
IMPORTANT!
Plywood formwork allows you to obtain maximum quality tape, a simpler and more airtight structure.
Ventilation issue
Ventilation of basements is carried out, as a rule, using ventilation ducts. Ventilation ducts are made of brickwork with a certain cross-section or from other suitable materials (corrugations, plastic pipes, etc.).
The exhaust pipe is installed under the basement ceiling. Its upper part should extend onto the roof of the house and be located as high as possible. To improve the draft of the basement exhaust pipe, it is necessary to lay it in close proximity to the smoke ducts (for example, the duct of a heating boiler). The upper part of the supply pipe can be placed in the attic, and the lower part - under the basement floor. During the summer months, there is often a lack of natural draft, so many homeowners install a fan in the exhaust pipe.
In addition to ventilation ducts, ventilation of the basement can be done using vents, which can be presented in the form of small windows located in the basement wall. High humidity is eliminated by ventilation.
Waterproofing
Cutting off the tape from contact with water is a mandatory element that helps preserve the working qualities of the material and increase the service life of the base. The traditional method of waterproofing , which has been used for many decades, is to apply a layer of heated (molten) tar to the side surfaces.
To cut off horizontal surfaces, a double layer of roofing material is used, glued inside with bitumen mastic. The bottom layer is laid before installing the armored belt, and the top layer is applied after curing and hardening of the material.
Modern materials for waterproofing make it possible to form high-quality protection for concrete from moisture . The most effective are impregnations that penetrate the surface layer of the material and completely eliminate the possibility of capillary penetration of water into it.
NOTE!
Most builders do not yet trust new and little-tested means, preferring proven methods - applying a layer of bitumen mastic or hot tar.
Insulation of the cellar
Insulating the ceilings of the cellar will allow you to safely store various products; they will not be frozen even in winter. The most commonly used tile materials are polystyrene foam, polystyrene foam and their analogues. It is best to install panels with a density of 25 kg/m³ or higher.
This is interesting: what needs to be insulated in the cellar from freezing.
It is also possible to use mineral wool, but if the humidity is too high, it will lose its properties in 1-2 years, so good preliminary waterproofing will be required.
Spraying a layer of polyurethane foam is the most reliable method, since the resulting coating will be seamless, and the material itself does not absorb moisture at all and retains heat well. But its cost is quite high when compared with mineral wool and polystyrene foam.
The main method of insulation involves creating a frame from wooden blocks or a galvanized metal profile, which is attached to the walls and ceiling.
Insulation is placed in the cells of the sheathing, after which it is recommended to stretch polyethylene film, and lay sheet plywood, boards made of boards on top, or simply glue the mounting mesh if solid materials (foam plastic or analogues) were used as insulation. After this, the wall surfaces can be plastered.
Ladder and manhole cover
The simplest solution to the question of how to easily build a staircase in a cellar is to use boards and bars of wood. If desired, you can use concrete or even metal. It all depends on personal preferences and capabilities.
It should be noted that wood will require impregnation with special compounds (to prevent rotting), and metal will require painting with a primer.
There are many types of stairs, for example:
- stationary wooden;
- complex concrete staircase;
- retractable.
Don't forget about the hatch
The hatch cover can be made hinged (hinged) or completely removable, it depends on how large the hole is inside and where it is located.
Overlap
Laying finished floor slabs over a cellar in a house is understandably somewhat difficult. In most cases, the ceiling is made of wood; The thickness of the beams allows you to lay insulation, which reliably insulates the cool subfloor from the heat of living quarters.
The structure of an insulated wooden floor.
How to do this work yourself?
- A solid panel is sewn to the floor beams from below - plank, plywood or OSB. It is better to use self-tapping screws for fastening; if for some reason you prefer nails, drive them staggered at an angle to the vertical.
- The shield is covered with a vapor barrier film. It ensures that there is no filtration of water vapor from a warmer room.
- Then insulation is laid between the beams - polystyrene foam, mineral wool or glass wool. It is better to focus on an insulation thickness of at least 100 millimeters: the better the cellar is thermally insulated, the safer the food in it will be.
- On top, the insulation is covered with waterproofing (the same dense polyethylene); a load-bearing flooring (again, boards, plywood or OSB) and a finishing coating are laid on top of the waterproofing material.
The access to the cellar is equipped with a double hatch; as an option, you can assemble a two-layer lid with insulation inside.