Necessary tool
Jigsaw Screwdriver Tape measure, pencil Bolts M10x100.
Wrench 17 For furniture bolts M10x100 I used an M10 nut with a nylon sealing insert and three washers.
You will also need some tie-down tape to keep the sawhorses from moving apart. I used welded chain.
When cutting wood using a two-handed saw, a stable support for the second hand is required. This should be taken care of in advance when assembling the device.
It is possible to make a stop from wood that can be installed in any desired place.
Using our recommendations on how to make a sawhorse, you will create a stable structure, and cutting firewood on it will be a pleasure. You can also view ready-made sketches, photo and video materials on the Internet.
Equally important is the correct use of sawhorses. You should not load too massive and heavy logs on it.
The folding design of the sawhorses is suitable for cutting firewood using a hand saw or chainsaw. This device is simply indispensable in the homestead for collecting firewood and stove logs to light the stove, barbecue or fireplace in the house.
Save the article to your page:
Post published: 29.10
Types of metal scaffolding:
- Pin,
- Khomutovy,
- Frame,
- Wedge (have one of the most complex connections, in the form of disks welded to straight posts and pipes. The lock is located on the disk, the wedge fits into the hole. The advantage of such scaffolding is that they are very easy to assemble and disassemble, and move to another place.)
Preparation of firewood for the winter is familiar to almost every rural resident and land owner. And of course, for convenient sawing of firewood you need a special tool called a sawhorse.
Surely many have seen photos of sawhorses for firewood in magazines or on the Internet. This is not a complicated device that you can build with your own hands, and besides, it should certainly be in the household.
With their help, it is convenient to process wood, wooden blocks or metal profiles.
Solving the question of what to make a goat out of at the dacha is quite easy. Indeed, to make this simple traditional design, it is enough to use the following materials:
- a wooden beam of a regular shape. Assembling a device from this material is simple, but it is susceptible to high humidity.
- wooden posts of medium diameter, which are used to build fences. This method is financially economical, but do not count on its reliability.
- metal strips that will ensure the reliability of the structure and will serve for many years.
- various items sent for scrap.
Although the sawmill for sawing wood has a simple design, it is essentially a machine. Therefore, in the process of its manufacture it is necessary to take into account some nuances:
it is necessary to have a plan (drawing) of the future structure with step-by-step instructions and calculation of the dimensions of all parts. It is important to correctly calculate the inclination of the supporting elements for ease of use.
When assembling, the main thing to consider is the size of the equipment, which depends on:
- human height,
- parameters of the future device,
- strength and size of the wood requiring processing.
Depending on this, the length of working time spent will be determined.
We invite you to familiarize yourself with the process of insulating a wooden house with your own hands, from the outside
A device with a height of 90-110 cm is considered a win-win option. As a result, the person working behind it will not have to lean forward too much, and the hands will not get too tired due to the horizontal position.
There will be minimal stress on the spine, and the work process will become much easier.
Country furniture from nothing
Let’s imagine something wonderful: you bought a dacha. Or rented a house for a couple of months. Alas, rarely does anyone sell and rent out Russian country houses with luxurious furniture. At best, you will get shabby chairs and dry cabinets. But don’t rush to furniture hypermarkets for cheap furnishings. Look around: interesting furniture can be made from anything.
Almost.
It all starts with a hanger
The cottage may be different. Maybe with lace napkins and Gzhel, or maybe with racks of boxes and timber as a hanger-shelf. Why not? As you can see, various unexpected objects can play the role of hooks - be it nails or hammers.
Advice: if you like the idea of a beam, take into account the significant weight of the material when calculating the fastening. A six-meter pine beam with a cross-section of 20 by 20 cm weighs about 210 kg! And 10 by 10 cm is a little more than 50 kg.
The more unusual the hook on such a designer hanger, the better. As long as this does not affect the ease of use.
A compromise option for thin walls is decorative hooks on an old board (for example, a picket fence).
You can also make an impressive frame for a mirror in the hallway from textured wood.
Sleeping area
If you have a bed or mattress, that’s good. All that remains is to decorate the sleeping area with an original headboard. For this purpose, scraps of boards, painted and arranged into a figured composition, will be useful. However, old lumber does not need to be brought into a civilized form, but, on the contrary, you can choose colorful, “beaten by life” specimens.
Massive slabs, dry birch trunks and thin bent poles look impressive at the headboard. Please note that this decorative technique is based on obvious dissonance, so if you have made a deliberately “street” headboard, let it be the only brutal element in the sleeping area. Otherwise, the comfort will leave the room.
Are there any leftover sawings from the arrangement of garden paths? Spread them into “cakes” 3-5 cm thick - you will get a chic decorative material for the headboard.
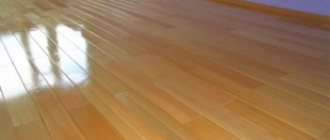
If for paths it is important to use hard varieties - oak, larch, then in the house any options are acceptable. Cracks will only add color to this decor. Wood can be aged - brushed and painted.
There are a lot of folk techniques that make it possible to give “solidity” to wooden products - they are aged using solutions of copper sulfate, iodine, metal salts, even hair dye. The most reliable way is two-layer painting with varnish glaze.
If you don’t want to throw the mattress on the floor, build a podium. The minimum height of the bed is 30 cm, the maximum is 75. For example, the remaining timber will work as a podium. But remember that not every floor can support a bed weighing a ton.
A bed frame made of bars, plywood and boards will be much lighter than a monolithic solid. And in production this design is very simple. Don’t be afraid of the handicraft look of the product - what in a city apartment looks like a challenge to “European-quality renovation”, in the countryside looks like cute fun without pretensions.
Advice:
Wide Euro pallets will work as the headboard of a wooden bed. Be sure to sand the wood, treat it with an antiseptic against fungus and bugs, and cover it with varnish - glossy or colorless matte.
Sofa
Pallets have proven themselves especially well as frames for sofa areas. It’s clear: if a homemade chair made from a pallet can be replaced with a cheap plastic one, then you won’t be able to do the same with a sofa.
Table
Place pallets on top of each other and you get a spacious table. Screw the roller wheels to the pallet - and now you have a mobile design table. Cover it on top with a sheet of plexiglass or glass - dirt will not be absorbed into the wood, and nothing will fall through the cracks.
But you don’t have to go for pallets specifically for the table - you can make one from an old door. The more worn the canvas, the more colorful the tabletop will be. If you are happy with a small table, then there is no need to look for legs for it - just cut the door leaf into three parts and fasten it with corners from the inside.
An old suitcase living out its life in the attic will also make an excellent coffee table with decent capacity. And two or three suitcases will make a chest of drawers or a bedside table.
A table can be made from a woodpile, having previously treated each log so that the gluing area is sufficient.
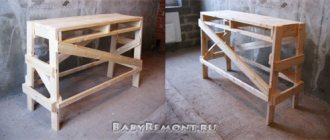
How to do it yourself?
The most practical and inexpensive option for a construction trestle, which can be made with your own hands, is a folding wooden one. It takes up minimal space and can also be used when working in a country house or apartment. The first thing you should decide on is the height of the legs, it is equal to the height of a person minus 10-12 cm. You can arbitrarily determine the number of spacers and the beam section.
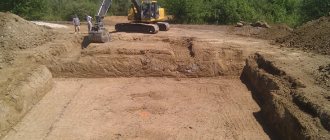
The upper ends of the frame can be connected using door-type hinges. To fix the legs, you should think about a limiter. A couple of pieces of rafter tape are taken and then fixed to the spacers below. The distance should be such as to maintain the stability of the structure. To fix the elements to each other, you can take nails and then bend them on the back side. But in order for the device to be practical and reliable, it is worth using self-tapping screws.
The next step is to prepare the site, the dimensions of which should be selected according to your preferences. It should be able to withstand from 150 to 170 kilograms, and its dimensions should be selected in such a way that the device easily fits into the doorway. The approximate width of the site should be 0.7 meters. To acquire a high-quality construction sawhorse, you will need to prepare no more than 150 centimeters of edged board.
Detailed assembly instructions.
- Markings are made on the legs, and excess wood is cut at an angle on both sides. At the same time, do not forget about the parallelism of the cuts.
- Using one leg as an example, it’s worth making the rest.
- A check is made to ensure that the upper ends are at an angle of 90 degrees.
- Future spacers are marked with angles of 80 degrees at one end and 100 degrees at the other.
- After preparing the blanks, it is worth cutting a place on them for the top board.
- The legs must be connected in the form of scissors, after which the rotation axes must be drilled into them. In the latter case, it is worth not tightening the bolts completely so that the legs can open and close.
- Spacers are made between the prepared legs. You should get two spacers on the wide side, one on the narrow side. A tie belt must be attached to them on the bottom side.
- Once one support is ready, you can begin assembling the second.
Many construction and renovation jobs involve heights, as the worker constantly has to reach. A ladder and a stepladder limit your freedom of action, but a construction sawhorse is a completely different matter.
You can see how to make construction trestles with your own hands in the following video.
Leg assembly and fitting
The performance of the device depends on the quality of the marking of the hole for the bolt. Therefore, preliminary fitting using technology is necessary:
- the leg is placed on the table so that the cutout hangs over the tabletop (you can use a stool, chair)
- the support bar (upper) is installed vertically in the groove
- a second leg is added on top of the first (the bar should fit snugly into the cutouts in both parts)
- the structure is temporarily tightened with a clamp
Then the following operations are performed:
- Using a vertical square, the intersection of the legs is transferred to the side surface on both sides of the structure
- the resulting points are connected by a line, which becomes the vertical axis of rotation
- the longitudinal axis of the leg is marked with a square
- at the intersection of these lines there will be a center for the hole of the M10 bolt, which is the hinge of the connection
Attention: The holes must be perpendicular to the plane of the boards, so a jig is required. They can serve as a cut in a block pressed to the leg with a self-tapping screw or clamp
If the hole is inclined, the legs will not be able to transform into the working position.
The legs are assembled in stages:
- the bolt goes through one piece
- two washers are put on it to facilitate the rotation of the wooden elements relative to each other
- the second leg is put on the threaded part
- the hinge joint is secured with a nut
The result is a set of two legs, into the cuts of which a support bar is easily inserted from above.
Work schedule
The beam for making the base needs to be marked for 12 cuts - 6 pieces on each side, their depth should be about 2.5 cm, they will act as grooves for the horns with legs.
Goat design diagram
After this, the cuts are knocked out using a chisel, sawn bars are inserted into the formed grooves, and everything is fixed at this point using self-tapping screws.
On bars with an inch cross-section, places for attaching amplifiers are marked; they will prevent the legs from diverging. Using a hacksaw, excess sections are sawed off, and the foreman selects the length of the legs. When the wood saws are ready, they need to be treated with stain and dried, after which the device is ready for use.
Standard goats are quite large in size and weight, which does not always allow them to be transported. This is why many people prefer to buy or build a mobile unit that can be easily transported.
But you should immediately take into account that the manufacture of such a design will take more time. All they need is:
- 4 wooden blocks of medium diameter;
- metal pipe 1.5 meters long;
- strong rope or cable;
- durable wood drill bit.
The assembly of the structure always begins with the beams. On them you need to mark the location of the cut, where the legs will then be installed. After drilling the planks, the base is inserted into them, then the legs are installed in place. Finally, a limiter is made for the racks to prevent deformation of the legs.
Upper platform of the trestles
There are only a few requirements for it - it must be as level as possible, stable and able to withstand the weight of a person standing on it. In addition, you need to take into account a lot of tools, buckets of paint, plaster, etc. The optimal load will be at least 150 kg. The width of the platform should not be wider than the doorways, and the height should not exceed 1.5 m, otherwise it will be inconvenient to deploy the trestles around the perimeter.
On average, it takes about 13-14 meters of edged boards to make a scaffold. As a result of such expenses, you will receive a reliable design that will be useful for any repair or as a substitute for a stepladder.
The upper part of the stage should not be too narrow or wide Source yandex.net
Making goats
Cutting parts
We mark out parts for cutting plywood.
Explanations for color detailing
- Green: tops 844*90 mm - (2 pcs needed);
- Yellow: bottom support cross member 711 x 90 mm (originally intended 711 x 180 mm);
- Orange: top crossbars 844 x 90 mm (originally intended 844 x 180 mm);
- Blue: legs. 844 *90 mm - 8 pieces;
- Pink: parts for making wall mounts;
- White: waste.
We cut the workpieces on a sawing machine, a circular saw or other devices.
Sidewall assembly
To begin with, a piece of plywood 80 x 200 mm was cut out; it acts as a marking template when making joints of parts.
At this stage, the task is to connect the support legs with the upper and lower crossbars. When installing the upper crossbar, it is recommended to attach hinges so that in the future the screws for fastening the hinges do not fall on the screws for fastening the plywood blanks.
We drill the fastening points of the self-tapping screws with a drill of a smaller diameter, countersink the holes in order to hide the heads of the screws in the future. PVA wood glue was also used to connect the parts, a small amount of glue was applied to the joint, the workpiece was applied and tightened with self-tapping screws.
Side connection
After the sidewalls have been made, you can fasten them together using furniture hinges. thereby producing a folding and unfolding mechanism.
Then we screw the upper support pad to the end of one of the sidewalls. It is not necessary for both, otherwise the opening and closing mechanism will not work.
Making an opening limiter
For safety when working on sawhorses, when they are opened more than 20 degrees, an opening limiter was invented. It is made of polypropylene rope, because this material is inelastic, durable and inexpensive. To make the limiter, we drill holes in each leg in the area of the lower support, and thread polypropylene rope through one leg and then into the second leg. We tighten the knot on the rope and melt it using a regular lighter.
Do-it-yourself production budget
For trestles with a height of 0.8 m, the following dimensions are valid:
- legs (4 pcs.) – 0.95 m
- top crossbar – 0.9 m
- spacers (3 pcs.) – 0.85 m, 0.77 m and 0.7 m
Therefore, to manufacture two sets of devices you will need lumber and fasteners in the following quantities:
- board 95 x 45 mm – 5 pieces 2 m each
- board 90 x 20 mm – 1 piece 2 m
- board 90 x20 – 1 piece 3 m
- furniture bolt M10 x 100 with nut – 4 pieces
- M10 washers – 12 pieces
- self-tapping screws 4 x 45 – 50 pieces (for wood)
- belt – 2 pieces
Attention: The main problem when buying boards is choosing dry wood with stable geometry. The trestles do not have a rigid frame, so “propellers”, boards with a difference in thickness, or chips are not suitable
An approximate estimate for the production of universal folding trestles is as follows:
- belt – 140 rub. (2 pieces per pack)
- bolts included – 75 RUR.
- self-tapping screws – 30 rub.
- board – 1000 rub.
You can meet the amount of 1.25 thousand rubles, that is, at least four times cheaper than when buying ready-made trestles.
Self-production of construction trestles: Instructions + Photos and Videos
Construction trestles - how to make them yourself? Many works related to repairs and construction must take place on an elevated surface. The first thing you come across is a stepladder, but it greatly limits your options. For this purpose, they came up with trestles and scaffolds, because even two people can stand on them, as well as all the necessary tools that are needed in the public domain. Since goat-building production is not yet so widely developed, you can learn how to assemble construction trestles with your own hands.
Construction trestles are a practical solution that allows you to be on a hill and move freely.
General information
Nothing can compete with goats in this. They can be made from:
- Trees,
- metal,
- Mixed (wood and metal).
What types of goats are there?
There are two types of construction scaffolds:
- Foldable. Very comfortable, compact trestles when folded are very convenient to store. But you should also be careful with them; they should always be checked for stability.
- Not foldable. They are extremely convenient to work on and stable, as they represent a single support. But in this case it will not be very convenient to store them.
Aluminum trestles are quite difficult and cost-effective to install at home. Therefore, wooden goats are a good option. After all, wood is very practical and convenient.
Installation
For installation you will need:
- Scheme,
- Tape measure (for measuring wooden panels before starting work),
- Saw (used to cut boards),
- Pencil (for marking),
- Drill (for fastening boards with screws; when working with electric tools, you must know and follow safety precautions),
- Screws,
- Bolts, nuts, etc.
- Carpenter's Corner,
- Wooden material.
Assembly diagram
- Place two more boards in the shape of a rectangle on the inverted structure and connect them. It turns out to be flooring or an area for work.
- Take four more wooden panels with dimensions 1100x100x30 and attach them at the ends. The result is a structure somewhat reminiscent of a table.
- The next step is to strengthen the structure with boards 1700x100x30mm and 1500x50x30mm. They must be attached so that the opposite reinforcements are in different diagonals.
- And the last point is attaching the ladder. For more convenient operation, the steps at the bottom can be made with a small protrusion. You select the length of the stairs based on individual preferences.
- That's it, your goats are ready. But for safe construction and repair work they need to be checked. To do this, we place any objects with a large weight on the surface; if the trestles can withstand it, then you can not be afraid and safely use them in installation.
Features of metal goats
Types of metal scaffolding:
- Pin,
- Khomutovy,
- Frame,
- Wedge (have one of the most complex connections, in the form of disks welded to straight posts and pipes. The lock is located on the disk, the wedge fits into the hole. The advantage of such scaffolding is that they are very easy to assemble and disassemble, and move to another place.)
You can also purchase materials for self-assembly, or already manufactured parts that just need to be fastened together.
Types and components of metal scaffolding
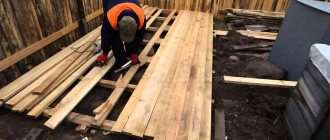
When building a house from stone or building blocks, metal scaffolding is more suitable. They are able to withstand any load. They are less popular only for the reason that in many regions wood is still the cheapest type of building materials. The second point, which is often decisive, is that after dismantling the wooden scaffolding, the boards can be put to work - used in further construction. And metal parts should gather dust in the shed.
But metal scaffolding also has its advantages. When disassembled, they do not take up much space. Owners of wooden houses still have to use them periodically: the log house requires maintenance, so scaffolding is needed every two to three years. In this case, it is more practical to use metal rather than wooden ones. They are easier to assemble, more durable and stronger.
All metal scaffolding has the same shape - vertical posts connected by crossbars and slopes. The only difference is the way the parts are attached to each other:
Pin scaffolding. They are called so because the crossbars and posts are connected using pins. Pieces of pipe or perforated disks are welded on the racks, and bent pins are on the crossbars. This system is very easy to assemble and can withstand heavy loads. Pin scaffolding for buildings of simple shape is very easy to implement; going around bay windows and projections is much more difficult. The principle of connecting pin scaffolds Clamps. For racks and crossbars, round pipes are used, which are fastened together using specially designed clamps. The system turns out to be very mobile and movable; you can easily get around any curved facades. The downside is the limited load capacity and height (according to GOST - no higher than 40 meters). Clamp scaffolding - quick installation/dismantling Frame scaffolding. Frames of the same size are welded from a round or rectangular pipe. They are connected to each other by transverse pipes and jibs. They have a modular structure and can be easily expanded both in height and in length. They have a certain step in length - 1.5/2/2.5/3 meters, in height one section is usually 2 meters, the standard depth is 1 m. Some frames have wheels for easier movement on a flat surface. Connection of flag-type elements - pins with a slot into which the flag is inserted are welded on the frame. Holes are made in the crossbars and slopes. The elements are put on a pin and secured with a flag. Sections are built up using connecting pipes of smaller diameter, welded to the frame posts on one side. With this method, it is important to have perfectly selected pipe sizes so that there is no backlash. Frame scaffolding - the principle of fastening the crossbars and wedges. Although generally similar, the designs differ in the form of the connection. On the jays with a certain pitch (usually 2 meters), perforated discs are welded. Special cleft-mouth type locks are welded onto the jumpers at both ends. The locks are fixed to the disk using a specially shaped wedge. Such scaffolding connects and disconnects quickly, has high mobility, and can be used on facades of complex shapes. Wedge scaffolding racks and crossbars are connected using wedges and specially shaped locks
When making metal scaffolding yourself, pin scaffolding is most often used. They are the easiest to implement, however, they are only good on rectangular facades; to bypass more complex shapes, you have to weld additional tubes.
Design and use cases
Unlike classic trestles, universal trestles are folding, which makes storage and transportation easier. The design of the carpentry and construction device is as follows:
- legs with spacers, hingedly connected to each other
- removable support bar
- belt tie at the bottom
The device allows you to harvest firewood, cut long lumber and support scaffolding panels (you will need 2 pairs of trestles) by default. A wooden table top can be attached to the support crossbar to accommodate power tools (for example, a cross-cut machine, a drilling machine, a sharpening machine).
If you assemble a lightweight frame from boards or plywood, you can build a large-sized carpentry table-workbench from two trestles for assembling furniture.
Cutouts in the support strip allow you to work with tubular workpieces and press the lamellas of the joinery parts being glued together. On one side of the trestles you can attach a sheet of plywood, gypsum board, OSB for marking, straight or figured cut.
Selection of materials for scaffolding
The wood must be of high quality, dry, without knots, rot or cracks.
It is best to use edged boards and beams made of pine. Nails are usually used as fasteners, but it is better to use self-tapping screws. Unlike nails, connections on screws do not become loose, and this is important. Especially if the scaffolding is often moved. I recommend: How to properly prepare for painting and what to paint wooden floorboards with? (Question)
However, nails will also come in handy. But more on this in the section on performing work.
Metal sawhorses for cutting wood
Metal products are compact in size, have a long service life, and are highly reliable. Small specimens intended for processing small volumes of wood, and larger machines for large-scale production are made from this material. The cost of a homemade model using scrap metal waste is low.
To make them at home, you need to prepare the following materials and tools:
- profile corner 50x50 mm, pipe of similar characteristics;
- grinder, hacksaw;
- measuring tape;
- connecting bolts, welding machine.
A sketch is drawn up listing the main elements and the mandatory marking of each of them. The design of the upcoming product may be different, but in order to give greater durability, two additional profile elements at an angle or a transverse beam of the base are additionally installed. For example, from a piece of pipe. In the second case, it is necessary to protect the saw teeth from contact with the beam, so at the final stage of assembly, a piece of timber is secured on top.
The fastening points are marked by welding or bolts. If a bolted connection is provided, then additionally indicate the location of the holes. A system assembled by welding is one-piece; a dismountable system is more mobile.
All parts are cut according to the intended dimensions using welding or a grinder. To prevent sliding and turning of the logs while sawing, a jagged edge is prepared on the inner side of the outer legs. For the safety of further work, the cut sites are processed, removing scale, burrs, and other defects from each edge. The product is being assembled. To protect against rust, non-demountable structures are treated with an anti-corrosion compound.
You can build a mobile version of folding trestles from metal. The simpler the design, the less often the device breaks down, so this type of machine is manufactured as simply as possible. When folded, it takes up little space, is convenient to store and transport, but more manufacturing and assembly costs are required.
The main difference is the mobility of the X-shaped support; it can be folded like scissors. The bolts are not fully tightened, to prevent them from unscrewing spontaneously, an additional lock nut is installed. Installing a limiter helps fix the supports in the desired position. This can be a metal chain attached to one leg of the support, and a hook is made on the other to hook it.
We are drawing up a project for a gazebo made of timber
Any construction should begin with drawing up diagrams, plans, drawings. This will allow you to calculate the required amount of materials and prevent possible errors.
For clarity, it is convenient to create a three-dimensional model of the gazebo frame in any of the specialized programs, for example, KOMPAS-3D. For a square-shaped lean-to building, it will look something like the one below.
Three-dimensional model of a gazebo frame made of timber with a section of 100x100 mm
The following identical elements are separated into groups in the assembly:
- red – longitudinal bars of the lower trim;
- green - 3 transverse beams at the base of the gazebo and 2 for the top trim (the grooves of both are made identically);
- blue – 6 short vertical supports;
- yellow – 4 front pillars;
- purple – 2 upper horizontal bars on the sides.
How to do it yourself
To make a bed from timber, you need to familiarize yourself with the stages of the process, develop detailed drawings of the future product, purchase material and accessories. To work, you will need a standard set of tools and consumables.
Before making a bed, the dimensions of the location are taken, the dimensions of the bed are calculated according to the size of the mattress and the number of people who will use it, their height.
Materials and tools
First you need to purchase solid wood. At the same time, you need to monitor the quality of raw materials. The boards must be completely dry and free of bends and cracks. Boards needed:
- for making a frame 25x200x2400 mm - 4 pcs.;
- for support beams 50x100x2400 mm – 3 pcs.;
- for decorative finishing 25x50x2400 mm – 3 pcs.;
For the legs, it is recommended to purchase timber 100 by 100 and 2400 mm.
To create a slatted base you need to buy 19 planks 25x75x2400 mm.
In addition to lumber, you will need 3, 5 and 6 cm screws and metal corners. If solid oak is used, it is better to use ordinary nails for fastening.
To implement the plan you will need the following tool:
- tape measure, ruler, building level, square;
- circular or hand saw, electric jigsaw;
- drill or screwdriver;
- grinding machine, sandpaper;
- clamps;
- glue and putty for wood;
- varnish, stain, brushes and rollers.
Frame making
If the bed is planned to be made with legs, the production of a piece of furniture begins with their blanks. To do this, pieces of the required length are cut from 10x10 cm timber. At a height that corresponds to the size of the bed, metal corners are screwed on.
Then 2 pieces are cut from the 5x10 cm beams, the length of which is equal to the dimensions of the mattress. To calculate two more frame boards, subtract 10 cm from the width of the mattress. Then the blanks are placed in the right place and tightly secured to the corners, which are already screwed to the future legs.
The final stage of creating the frame is the installation of transverse boards, which will serve as a shock-absorbing base for the mattress, in increments of 5 cm.
Slats and back
Instead of a slatted base, you can make a base from lamellas, which are more flexible and can withstand heavy weight.
First, special supporting beams with a thickness of at least 4x4 cm are attached to the inside of the side boards of the frame using self-tapping screws in increments of 15 cm. The grooves in which the lamellas will be placed are first cut out in the timber, but this step can be dispensed with. Then all that remains is to screw the elements - and the frame is completely ready.
To simplify the manufacture of the headboard and footboard, a chipboard or MDF board is used, from which the header of the required shapes and sizes is cut out with a jigsaw, the edges are sanded and covered with veneer. If possible, it is advisable to make the backrest from wood, using various processing and finishing methods.
Finishing
Giving the finished product an aesthetic appearance is done by treating its surfaces, painting (staining) and opening with varnish. Even if the wood has undergone primary processing in advance, this is not enough to make the bed look beautiful and well-groomed.
Immediately after the frame and its components are ready, all elements are carefully polished with an electric machine and discs. First with a large coating, then with the finest. Finally, polishing is done with a felt disc.
Further finishing depends entirely on the choice of the owners: color, texture, matte or glossy surface, the presence of additional decorative details. All this is used in accordance with the original design.
Features of manufacturing wooden scaffolding
If you decide to make trestles from wood, then the step between the racks can be equal to the limit of 2 to 2.5 meters. As for the width of the flooring, it should be equivalent to one meter. You should not make the structure too high; the maximum height limit is 6 meters. To carry out the work, it is necessary to prepare boards 50 millimeters thick. As for their width, this figure should not appear less than 100 millimeters. You can replace such blanks with a square beam of 10 cm. The racks and stops can be based on round timber. Spacers and barriers are typically made from boards that are 30 millimeters or more thick.
Calculations and materials
You can buy sawhorses, both folding and regular, in almost any specialized store. But they most often have an aluminum base and are quite expensive. It is much easier and cheaper to make trestles for your dacha with your own hands. This is a relatively simple design that requires a minimum of carpentry skills from the manufacturer. In addition, homemade goats will not cost you a pretty penny, they can be easily adapted to the construction project you need, and they can also be easily used in the future if desired.
Goats from the store
You can assemble both metal and wooden trestles yourself. But we still recommend choosing the wooden version. Wood is much easier to work with and cheaper.
One of the first stages of work is the design and creation of a drawing. We strongly recommend that you do not carry out all the work “by eye” - it is very easy to make a mistake due to which your structure will turn out to be crooked and unstable. Well, or it won't work at all. Therefore, sketch out a detailed drawing on a piece of paper indicating all dimensions, immediately write down how much fasteners you need and how much base material you need. The drawing will also clearly allow you to see what the finished structure will look like.
A simple drawing of a folding trestle
At the first stage, it is important to determine the height of the future goats. Usually it is chosen depending on the person’s height
Traditionally, the height varies between 75-95 cm.
Your favorite desktop or workbench will also help you determine the height. If you have one and you often work with it and feel comfortable, then you can measure its height and make a sawhorse with exactly the same parameters.
Universal sawhorses
The support legs of a goat must be assembled at a certain angle relative to each other. This will increase the stability of the structure. Let's take the standard version with angles of 65 and 80 degrees. Based on the height and angles of the legs, it is already possible to calculate the parameters of the remaining parts. Thus, it turns out that for one goat you will need:
- legs 95 cm long - 4 pcs;
- upper support crossbar 90 cm - 1 piece;
- spacers - 2 on each side.
In addition, do not forget to buy fasteners. These are bolts, nuts, washers and screws. These elements will allow you to assemble a reliable structure. We do not recommend using nails - connections with them are less reliable and durable than with self-tapping screws. Nuts and bolts will be needed to connect the folding legs.
You can buy wood for the goats at your nearest hardware store, but you can also look at all sorts of scraps at your dacha. You most likely have them if you have done any construction work before. The board is suitable size 100x30 mm.
Do not use wood with obvious defects to create a goat.
Preparation
After creating the drawing, you need to decide how long the platform will be, and how many trestles will have to be made for it. Goats are always created from two or more - if the board being applied is long and can break in the middle.
3
Assembly diagram
To make the goats reliable and comfortable, you need to follow the following manufacturing scheme:
1. Place five boards 1500x100x30 mm and three boards 500x100x30 mm side by side on a flat surface. Place two short boards on edges so that the distance between their edges is 1500 mm. Place the third similar board in the middle, measuring the distance by eye. Lay two long boards on top of the short ones to create a rectangle. Align the central board, 500 mm long, using a tape measure so that it is exactly in the middle. Check the evenness of the structure, lay two more 1500 mm boards and connect them all with screws.2. Take two more boards 1500x100x30 mm. Turn the already assembled structure over with the short boards facing up. Lay the long boards on top to form a rectangular frame. Connect everything with self-tapping screws. The result is a flooring or work surface.3. Prepare four boards 1100x100x30 mm. Screw them to the work surface from the ends. The result is a structure similar to a table.4. We strengthen the structure with oblique crossbars made of boards 1700x100x30 mm and 700x100x30 mm and straight ones 1500x50x30 mm. They are screwed to the legs in such a way that the projections of oppositely located reinforcements intersect (in other words, they are in different diagonals).5. The last step is to screw in the steps, the function of which will be performed by 500x100x30 mm boards. For convenience, the lower steps are made with a projection, so two such boards are screwed to the legs of the trestle with blocks (bars 100x100x30 mm). The height of the steps can be chosen at your discretion.
So, the construction trestles are ready. Since work even at low heights is dangerous, the manufactured structure requires testing. To do this, you need to place a load on top that is larger than the one that will affect the structure during operation. Any heavy objects will do. If the goats have passed the test, then you can safely use them.
Design options
You can make different types of wooden scaffolding with your own hands; the choice of a specific option depends on the specifics of the upcoming work.
Scaffold
If you plan to decorate the house with lightweight materials, then scaffolding, the manufacture of which requires less material and time, is quite sufficient. There are two types of attached structures, the diagram of each resembles the letter G.
The location of the construction scaffolding varies:
- in one case, the short horizontal part of the letter L rests on the wall, and its vertical part is slightly recessed into the ground under the working load;
- in the second type of scaffolding, the vertical part of the letter G rests against the wall. The entire weight is concentrated on the thrust elements, the upper part of which is driven into a corner - the junction of the two main bars.
The structure is often called Armenian scaffolding, and the vertical part in them can be shortened, then the scaffolding takes on the shape of a triangle, the base of which rests on a board. The entire load is concentrated on it.
Despite the fact that the scaffolding does not seem very reliable, in practice its strength and ease of use have been repeatedly proven. Triangular scaffolding should be located every meter; if possible, they are nailed to the wall; if there is none, then they are fixed with stops. To ensure safety, the place where the thrust bars are immersed in the ground is additionally wedged.
To make sure that the scaffolding does not move sideways along the wall, the stops are additionally sewn together with bars, which increases the rigidity of the structure. All thrust bars and boards must have a thickness of at least 50 mm; boards with a thickness of at least 50 mm are also placed on the flooring. The horizontal surface is nailed or secured with self-tapping screws, otherwise it is dangerous to move on them.
Construction trestles
Wooden scaffolding with such an interesting name is known to everyone, because they are often used both on construction sites and during major renovations of apartments. The convenience of construction trestles lies in the fact that they do not rest on the wall and allow covering with siding and many other facing materials.
Standing on top of a trestle, you can attach both the top and bottom of the panels, then move the structure and continue working on an adjacent section of the wall. Cross members are placed between the posts of such wooden scaffolding; they strengthen the structure and at the same time serve as a ladder. The racks on one side can be fixed strictly vertically, which will allow you to place portable scaffolding close to the wall.
Nothing extra: mobile trash can
Forgive me for such a natural comparison, but do you know why the horses that drove chaises around the city had a bag tied under their tails? Yes, precisely for this reason, to keep the pavement clean. So my working goat got such a device.
I cut the rim off the paint bucket and cut off the lid. You can attach a garbage bag between the rim and the lid. And the rim itself was fixed with a movable holder. I hope you liked my construction beast. I will be glad if my experience helps someone with repairs
Thank you, Olga! A charming master class from a real craftswoman! It's nice to look at your work. We don't even have anything to add. The only thing you can do is to suggest complicating the task, as in this short video on creating a multifunctional carpentry table:
Watch this video on YouTube
We are waiting for your impressions and comments, as well as new materials in the section “This is not a woman’s business!”
PHOTO: Olga Yarovaya
Goats for working with a hand saw
Most often, a regular saw is used for harvesting wood; this allows you to cut small-sized logs. Goats for such purposes may have standard dimensions. To assemble such a structure you will need the following materials:
- Beam with a section of 100 by 100 mm. This thickness of wood is enough to create a stable structure. The length of the material is taken from 1 to 1.5 meters.
- Beam for legs of smaller diameter. For supports, material from 50 to 50 m in cross section and a meter in length is suitable. The goat will have 4 legs in total.
- Material for crosses. The “horns” of the structure are made of 10 by 10 cm timber. Some structures require reinforced legs. For them, timber with a cross section of 30 by 30 mm or more is used. For stability you will need 4 supports, but you can leave only two.
- Fasteners. It is best to use self-tapping screws to connect parts. The diameter of the cap is 45 mm and the length is 100 mm. The entire product will require about 40 fasteners.
- Coating. In order for the timber to remain intact for a long time, it must be impregnated with varnish or other protective compound.
The material will be required for homeowners who do not have building materials on the site. Those who have scraps of timber or pipes left over from other work can use them in assembling the trestle.
To create the design you will need the following set of tools:
- hacksaw for cutting timber;
- corner for aligning parts of the structure;
- pencil for marking;
- hammer or screwdriver;
- roulette;
- finishing coat and brush.
Once the material has been purchased, assembly can begin. The goat frame is made starting with wood processing. To do this, use a tape measure and a pencil to mark the cutting areas. They need to be made 6 on each side. There will be 12 of all grooves for connecting the legs and crosses. With a beam cross-section of 100 mm, the depth of the groove is 25 mm, this is enough for a strong fastening. When cutting the grooves, make sure that they are a couple of millimeters smaller than the legs. After marking and making grooves, all parts are assembled into a single structure.
After assembly, fastener reinforcements are installed; they enhance the strength of the structure and make work safer. To do this, saw off the bottom of each leg so that there is enough space to install a new fastener. After assembling the product, it is treated with a protective compound. To do this, use varnish or stain. When the structure is dry, it can be used.
Complete assembly of goats: what material is required
In order for the trestles to be foldable, each of them will require two door canopies, which will connect the elements. To complete this work, you need to lay the squares one next to the other on any flat surface. They should be located in one line at the ends. If there is no suitable workbench, then all the work can be done on the floor.
At first glance, it may seem that the structure made from scraps of plywood looks flimsy, but this impression is deceptive. After complete assembly, the strength will be at a very high level.
PHOTO: YouTube.comThe elements are located as needed, it’s time to connect them together
Door awning fastening
The canopies are attached to the same self-tapping screws with a slight indentation from the edge of the elements, but without going beyond the joint of the plywood scraps. It is better to purchase canopies with three or even four holes for fixing screws. This will give the structure additional strength.
It is best to use hardened black self-tapping screws (they are also called German, or Germanic). The main thing is to choose the right length so that they can sink into the wood to a depth sufficient for fixation (through both layers), but at the same time do not stick out too much from the back side. Otherwise there is a risk of injury.
PHOTO: YouTube.com Trying on door canopies before final fixation
The final touch in the manufacture of construction sawhorses
Despite the fact that after fastening the canopies, the sawhorses seem ready, they lack stability. If you press from above, the legs will simply move apart in different directions. This means a little modification is needed.
To prevent falls from the scaffolding, it is necessary to install a limiter that will hold the legs in the desired position. A wide and durable canvas belt is ideal for this. Having measured the required length (the same for both trestles), it needs to be fixed on the lower jumpers of the elements. However, simply screwed in screws will not work here. The connection needs to be strengthened. This can be done using a metal profile through which the screws will be screwed.
PHOTO: YouTube.com The canvas belt will perfectly hold the sawhorses in the desired position
Collapsible wooden construction trestles
The advantage of collapsible trestles over a conventional platform is their reusability and the ability to quickly remove them from storage and use. In conventional scaffold construction, only boards fastened with nails are used.
After completion of work, it is difficult to leave them for storage unassembled. To ensure that such scaffolds do not take up much space, they have to be dismantled, which is difficult if they are made with high quality.
Collapsible trestles do not take up much space; they can be transported and used for various needs other than their intended purpose. To create a sawhorse, you need two supports.
To make one support you will need:
four boards for legs - 0.95 m; board 0.9 m for the top; three crossbars of 0.85, 0.77, 0.7 m each.
1
Construction trestles - what are they?
If previously scaffolding products were made only by hand, today they can be bought ready-made in the store. Shop sawhorses are typically made of aluminum, making them both lightweight and durable. You can find both folding trestles and monolithic structures. But all such goats have one huge drawback - they are quite expensive. That is why the topic of making construction trestles with your own hands always remains relevant.
As we have already noted, construction trestles or scaffolding come in two types:
1. Foldable. Their advantage is high mobility, compactness for storage after completion of work.
But such scaffolding means should be handled with extreme caution. Before working on them, you need to make sure that they are very stable.2
Not foldable. They are more reliable, since when finished they represent a single structure.
In order to assemble wooden scaffolding, you will need the following materials:
We recommend: Do-it-yourself staircase to the second floor: types and installation of second floor stairs in a private house
drawing; tape measure; hacksaw or jigsaw; carpenter's corner; simple pencil; screwdriver; self-tapping screws; boards; bolts, washers and nuts (for collapsible trestles).
You need to choose lumber that is dry and smooth, without cracks, chips or knots. If they do not meet these characteristics, then they are only suitable for firewood.
We recommend
Do-it-yourself sawhorses for sawing firewood - a device for sawing with a chainsaw Do-it-yourself scaffolding - how to make it from pipes and wood? Do-it-yourself scaffolding - how to make it from pipes and wood?
What you need to make your own scaffolding
First you need to decide on the length of the sawhorses. The most convenient option for work is the entire wall, because you can put all the necessary tools on it and even take an assistant. But if you want to use the scaffold more than once or twice, it may be better to choose shorter boards so that they can be moved from place to place.
Goats with adjustable dimensions Source waysi.ru
In addition, 2-3 small trestles can easily replace a desktop, that is, they can be used even after renovation or construction is completed. You just need to fasten them with a vice or any other similar equipment. Once the renovation is complete, the scaffold can easily be converted into a garden picnic table. If they are too large, then you will only have to disassemble them into components.
Lower tension strap
The support bar prevents the legs from folding inward. However, a home craftsman can accidentally move them outward, causing the structure to “corrode” and lose its rigidity. To do this, a belt tie is used to secure the opposite lower struts. It is installed using the following technology:
- trestles fold out
- the middle of the lower strut is marked
- a through hole is drilled with a 10 mm drill (for an M10 bolt)
- a hole is punched 40 cm from the belt carabiner into which the bolt is inserted
After that, it is enough to secure the bolt with the belt in one spacer with a nut, tighten the belt around the opposite spacer, and cut off the excess length. The same strap secures the support bar to the legs during transportation or storage when folded.
Thus, universal folding trestles can be made on your own with a minimum set of tools within a couple of hours. All parts are ready-made templates, which facilitates the further assembly of the required number of these transformable devices.
Leg assembly and fitting
The performance of the device depends on the quality of the marking of the hole for the bolt. Therefore, preliminary fitting using technology is necessary:
- the leg is placed on the table so that the cutout hangs over the tabletop (you can use a stool, chair)
- the support bar (upper) is installed vertically in the groove
- a second leg is added on top of the first (the bar should fit snugly into the cutouts in both parts)
- the structure is temporarily tightened with a clamp
Then the following operations are performed:
- Using a vertical square, the intersection of the legs is transferred to the side surface on both sides of the structure
- the resulting points are connected by a line, which becomes the vertical axis of rotation
- the longitudinal axis of the leg is marked with a square
- at the intersection of these lines there will be a center for the hole of the M10 bolt, which is the hinge of the connection
Attention: The holes must be perpendicular to the plane of the boards, so a jig is required. They can serve as a cut in a block pressed to the leg with a self-tapping screw or clamp
If the hole is inclined, the legs will not be able to transform into the working position.
The legs are assembled in stages:
- the bolt goes through one piece
- two washers are put on it to facilitate the rotation of the wooden elements relative to each other
- the second leg is put on the threaded part
- the hinge joint is secured with a nut
The result is a set of two legs, into the cuts of which a support bar is easily inserted from above.
Making fastenings for trestles on the wall
Also, for convenient storage of paired sawhorses, simple wall mounts were invented. for this purpose they were cut out of plywood
- 2 blanks 206 x 50 mm;
- 2 blanks 188 x 50;
- 2 triangles with legs of 188 mm each.
The overall dimensions of the workpieces are also given above on the parts cutting plan.
To tighten the blanks, black wood screws 50 mm long were used.
After manufacturing, the mounts can be hung on the wall.
Self-tapping screws and nails
Doubts about the choice of fasteners are quite understandable. Nails are easy to drive and provide strength to scaffolding because they have some flexibility to absorb the load. The inconvenience is that the building structure is almost impossible to disassemble without damaging the wood.
Self-tapping screws are convenient in this regard; they can be unscrewed without damaging wooden surfaces, but they are characterized by great fragility. Black self-tapping screws made of hardened steel alloys can break when hit or simply under weight.
Note! Anodized self-tapping fasteners are somewhat stronger; they can be distinguished from ordinary ones by the greenish tint of the coating.
If the owner often works on the site with his own hands and the wood is needed in its most complete form, you can use anodized screws, and to be sure, hammer in only two or three nails at the junctions of the scaffolding, just in case, for insurance.
How my goat became electric and mobile
So, when the main structure is ready, you need to add additional capabilities to it for comfortable work.
Pieces of plywood that were cut with a special drill were used as covers to prevent debris from getting into the sockets
I secured these covers with plastic ties, threading them through the drilled holes.
Slightly going off topic, I’ll say that it would have been better to make the sockets on the side of the tabletop, and not on it. The top location is undoubtedly convenient, but I was constantly haunted by the thought of what would happen if I accidentally spilled something on this table, for example, paint thinner. This thought was not entirely pleasant.
To prevent the extension plug from dangling, I attached the cheapest socket I found in the store to the side
Now I needed to give my instrument mobility, because I would need it in almost all rooms.
The table turned out to be stable and comfortable, I tested this from my own experience
Varieties
Thanks to modern capabilities and technologies, you can buy various types of scaffolding in stores. These structures can have different sizes, assembly methods, production materials, and can also be equipped with various additions. The first type is considered to be ordinary construction scaffolding. They are produced similar to stools, but using more advanced technology. This type of structure is classified as foldable, as it can be disassembled into individual elements. In this case, the largest part is considered to be the working flooring.
Modern versions of construction trestles have decking that can be installed at different heights. This became possible thanks to the features of the sidewalls, which look like stairs. Typically, these devices weigh a lot, since they are designed for the work of several people at the same time. The dimensions of this design are considerable. A professional construction trestle has the following dimensions: 150 (200) cm – width and 180 cm – height. This design option is ideal for working on large objects, but for an apartment it is considered quite cumbersome. Often the construction trestle package includes a ladder, a limiter, and wheels with stoppers.
The second type is a transformer. This is an ideal tool for indoor work and is quite compact when assembled. The main characteristics of this type of construction trestle include light weight, practicality, ease of use and transportation. Due to the design features, this option can be used not only on a perfectly flat surface, but also when inclined and even on steps. Such scaffolding is often used as an alternative to stairs.
The transforming scaffolds have a height of no more than 100 cm, a width of 50 cm. When unfolded, the dimensions are no more than 160 cm, and when folded, the goat can easily fit into a car trunk. Based on the material used, construction trestles are divided into aluminum, wooden and combined. You can also find painting scaffolds with dimensions of 50 by 100 cm on sale.
Carrying out the assembly
When making scaffolding from metal, the next step will be assembly. To do this, the master is recommended to enlist the help of another person. One of them will have to hold two posts, while the other will have to insert jumpers into them. With the help of short elements you will be able to assemble two sidewalls. Each of the craftsmen, holding one side, begins to insert long jumpers. Once these blanks are in place, you can level everything by laying ladders on them. Before making construction trestles, you should familiarize yourself with the technology. At the next stage, it assumes the possibility of installing subsequent tiers, and you need to use the method described above.