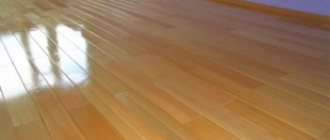
Wood floors are one of the best options for environmentally friendly and reliable flooring. They are durable, beautiful and do not harm the health of people living in the house. The disadvantage of such a base is that if it is installed incorrectly or after some time, the floor boards begin to move apart - cracks form between them, which is why the floors look unsightly, and various debris gets underneath them, and an unpleasant squeak may appear. To prevent this from happening, the technology for laying such a coating must be carried out exactly according to time-tested rules. But, fortunately, even old floors can be restored to their original form if you use a tool to screed the floorboards. Now there are a lot of variations on how to join together floorboards quickly and without much expense.
Tool for screeding floor boards
Pulling together floorboards
Pulling (or rallying) floor boards is a process that leads to the fact that the individual elements of the covering will lie next to each other as closely as possible, which will eliminate the formation of cracks and gaps. The procedure is performed when installing new wooden floors, laying floor boards, as well as during the repair of old floors.
General rules for laying floorboards
The bonding of floor boards should not be neglected, since wood is a “living” material; it reacts sharply to any changes in the microclimate in the room. For example, with fluctuations in humidity and temperature, especially seasonally, floors often begin to deform, as a result of which quite large cracks and gaps appear between individual floorboards. Moreover, they can form in the most unexpected places, that is, where there was not the slightest hint of free space.
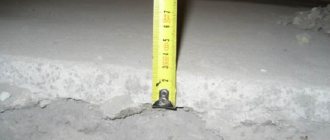
On a note! The permissible gap between the floor boards is only 1 mm.
The gap between the boards should be no more than 1 mm
Correct laying of floorboards and the use of special devices for screeding wooden floors helps to get rid of such gaps, as well as carry out the necessary prevention of their occurrence. Moreover, problems that arise can be corrected quite quickly.
Laying on plywood
This installation method is used when it is planned to install a wooden floor on a concrete base and it is impossible to use logs. This may be due to low ceilings or inconvenient location of the door frame.
Preparing the base
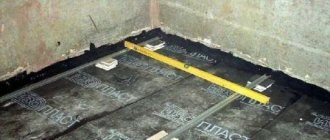
First you need to determine the humidity of the base; if it is above 3%, you cannot lay a wooden floor. After this, using a level, you need to check the horizontalness of the surface; the maximum permissible deviation is 0.2% of the length of the room. If it is too full, you will have to level it first. Then the concrete should be treated with a deep penetration primer and a layer of waterproofing should be laid.
On a flat screed, the plywood flooring is mounted with glue; if the floor is curved, then installation of joists is necessary
Installation of boards on plywood
It is necessary to lay the plywood sheets so that the distance between them and the walls is 15–20 mm. After this, secure the material with screws and dowels. Then you need to sand the surface, remove dust from it and treat it with a sealant. At the next stage, a layer of glue based on epoxy resin or polyurethane is applied to the plywood and the boards are covered in the same way as in the case of joists, only you do not need to screw in the screws.
When installing floorboards on plywood flooring, in addition to self-tapping screws, adhesive fixation is used
Methods for tightening floorboards
There are several different methods for fusing floor boards together. They differ from each other in the use of a certain device, but in general the principle is the same. Methods for screeding floor boards:
- using an ax and a hammer;
- using wedges;
- metal clamps;
- ordinary car jacks;
- special lever Bowrench or Bowjak;
- with a mount.
Pulling together boards using wedges
On a note! All these methods are suitable for screeding old floors, but can also be used when laying fresh flooring or installing ceilings and subfloors.
Let's take a closer look at the most popular and interesting (and most importantly, effective) methods for reliably screeding floorboards.
Elements for fastening
How can I attach a board to the joists or subfloor? Today, manufacturers offer various types of elements so that the flooring material can be properly fixed. The most common are:
- nails;
- self-tapping screws;
- screws.
Nails are often used to install floors, especially if the material used is oak or larch. But they tend to break out during intensive use, which can lead to damage to the surface.
Self-tapping screws securely fix the wooden base to the joists. But, given the fact that they are made of steel, the fasteners are subject to corrosion.
Using self-tapping screws to fasten boards
Screws made of galvanized material have a cutter at the end, which ensures high-quality and fast screwing. You can use these fasteners for floors made of any wood. The coating prevents the screw from rusting even when in contact with moisture.
You can use any type of fastener for wooden floors, the main thing is to take into account some points during work:
the distance between screws or nails should be no more than 25 cm; the boards are pulled together as much as possible, but it is important not to forget about the technical gap of 2 cm, which is necessary in case of wood expansion; if a non-galvanized fastener is used, then its caps must be treated with sealant.
A device designed for joining floor boards together with your own hands is a great help. But, in addition to this, to install the floor you will also need a level that is at least 1 m long. It will be convenient for them to check the evenness of the exposed joists. This tool is also useful for preparatory work.
It is very important to have a chisel, a screwdriver, a metal hammer and a hacksaw in your arsenal
When laying flooring, it is a good idea to have a cutting machine, especially if the flooring will be laid over a large area. This tool will make the job much easier. It performs various functions. They will be able to cut off excess pieces from the boards or make a cut not in a straight line, but along an oblique line. The advantage of this tool is that the blade size can be adjusted. This helps with large and wide boards. The machine makes very precise cuts, which is very valuable when laying floors.
Cutting machine for work
To make a cut at a certain angle, you should set the required angle on the scale and fix the blade in the desired position. If millimeter precision is required, this tool is simply irreplaceable. You need to step back a little from the edge, then mark the line where the cut should take place, fix the disk and only then turn on the machine.
You can use this tool if you have a board that is too wide. To do this, attach a special stand to the cutting machine. The frame will extend and thereby support the long board.
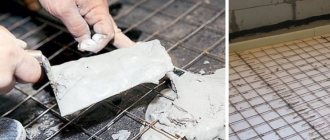
Screeding a wooden floor using homemade wooden wedges
This is one of the simplest, yet most effective methods, characterized by its absence of costs and high reliability. To bring it to life, you don’t need to purchase any expensive tools - all you need to do is use a pair of hand-made wooden wedges and a hammer.
Wedges are made using a hacksaw. A floorboard or any other board 15 cm long is sawn in half with a cutting angle of 10 degrees. Pulling together floor boards using this method is done as follows.
Step 1. 8-15 boards are laid on the joists, then the trim is applied to the last of the laid floorboards.
The floorboard cut is applied to the last of the laid floorboards
Step 2. Two wedges are laid on the joist above the previously laid cut floorboard. Wedges can also be used without cutting the floorboards, but in this case the wedge, which is called a “working” wedge, must have a ridge on one side that fits into the groove of the floorboards. The second wedge will be called “intermediate” and there are no grooves on it. It is usually 10-15 mm thicker than the working one.
Laying wedges
Advice! You need to use wedges in 2-3 places along the boards being laid and pulled together. This will make floor screeding more efficient.
Step 3. Use a piece of board to close the excess gap. You can fix the thrust block between the wedges and the space not covered by the floor boards using self-tapping screws. To do this, the stop is screwed to the joists. Instead of a board closing the gap, you can use clamps or staples, which are also secured to the joist.
Fixing the thrust block
Step 4. Next, blows are applied with a hammer to the end part of the intermediate wedge. Thanks to these actions, the boards throughout the flooring are compacted together. In this case, the gap between the floorboards being joined should not be more than 1 mm.
The end part of the intermediate wedge is struck with a hammer
Step 5. After this, the boards are connected to the joists using self-tapping screws, which are screwed into the outer board at an angle of 45 degrees. Nails 75 mm long are also sometimes used.
The boards are connected to the joists using self-tapping screws
Step 6. It is easy to remove the wedges after pulling the boards together - to do this, strike the intermediate wedge from the end part again with a hammer, but from the other side. Klin safely leaves his place.
Wedges are knocked out
The procedure is performed every 8-15 boards, and it is important to ensure that the ridges of the floorboards fit into all grooves if a tongue-and-groove board is laid; 2-4 outer boards are joined together without a board closing the gap. At the floorboard closest to the wall, the lower edge of the groove is removed; a wedge is used for bonding, which is located between the outermost board and the plywood, which protects the wall from deformation.
Wedges are the fastest and most convenient method of tightening foundation boards, which does not require the use of any special and expensive equipment. The method has been tested by many generations of experienced builders and is still actively used in work.
Video - We tighten the boards using wedges
Video - Laying flooring (tongue and groove) boards
Choosing good building materials
To avoid problems with the finished floor, you should take a responsible approach to the choice of tongue and groove boards and the method of storing them.
Aspect #1 - wood type
The first thing people pay attention to is the quality and type of wood. Tongue and groove boards are made from:
- Spruce and pine are inexpensive, easy-to-process species. Their main advantage is their low price. In addition, they have excellent heat capacity, so spruce and pine floors always seem warm. However, it is better not to use them for floors in high traffic areas. Women's heels, furniture legs, fallen objects - all this can leave noticeable dents on the wooden surface. Varnishing is required.
- Larch is a hard coniferous species characterized by moisture resistance and durability. Larch boards have a beautiful, clear structure and rich color. Thanks to this, it is not necessary to cover it with stains and varnish.
- Oak and ash are durable, hard woods. Their wood has a clearly defined texture and rich shade. Ash and oak boards are considered the most reliable and durable. However, they are also the most expensive.
Aspect #2 - board sizes
The dimensions of the tongue and groove boards should also be taken into account. They can vary significantly
Ideally, the length of the boards should match (or be slightly less than) the length of the wall along which they will be laid. The thickness of the coating determines the reliability of the coating and the price. The standard sizes of tongue and groove boards are as follows:
- length – 1-6 m;
- width – 70-200 mm;
- thickness – 18-45 mm.
Aspect #3 - quality class
Tongue and groove boards are sorted by quality class. There are 4 classes in total:
- Extra - the highest class or, as it is also called, euro sheet pile. This is the most expensive material, without knots, cracks, with a uniform structure and shade.
- A – material without cracks or knots, some inhomogeneity of shade is allowed.
- B – single stains and cracks are allowed.
- C – economy class, with the presence of multiple knots, single through holes, and cracks. Typically, class C boards are used for subfloor installation.
This is what it looks like:
Aspect #4 - Humidity
The ideal moisture content of tongue and groove boards is 12-16%. If the boards are poorly dried, then deformation of the finished floor is inevitable. Cracks and warping of boards often occur. There will almost certainly be gaps between the boards, so the floor will have to be re-laid.
The moisture content of the boards can be determined using a moisture meter. If this device is not available, you can get by with simpler evaluation methods:
- When tapped with your knuckles, dry (suitable for flooring) wood produces a ringing, clearly audible sound. A wet board, on the contrary, sounds dull, barely audible.
- If you touch a wet board, you can feel the dampness. There is no feeling of moisture on a dry board.
- The color of a wet board is darker than that of a dry board. Also, after high-quality industrial drying, the surface of the board acquires a noticeable shine. A damp board remains matte.
- There should be no condensation inside the packaging film. Droplets of moisture on the film always indicate excessive moisture on the boards.
Additional recommendations for choosing tongue-and-groove floorboards are given in the video:
https://youtube.com/watch?v=QnJ7NdrbbIE
Wooden floor screed: special devices
In order to tighten the floor boards, you can use special devices that you can purchase in a store or make yourself. They will help solve the problem of gaps, so to speak, in a high-tech way.
BoWrench Deck Tool
What is Bowrench?
Among the various devices for screeding wooden floors, this option is often highlighted. Bowrench is a kind of lever that is great for screeding both smooth floorboards and elements with uneven edges. The device is made from a profile pipe with a square cross-section. Bowrench consists of several elements - a guide, a handle and a support bar. The latter also has metal rods that allow the structure to be secured to the joists. The guide and the bar are fixed at a certain distance from each other. When the handle-lever is turned under the pressure of a person’s hand, the guide, in turn, exerts pressure on the floor board, due to which the latter is securely pressed against the adjacent similar board.
BoWrench board fastening tool
We make Bowrench ourselves
Step 1. To make this device you will need a piece of aluminum profile with a cross section of 25x25 mm.
Aluminum profile piece
Step 2. Two pieces 18 cm and 75 cm long are cut from the aluminum profile.
Aluminum profile cutting
Step 3. Holes are marked for attaching the hinge pins - they are marked at a distance of 25 mm from both edges of the short strip and from one edge of the long one.
Holes are outlined
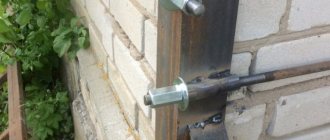
Step 4. The distance between the toe pins (which will be fixed to the joists) should be equal to the total distance of the joist and the width of the stud. Also, a small margin (about 5 mm) is added to this value in case the logs turn out to be uneven.
The distance between the toe studs should be equal to the distance of the joist and the width of the stud in total
Step 5. The hole for the stop strip will be made on a long section of the profile. It will be approximately 20 cm from the edge.
Mark the hole for the stop bar
Step 6. The thrust part of the device is made of a steel profile pipe with a cross-section of 25x25 mm and a length of 100 mm.
The length of the steel profile pipe should be 100 mm
Step 7. A hole for the pin is also marked in the middle of the supporting part.
Marked hole for the pin
Step 8. The marked holes are drilled with a drill with a diameter of 10 mm.
Finished holes
Step 9. A pie of washers and nuts is collected and applied to the thickness of two pipes to understand how long an M10 stud should be used. Another 3-4 mm is added to the resulting result.
Determine the required length of the M10 stud
Step 10. The resulting distance is marked on the workbench for a more convenient process of cutting the studs; all 4 studs are cut off. You will also need nuts with an M10 groover, washers and regular nuts without a groover.
Cutting studs
Studs, nuts and washers
Step 11. Nuts without a screw are used to thread the stud through them inside the metal profile.
Using nuts without a Grover
Step 12. Washers are placed on all connections so that the device does not unwind under heavy load.
Washers are placed on all connections
Step 13. The parts are assembled as in the pictures below. There is nothing complicated, the main thing is to fasten everything correctly and securely.
The collection of parts begins
Collection continues
Completion of parts collection
Advice! For convenience, the handle can be wrapped with cork, hemp rope, PVC tape or rubber. This will also prevent damage to the floor boards. If PVC tape is used, it is applied in several layers.
How to use this device? Everything is quite simple: to do this, the narrow part is installed on the joist so that the joist passes between two studs, and then the boards are compressed with a lever.
How to use the device
White version
It is much more labor-intensive to produce “white” floors from specially treated floorboards. As a rule, a so-called tongue-and-groove board is used for this. In some cases, it is permissible to use floorboards whose ends are chosen as a quarter. But the source material must first be dried in a chamber.
The main thing that must be observed is the layout of the floor boards. They must be placed “in the light” - in other words, perpendicular to the wall in which the number of windows is maximum.
When laying a “white” floor, there should be no gaps between the boards. To do this, the canvas must be “pulled.” Each subsequent board is tacked to the previous one with special wedges, and then, if the joint is of good quality, it is attached to the joists. Sometimes you have to touch the end with a plane. To consolidate the floor, you can also use special screeds, but this is already a professional tool, which does not make sense for a home craftsman to spend money on.
When laying such a floor, completely different methods of attaching the floorboard are used. This is the so-called parquet seam, when the fasteners are installed not all the way through, but flush into the end of the board.
Ordinary construction screws 35-55 mm long are also suitable for this. But it is best to use special screws for floorboards currently on the market. They have a different pitch and length of the thread, a “spoon”-shaped thread that imitates a drill, which makes it possible to avoid pre-drilling channels with a drill, and a flatter angle of the head (it does not split the edge of the floor board into which the self-tapping screw is wrapped). They cost, of course, significantly more, but the overpayment is justified.
When laying, it is often necessary to join the floor boards lengthwise. The docking options are not particularly diverse. As a rule, the joints are “guessed” so that they fall on one of the lags. This helps prevent the floor from weakening. The edge of each board is overlapped with a joist half its thickness.
But this method, as a rule, is accompanied by the appearance of a considerable amount of scraps. There is a method that gives greater freedom, but requires, however, the use of a professional tool.
Other floor tightening methods
In order to effectively pull the floor boards together, you can use a regular ax. It acts as both a stop and a lever, helping to apply a certain force to move the boards in the desired direction and seal them together. One of the boards is placed against the wall, secured with nails or self-tapping screws, and the next (adjacent) is pressed against the first with an ax that rests on the joist with its sharp part, while the blade of the tool exerts pressure on the second board.
You can use an ax to pull the boards together
Sometimes clamps are also used to screed the floor. It is only important to ensure that there is rubber at the point of contact of this metal device with the wood. Otherwise, there is a risk of damaging the floorboards. The clamp acts as a spacer; it rests against a block temporarily attached to the joists.
Using a clamp
To implement another popular method of screeding wooden floors, you can use a regular car jack. This is where its lifting power comes in handy. To do this, a wooden block is attached to the support beams, which will serve as a support for the jack. Then this tire mounting device is installed on this block and the jack is expanded - the lifting force acts on the laid floorboards.
Car jack
Due to this action, the boards are compacted together.
Video - Floor screed
Video - Screeding a floor using a jack
Prices for tools for screeding boards
board clamping tool
How to identify the cause of a squeak
To effectively eliminate the problem, you must correctly determine the cause of creaking floors. To do this, you need to inspect the places where creaking is heard, check the tightness of the connections by pressing hard. If there is movement of the nails or individual floorboards are “walking,” the problem lies in loose fasteners. If the boards are firmly knocked down, but the flooring sags when pressed, this indicates deformation of the joists or subsidence of the soil under the base.
It is necessary to check the flooring by intense pressure, visually inspect the floor, cracks
A building level or rule will help you find the problem area: creaking usually occurs in places of greatest differences in height. In this case, it is best to remove a couple of floorboards and look under the flooring: this way you can accurately assess the condition of the joists, the degree of their wear, and the quality of the rough foundation.
Checking the levelness of the base
Creaks near the wall are often caused by incorrectly fastened or dried out skirting boards. Inspect them carefully, pressing your hand in several places, check whether nails come out of them when pressed, and whether there are cracks in the material. To make sure there is a gap between the boards and the wall, you should carefully remove one of the plinth fragments.
Inspect the baseboard along its entire length
Flooring fixation methods
To make the floor high-quality and reliable, it is not enough to pull the boards together. It is also important to secure them well. Otherwise, over time they will disperse again, since the floors experience significant loads during operation. There are three main methods of fixing wood flooring.
Table. Methods for fixing boards.
| Way | Short description |
| Adhesive | The method is only suitable if plywood is used as flooring. It is fixed to the joists using waterproof glue. This method is not suitable for fastening boards. |
| Secret | The floorboards are secured to the joists using nails or self-tapping screws that are screwed or hammered into the end of the board at an angle of 45 degrees. |
| Clamping | The boards are pulled together using a special tool and then secured with special screws. |
The most reliable method is secret. It is suitable for securing material to any base.
Installation of floor boards
Elements for fastening
The floorboards are attached to the joists using various fasteners. These can be screws, self-tapping screws or regular nails. The latter are used most often, especially if larch or oak floors are laid. However, the disadvantage of nails is that they can come out of the joists after some time and ruin the floor.
Floorboards are often secured with nails
It is most reliable to fix the boards with ordinary wood screws. But it is worth remembering that they can rust, which is why the reliability of the connection between the joists and floor boards suffers. To prevent these metal products from corroding, their caps can be treated with a special anti-corrosion agent. This is true for non-galvanized fasteners.
On a note! There should be a distance of no more than 25 cm between adjacent fasteners.
Fastening boards with self-tapping screws (secret)
Features of screws with a cutter
There is a certain type of fasteners that have a so-called cutter at the end - a small drill; it will ensure quick screwing in of the screw with minimal risk of damaging the boards. It is these screws that are most often galvanized, which reliably protects them from rust. By the way, these elements do not have threads near the cap, which will help achieve the most durable tightening of the floorboards and joists.
Wood screw with drill and cutter
High-quality wooden floors will delight the owner for a long time with their appearance and reliability - the service life of such a base reaches 50 years with proper care and installation. At the same time, the wood coating is 100% environmentally friendly and will not cause harm to health. The most important thing is to carry out all the installation work correctly, and then there will be no disappointments.
What tools and materials are needed?
If you decide to make a wooden floor in your apartment yourself, you need to purchase materials and tools, and you must also be able to use them.
To work you will need the following tools:
- hacksaw;
- hammer and axe;
- electric drill and screwdriver;
- perforator;
- building level
In addition, you need to purchase the following materials:
- batten;
- logs with a section of 50x50mm and a length of 3 m;
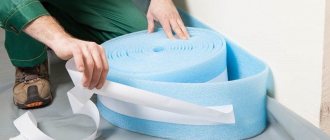
- insulation and substrate;
- nails and screws;
- anchor bolts.
Once you have acquired all the tools and materials, you can begin installing the floorboards.