Laminate flooring has been incredibly popular for several years now. It is no coincidence that this flooring has won the hearts of both ordinary apartment owners and construction business tycoons. It is distinguished by unsurpassed quality, wear resistance and attractive appearance.
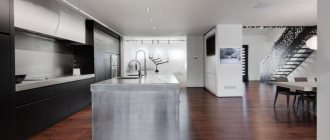
White laminate diagonally
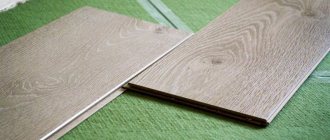
Brushed laminate diagonally
When laminate boards are laid non-standard
Recently, designers have been recommending moving away from standard design techniques, trying to make each interior original and distinctive. Laying laminate flooring diagonally falls into the category of extraordinary solutions. The unusual arrangement of lines and directions creates a lasting impression. Using this technique, you can play with the size of the room, making it wider or longer if desired.
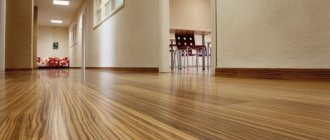
- To visually increase the length of the room, you can lay laminate on the sides along the walls, and linoleum of a similar shade in the center of the room.
- Laminate diagonally leads the eye to the corners of the room, which not only allows you to visually expand its boundaries, but also gives the interior originality and unsurpassed style.
- If you purchase laminate boards in contrasting colors, the floor will come to life and become more expressive.
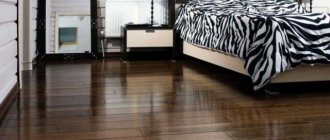
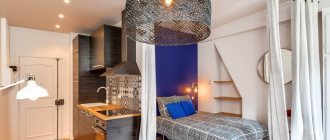
Laminate diagonally in the nursery
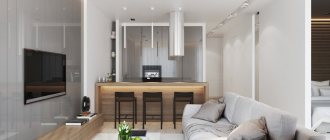
Laminate diagonally in the interior
Laminate diagonally in the interior of the house
Let's sum it up
In the article, we outlined the basic rules for installing and laying laminate flooring made in a diagonal manner. Despite the fact that this is a rather labor-intensive and sometimes more complex process than installation using the traditional direct method, the result is usually much more advantageous and creates room for creativity and imagination. The room will look much more beautiful and original, often the appearance of the room is truly transformed. Use different colors and feel free to find your own solutions.
We examined the main advantages and disadvantages of this method, as well as the features of its self-installation. If you want your flooring to look good and harmonious, then we recommend that you choose this method.
Feel free to experiment, learn new things and get acquainted with interesting design solutions - and good luck in transforming your home!
Advantages and disadvantages
As you already understood, flooring laid diagonally can be used in rooms of any size, but in narrow rooms it plays the role of not only complementing the overall style, but also has the function of visually increasing its size. How it works? Let's take a closer look.
In a narrow space, the attention of guests and owners is concentrated on the floor, or more precisely on the direction of the slats. And in the case of diagonal masonry, everyone will consider the interesting arrangement of the pattern. This also applies to corners, which in the latter case can become the main accent in the interior.
Laminate board laid diagonally
Oak laminate diagonally
Speaking about the disadvantages, it should be noted that this technique is characterized by a certain complexity. And quite a lot of material is consumed. Although a detailed study of the nuances of diagonal laying and a competent approach to the use of planks help to minimize the quantitative indicators of labor and material costs.
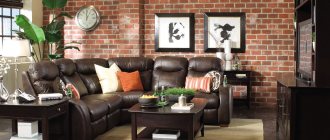
Laminate flooring diagonally in the living room interior
Laminate flooring diagonally in the hall
Installation cost
The final installation estimate will depend on the surface on which the installation will take place. If we talk about installation on a finished surface, then the price will consist of the laminate itself, the substrate, baseboards and thresholds.
- For example, the cheapest laminate costs 200 rubles per square meter.
- The cheapest substrate is made of polyethylene foam and costs 15 rubles per square.
- Plastic skirting boards with a cable channel cost 40-130 rubles for 1 piece 2.5 meters long.
- In addition to them, you will need to buy components for joining, nozzles for pipes, and a metal threshold.
- If you hire a professional craftsman, then for his services you will have to pay from 150 rubles per square, depending on the area.
As a result, if you install 16 square meters in a room yourself, you will spend approximately 4,500 rubles, and if you hire a specialist, at least 6,900 rubles.
Advice! Regardless of whether you are working with an individual or a company, draw up a contract agreement. This will give you a guarantee of reimbursement in case of damage due to violation of the installation technology by the master.
Process Features
To the question of how to lay laminate flooring diagonally, every professional has only one answer: easy and simple. Of course, only an experienced specialist can make the flooring original and attractive without much difficulty. But is it possible to do this kind of work yourself?
It must be said that the installation process is not much different from the classical technique. At the initial stage, it is necessary to level the surface and take care of the substrate.
The main criterion for choosing the direction of the dies is the level of natural light. Lay the laminate diagonally so that the sun's rays slide along the entire length of the laminate boards. This is necessary so that the glare playing on the floor distracts from the joints and seams, creating the illusion of the generality of the canvas.
Laminate flooring diagonally in the interior
Combined flooring
Also, for high-quality work, the following rules must be observed:
- Laying laminate flooring diagonally must be carried out under certain conditions. The room temperature should not be below 20 degrees, air humidity – 45-75%.
- One day before the start of work, the material must be removed from the packaging and laid out on the floor. This will help reduce the risk of deformation of the slats.
- To ensure proper engagement of the lock mechanism, use a wooden block (a rectangular block of wood).
- If desired, you can lay the boards from the middle of the room or from one of the corners. The first option, by the way, will help to significantly reduce the consumption of materials. If you start work from the center, you will have two spaces at your disposal, so a die that is not suitable on one side can be used on the other edge.
- It is necessary to lay the laminate diagonally one at a time, ending one row and starting another.
- Pay attention to the spacing of the seams. It is better to eliminate the defect immediately than to suffer over the dismantling of the laid dies at the end.
- If the gap between the wall and the last row is too large, insert wedges into the gap. But if in this case small defects can be hidden with the help of skirting boards, then defects near the doors are extremely difficult to hide.
It is precisely because of the possibility of gaps occurring near the entrance to the room that experts recommend installation without thresholds.
Diagonal laminate in the hallway
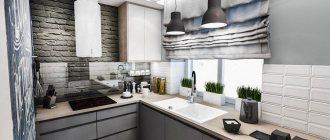
Diagonal laminate in the kitchen
Diagonal laminate in the apartment
List of tools
First of all, we will need a saw with fine teeth; a special machine, jigsaw or circular saw will also work well. However, remember that hacksaws for working with metal and hand saws will not work.
Additionally, purchase a hammer, measuring tape, bars and wedges, as well as pencils and rulers for taking measurements.
You need to prepare the necessary materials in advance
Features of diagonal laying without thresholds
For a neat floor design, it is best to use laying technology without thresholds and joints. To do this, it is necessary to change the flooring in two adjacent rooms. The absence of thresholds will allow you to erase the boundaries of rooms and create an overall design.
The combination of two types of finishing materials looks very nice. For example, a conditional boundary can be drawn by laying ceramic tiles in an adjacent room. This division is typical for the design of the hallway, kitchen and bathroom.
Diagonal laminate in Art Nouveau style
Laminate diagonally in a penthouse
If, after finishing the work, you notice small gaps, they can be sealed with artificial cork. In terms of technical characteristics, it is similar to polyurethane foam, but the effect of its use is more attractive to the eye. Use a special gun to fill gaps. After treating the surface, take a break from working until the composition dries completely. After this, cut off the excess material.
Laminate with diagonal tiles
Laminate diagonally in pop art interior
How to prepare a rough foundation?
Let's start with the fact that laminate can only be laid on an extremely flat floor (a maximum difference of 1-2 mm per 1 linear meter is allowed). There should be no protrusions at all, otherwise the coating in these places will soon begin to crunch and creak. In addition, the base should not sag (if we are talking about a wooden floor), because this can cause the locking joints to become deformed, which, in turn, will cause obvious problems. Also, wooden floors should be treated with an antiseptic.
As for the floor, it is recommended to treat it with a deep penetration primer before finishing. It is better to use a primer mixture that has an antiseptic effect.
Before installation, the floor must be thoroughly cleaned of debris and dust (use a vacuum cleaner).
Diagonal laying instructions
By following the recommendations below step by step, you will get a perfectly smooth flooring surface.
- Start work in the middle of the day. In the afternoon, the sun's rays slowly change directions, which helps determine the direction of the slats.
- If you start laying from a corner, measure the angle at 30-45 degrees. This is exactly how the laminate boards will be positioned.
- Place spacer wedges along the wall. The distance between the wall and the floor covering should be 10 mm.
- The first few rows of diagonal laying must be adjusted to two opposite angles.
When laying out the tiles, you must maintain the order of the chessboard. In this case, the shape and size of the final edge must correspond to the beginning of the next board.
Laminate diagonally in the hallway
Laminate diagonally in Scandinavian style
Types of castles
Types of laminate locks
Depending on the type of lock, the process of joining panels may differ:
- Adhesive locks are now practically not used, since installation with glue is very labor-intensive.
- Click-lock - joins at an angle of 45 degrees, then lowers. If you start joining such panels with a hammer, you will damage the locks and they will not hold well.
- Lock-lock - is joined by hammering it through the gasket, and the panel does not need to be held at an angle.
- Also, many manufacturers have their own developments. For example, Quick Step has Uniclic locks that can be joined at an angle or driven horizontally.
Sawing laminate
To create the edges of the required shape, you must use an electric jigsaw. Only with its help can you achieve high-quality cutting and, accordingly, a smooth surface of the floor covering.
- Considering the existence of a gap between the wall and the floor, measure the distance from the penultimate bowl to the wall.
- Place marks on the board. Use a simple graphite pencil; it can be easily erased from the surface of the plank.
- Make a similar measurement on another board that will connect to this plank. Do not forget that the measurement should be carried out on the opposite side of the second board.
- Connect the marking points and saw the laminate along the contour indicated with a pencil.
To prevent chips and cracks from appearing on the outer coating, saw the products from the reverse side.
Laminate diagonally in a modern interior
Laminate diagonally in light colors
Dark laminate diagonally
When choosing a laminate, pay attention to the length of the planks. You should not purchase boards that are too long, as during installation you can disrupt the geometry of the space. Much depends on the type of connection. Laminate with locks can be used immediately, but you cannot walk on the planks glued together until the composition dries completely.
Laminate diagonally on the bathroom floor
Cherry laminate diagonally on the floor
Laminate diagonally in the interior looks very unusual. Such originality, it must be said, can serve well in the matter of visually expanding the boundaries of cramped spaces. You can do the installation yourself, which will help significantly reduce repair costs. The result of this work will be an excellent floor covering, which, if all operating rules are followed, will serve you for decades.
Laminate diagonally on the floor of a country house
Zebrawood laminate diagonally on the floor
Substrate
Features of the technology require the mandatory use of a substrate under the laminate. The only exceptions are types with a built-in backing.
It solves many important problems:
- Soundproofs the floor from noise from below and reduces it when walking and falling objects. This is especially important when laying on concrete: over time it will begin to crumble and creak when walking.
- Additionally insulates and waterproofs the floor surface.
- Smoothes out small uneven surfaces.
Extruded polystyrene foam backing
The most commonly used are 3 types of substrate:
- Made of foamed polyethylene 2 or 3 mm thick. The cheapest, but short-lived. Over time, it loses volume and shrinks. A good option for cheap laminate.
- Made from extruded polystyrene foam. It has a high density, does not lose volume over time, and is therefore more durable.
- From a technical jam. The best option in terms of quality, but more expensive, so there is no point in taking it for a cheap laminate. This is a natural, durable material with high density and good insulating characteristics. Keep in mind that this species is afraid of humidity, so it can only be used in dry rooms.
Advice! It is not recommended to use a substrate thicker than 4 mm. The fact is that with a large thickness, the base will sag greatly under load, and the locks will quickly become unusable. For large unevenness, you need to prepare the base, and a thick substrate will not correct them.
Calculation of the required number of tiles
When choosing a facing material, it is recommended to very carefully compare the sizes of tiles, especially from different packs. If there is a discrepancy in length or width of even one or two millimeters, the masonry will turn out sloppy. All its decorative advantages will simply disappear! So you should use tiles of the highest possible grade, with the most accurate calibration.
All purchased packs of ceramic tiles must be of the same caliber. As you can see from what is shown in the illustration, the discrepancies in sizes can be very significant.
In this case, of course, the tiles should be intended exclusively for covering the floor. This will be indicated by the pictogram on the packaging with a footprint. No matter how much the buyer likes the appearance (and perhaps the price) of a model designed for wall covering, such a coating will not “live” for long on the floor. In addition, tiles are usually used for cladding in rooms where water can get on the floor. That is, the tile must also have anti-slip qualities. Just for personal safety reasons.
The boot icon on the inclined plane indicates the anti-slip properties of the cladding. And the footprint indicates that the ceramic tiles are intended specifically for the floor.
Before purchasing facing material, you should decide on its quantity. To do this, of course, you should clarify the dimensional parameters of the selected tile.
After this, it would be wise to draw up a drawing of the floor of the room in which the installation will take place. In this case, it is necessary to take into account everything - protrusions, niches, the location of heating radiators, communication risers, fixed pieces of furniture or large plumbing equipment (bathtub, shower stall, etc.) Careful execution of the drawing is especially important if you plan to create complex patterns with tiles on the floor different types.
The drawing must be made exactly to scale. For example, it could be 1:10.
A drawing of the room made to scale and a laying diagram applied to it will greatly simplify both the calculation of the required amount of material and the carrying out of facing work.
Tile calculations are done in several ways:
- If you do not intend to decorate the surface with a complex pattern, then calculating the number of tiles is not so difficult. To do this, you simply need to divide the total area of the room by the area of one tile.
- If you plan to lay out a panel on the floor, then the diagram should be more detailed, with the exact dimensions of each of its elements. This graphical calculation allows you to determine the number of tiles of different colors and sizes.
When determining the number of tiles, focusing on the drawn up diagram, you must consider the following:
- Two tiles cut in less than half must be counted as one.
- If a large part of a tile is cut off, it is also counted as one.
An example of drawing up a diagram of the distribution of tiles on the floor surface.
To the result obtained as a result of calculations, it is necessary to add 15÷20% of the total amount of material. This is a reserve for the remaining unavoidable trimmings, in cases of unsuccessful cutting that was not detected when purchasing defects or accidental independent damage to the tiles during the stages of its transportation and execution of work.
If the calculation is carried out for one type of tile, the reader can use the calculator offered below.
Calculator for calculating the required amount of ceramic floor tiles
The program is simple - it compares the area of the room for cladding with the dimensions of one ceramic tile. True, there will be some nuances.
- First of all, it is necessary to determine the area on which the ceramic cladding will be laid. There are usually no problems with rectangular rooms. Difficulties arise if the floor has a more intricate configuration. But even here you can be smart, break it into several sections of simpler shapes, calculate their areas and sum them up.
The area value is indicated in the first data entry field.
Calculation of area - to help in difficult cases.
Geometric formulas memorized in school may be forgotten. It's okay, we will help. A special publication on our portal is dedicated specifically to calculating the area of premises , with an analysis of complex cases and with built-in convenient online calculators.
Next, enter the length and width of the selected tile model in the appropriate fields. Since most manufacturers indicate the size in centimeters, the same unit of measurement is left in the calculator.
Don't forget about the thickness of the tile joint. When laid on the floor, it can be quite solid, and on large areas this parameter makes quite significant adjustments to the calculation result. The thickness of the seam is indicated in millimeters.
Finally, you should choose how to lay the tiles. It directly affects the size of the stock laid down when purchasing material. If for straight laying 10% is enough, then for diagonal laying it is better to reserve the entire 20%.
The result will be shown in unit terms - the number of tiles.
Go to calculations
Expert opinion: Afanasyev E.V.
Chief editor of the Stroyday.ru project. Engineer.
It is better not to neglect the stock - there is no guarantee that if there is a shortage of tiles for one reason or another and you go to the store, this model with the same batch and caliber will be available. By the way, when purchasing material, you should try to immediately agree with the seller on two services. Firstly, this is the exchange of defects identified during work for high-quality products. And secondly, the return of unused material (naturally, we are talking about whole, uncut and undamaged tiles). Many showrooms, valuing their reputation, are willing to cooperate in such matters.