A high-quality and beautiful floor is the basis of comfort in the home. The floor is an interior decoration, but not only. During operation, it can withstand the weight of people and furniture in the house and helps conserve heat. For everything to be exactly like this, he needs a reliable foundation.
In the case of a wooden house, this base will be a subfloor on wooden joists. It is easy to make with your own hands, it is strong and durable.
Kinds
The most common option for a subfloor in a frame or wooden house (or “black”) is to create a durable flooring supported by beams. But for the first floor it is also possible when the logs are installed on a reinforced concrete slab floor on a strip foundation, on a shallow foundation slab or on a concrete floor on the ground. The last three options are not fundamentally different from each other, although in all cases the methods of fastening and leveling the logs horizontally are different.
Since the concrete base itself is strong and reliable, it can be considered as the “underlying” part of the floor of the lower floor (according to the regulatory terminology SNiP 2.03.13-88). In this case, it remains to equip only the “leveling” part (wet, dry or prefabricated screed) and the “intermediate” part (heat, vapor and waterproofing). And lay the finishing coating over the leveling part.
Concrete floors laid on the ground are another common option Source remontik.org
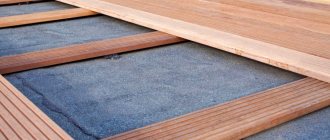
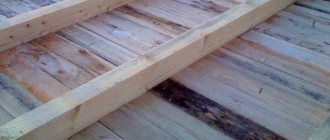
The subfloor is only part of the wooden floor. It is made from edged boards and sheets of moisture-resistant wood materials. The thickness of the flooring (board or sheet) and the layout of the logs have a “direct” relationship: less thickness means less interval between runs.
Important! If we are talking about boards, then when laying diagonally (for example, in rooms with complex geometry), the pitch of the lag should be even smaller. Moreover, the angle between the board and the purlin must be greater than 45°.
Wood flooring is the top layer of the cake. Layer by layer the entire structure looks like this:
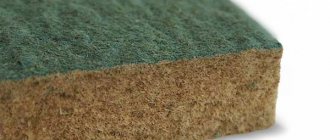
- Lining . It does not affect the load-bearing properties of the ceiling, but acts as a support for insulating materials.
The thickness of the lining must be sufficient to support the weight of the insulation Source doma-na-veka.ru
- Waterproofing . Membrane type materials are used. They do not allow water to pass through, but allow water vapor to erode from the insulation, which then exits through the vents in the basement (plinth) of the foundation.
- Thermal insulation . Usually these are mineral wool mats, which, unlike polystyrene foam, are non-flammable materials.
- Vapor barrier . There are three types in total. Films with limited vapor permeability that maintain a “balance” between moisture transfer from the room into the insulation and from the insulation to the outside. Vapor-tight films are a vapor barrier that almost completely excludes the penetration of warm air with water vapor into the insulation. Foil materials (reflex films) are a vapor barrier that returns some of the heat back into the room. All three types, as befits a vapor barrier, have waterproof properties that protect the insulation from above, from the side of the room, from water ingress.
- Flooring.
A multilayer sheet of plywood for the subfloor will withstand heavy loads Source yug-energo.ru
See also: Catalog of companies that specialize in the design and construction of turnkey country houses.
How to reduce moisture from the soil in ground floors
As has already been said, in wooden floors the rough flooring is the first to suffer. But it is possible to reduce the amount of moisture that comes from the ground. To do this, stones, cuttings of boards and other construction debris are removed from the underground. The soil is leveled and covered with dense waterproofing. It could be roofing felt or other rolled material. But more often they use regular or reinforced polyethylene film.
We place the film on the walls of the subfloor and nail it with a pressure strip. The film should not be tight, but only slightly loose. We lay the panels with an overlap of 15-20 cm, taping the joints twice with double-sided tape. Pour sand onto the film and level it. If this is too expensive, sifted soil (must be good at absorbing water), dry leaves, pine needles, etc. will do.
Ways to protect subflooring from moisture
What does all this give? Because of the film, less moisture seeps out of the soil. It condenses on its lower side, and then goes back into the ground. The backfill absorbs drops that fall from the subfloor without creating puddles. Moisture is redistributed throughout the backfill and evaporates faster.
If mineral wool is used
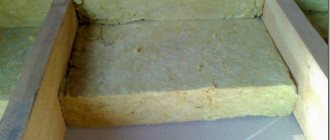
Consider the option of using mineral wool as insulation. In general, there are two types of mineral wool - glass wool and stone (basalt). Stone is easier to work with (it doesn’t hurt so much, you can lay it by hand), but it is afraid of getting wet.
Mineral wool lies on the rough flooring. But for better heat retention, it should be pressed tightly against the joists. To do this, cut it several centimeters wider, then stand it apart
“Afraid” is an understatement. After several wetting/drying, it loses its properties by 50%. And if it freezes wet, it will immediately lose about 75% of its insulating properties. Therefore, in all structures using it, we make sure that as little moisture as possible gets inside, and that what does get in is removed as quickly as possible. Therefore, to the basic pie - subfloor, insulation, finishing flooring - at least one more layer is added - a vapor barrier on the side of the room.
How everything needs to work
How does this scheme of installing a wooden floor using joists work? The vapor barrier, which is placed on top of the mineral wool, protects it from moisture from the room. The moisture that does get inside gradually rolls down (under the influence of gravity) and condenses at the bottom. Since the subfloor must be ventilated, moisture is carried away by the wind. The rough flooring board is not a hindrance in this. It conducts both steam and water, and it itself absorbs it, then releases it.
One of the subfloor options with insulation
What is the design flaw? Drafts in the underground carry away a lot of heat. This time. Mineral wool particles are also carried away by the wind, which worsens the thermal insulation properties over time. That's two.
The problem of heat loss and weathering of insulation can be solved. To do this, a layer of wind insulation is laid underneath - between the sheathing and the insulation. Please note: it must allow moisture and steam to pass through. That is, it must be vapor permeable . Regular plastic film will not work. It will not allow moisture to be carried away. And a vapor barrier won't work either. Or rather, there may be a vapor barrier membrane with one-sided vapor permeability. In this case, the membrane is positioned so that moisture is introduced from the insulation, but cannot penetrate inside (from the ground). But more often, a vapor-permeable windproof membrane is used in this layer. It is simply much cheaper, and such a floor arrangement with insulation is quite workable. It retains heat and does not allow the insulation to erode.
What will happen if there is waterproofing underneath?
What will happen if a hydro/vapor barrier is lined from below - from the subfloor side (as in the picture below). This is often recommended. After all, with such a device, moisture from the soil will not get into the insulation. In theory, it will be drier.
One example of a scheme with waterproofing at the bottom of the insulation
In fact, it turns out completely differently. From below - from the soil - almost no moisture comes. Fine. But it comes from the side of the room. No matter how you fasten the vapor barrier, complete tightness cannot be achieved. All the same, some amount of steam gets into the floor structure. Due to temperature changes, it condenses, flows down the mineral wool, and collects in puddles on the film. If it finds a hole, it leaks out; if not, it fills in until it breaks the waterproofing. It is clear that mineral wool is clearly not dry.
Device options
There are two main filing options:
- Under the beams . The disadvantage of this method is that in the subfloor of the house there is often not enough “space” to carry out the fastening procedure. The advantage is that almost the entire volume between the beams can be used for insulation. Only when reflective vapor barrier materials are laid should a small gap be left between the film and the flooring.
Fastening to each beam, on both sides of the “opening”, cranial bars - a lining is mounted to them. The most common and easy to implement method. The disadvantage is that the insulation layer will be less than the thickness of the skull block plus the lining.
This is what the floor plan with filing to the cranial block looks like Source derevyannyydom.com
- On top of the beams . Disadvantage - the height of the logs is chosen greater than the thickness of the insulation. As an option, it is possible to lay an additional counter-lattice on top of the logs for another layer of thermal insulation.
In principle, such a complex ceiling device is only necessary for a heated residential building. In a garden or country house for seasonal use, you can limit yourself to only wooden flooring without filing and insulation, although waterproofing in this case must also be laid to protect the wood from moisture.
Important! All wooden elements, from the sheathing to the flooring, must be impregnated with antiseptics and fire retardants. And after sawing and drilling, the ends must be treated again with these compounds using a brush.
Fire and bioprotection is a mandatory stage in the processing of wood working in extreme conditions Source derevovdom.ru
Attachment to base
When the owners of a private house or apartment need to replace or install flooring from scratch, the shelving design will be universal for any type of foundation. Great for basic types such as:
- unpaved.
- specific;
- wood;
To choose one of the types, it is necessary to take into account the performance characteristics of the finished surface. The only thing that remains virtually unchanged is the installation principle. All technology adapts to any substrate.
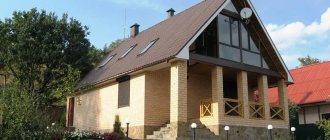
Wooden base
You can lay logs under wooden floors in a variety of buildings. It can be a brick, wooden or reinforced concrete panel house. This type of foundation requires a competent approach and consideration of climatic characteristics.
You can use plywood or OSB panels as a basis. This configuration allows you to expand special insulation into the free space:
- mineral wool.
- fiberglass;
- polystyrene;
If there is insulating material, care must be taken to ensure waterproofing.
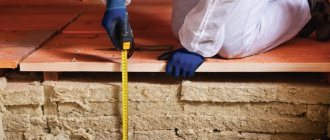
The first stage of installation is taking measurements and applying markings. Having prepared all the necessary tools, you can gradually install the logs. Pro Tip: As a beginner, you should never rush. Correcting errors will significantly prolong the process of laying the floor.
Installation begins from the edge of the room. Using metal squares, you can speed up work and make the structure as stable as possible. When adjusting one end of the log, you need to be guided by the marks on the wall. If you do not tighten the screws of the end strips, then they can be adjusted relative to the plane in the future.
After installing the finished products, tighten the cables or rope. The remaining bars are installed along them.
After fastening the products, it is necessary to lay out all the thermal insulation along with waterproofing materials.
Material requirements
The following materials are usually chosen for flooring :
- edged board;
- waterproof plywood;
- Fiberboard or chipboard with waterproof treatment;
- OSB plate;
- cement particle board (CSB) or GVL.
Recommended ratio between board thickness and joist layout Source semanticscholar.org
Plywood is stronger due to its multi-layer structure, and it is much thinner for a subfloor.
Necessary tools and building materials
Tools for screeding
There are several different technologies for laying subfloors. This requires different materials, but the same tools. The main list includes:
- devices for removing the old floor if repairs are being made;
- construction or laser level, tape measure, corner;
- shovels, trowels, wood hacksaws, jigsaws;
- screwdriver, drill, grinder;
- beacons and rules for leveling the screed;
- concrete mixer for preparing concrete;
- thermal insulation materials – the latter are recommended to be kept indoors for about a day before installation;
- waterproofing – roofing felt, films, membranes, coating compounds;
- vapor barrier - not always required;
- materials for dry screed - chipboard, waterproof plywood, GPV sheet.
Other tools may be required to install the subfloor.
Classic scheme
A feature of the classic scheme is the significant distance between the beams.
Typically, the layout step is 0.8-1 m, and this is “reflected” in the choice of board thickness.
This is what a “powerful” log house floor looks like Source ukrasheniyedoma.com
A typical subfloor structure looks like this:
- timber with a section of 15x15 or 15x20 cm;
- cranial block with a cross section of 4x4 cm;
- hemming with a board 2.0 cm thick (can be unedged, but cleared of wane) or plywood 1.5 cm thick;
- waterproofing (glassine, polymer membrane);
- insulation (stone wool) no more than 10 cm thick - this is all that the remaining volume between the beams allows after installing the cranial block with filing;
- vapor barrier;
- board 4.5-5.0 cm thick.
And now this design is used, but it no longer meets modern requirements for thermal protection. Therefore, a counter-lattice is mounted on top of the beams, between which another layer of thermal insulation is laid.
Another advantage of this method is that the layout of the logs can be reduced to 30-40 cm, and subfloor boards can be chosen with a thickness of 20-24 mm.
Scheme of complex insulation of a frame house with a double thermal insulation contour of the floor and mesh as a backing Source obustroeno.com
The modern scheme for laying a subfloor for a wooden house is more advanced and allows you to insulate the floor without additional “superstructures” in the form of a counter-lattice:
- Boards placed on edge . Fixed to the beam, and, if necessary, supported by intermediate supports, they act as logs. The thickness of the board is 5 cm, and the width is at least 20 cm. The layout step can be made 60 cm (to match the width of the stone wool rolls), and in terms of wood consumption for purlins, this option is more economical than the classic scheme.
- Polymer (wire mesh) for supporting waterproofing and insulation.
- wind and waterproofing film . Allows excess moisture to evaporate, protects the insulation from water ingress and weathering of fibers.
- Stone wool in the form of semi-rigid mats 20 cm thick.
- Vapor barrier.
- Flooring made of boards 36 mm thick.
The only drawback of the modern scheme is the poor stability of the lag. This is due to the large difference between the width (the supporting part) and the height. To ensure the stability of the structure, additional transverse braces are used that “connect” the logs to each other and to the frame (grillage).
Typical ceiling of the first floor of a frame house made of boards on the “edge” Source stranapap.ru
The advantages of the scheme are obvious - savings on lumber (in “volume” equivalent) and a simple one-layer insulation scheme.
DIY floor made of wooden material
Making a wooden floor has its own technology:
- Wood preparation.
- Arrangement of sheathing.
- Laying insulation.
Second or third grade wood can be used as subfloor beams. Those sides of the beams on which the flooring will be laid should be leveled.
You can install logs in two ways: on the floor or on the base.
According to the first method, it is necessary to lay the logs of the lower trim and make grooves in them in those places where the logs of the upper trim will be laid. The depth of the grooves is equal to the width of the upper beams.
The harness must be securely installed. To do this, make brick columns that will serve as support for the logs.
The installation of the posts is carried out at the initial stage of the subfloor. This design is also called a “column foundation”. The technology is like this:
- Along the line of the ceilings, holes are dug at the same distance from each other. Pit size: 20x20x40 mm.
- Layers of gravel and sand are poured onto the bottom, compacting well. Then lay the reinforcing mesh.
- The holes are filled with sand-cement mortar. Cement, sand and water are taken respectively in the following proportions: 1: 3: 0.5.
- Roofing felt is laid on the hardened concrete.
- Brick columns are built.
The distance between the logs depends on the thickness of the wood material: the thinner the timber, the closer the logs are located. The laid beams must be secured to each other.
Installing a log “at the base” involves removing the top layer of soil and filling the surface with small crushed stone. Overlapping logs are laid on the resulting base, as in the previous version.
A waterproofing film is laid on the lower base, and a layer of insulation is laid on top.
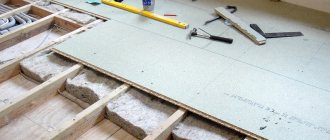
At this stage it is necessary to decide on the finishing coat. If it is sheet material of chipboard, then before laying it it is recommended to make a sheathing of transverse bars, which are secured to supports.
Sheets of flooring are laid on the sheathing so that their joints are located in the center of the lintels.
Subfloor of the second floor (attic) or cold attic
There are no living rooms under the wooden floor of the first floor, so “simple” materials can be used for lining without finishing or decorative surface treatment. The interfloor ceiling is hemmed from below with planed boards or clapboard.
And although insulation of the floor between heated floors is not required, mineral wool is placed between the joists. In this flooring pie it acts as sound insulation. Ideally, you should use acoustic wool. It differs from the usual one in its “chaotic” fibrous structure. But heat-insulating modifications can also be laid - with the same thickness and density, their sound absorption coefficient is only 10-15% lower than that of acoustic ones.
The ceiling of a cold attic must be insulated.
Installation of a cold attic ceiling begins with attaching a vapor barrier Source legkovmeste.ru
And since in a low-rise building even an “uninhabited” attic is used, the insulation must be covered with a subfloor (but without further finishing).
The ceiling diagram of a cold attic looks like this (from bottom to top):
- false ceiling of the underlying heated floor;
- vapor barrier laid in a continuous and continuous layer with sealing tape along the entire perimeter of the ceiling;
- insulation between beams (lag);
- membrane-type waterproofing laid on the surface of stone wool;
- spacer bar stuffed onto the beams, providing a ventilation gap;
- attic subfloor.
Important! The layer-by-layer structure does not reflect the installation sequence. At the first stage, a vapor barrier film is attached to the bottom of the floor beams. And on top of it, a block is mounted on the beams, to which the sheathing for the false ceiling is attached. If you first hem the boards, the film will have to be laid on top of the beams. In this case, water vapor will penetrate into the wood, but there will be nowhere for it to erode, which will lead to wetness of the floor beams and create conditions for their rotting.
Insulation and design features: what films/membranes should be used, where and for what?
In the simplest floor design there are two floorings: rough and finishing. One is nailed to the bottom of the joist, the other to the top. There is no insulation between them. There are no other additional layers in between. With this arrangement, most of the moisture from the room and soil condenses on the subfloor. And he is the first to rot/sick. Therefore, it is very important to thoroughly treat the rough flooring with antiseptics.
The subfloor in this design serves to reduce drafts and save heat
A similar scheme works this way. Moisture from the room penetrates downwards through the finished floor. Since it is clearly colder in the underground, it condenses. This usually occurs on/in the subfloor. But if there is a wooden floor, the subfloor must be ventilated. So the moisture is carried away without interference and the wood dries out.
The same picture occurs with moisture from the soil. It is always there in the ground. As moisture evaporates, it rises, condenses in the flooring due to the temperature difference, and then is carried away by the draft. Although the floor underfoot cannot be called warm, the structure is durable (if the wood is well processed).
Subfloor under tiles
The technology of how to properly make the subfloor of a wooden house for laying tiles has its own characteristics if a board is chosen for the flooring.
Tiles in a wooden house in some rooms are simply necessary due to the nature of their use Source et.aviarydecor.com
Unlike wood, ceramic tiles do not change their linear dimensions with changes in humidity levels. Moreover, wood reacts differently to such differences in the directions along and across the fibers. And to compensate for these changes, a “damper” layer must be laid on top of the boards.
Plywood or moisture-resistant plasterboard is chosen as the top layer of the leveling part of the subfloor. Although plywood is made of wood, it does not change its linear dimensions due to its multi-layer structure with multi-directional arrangement of fibers in each layer. But we must take into account that both materials are subject to deformation during prolonged contact with water or when used in a room with a “wet” regime. And in such areas, before laying the tiles, you need to make another waterproofing layer.
Floor on joists
Any home craftsman can make a reliable and durable subfloor in a wooden house with his own hands. This is not a very difficult matter, but to achieve the desired result, you will have to work hard. The work itself can be divided into two large stages. The first is the preparation and fastening of the logs, the second is the cutting and laying of sheet material.
Fastening
The first thing you need to do before starting work is to sketch out a floor plan and calculate the amount of material. You need to count the number of beams and multiply by the length. It is important to choose the correct installation step. It is calculated individually and depends on the area of the room, the material that will be used in the second stage, its thickness and mechanical strength.
Advice . The installation of a subfloor with insulation has its own specifics. When choosing a lag pitch, it is worth choosing its standard value, namely 55–58 cm. This is due to the fact that the width of a standard mineral wool sheet is 60 cm.
Before starting installation, it is necessary to saturate the beams with an antiseptic. Professionals recommend processing wood in two stages, which will provide maximum protection to the wood, and therefore, the durability of the structure as a whole. If the ends of the logs will lie on the foundation, be sure to lay two layers of roofing felt or a modern equivalent between the wood and concrete.
To attach the beams to the wall, you will need metal holders. Several modifications of them go on sale; choosing the best option for each specific case is not difficult. The fasteners are easy to install and guarantee high reliability of the floor and its durability.
When installing logs, it is important to ensure that their upper edges lie in the same plane. To control, you can use a long, flat rod; to make sure that the surface is horizontal, you will need a building level. It is not difficult to correct a slight misalignment; you need to place an adjusting pad under the sagging beam. It should be made of metal or plastic (wood will soon sag, causing the floors to begin to creak).
Installation
Using a screwdriver or electric drill with an attachment, screw the cranial bars along the lower edge of the lag. Their task is to support the plywood or wood board, which will serve as a support for the mineral wool. Sheet material is cut, focusing on the pitch of the beams. Instead of slabs, you can use offcut boards.
Advice . When cutting sheets for laying in the space between the joists, there is no need to strive for perfect accuracy; on the contrary, it is better to cut the workpieces 1–2 cm narrower. This compensates for the possible curvature of the beams themselves, and the cracks can be easily sealed with polyurethane foam.
The assembled frame is covered with a vapor barrier. You can buy expensive membrane-type roll material or limit yourself to cheap polyethylene film. In any case, the insulation must be reliable. The film is secured with a construction stapler, and the joints are taped.
Lay the first layer of cotton wool. If a standard step is selected when installing the logs, there will be no problems. If necessary, the cotton wool is lightly compacted along the edges so that it fills the entire internal space. Next, lay the second layer. It is important to offset half or a third of the sheet.
The thickness of the insulation is selected based on local climatic conditions. For the middle zone, 10 cm is enough, for the north of the country - at least 15 cm. Waterproofing is laid on top of the top layer. On beams it is additionally fixed with a stapler; the joints must be sealed with tape.
A 20–30 mm thick lath is placed on top of the logs; it will ensure good ventilation of the finished floor and protect it from mold. The warm subfloor is almost ready. All that remains is to lay the finished floor boards or sheet material, which will serve as the basis for carpet, linoleum, or laminate.
Plate
If a wooden house stands on a slab (foundation or ceiling on a brick plinth), then the floor of the first floor is equipped with a screed. In this case, the same technologies are used as in stone houses.
On a solid base, logs can even be installed on point adjustable supports Source pinterest.it
Even for installing a wooden subfloor, there is a choice among a wider list of methods:
- installing joists on supports on a concrete base without fixing them to the base and load-bearing walls (floating floor);
- installation of logs on adjustable supports;
- installation of adjustable plywood.
Compositions for chemical protection of wooden elements
Impregnations penetrate 15–35 mm into the fibers
The main way to prevent rot from forming is to use chemical coatings on the floor joists. All SNiP protective fluids are divided into several groups:
- surface applied antiseptics;
- impregnating compositions;
- film-forming substances.
According to SNiP, materials for surface antibacterial protection can be:
- water soluble;
- organic;
- oil
The first group includes salts (fluorides), borates (washable antiseptics), as well as compounds containing chromium, copper, arsenic, which are called difficult to wash out. The second group includes alkyd, urethane and acrylic compounds. The third set of antiseptics includes resin-containing substances based on coal, anthracene and other similar compounds. This also includes vegetable oils of linseed, hemp and gum, as well as rosin and tar.
Glazing materials are intended for surface application - to a depth of 1–3 mm. Impregnations penetrate 15–35 mm into the fibers. Water-washable compounds are suitable for protecting parts that are not exposed to atmospheric precipitation and are not subject to intensive washing: in a bath they can be used to cover, for example, logs.
Antiseptics are classified according to their functional use:
- transport;
- preservatives;
- whitening;
- fire protection (flame retardants).
Features of log operation
Wooden structural elements during operation are not directly exposed to all kinds of natural factors, such as precipitation and wind. As a rule, there is no direct contact between the logs and the natural environment.
Sometimes dampness can damage them only if they are laid on a damp foundation. But when installing logs, property owners strive to prevent the beams from coming into contact with the external environment. In this case we are talking about the device of vapor and waterproofing.
Since wood is highly susceptible to rotting processes and mold fungi can intensively multiply on it, it must be protected from adverse external factors.
Even with slight non-compliance with the technology for installing wooden beams, the wood begins to rot. It is for this reason that floor joists need to be treated with various special compounds that can protect structural elements from unfavorable processes. This procedure is considered mandatory and should not be forgotten when arranging a wooden floor.
Finished floor installation
To obtain an aesthetically attractive and durable finished floor, it is recommended to use a milled board with a tongue-and-groove fastening.
tongue and groove board
Table 1. Instructions for laying finished floorboards
| Illustration | Description |
| The first board is laid with a groove against the wall, leaving an expansion gap. | |
| It must be secured with self-tapping screws so that you can later cover the attachment point with a plinth. There are 2 options for further fastening the boards. | |
| The first option uses self-tapping screws that are twice as long as the floorboard. | |
| Self-tapping screws are screwed into each joist in the center of the board. Subsequently, the caps can be masked using wood putty. | |
| Then take the next board and align the tenon with the groove. | |
| If necessary, the boards are adjusted by hitting them with a mallet through a block. | |
| Or they press it with a chisel. | |
| The second fastening option involves screwing self-tapping screws at an angle of 45 degrees into the tenon. To prevent the board from bursting, you must first drill a hole for the screw. | |
| With this option, the boards fit closer to each other, and the fastening elements are invisible. |
After all the boards are laid, their surface is sanded and coated with wear-resistant varnish in several layers.
Which is better - concrete or wood?
At the design stage of a private house, you must immediately decide what the floor will be - wooden or concrete. To choose the most suitable option, you need to know what the difference is between these floors.
Price
To fill a screed 5 cm thick, you will need 0.5 bags of cement (300 rubles/bag) and 1.5 (50 rubles/bag) bags of sand. Thus, 1 m2 of screed will cost an average of 225 rubles. If the work will be performed by a hired person, then the cost of the work must be added to this amount - 250 rubles / m2.
Average cost of concrete screed
If we take as a basis dry timber 10 x 10 cm, in increments of 40 cm (400 rubles/m2) and OSB boards (600 rubles/m2) 18 mm thick. With the work of a carpenter, the cost will be 1250 rubles/m2.
Average cost of plank flooring
Communications
In modern houses, the heating, water supply and sewerage systems are laid inside the floor structure. In the event of a pipe break, wooden ones can be quickly sawed and access to communications can be gained. With concrete floors it is more difficult - to remove the screed you will have to use a professional tool, and the process itself will take a lot of time and effort.
Deadlines
The screed gains full strength within 28 days from the date of pouring. Moreover, it gains 70% of its strength in the first week. All this time, the solution gives off moisture and nothing can be laid on it.
Wooden floors can be used immediately after installation.
Filling the screed
Durability
If the installation of a wooden floor is not carried out by a professional craftsman, then after a couple of weeks you can hear a characteristic creaking sound when walking on the floor. Concrete screed does not have this drawback. Moreover, when work is performed by hired workers, the result and quality of their work can be assessed immediately.
Rich texture of natural wood
Weight
The weight of 1 m2 of OSB sheet with a thickness of 18 mm is 12 kg, logs per 1 m2 weigh about 25 kg, depending on the type of wood. Thus, 1 m2 of wooden floor will weigh about 40 kg. And 1m2 of screed with a thickness of 5 cm weighs 100 kg.
Wood processing materials
Since moisture can penetrate into the base of the flooring from the soil below and from the room above, the subfloor materials need to be impregnated with an antiseptic. In addition, to ensure the fire safety of lumber and wood-containing boards, they should be coated with fire retardants, which increase the fire resistance limit.
The most popular antiseptics are:
- on an organic basis - penetrate deeply, but have a pungent odor, it is necessary to ventilate the rooms;
- water-based - water-repellent additives are present in dispersions in the form of suspended particles; they do not penetrate deeply, but they allow the treatment of damp wood.
Important! When using organic-based antiseptics, the application technology is similar to dyeing; materials can be dipped into these liquids. Water-soluble antiseptics and dispersions should be intensively rubbed into lumber with a brush until foam appears, indicating the beginning of a reaction with the material and the normal quality of impregnation.
To save construction budget, it is enough to choose a budget “preventive” water-soluble antiseptic for interior work. Unlike a “medicinal” hydrophobic liquid, it does not correct defects existing in wood, has no decorative properties and does not require additional treatment with a glazing compound that emphasizes the structure of the fibers. But it absorbs and dries faster, and is easier to wash off tools and workwear.
Fire retardants are rarely sold separately; they are usually included in combination products. For example, the fire-bioprotection product contains both fire retardants and antiseptics, which reduces the processing time of structural materials.
Nuances of technology
The subfloor allows the use of decorative floor covering material that does not have self-supporting properties, rigidity and resistance to bending loads. The main difficulties arise with the installation of partitions and remote consoles.
Partitions and walls
To ensure the operational life of the partitions, their installation should be carried out along the floor beams. If an internal non-load-bearing wall passes between the beams, they must be reinforced with jumpers made of boards or bars according to the diagram below. In order for the subfloor wood to withstand the loads, the following conditions must be met:
- jumper spacing within 1.2 m;
- The minimum section of the bar is 40 x 90 mm.
Important! Jumpers are not needed if the partitions run perpendicular to the beams.
The internal main wall of a wooden cottage must rest on the lower wall or floor purlin. It can be shifted by 0.6 m in any direction relative to the support unit of the floor beam between floors and by 0.9 m in the attic.
Reinforcement under partitions.
Components and types of floors
To lay the floor, as a rule, two types of materials are used: wood or concrete. In the first case, you will need to lay and level various building materials in several layers:
- waterproofing;
- thermal insulation;
- rough flooring;
- finished floor and floor covering (for example, parquet, laminate or tile).
You need to understand that sometimes it is advisable to build a floor in one layer, without a rough ball, but this is rarely required. The base of any floor is laid out and leveled with your own hands on logs or brick pillars. The last option will have to be used if it is not possible to lay a concrete foundation, but you really like tiles.
Step-by-step installation technology for electric (IR) floors
Any construction work should begin with calculating the amount of material required. And when arranging an electrical system, it also involves calculating the costs of electrical energy.
Let's consider installing heated floors in a country house, using infrared film as an example, since this is the easiest and simplest option. Savings when installing such a structure can be achieved by purchasing a controlled IR system.
The sequence of work for installing infrared heated floors in a country house is as follows. You will need to purchase the necessary material and prepare the tool. We will need:
- film heating element;
- terminals and cable;
- special insulating material - bitumen tape;
- temperature sensor to control the heating level;
- control unit - thermostat, which can be electromechanical or electronic;
- Double-sided tape;
- foil backing;
- insulation;
- plywood.
For your information! The film material should be less than the area of the heated room, since it is not mounted under heavy furniture. And there should be enough plywood, thermal insulation and waterproofing material to cover the entire room.
You can buy a ready-made kit that contains everything you need to install an IR system, except for the sensor and thermostat.
In addition, during the work you will need: scissors, a knife, a screwdriver, and pliers.
Preparing the wooden base. Laying the film requires a flat and clean surface, so experts recommend laying the flooring on plywood boards. An excellent option is plywood with a snap mechanism, which results in a smooth and virtually seam-free surface. The plywood is fixed to the rough base using self-tapping screws, which should be slightly recessed. If desired, you can put insulation under the sheets, in the form of foamed polyethylene.
Laying thermal insulation. The thermal insulation material is placed on the plywood with the foil side up, end-to-end, and fixed with a stapler. And the joints of the product are taped with tape; you can use construction tape or foil tape.
- Drawing up a scheme for laying the film and determining the location for installing the thermostat. It is better to install the device near the exit and next to the switches.
- Preparing the film - cutting it to the required length. Cutting should be done strictly in places specially designated for this purpose.
Installation of the heating element - the sheets are laid parallel, with copper strips down.
Carrying out cable insulation work. It is necessary to insulate the film in the cut areas with bitumen, except for the areas where the connection will be made.
Fixing contacts. The clips are installed on copper busbars at the points of connection to the electrical circuit. One plate is inserted inside the film, and the other outside, onto copper strips. The clamp is fixed by squeezing it with pliers.
Securing the film. The strips are connected to each other using tape; for a stronger fixation, you can fasten them along the edge in increments of 500 mm.
Connecting the system. The connection of the terminals to the wire is done according to the diagram. To ensure high-quality contact, the connection points are clamped well with pliers.
Contact insulation. The terminals are treated with bitumen tape. One piece of insulator is glued to the bottom of the clamp, and the second to the top, after which they are glued together.
Installing a temperature sensor. It is installed under the film, on a special black strip. The distance from the edge of the canvas should be 150 mm. The device and the cable from it are laid in the grooves of the insulation, which must be made for this, otherwise the surface will not be smooth. The sensor and wires are fixed with mounting tape.
Installation of thermostat. The thermostat can be overhead or mounted in a socket in the wall. The cable from it can be fixed directly to the wall, or placed in specially made grooves.
Connecting the cable to the thermostat. The cable coming from the infrared floor, sensor and power source is connected to the thermostat according to the instructions.
Laying a waterproofing layer. The polyethylene film is laid out over the entire surface of the infrared floor, overlapping and secured with tape.
Installation of flooring. Plywood is used as the backing material and is placed on the heating elements.
Installation of finishing coating. The floor covering is installed on top of the flooring.
As you can see, installing an infrared heated floor in a dacha is easy to do with your own hands, the main thing is to strictly follow the technology.