Living in a solid wood building is comfortable, prestigious and even healthy. But there are no ideal objects, and houses made of timber have their characteristic disadvantages. One of the disadvantages is the cooling of the floors of the first floor under the influence of air coming from the cold ground. Walking on icy surfaces negates the benefits of a building made from environmentally friendly materials. Properly carried out insulation of the floor in a wooden house will allow you to get rid of this problem forever. To do this, you need to select the right materials and, in accordance with the technology, fix them on the supporting plate.
Which insulation to choose
It is necessary to familiarize yourself with the features of floor insulation so as not to make a mistake with your choice.
Houses on concrete and screw piles suffer the most from ground cold. Their bases are not protected from environmental influences and can quickly become unusable. There is a wide range of insulation products on sale, which vary in price, appearance, application methods and operating conditions. Each material has its own advantages and disadvantages that need to be taken into account when planning work. In order not to make a mistake when making a decision, you should briefly familiarize yourself with the features of the most common heat insulators used in modern construction.
Penoplex
One of the advantages of penoplex is its light weight.
Penoplex is produced by passing foamed polymer through an extruder. The result is slabs with an impressive list of positive characteristics. They are determined by the structure of the material, the structure of which consists of many small closed cells. The blocks are produced in 100×100 cm format, 20, 50 and 100 mm thick.
Pros of penoplex:
- low thermal conductivity;
- flexibility and elasticity;
- wide temperature range of application;
- ease;
- ease of installation;
- waterproof.
The disadvantages of penoplex include instability to ultraviolet radiation and the release of toxic smoke when exposed to high temperatures. In addition, the polymer conducts sound well. This factor must be taken into account if the building is located in a noisy place.
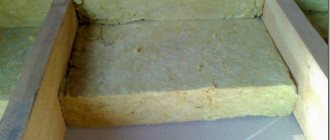
Mineral wool
Mineral wool
Mineral wool is a decades-tested thermal insulation that has proven itself in a wide variety of conditions. It consists of fibers oriented in space and tightly intertwined. Available in mats and rolls depending on the thickness and raw materials used in production.
The following types of mineral wool are available for sale:
- stone;
- slag;
- glass.
Mineral wool is a good heat insulator.
The most popular product among builders is basalt mats produced by Knauf.
The material is used for insulating logs, supports, basements, floors and has the following advantages:
- light weight;
- non-flammability;
- good sound insulation;
- insignificant thermal conductivity.
In addition to its high price, mineral wool has the disadvantage of being hygroscopic. When saturated with moisture, its performance characteristics decrease. In addition, during the installation process, many small fibers are separated from the material. Installation must be carried out in protective equipment and special clothing.
Styrofoam
Polyfoam is easy to process and has high water resistance.
Foam is often used for insulating wooden floors, since, along with its affordable cost, it has a number of other positive properties:
- low thermal conductivity;
- waterproof;
- ease of processing;
- light weight;
- durability;
- resistance to temperature changes.
The disadvantages of the material are that it decomposes under the influence of ultraviolet radiation, crumbles and breaks even under light loads.
Foil materials
Penofol retains heat well.
The decision to foil insulation was made based on the study of space technologies. A thin layer of aluminum reflects heat back into the room, preventing cold from entering from outside. Thanks to this property, the thickness of the porous component is reduced, which has a positive effect on construction - useful volume is saved, thin material can be wrapped around structures of almost any complexity.
Penofol has the following advantages:
- environmental cleanliness;
- versatility in application;
- good heat retention;
- excellent sound insulation.
The disadvantage of penofol is its limited service life. Contact with moisture causes aluminum foil to deteriorate within 5-10 years, after which water penetrates the porous structure and the material must be replaced.
Other insulation materials
Expanded clay is often used to insulate wooden floors.
You can insulate a private building in other ways, using factory-made and home-made raw materials.
For this you can use:
- Polyurethane foam. This is a binary substance that is applied to surfaces under pressure using a spray gun. After hardening, a dense porous mass is formed, filling all the voids. PPU has excellent thermal insulation and only needs protection from ultraviolet radiation.
- Expanded clay. Vulcanized porous clay balls are poured into the space between the subfloor and the finished floor. The material has excellent insulating characteristics, is environmentally friendly, and has an affordable price. The disadvantage is that over time it becomes compacted under the influence of gravity and loses its working properties. The material must be changed periodically, which will require opening the coating.
- Wood sawdust. Natural raw materials are inexpensive and protect your home well from the cold. Sawdust is used together with clay to make a thick solution. They are pre-treated with antiseptics and hydrophobic drugs. Once hardened, the clay can be used as a base for laying the finishing coat.
To choose the right heat insulator, you need to carefully consider all available aspects, placing the durability of the filler at the forefront.
Installation of different types of thermal insulation
Options for thermal insulation are offered that differ in the technological process (spraying and laying insulation).
Video - Insulating the floor above a cold basement
Spraying of polyurethane foam
Before starting work, it is necessary to dismantle the floor covering. The rough foundation and logs should remain.
Step 1 . It takes specialists about an hour to prepare the equipment for work. The future foam (polyol) and hardener (isocyanate) are mixed under high pressure (150 atmospheres). To insulate the floor, a closed-cell material is used that is not afraid of moisture (open-cell polyurethane foam is more suitable for insulating interior partitions).
The future foam is mixed with a hardener
Step 2 . It is better to cover surfaces that are of value (to a height of about 0.5 meters from the floor along the entire perimeter), since during work the finely dispersed mass can stain objects and cladding.
Sockets are covered with film
Step 3 . The flooring begins. Work must be carried out in protective suits and masks (only half an hour after application the foam becomes completely harmless).
Floor pouring begins
It is necessary to ensure that no open cavities are left. The result is a monolithic base made of foam insulation.
Monolithic PPU coating
Step 4 . The room must be ventilated. What needs to be done after the foam has hardened? Clean it off the beams. After this, the finishing coating can be laid. If excess polyurethane foam has formed, it can be removed with a regular stationery knife.
Expert opinion
Masalsky A.V.
Editor of the “floor screed” category on the Pol-exp.com portal. Engineering systems specialist.
As you can see, the technology for installing thermal insulation in this way is not complicated. In addition, it allows you to get the job done very quickly. The insulation will last at least 50 years. The only thing is that it needs to be protected from ultraviolet radiation. Unlike open-cell material, which mice can, in principle, chew through, they cannot overcome this coating.
Laying mineral wool insulation
Such work is completely within the capabilities of every home owner. This is the floor that needs to be insulated (there is no finishing coating, but if it is present, it will have to be dismantled).
This floor needs to be insulated
Step 1 . All joists and rough boards must be treated with an antiseptic.
Step 2 . A vapor barrier is laid on the surface of the rough base. The canvases should be placed overlapping (if there is no moisture penetration from below, you can skip this step). If you attach the material with double-sided tape, this will ensure the tightness of the coating.
Laying vapor barrier material
Step 3 . The insulation will be made of mineral wool 5 cm thick, laid in three layers. The first layer is made of rolled material to minimize the number of joints. It needs to be cut using a construction knife so that it fits tightly between the lags (it is recommended when cutting to ensure that the width of the thermal insulation is about a centimeter greater than the distance between the lags). Having straightened out, it will fill the entire space.
Mineral wool is laid between the joists
Step 4 . Next, the slab material, cut to width, is laid.
Mineral wool in slabs
During installation, the offset of the slabs of adjacent rows must be observed. This must be done so that the seams are located at a distance from each other. Thus, the thermal insulation characteristics of the coating will be higher.
Thermal insulation boards laid
Of course, it is easier to work with slabs, they are denser, and easier to lay.
Step 5 . A vapor-waterproofing membrane is also overlapped on top (smooth side down). A construction stapler is perfect for securing. The coating should extend slightly onto the walls of the building.
The membrane should extend slightly onto the walls
It is recommended to secure the edges of the membrane to the walls with double-sided tape (the protective film is then removed).
The edges of the membrane are fixed with double-sided tape
The floor is ready for finishing.
You can start finishing
Wooden houses are always associated with comfort. However, for your home to be truly comfortable, you need to take care of its insulation. Thermal insulation of the floor is the most important step, which is usually performed immediately after the construction of the structure.
Preparatory work
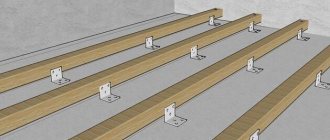
Logs for laying floor insulation
Before starting insulation, it is necessary to carry out a number of measures to prepare load-bearing structures and surfaces for long-term insulation. This is necessary to prevent the development of corrosion and rotting of materials located in a place inaccessible to inspection.
Sequencing:
- Remove the old covering. It must be disassembled carefully so as not to damage the supporting structures.
- Inspect the wood, mark areas damaged by mold. Remove rot and strengthen these areas if necessary.
- Treat the structure with a fire retardant, antiseptic and hydrophobic agent.
- If access to the supports or foundation is subsequently closed, equip them with waterproofing and cover them with insulation.
After the preparatory work, you need to choose a method for insulating the floor in a wooden house, carry out calculations and purchase the necessary materials. They must be purchased with a margin of 10-15%, taking into account errors and losses during transportation.
Water heated floor system
There are two systems of heated floors in the house: water and electric. A water heated floor consists of circuits—polypropylene or metal-plastic pipes, a boiler, a manifold, and a circulation pump. Heating of the room and floors occurs due to hot water flowing through the pipes. The boiler heats the water to a certain temperature. The circulation pump drives it to the circuits. The manifold regulates the temperature in the pipes. If the floors are heated to a certain temperature, the thermostatic valve shuts off the access of hot water to the circuits. The hot water supply stops. If the room is cold, the valve opens and water is supplied to them.
Insulation options
Scheme of floor insulation on the first floor
Before starting work, you need to decide on which side to lay the insulating materials. Insulation from below provides the following advantages:
- maintaining the height of the room;
- the point of contact with cold air moves away from the supporting structures;
- there are no restrictions on the thickness of the created layer;
- the ceiling is protected from dampness, insects, microorganisms and thanks to this it will last a long time.
The disadvantage of this approach is that it is convenient to use it at the construction stage of a building. To insulate a wooden floor during operation, it will be necessary to dismantle it, which can lead to breakage and damage to the previously laid coating.
Finishing on top can be done at any time, even several years after completion of construction. But this is the only advantage of this technology. The disadvantages are the following:
- you need to select a hard surface finish;
- the ceiling comes into contact with the external environment and quickly becomes unusable;
- Raising the floor level reduces the height of the room.
Experts recommend applying insulation from below, as this is the optimal solution in all aspects.
Recommendations from professionals
The greatest efficiency in floor insulation can be achieved if:
- carry out thermal insulation of adjacent structures - plinth, foundation, blind area;
- protect the insulation from moisture with waterproofing, and provide a ventilation gap of at least 50 mm for water evaporation;
- fill the joints and gaps between the plates with scraps of material or polyurethane foam;
- to prevent rodent infestations, use special fine-mesh (up to 8 mm) meshes; they are laid in places where animals can access them;
- If you lay the floor covering on top of the insulation layer, moving 10 mm away from the wall, an additional noise-insulating effect will be obtained.
The decision on how and with what to insulate the floor of the first floor is made by the owner. The advantages of thermal insulation are obvious - while heating costs are reduced, comfortable conditions in the premises are maintained in winter. Modern materials are accessible and technologically advanced.
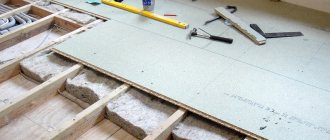
Step-by-step instruction
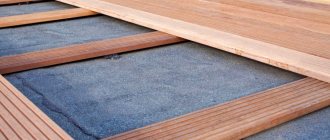
The insulation is placed between the joists.
Before starting repairs, you need to draw up a competent diagram. It will help you complete the job accurately and in the required sequence.
Step-by-step instructions for insulation:
- Laying rough boards on the joists. They will be the basis and support for all subsequent layers. The cracks are sealed with polyurethane foam or tape.
- Laying a vapor-permeable membrane. It is necessary to remove moisture generated in the room. The fabric is fastened using a manual stapler with 6 mm staples.
- Creating a frame. The height of its walls should correspond to the thickness of the insulation. If mortar or bulk material is used, its layer must be at least 20 cm.
- Installation of thermal insulation. This procedure is performed in accordance with technology that is valid for each type of material. You should pay attention to the absence of cracks.
- Installation of waterproofing. For this purpose, fabrics that conduct moisture in one direction are best suited. The strips are overlapped with an overlap of 15-20 cm. The joints are fixed with tape.
- Laying the finished floor. The choice is determined by the type of finish. For linoleum, parquet and carpet, it is better to take inexpensive sheets of waterproof plywood 16-25 mm thick. Solid boards can be laid directly on the frame. In this case, you should take slats with selected edges so that there are no through gaps in the surface.
Since the main advantage of a wooden structure is its ventilation qualities, the finishing coating must be selected in a similar manner.
Electric underfloor heating system
Electric heated floors do not depend on heating. They can be turned on at any time. They are:
- cable The heating element is a heating cable. It can be single-core, double-core and self-regulating.
The cable connects to the existing wiring in the house. The single-core cable is laid in a thin tie. The good thing about the two-core one is that both ends of the core should not be pulled to the network. It has a reinforcing braid and is insulated. A self-regulating cable contains a semiconductor instead of cores. It regulates the heating level;
- heating mats. The width of the mat is half a meter. This is a heating cable on a polymer mesh. It works from a thermostat that is inserted into the wall. The thermostat can be simple, which regulates the heating level, or programmable. This thermostat turns the mat on and off. The mat is rolled out on the surface and mounted in adhesive under the tile;
- infrared film systems. The film is cut into pieces. Waterproofing is being laid, thermal insulation is being laid. The film is attached to the floor with tape. The copper wires should be at the bottom. The screed is not poured from above;
- rod system. The heating element is a carbon rod. It runs on mains power and is connected to a thermostat.
If you are installing thermal insulation in your home yourself, then listen to our advice. Proper installation of thermal insulation in the house will help save thermal energy and eliminate cold bridges. You will be comfortable, cozy, warm and comfortable in your home.
Common errors and problems
The use of a vapor-proof film leads to the formation of condensation under the coating and rotting of the filler.
When insulating wooden buildings, novice craftsmen make mistakes at various stages of construction.
- Unpacking the insulation long before installation. As a result, the material becomes saturated with moisture and loses its characteristics.
- Incorrect installation of thermal insulation. With strong compression, thermal conductivity increases, and the cracks act as cold bridges.
- Ignoring the preparatory stage. If mold is not removed from wood, it will continue to deteriorate until it cracks or breaks.
- No antiseptic treatment of boards and joists. When exposed to dampness, fungus grows in them, which soon leads to unscheduled repairs.
- Insufficient layer of insulation. Savings or incorrect calculations lead to the fact that in severe frost, insulated floors still freeze.
- Use of vapor-proof film. The consequence is the formation of condensation under the coating and rotting of the filler.
- Violation of the sequence of laying materials. The result is the penetration of dampness into the finished “pie”.
To avoid such mistakes, you need to act in strict accordance with the drawn up plan, strictly following the instructions specified by the manufacturers of building materials.
Formation of products
An integral characteristic of high-quality insulation of a wooden house is ventilation of the lower point of the “pie”, a ventilation system for the underground space. The better the ventilation scheme is thought out, the better the insulation and logs are protected from waterlogging as a result of condensation (dew point)
Ventilation also prevents radon gas, which is harmful to human health, from accumulating under the house.
The area of the underground vents is 1/400 of the total underground area. For example, to make proper insulation with your own hands for a house of 100 square meters. m., you will need 14 ventilation pipes with a diameter of 150 mm.
It is advisable to make a foundation at least 40 cm high for better ventilation. Additional moisture insulation is achieved by laying a vapor barrier on the open ground under the house and sprinkling it with a 100 mm layer of sand.
When is the best time to carry out
The ideal option is when all such work is carried out at the stage of construction of a private house or cottage, but this situation does not always occur. As a rule, thermal insulation is carried out during renovation and forces the floor covering to be completely dismantled.
Thus, insulating a wooden floor is a process consisting of several stages that can be easily done with your own hands. A properly insulated floor, which includes an appropriate insulating layer, will retain up to 20% of the heat.
Use of mineral wool
The main advantage of mineral wool in slabs or rolls over other insulation materials is resistance to high temperatures and non-flammability, which is very important for wooden structures. In addition, rodents do not like it very much. On the other hand, the material is able to absorb moisture and at the same time sharply increase thermal conductivity. Therefore, when insulating with basalt wool, it must be carefully protected from water vapor using different membranes (films).
Important. You cannot use different types of glass wool inside the house. This applies to ISOVER products intended for roof insulation.
Now let’s talk about how to correctly determine the thickness of the insulation layer for the floor. Since the thermal conductivity of mineral wool is only slightly higher than that of polystyrene foam, it can be taken with a thickness of 100-120 mm for the middle zone. If you take rolled material of a lower density, then it should be laid in 2 layers.