Every owner of a wooden house knows: in order for the building to withstand the harsh Russian winters, winds and cold, it must be properly insulated. Thermal insulating materials must be used on the walls of the house, on the ceiling and, of course, on the floor. A lot of precious heat can escape through a cold wooden floor. To avoid significant heating costs and make the floor warm, you can use different materials. But now modern high-tech insulation materials that allow the coating to breathe and at the same time have high thermal insulation properties are especially popular. This type of material is penoplex or extruded polystyrene foam. In the article we will look at the features of this insulation, find out its advantages and disadvantages, and learn how to properly install it when insulating the floor in a wooden house.
Description and features of floor insulation in a wooden house with penoplex
Penoplex is the collective name for thermal insulation material. In general, strictly speaking, “Penoplex” is the name of a company that produces construction and finishing materials - by the way, ours, Russian. Thanks to the popularity of their extruded polystyrene foam, this material, even from other manufacturers, is now called penoplex.
Penoplex is made from the same raw materials as the familiar white foam. By the way, the latter can also be used for insulation. However, if polystyrene foam is always white, then polystyrene foam can be gray, red, or even colored. Penoplex took all its advantages from polystyrene foam, leaving its disadvantages.
Extruded polystyrene foam is produced by foaming raw materials. As a result of this processing, the output is a light but hard material, permeated with many tiny air bubbles. Thanks to this air gap, the material has really high thermal insulation properties.
In addition to insulating the floor in a wooden house, penoplex can be successfully used for thermal insulation of ceilings, attics, interfloor ceilings, and walls.
You will learn about the technology of insulating a wooden house from the outside with mineral wool under siding here.
Advantages of polystyrene foam material, comparison with polystyrene foam
Let's find out what advantages there are to insulating the floor in a wooden house with penoplex.
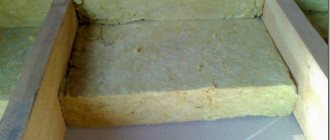
This insulation provides reliable protection of the room from the cold. The material has really high and reliable thermal insulation properties. In addition to the fact that the material retains heat well in the house, it also has high sound insulation properties.
Compared to polystyrene foam, penoplex is more durable. Many people know how easy it is to break a fragile sheet of foam. This will not happen with modern penoplex.
Due to the fact that this is a solid material, it will not sag over time, exposing areas of the floor. By the way, a similar incident often happens when insulating with soft materials, for example, mineral wool. Penoplex is resistant to deformation and easily resists compression.
In addition, you may be interested in material about the features of insulating a log house from the outside.
Penoplex is resistant to moisture. This is a really important nuance, since the house may be located in a swampy area or in a flooded area. Mineral wool, for example, will not withstand exposure to moisture.
Penoplex is convenient and easy to install. There is no need to wear respirators or protective clothing. The slabs of this material are lightweight; if necessary, you can achieve the desired size by simply cutting the slab with a knife. Penoplex easily “stands up” on the glue, while being securely fixed.
Penoplex is not chewed by mice, bugs and other insects do not grow in it. For an environmentally friendly wooden house, such a problem sometimes becomes a direct threat to the preservation of heat and the integrity of surfaces. For example, mice love to live in soft mineral wool. But fortunately, this will not happen with penoplex.
We also advise you to familiarize yourself with the features of insulating the outside of a house from 150x150 timber using this link.
Due to its artificial origin and immunity to moisture, penoplex does not rot, deteriorate or decompose at all. The material is environmentally friendly and completely safe for those living in the house.
The safety of this insulation is also evident in the fact that penoplex does not emit any toxic substances. During operation, unlike mineral wool, it does not generate dust and does not cause allergic reactions. In addition, extruded polystyrene foam is odorless.
It will also be interesting to read about insulating the outside of a house using foam blocks.
Penoplex comes in different types. You can choose a non-flammable variety, which is important for a wooden house.
Characteristics of penoplex insulation.
The material is laid in a rather thin layer, but due to its high thermal insulation characteristics and density, this is quite enough. Therefore, penoplex can also be considered a rather economical type of insulation.
If installation is carried out correctly and you choose high-quality penoplex from a trusted manufacturer, the material can serve for a very long time without any loss of its technical characteristics. With careful use, manufacturers guarantee uninterrupted service of penoplex for at least 55 years.
This article will tell you how and how to insulate a brick house from the outside.
Minuses
For balance, you need to know the disadvantages of insulating floors using penoplex.
The material has a fairly high price. This stops some home owners. However, we must not forget that laying penoplex does not require a thick layer.
The material is completely artificial. But thanks to this, mice and bugs do not grow in penoplex. So it is quite possible to consider this disadvantage as an advantage.
Penoplex cannot withstand too high temperatures, causing deformation. But these temperatures range from plus 80 degrees on one side and minus 90 degrees on the other. Such changes in life are rare, so we can say that this drawback does not greatly affect the quality characteristics of the material.
The material does not withstand strong mechanical stress. Do not forget that, in essence, these are balloons inflated with air or gas, so penoplex is quite fragile. You should not jump or run on a laid surface that is not yet protected by the floor covering.
Summary: compared to the list of advantages, the shortcomings of the material look completely invisible, so you can safely go buy this high-quality and durable insulation.
Material selection criteria
It is important to understand that only high-quality material is selected for a reliable layer of thermal insulation. Therefore, when buying expanded polystyrene, do not make a choice on the first one you come across, focus on the following criteria:
- Availability of quality certificates and related documentation.
- Manufacturing standards. If the documents indicate specifications, refuse such products; GOST gives the green light to purchase.
- Marking - PSB-S is suitable for facade insulation; this material is treated with fire retardants, which means it will extinguish on its own in the absence of a fire source.
- Density not less than 40 kg/m3. Other options are not suitable for facade insulation.
- Try breaking off a corner of the slab of the option you like. The scrap should be smooth, and the visible elements (balls) should have the shape of a polyhedron. If this is not the case, the option is suitable for packing things during transportation, but it will not withstand the load that the facade is subject to.
How to style
In a wooden house, the floor is mainly blown due to the fact that the boards dry out over time, and gaps form between them, sometimes quite large. But if the floor is insulated with high-quality material, then even as the floor covering dries out, the heat in the house will not become noticeably less. Our recommendations for proper installation of penoplex when insulating the floor in a wooden house.
What you will need
What tools and materials may be needed when insulating a floor with penoplex.
- Roulette, large ruler;
- Construction flat pencil;
- Level. Possibly laser.
- Stationery knife;
- Chisel;
- A construction gun for sealant and, in fact, the sealant itself. This material will be needed to thoroughly fill all the joints and voids and cracks formed during the installation process.
- A film with vapor and waterproofing properties is required.
- Well, and, in fact, extruded polystyrene foam itself.
You can read all the information about foam adhesive for outdoor use here.
It should be noted that wooden floors can be insulated using penoplex in different ways. The most common and simplest of them is insulation along logs.
The result is a truly warm floor. But in this case, high-quality waterproofing is necessary.
Specifications
Polystyrene foam (expanded polystyrene) is a heat-insulating material characterized by excellent physicochemical properties. Available in the form of white slabs consisting of polystyrene balls filled with pure hydrocarbon (pentane).
To make this material, only 2% polystyrene is used, the remaining 98% is air. During the foam creation process, pentane becomes volatile and expands. The balls, filling with air, increase in volume. When exposed to steam, they become elastic and stick together. This results in a lightweight material, the scope of which includes not only construction.
Depending on the brand, the density of the foam is from 15 to 50 kg/m3. When bending, the strength limit is up to 0.42 MPa. In a dry state at temperatures from +20 °C to +30 °C, the thermal conductivity of the foam is no more than 0.029-0.033 W. Humidity no more than 2%.
Stages of work
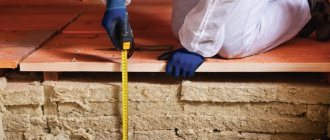
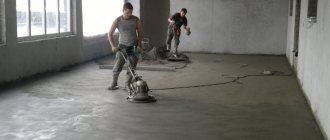
The horizontal surface under the floor must be thoroughly cleaned and leveled. If you decide to insulate the floors in an already inhabited house, then before carrying out the work it is necessary to dismantle the floor covering. If it is still in good condition, then remove it carefully so that after work you can put it back in place. Well, if you plan to replace the coating, then you don’t have to stand on ceremony and remove it quickly. Check the condition of the subfloor. If it is deformed or there are defects, carry out work to strengthen it.
Prepared wooden logs must be positioned and secured in such a way that there is a space of no more than 70 cm between them.
The boards on which the penoplex will be laid must be hemmed to the joists or secured to bars specially designed for this.
Before laying the insulation, it is necessary to treat the logs and all wooden elements with antiseptic solutions. This precautionary measure will protect the tree from rotting and damage by bugs. After antiseptic treatment, it would also be useful to treat with a moisture-repellent agent.
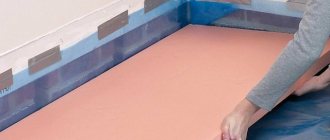
First you need to lay out a layer of thick waterproofing film on the boards or plywood , so carry out the work of installing the waterproofing. Keep in mind that this material is overlapped (about 15 cm) to ensure complete tightness and high-quality protection from moisture.
It is possible that it will be useful for you to study the material about insulation for the walls of a house outside under siding.
Floor insulation scheme.
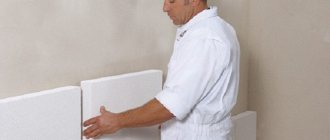
The next step is the direct installation of insulation on wooden boards. When laying out the penoplex, carefully ensure that no gaps or cracks form during the work. Careful placement of the material will provide reliable protection from the cold.
For additional protection from moisture, you can stretch polyethylene film over the surface of the insulation. This technique is of particular importance if the house is located in a swampy area and the climate is rainy.
The floor covering is laid on top: laminate, parquet, solid wood, etc.
By the way, similar work can be done in an ordinary apartment. Such insulation is of particular relevance if you live in an apartment building on the ground floor.
Penoplex can also be used as an insulator under a “warm floor” system. In this case, it will provide additional protection of the room from blowing and heat loss. In order to lay the material in this case, a concrete screed with floor pipes built into it is used.
You will probably want to find out more information about whether it is possible to insulate the ceiling and floor with sawdust.
Preparing the sheathing step by step installation
To make the lathing, you need to decide on the material from which it will be made:
Wood is more environmentally friendly, but more complex in terms of installation. The aluminum frame is much more convenient and practical. Let's move on directly to installing the sheathing:
- The first step is to clean and prepare the surface for future lathing.
- At the second stage, you will need certain tools to attach the frame to the prepared wall.
- The third step is to mark the entire surface where the sheathing frame will be installed.
- After all the preparatory work, you can begin installing the sheathing elements according to the marked marks.
Video
In the video, how to insulate the floor in a wooden house with penoplex:
We looked at the features of penoplex as insulation for floors in a wooden house. The important thing is that it is quite possible to carry out the installation yourself and that penoplex has truly outstanding performance characteristics. Thanks to our recommendations, as well as your own hard work and accuracy, you will be able to provide your country house or cottage with high-quality heated floors.
Maybe
Recommendations from specialists for thermal insulation of a frame residential building
In order to qualitatively insulate your own frame house with your own hands, both outside and inside with penoplex, you must take into account the following recommendations from experts:
- During the construction process, insulation boards must be laid and fixed on top of the rafters. This will create a permeable insulating layer;
- When repairing a finished residential building, insulation can be attached from the inside. And to increase the thermal insulation characteristics of the building, you can additionally insulate the attic;
- Installation of insulating boards must be carried out on a pre-fabricated sheathing. Ordinary galvanized nails are suitable for fixing the material. This procedure does not require significant labor and time.
Choosing penoplex as the main thermal insulation material is reliable protection of your home not only from severe winter frosts, but also additional sound insulation of the building. At the same time, the material is absolutely safe for the environment and human health; it does not contain dust and resins that can release harmful components.
Standard length, width and thickness of bricks
Since bricks have their own standard dimensions (6.5 x 12 x 25), the thickness of the brick wall will have several standard dimensions, taking into account the thickness of the seam between adjacent bricks.
There are other sizes, but they mainly differ in height, and the height of the brick does not affect the thickness of the wall.
Standard dimensions of a brick wall
| Number of bricks, pcs | Wall thickness, cm |
| 0,5 | 12 |
| 1 | 25 |
| 1,5 | 38 |
| 2 | 51 |
| 2,5 | 64 |
In addition to the thickness of 65 mm, there are brick thicknesses of 88 mm - one-and-a-half bricks and 138 mm - double bricks. Those. sizes 8.8x12x25 and 13.8x12x25. In general, the thickness (height) of the brick does not in any way affect the thickness of the brickwork.
The main criterion when choosing the thickness of a brick wall is the purpose and location of the wall itself.
Production of foam formwork
From hollow foam blocks you can assemble permanent formwork for the foundation of a residential building with your own hands. This saves time and reduces the cost of construction . Also, polystyrene foam formwork serves as an additional thermal insulation layer for the foundation.
Please note: for this type of work, the density of the foam must be higher than 25 kg/m3.
Work begins with standard marking of the site, digging a trench, and laying a sand and gravel cushion for drainage. Then a thin layer of concrete is poured onto it, which, after hardening, will become the basis for the formwork . Along the perimeter of the entire foundation, reinforcement is embedded in concrete. Foam blocks are placed on it, securely connecting them with jumpers. At the next stage, all blocks are leveled horizontally and filled with concrete. The solution is then compacted using deep vibrators . The walls of a residential building can be built in a similar way.
Thus, polystyrene foam is a universal material that is suitable for thermal insulation of the entire house - from the foundation to the roof. However, if you are insulating a large part of the building with it, take care of high-quality supply and exhaust ventilation. This is important for “non-breathable” polystyrene foam.
Why is it necessary to calculate the thickness of insulation?
Comfortable living in the house involves maintaining optimal indoor temperature, especially in winter. When constructing a building, you should remember about thermal insulation; you should correctly select and calculate the thickness of insulation for the walls, roof, floor and attic. Any material - brick, wood, foam block or mineral wool - has its own value of thermal conductivity and thermal resistance.
A warm home is every owner’s dream
Thermal conductivity is the ability of a material to conduct heat. This value is determined in laboratory conditions, and the obtained data is provided by the manufacturer on the packaging or. Thermal resistance of a material is the reciprocal value of thermal conductivity. A material that conducts heat well has low heat resistance and requires insulation.
When constructing a building, you should remember about high-quality thermal insulation. If mistakes were made in the walls of the house or in other structures during construction, then cold bridges may appear - areas through which heat quickly escapes from the house. In these places, condensation may appear, and subsequently the formation of mold, if insulation measures are not taken during the process.
Fixing in the attic
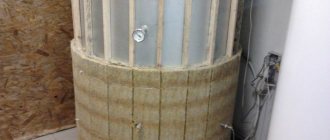
To get additional living space, some owners of country houses insulate the attic area. Insulating the attic of a frame house with polystyrene foam requires all work to be done inside and outside.
There are some conditions for roof insulation. We are talking about protecting the heat-insulating material from the influence of steam and moisture, forming ventilation, laying the insulation without breaks, ensuring a continuous surface.
The roof structure includes several layers. This is a vapor barrier, interior cladding, insulation itself, sheathing, waterproofing material and roofing. First, waterproofing is laid. Izospan is used for this purpose. They direct it from the lower edges of the roof upward.
The surface layer is secured with a stapler, wood slats with a cross section of 3 by 5 cm are hammered in. They are treated with a special antiseptic composition in advance. After this, a gap is formed by securing the waterproofing to the rafters using a counter batten. The joints near the pipes are sealed with special tape.
The outer walls of the attic are strengthened using the same principle. In the attic, the floor is laid in accordance with the type of foundation. When it is made of wood, insulation is carried out in the following stages:
- A vapor barrier is laid between the beams;
- Extruded polystyrene foam is placed on top;
- Following this comes a layer of vapor barrier;
- The joining is carried out, for complete tightness, with an overlap.
Subsequent wall finishing after foam plastic
How to do interior finishing after foam plastic? So, you have glued all the foam sheets to the wall, foamed the joints and waited for them to dry.
Next, you need to cut off the excess foam and check the wall for defects.
If some parts of the insulation stick out, they can be smoothed using a grater. This is especially true for unevenly protruding places in the area of joints.
Use a large spatula and apply the adhesive to the entire wall. Make sure that the glue is applied evenly.
Wall finishing after foam plastic
We glue the plaster mesh to the insulation. Since the glue dries quickly, we cut the mesh in advance to a size of approximately 100x100 cm.
A large mesh may not have time to be securely fixed. After the entire wall is covered with mesh, you can begin to apply the leveling layer.
The layer should be about 3 mm thick; for this we also use a large spatula.
After drying, grouting is performed to remove unevenness.
The next layer is a special primer and a finishing coat. Read about interior decoration methods here.
We cut the mesh at the bottom with a construction knife
Calculate the thickness of the insulation
Thermal insulation of the outer wall reduces heat loss by two or more times. For a country, most of whose territory belongs to a continental and sharply continental climate with a long period of low negative temperatures, like Russia, thermal insulation of enclosing structures provides a huge economic effect.
Whether the thickness of the heat insulator for external walls is correctly calculated determines the durability of the structure and the microclimate in the room: if the thickness of the heat insulator is insufficient, the dew point is located inside the wall material or on its inner surface, which causes the formation of condensation, high humidity, and then the formation of mold and fungal infection.
The method for calculating the thickness of insulation is prescribed in the Code of Rules “SP 50. 13330. 2012 SNiP 23–02–2003. Thermal protection of buildings."
Factors influencing the calculation:
- Characteristics of the wall material - thickness, design, thermal conductivity, density.
- Climatic characteristics of the building area - the air temperature of the coldest five-day period.
- Characteristics of materials of additional layers (cladding or plaster of the inner surface of the wall).
The insulation layer that meets regulatory requirements is calculated using the formula:
In the “ventilated facade” insulation system, the thermal resistance of the curtain wall material and the ventilated gap is not taken into account in the calculation.
How to insulate aerated concrete, mineral wool or polystyrene foam
Mineral (stone) wool and polystyrene foam are the main insulation materials for aerated concrete houses. Low-density aerated concrete (D200) and sprayed polyurethane foam are used much less frequently.
Insulation should be carried out only from the outside of the building so that the dew point is closer to the outer layer of the wall.
Dew point is a place in the wall with zero temperature. In this zone, a zone of increased condensation (moisture) is formed; the wall in this place constantly freezes and thaws.
If we compare polystyrene foam and mineral wool, then wool is a more expensive and correct solution for aerated concrete walls; it’s all about vapor permeability. Cotton wool has excellent vapor permeability, which ensures that moisture is removed from the wall to the outside of the house. Thus, the interior will be drier and more comfortable. The thickness of mineral wool insulation can be made to any thickness, but it is more economically feasible - from 100 mm.
Polystyrene foam does not allow steam to pass through well, trapping it in the wall and creating increased humidity in the house. Moreover, aerated concrete walls need to be insulated with foam plastic with a thickness of 100 mm or more in order to guarantee that the dew point will shift from the wall to the insulation. Otherwise, at the boundary between the foam plastic and the wall, moisture will constantly freeze and thaw, reducing the service life of the wall.
In general, we recommend using mineral wool or foam plastic with a thickness of 100 mm or more, but it is better to give preference to mineral wool.