In most cases, carved frames are used to decorate the windows of wooden houses. But due to the fact that buying a ready-made platband today is quite problematic, it is easier to make it yourself.
DIY window trims
Important! All platbands, even the highest quality ones, have one significant drawback - they need protection from precipitation. The production of window trims traditionally begins with the preparation of everything necessary.
DIY window trims
How to make carved frames for metal windows
Since ancient times, people have been decorating their homes.
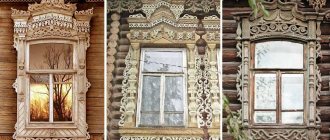
The buildings from the old era are still preserved. There, the presence of platbands was a mandatory attribute. He pointed to the wealth of the residents who lived in it. This decoration of the house gave it status. Nowadays, platbands are used both for decoration and to perform some useful functions. Nowadays, the popularity of window frames is gaining momentum. It's becoming fashionable. But not everyone knows that platbands serve as good protection against freezing of the seams between the window opening and the window frame in winter.
Platbands are made from different materials. Consider an option made of iron.
Iron platbands, along with wooden ones, are distinguished by their durable properties. They tolerate moisture and natural factors well. Of course, they are susceptible to corrosion, but if you follow the painting technology, you can achieve the maximum effect of counteracting external natural factors.
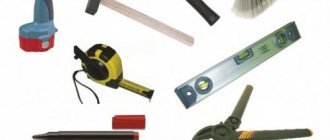
Creating metal trim is a real art. For manufacturing we will need a set of tools and consumables:
- Metal sheet, from which we will make our platbands. Iron sheets are produced in factories in rolls. The optimal option for processing and manufacturing platbands will be a sheet thickness from 0.4 to 0.7 mm.
- Large sheets of paper, whatman paper or wallpaper. They will be needed to create a template for our future drawing.
- Jigsaw. For cutting holes in metal.
- Metal drills of different diameters, mainly 8 mm for holes for jigsaws and 4 mm for holes for connections of platbands and its parts.
- Sandpaper. Grinding of flash and irregularities.
- A hammer or riveting machine for joining parts.
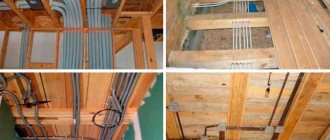
Before you start creating platbands, it is worth making slopes. They are also made of metal. Take measurements of the slopes, taking into account the protruding edges. Based on the dimensions obtained, we create a template for future platbands. You should make two parts of the platbands. Side and top with bottom. You should fold a sheet of paper in half and then apply the design. This will simplify the task and you will get two identical drawings. When moving on to working on metal, you need to prepare a place for cutting it so that it is convenient for you. You can use two identical tables. Place them side by side, with a short distance for working with a jigsaw.
Let's start cutting:
- We cut out the blanks of our future platbands from metal to size;
- Glue or attach a template for the future drawing. We mark the drawing;
- We drill holes for cutting out the ornament with a jigsaw;
- We cut out the drawing;
- We clean the edges of the cuts with sandpaper;
- We carry out drilling and subsequent riveting of parts of the platbands;
- If necessary, paint the trim in the color you like.
Now the platbands are ready. All that remains is to mount them to the windows. Installation depends on the materials from which the house is built. You can secure it with nails or self-tapping screws on a wooden house. The dowel should be secured with nails or anchors on brick houses. Metal trims are ready!
Creating metal trims is labor-intensive work. She will be rewarded with a new transformed look for your home. Give positive emotions to you and passersby.
The process of making carved platbands
When starting to manufacture window casings, it is necessary to prepare and install slopes on the windows in advance. One option is white iron slopes.
After we manufacture and install the slopes, we take the exact size from the window, taking into account the edges of the slopes protruding onto the walls. When the size is taken, we calculate the width and length of the platbands. The standard width is 30-35 centimeters, the length of the window plus the width of the casing.
Having taken all the measurements, we make templates for the platbands from any smooth roll of wallpaper. Having chosen a sample drawing, we prepare two templates. One long side and one short for the bottom and top of the window. Fold the cut strip of paper in half and draw a sketch so that the center of the pattern is at the fold. When the design is cut out, its second half will automatically be ready, so you will get the correct, even template.
We prepare the workplace, for this we place two tables of the same height, next to each other in length, leaving a gap of 7-8 cm between the tables, this is the place to work with an electric jigsaw. Platbands are made of two colors of metal (the simplest option). The top overlay color will be white, and patterns are cut out on it. The second color of your choice is the background lining under the top carved sheet.
We take a sheet of flat iron and cut strips for the trim of the required width.
We turn the blanks of the upper overlay part of the platband face down, and securing the template with paper clips to the reverse side, we transfer the openwork pattern of the platband.
When the drawing is ready, take an electric drill, insert an 8 mm drill and drill through holes along the edges of the drawing for a jigsaw file and begin cutting out the casing.
We cut out the frames for the iron windows.
We place the strip of iron on the table so that the part to be cut out is in the center of the table, and begin to cut out the design along the contour. Having cut out the upper part, we proceed to making the lower, background part of the casing. To do this, we also cut the sheet of iron into strips of the size we need, taking into account the edging. The width of this sheet should be 4-5 centimeters wider.
Turn the sheet face up. We place the finished top blank of the casing on it face down. We trace the outer edge along the edge of the design 4-5 cm wide and begin cutting.
Having prepared both pieces, remove the protective film from them and place them on top of each other.
We fix them with paper clips and make 1-2 holes with a 3-4 millimeter drill. Using a manual riveting machine, we make a control coupling so that the parts do not come apart. After that, we drill and rivet the entire structure. The window casing is ready.
Metal frames for windows - advantages, installation features
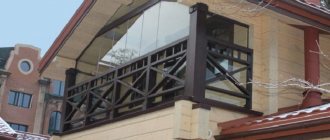
Platbands are necessary not only for decorating a window, giving the facade a designer look that allows you to bring any ideas to life, but also provide decorative protection for seams from freezing and the negative impact of natural phenomena. Metal trim is a high-quality, reliable material that can protect window seams well, make them airtight and decorate the window itself.
Platband as decoration
Many have seen ancient wooden buildings decorated with carved platbands on the outside. Such decorations are made by hand and can have a rather complex design that turns a boring house into a work of art. You can create a piece of a fairy tale using metal window frames. Any patterns can also be carved on them, but, unlike wood, metal is a more reliable and practical material that can withstand any load.
If wooden products do not tolerate moisture well, require constant care and are not very durable, then metal analogues do not have these disadvantages. It is enough to use stainless metal or paint the product regularly. Metal window frames can completely replace wooden elements. You can cut out the desired pattern yourself using flat metal sheets, and, unlike working with wood, you do not need to have carving skills or special tools.
It is much easier to work with metal sheets: they will not require drying, special conditions for this, and will not require the use of varnish, which fades in the sun, which is why you have to constantly renew it. After installation, metal platbands will not require additional maintenance and will fit perfectly into the design of the facade. Installation of metal slopes will also not cause any difficulties.
For beauty and aesthetics, plastic corners are installed on the windows. Find out what they are from our material.
Types of coatings
Different raw materials are used to decorate and decorate a house or apartment, so the framing must be selected in accordance with the conditions. The style and raw materials are chosen by the owner, taking into account the characteristics of the frame. There are different options for decorative elements. There are no strict rules, you can only follow the recommendations.
Carved elements
Carved frames are a bright decoration of the facade. They add personality to a home as they come in a variety of options. The planks are characterized by decorativeness and emphasize the architectural direction.
Depending on the installation method, the following options are distinguished:
- Telescopic . With protrusions in the area where the grooves are located in the structure.
- Invoices . Attached with glue or fasteners to the frame.
Most often, slotted elements are made from boards. The result is elegant details that create a special, harmonious design of the structure.
Carved plastic frames are also popular. They are resistant to temperatures and ultraviolet radiation.
Carved MDF cash is similar to wooden products. It is made from waste, so it is environmentally friendly compared to plastic.
Polyurethane casings are used for stucco molding on the outside. They are practical in their properties.
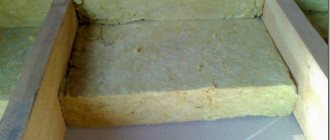
Wooden frames are made from different types of wood. You need to choose raw materials to easily create patterns on the base. On soft varieties it is easier to make slotted carvings. But they are not resistant to climatic conditions, so treatment with a protective compound is required. Rocks with good working qualities are used for small parts. Solid structures make good bases.
An original and high-quality finish is obtained by combining wood species with different characteristics.
Plastic coverings
Plastic options are always installed on main PVC openings. They look neat and do not require special care. You just need to periodically remove dirt from the surface.
Plastic decorations are made from climate-resistant plastic. To prevent the surface from fading, add an appropriate dye. The composition also contains substances that impart heat and frost resistance.
Advantages of plastic window frames:
- low maintenance requirements;
- price.
Negative sides:
- small selection of models and colors;
- artificial material.
For houses made of logs, owners prefer not to use PVC cladding, although the raw materials differ significantly in price.
Cash registers made of metal, corrugated sheets
Window trim with metal trim is used for PVC windows on the outside. They are thin, painted metal sheets. The top layer protects the structure from environmental influences.
They are usually equipped with stone houses. Its popularity is due to its durability and reasonable price.
Metal strips will look beautiful:
- on private houses of modern style;
- on buildings with facades made of aluminum composites;
- in offices, industrial premises.
Corrugated sheeting is a reliable, durable raw material that will last a long time. It is often used in the construction of objects in an accelerated mode. When installing cashing on windows made of corrugated sheets, it is important to properly process the joints. It will provide good protection from negative influences.
Wooden crafts
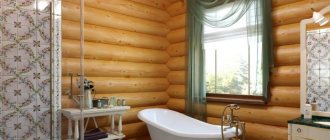
Natural designs are the oldest method of finishing openings. They are usually used in houses built from logs. Cash wrappers will only look beautiful with careful and regular care. They need to be painted and varnished every 2-3 years. Renewing the surface will allow the equipment to last for a long time.
A significant criterion is the ability to process wood in various ways. Cash platters can be simple, carved or supplemented with decorative details.
Wooden models are installed inside or outside the room. At the same time, for outdoor options, special protective compounds are used against environmental influences.
Features of rough material
The thickness of a suitable iron sheet is between 0.40 and 0.70 mm. Such sheets are produced at factories in rolls up to 50 meters long. The width of the product is 1.25 m; the sheets do not always need to be painted, since you can buy an already painted product of the color and shade you need. To ensure that the material does not receive damage during transportation, it is protected from scratches with a special film, which can be removed if necessary. The metal is quite strong and flexible, so it does not cause difficulties when working with it.
What is required to make a slope?
To work you will need:
- The metal sheet from which the platband will be made.
- Wallpaper or whatman paper from which you can make a drawing template.
- Paper clips: These will be needed to secure templates and parts.
- Connecting staples no less than 4 mm.
- Pencil.
- Ruler.
- Eraser.
- Drill 8 mm. You will need it in order to use a jigsaw.
- 4 mm drill for joining parts.
- Metal saw and jigsaw.
- Sandpaper for sanding products.
- A small hammer for straightening and a riveting machine, you can use it manually.
Materials and tools
To make carved window frames we will need:
- a flat sheet of tin iron with a standard width of 1 meter 25 centimeters;
- a roll of wallpaper for making templates for the platband pattern;
- paper clips for fixing templates during translation of drawings and for subsequent fixing of finished parts to each other;
- connecting brackets size 3-4 millimeters;
- a simple pencil;
- eraser;
- ruler;
- an 8 mm drill bit for drilling holes for a jigsaw in the places where the parts of the top cover plate are to be cut;
- a small drill of 3-4 millimeters for drilling holes in places where parts are riveted;
- electric jigsaw;
- metal saw with fine teeth;
- fine and medium sandpaper for grinding burrs on the back of parts;
- manual riveting machine and rubber hammer for straightening workpieces.
Methods for making platbands
Before proceeding to the manufacture of platbands, you need to install metal slopes on the windows . White metal would be a good option. You will need to measure the slopes to find out their exact size. In addition, you need to take into account the protruding edges: you need to calculate the length and width of the platbands based on these data. Typically the length is 35 cm with the addition of the width of the trim.
Once the size is obtained, you can make templates for the trim. For this you will need whatman paper, you can use wallpaper. You need to make two templates - a long one for the side of the window and a shorter one for the top and bottom if the windows have a size close to the standard one.
The sketch is drawn on a sheet of paper folded in half. The center of the pattern should be on the fold. You don't need to cut out the design twice: using this method, you will get two identical templates without any extra effort, and the templates themselves will be perfectly even.
It is more convenient to make carved metal window frames at a previously prepared workplace. This will require two tables of the same size and height. You need to leave a distance of 8 cm between them so that the jigsaw can maneuver. Most often, metal of two colors is used to make platbands: the top sheet can be white, and the bottom sheet, which will act as a background lining, can be any one.
- To make platbands from a sheet of metal, you first need to cut a sheet of suitable width. Once you have all the lines drawn, you will need to use an electric drill. Using an 8 mm drill, you need to make holes for the jigsaw in the corners of the picture.
- The part that you will cut needs to be placed on the table, so that the cut out pattern is in the center, taking up the free space between the tables.
- After the upper part is ready, you need to move on to making the lower part. You will need to cut a strip of the desired size.
- After this, the metal trims need to be turned over. The finished part should be placed face down. This will free up the outer edge; leave a width of 5 cm and cut out.
- When the workpieces are ready, the protective film will need to be removed and the sheets of metal placed on top of each other. Just in case, secure them with paper clips: to do this, you need to drill several holes with a 4 mm drill. A manual riveting machine is used to connect the parts so that they do not come apart during work.
- After you have secured the sheets, they need to be completely drilled and riveted. The platband can be considered ready.
How to make wooden trims
As a rule, two technologies are used to frame window openings. The Finnish design is considered a simpler option. If the home owner prefers a more sophisticated window design, then a carved manufacturing technique is chosen. Let's consider each of the methods in more detail.
Making a simple Finnish window cashing
You can make window frames using Finnish technology using coniferous wood; pine or larch are excellent. Less commonly, birch, beech or oak are chosen for this.
The design is simple and concise, consisting of the following elements:
- Four trim boards around the perimeter of the window.
- Visor.
- Two supports for the casting board (canopy).
The width of the trim is from 90 to 145 millimeters, the casting board is 175 mm, the thickness is 20-30 millimeters.
Finnish cashing device
The manufacturing algorithm is as follows:
- They cut out supports for low tide. Complex geometric shapes are not used for their manufacture. The cutting is done using a jigsaw.
- The harness is made like this. The side boards should be slightly longer than the window opening (approximately twice their width). Their lower part is beveled. The top board is made along the length of the ebb and also has figured edges (usually simple bevels).
- The visor is made beveled along the edges, and a chamfer is cut in front (to drain water).
- Installation of Finnish platbands is carried out on a casing board (for plastic windows) or on a window frame. In this case, they do not use self-tapping screws, but only wooden spikes in combination with an adhesive composition.
The glue itself will not provide sufficient fastening during installation work.
Manufacturing of carved platbands
First, a stencil with a pattern is made. For a beginning carver, it is best to use a pattern with large elements - they are easier to implement. The main thing is to adhere to the same type of pattern, which will create a unified design of the entire facade .
The carving of the platbands can be of two types:
- Proreznaya. It has a very original look, the pattern gives the impression of wood lace. It is made by cutting through the board and further fastening it around the perimeter of the opening.
- Invoice. In this case, all elements of the drawings are made separately and then fixed to a single board as a base.
When making it you will need a set of woodworking tools. Elementary carved platbands can be made using a manual and electric jigsaw, hacksaw, and drill.
More complex patterns are made using milling machines and sets of wood cutters. Sandpaper is needed for sanding.
The thickness of the board of the selected material is at least 30 millimeters for the slotted pattern and 10 mm for the manufacture of the invoice. The wood must be perfectly dried, otherwise in the future such platbands will crack and change shape .
- The window opening of the house is measured and blanks are prepared according to it.
- The required pattern is applied to the surface of the board under a stencil. It is imperative to take into account the mirror opposite of the left and right trims, as well as the top and bottom (that is, there must be at least four stencils).
- Internal cuts begin by drilling holes for the jigsaw blade.
- All necessary drawings are cut along the lines.
- After cutting, all irregularities are carefully leveled and polished using sandpaper, rasps and even needle files.
- When the product is ready, it is finally finished using 600-grit sandpaper.
- Overlay elements are fixed to the base. Fasteners can be made using glue and nails without heads. Self-tapping screws can cause cracks.
How is installation done?
Once the façade trims for the windows are ready, you can proceed to their installation. It will not take much time and can be completed without the involvement of specialists. The installation method depends on what materials the walls are made of: if they are wooden, you will need the following:
- Hammer and nails 6 cm.
- Mounting gun and silicone: it is better to take a colorless one, it will be needed for sealing cracks.
- Artist's brush and paint to match the color of the trim. With its help, you can paint over the heads of nails and screws and make them invisible.
- Drill with 4 mm drill bit.
- Plugs for screws. You can also use homemade wood products.
- Medical syringe filled with liquid silicone.
- External metal slopes should be ready by this time.
The platband must be fitted tightly to the slope so that it does not protrude beyond its limits, and secured to the wall. If there are uneven places or gaps remain, they need to be coated with silicone sealant. After this, paint all the heads of the screws and nails with a small brush: this will rid the structure of unsightly dark spots.
For more information on how to restore a wooden window and give it a new look, read the article “How to repair and paint a wooden window” on our website.
Decorating windows in a wooden house requires a special approach. Read how to choose a material for covering windows in a wooden house.
What if the wall is brick or block?
Slopes are not always installed on a wooden structure - sometimes the owners want to make a brick house more decorative. You can also use metal slopes for this. The construction of metal slopes in this case is no different, but the use of nails will have to be abandoned.
Before installation, you will need to drill holes for dowels in the walls. It is advisable to use materials at least 6 cm long, otherwise there will be a risk of the structure falling out of the wall. After the holes are ready, you need to insert plastic blanks into them. Holes for screws are also pre-drilled in the mounted slopes: make sure that all holes strictly coincide.
After everything is ready, the structure is put in place and screwed. Working with cracks occurs in a similar way. You can use silicone sealant: a colorless one will be most convenient, since you won’t have to select its shade, but if both the wall and slopes are white, you can use white. It is not recommended to use polyurethane foam. It cannot withstand moisture, requires protection from weather conditions and has an unattractive appearance.
Slope function
Finishing windows on the outside with metal slopes performs decorative and protective functions. By installing slopes on windows with your own hands, you can close the installation seam and thereby protect it from exposure to precipitation and direct sunlight .
Metal slopes perform a protective and decorative role
Polyurethane foam, used to seal the joint between the frame and the window opening, is a porous, vapor-permeable substance that allows moisture from the room to pass through it. As a result, moisture and condensation settle on the surface of the window slopes, which leads to the formation of mold and destruction of the integrity of the structure. Moisture from the street can penetrate through the mounting seam and cause fogging and freezing of the window in winter.
Purpose
Metal external slopes perform several important functions:
- The iron platband for windows gives the appearance of the opening an attractive, neat appearance. The steel slope is often made in the same color as the profile of the window structure - white or brown (for wood-laminated profiles). However, if the customer wishes, the panels can be painted in any color according to the RAL catalog.
The customer can choose any color of the slopes from the RAL catalog
- Protection of the assembly seam from moisture and exposure to natural phenomena in the form of precipitation, wind and temperature changes.
- Protection of the slope surface from dampness, mold formation and destruction. External metal slopes reliably seal the wall surface and increase its heat-insulating qualities.
Metal window trim should be installed immediately after the windows are installed to prevent moisture from being absorbed by the foam . If this cannot be done in the near future due to work on finishing the facade, then the installation seams on the windows can be temporarily covered with polyethylene.
What are platbands, their features
Few people do not know that platbands are small decorative elements that are installed around windows both outside and inside any building. By the way, they not only give the windows a finished and neat look. Platbands are also needed to protect the seam between the wall and the window, usually filled with polyurethane foam, from the influence of a number of external factors, such as light, water, wind, etc. Also, the purpose of using platbands is to increase the protection of the house from drafts .
Plastic trim for windows
Visually, the platbands look like small rectangular strips. They can have different colors, and among them there are also beautiful decorative models (carved, patterned, etc.).
Putting trim on your windows yourself is the easiest and cheapest way to give your home a personal touch.
Previously, most often, platbands were made of wood, but now, when the world has been taken over by plastic, it is from this that they are mainly made. This is due to the ease of manufacture of products, durability and low cost of the material. The advantages of plastic platbands are as follows.
- They're cheap . For wooden platbands, which, by the way, can change their size and dry out over time, you will have to pay much more money.
- Plastic is a reliable material. Of course, a lot depends directly on the raw materials and quality of production, but in general, such platbands can serve for a long time without collapsing under the influence of a number of factors.
Plastic windows - Plastic trim looks beautiful and neat . They do not need to be painted - they can initially be painted in the desired colors at production. Although, most often, ordinary white or brown, wood-like elements are installed.
- Caring for plastic is much easier than caring for wood . It is enough to wipe the dust off it, and the platbands look like new. The same cannot be said about wood - not only is it more difficult to clean it of dirt, but over time it also needs to be painted regularly.
- Mold does not live on plastic, and wood borers do not eat it . This means that this also increases the service life of plastic products. Also, the plastic does not rot or dry out.
- Easy to install . Yes, anyone who wishes can install plastic trims - there is no special science in their installation.
Plastic panels for window slopes
On a note! Previously, it was believed that plastic platbands are installed only in combination with plastic windows, but this is a mistaken opinion. They can completely replace the decor of wooden windows. It’s just that in this case it is better to choose the option that will imitate wood in appearance.
Also, plastic platbands go well with siding and are in harmony with other materials intended for facade finishing. You can simply choose elements that perfectly match the color, or choose a contrasting color option.
Functions of platband on plastic windows
Advantages over other materials
There are several types of finishing materials, using which you can give the window opening a complete appearance. These are plaster, drywall, plastic and paint. But in terms of its technical characteristics, none of these materials can compare with metal slopes. When deciding how to make slopes, you need to study the characteristics of finishing materials.
The polymer layer of the steel slope protects the product from rust
When using plaster, you must be prepared for the fact that the plaster layer will crack over time. Moisture getting into the gaps between the window frame and the plaster layer can cause mold to appear.
Drywall as a finishing material for slopes is only suitable for interior work. Even GVLV brand drywall is not able to withstand the direct effects of precipitation. In a short time it will swell, lose its appearance and collapse.
The use of plastic panels for finishing external slopes leads to the fact that in the sun the plastic fades and acquires an unpleasant yellowish tint. And with a sharp drop in air temperature, the plastic becomes brittle and may lose its integrity after minor mechanical stress. Therefore, it is better to use plastic for finishing internal slopes, especially in the kitchen.
Metal slopes are not exposed to weather conditions
The advantages of metal slopes are obvious, since the material for their production is galvanized steel, which is covered with a protective polymer decorative layer at the production stage. This protects products from corrosion and rust.
How to correctly print a template and transfer it to material
Unless you have polished artistic skills, it's best to print out a template or sketch on a printer. Preference should be given to a 1:1 scale - this will avoid cutting errors and size discrepancies. Professional copy centers provide large-format printing services - the service will cost up to 300-400 rubles, depending on the complexity and size.
You can transfer simple drawings yourself - use regular tracing paper or thin paper. The finished template is connected to a wooden panel, the drawing is transferred with a pencil. Experts recommend preparing several templates and cutting each element separately:
- bottom bar;
- top bar;
- vertical slats or frames.
Please note: be sure to highlight the slot locations in color in the drawing - this will avoid mistakes in future work.
Pros and cons of the material
Despite the fact that external metal slopes are more expensive than other types of finishing, their positive qualities more than make up for this drawback:
they have a high degree of resistance to corrosion and rust;
It is recommended to install noise-absorbing tape along with the slopes
Among the disadvantages, we can note the high cost and the presence of sound effects arising from the fall of drops or hail on their surface . This can be dealt with if you use a special noise-absorbing sealing tape when installing metal slopes.
Another disadvantage of a metal slope is the impossibility of installing it in arched openings.
Preparing for installation
Installing modern metal slopes on windows with your own hands will require the preparation of special materials and tools for this type of work:
- metal sheets;
- level;
- fasteners;
- mounting foam and silicone sealant;
- screwdriver and bits;
- painting knife;
- metal scissors;
- roulette
Excess polyurethane foam must be cut off
Surface preparation involves removing construction dust and contaminants from it. Excess polyurethane foam is cut off with a painting knife, and the seams and joints are treated with silicone sealant. Do-it-yourself installation of a metal slope on windows should be done after the seams have dried .
Instructions for finishing window slopes with metal
Korovin Sergey Dmitrievich
Master of Architecture, graduated from Samara State University of Architecture and Civil Engineering. 11 years of experience in design and construction.
Metal-plastic windows are a multifunctional modern product for glazing window openings. The final stage of installing plastic windows is finishing the external slopes. For this, various finishing materials can be used: plaster, paint, PVC panels, plasterboard, but most often metal window trim is produced. Installing a metal slope on windows can be done with your own hands.
Sequence of work
Installation of metal slopes on windows involves carrying out measuring work. The width and height of the product will correspond to the internal and external parameters of the opening. The manufacture of the top, bottom and side metal elements is carried out by cutting them from a prepared metal sheet in accordance with the measurements obtained.
Scheme for trimming the upper metal ebb
At the second stage of work, the installation of a low tide takes place, the horizontal position of which is controlled by the building level. The lower junction of the wall and the window frame is equipped with a special heat-insulating material and diffusion tape for noise reduction and moisture protection.
First you need to install the tide
When attaching the ebb, mounting foam is applied to the window opening and to the ebb from the inside. To prevent it from bending due to the expansion of the foam, it is pressed tightly for a while. After the ebb is fixed, the installation of metal slopes begins.
Before installing metal slopes, it is necessary to treat the places where they will come into contact with the window frame with sealant.
Metal slopes are secured with polyurethane foam
First, the side elements are installed, maintaining the required slope from the inside to the outside. The upper and lower parts are adjusted using a knife depending on the level of inclination .
The side elements must be installed in a vertical position and tightened with screws. The upper part is adjusted to the side elements. It is aligned with the outer corners and secured with self-tapping screws.
At the final stage, all contact areas are treated with sealant.
When installing slopes on a façade made of corrugated sheets, use horizontal lintels
If the façade of the house is covered with corrugated sheets, it is necessary to use horizontal lintels when finishing window openings. These are side shelves made of corrugated sheets, which are attached to the wall on one side and to a metal profile on the other. Steel trims give the façade completeness.
Installation of window casings
Installation of the plastic trim is carried out after placing the frame. First, the surface is marked with a coated thread, stretching it from edge to edge from the bottom and top of the opening. The width of the casing is added to each point.
Mounting order:
- Attach the base to the mounting location and draw a line at 45 degrees from the corner of the window.
- Mark with a pencil on the coating.
- Cut off the excess along the marked line.
- Apply special glue for plastic to the inside of the product and to the wall.
- Press the block well, ensuring that adjacent elements are tightly joined.
- Wipe off any remaining glue.
- The lower casing is secured with bolts by drilling 3-4 slots in the wall and the product. Add a little glue to each hole and screw in the bolts.
- Treat the places where the cash is connected to the wall with glue.
Wooden cashing is installed on a blind or through tenon. In the first case, the mounting holes are invisible, since the spikes are placed in sockets on the products or base. With the through type of installation, through holes are made into which dowels are installed.
Blind tenon fastening is carried out in the following order:
- Marking the surface and frame for tenons.
- Making slots. Hard wood is used for spikes. The size of the fastener must exceed the required diameter by 0.5 mm.
- Processing the dowel with glue, placing the element in the hole. Placing the coating on the fastener.
Installing window casings correctly is not difficult, but the process requires care and precision. If deviation is allowed, the fastening will be unreliable. After installation, it is necessary to treat the surfaces with paint, varnish or stain.
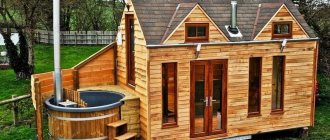
Making a platband for a window with your own hands
This summer, a good idea came to me - to add some personality to our country house, so that it would be pleasing to the eye and different from other houses. I thought a little and found a solution, especially since I was gradually preparing for it. I have long been interested in the decoration of houses in the old days, I reviewed a large number of sites on this topic. There was even a small collection of photos of platbands and decorative elements. But there, houses were mostly made of timber or logs, but our house was covered with siding, and I thought that you couldn’t make such beauty with siding. In a word, everything came together and came up with an idea, all that remains is to do it.
I apologize in advance that there are not enough detailed photos, because... At that time I didn’t yet know about the existence of the 7Dach Club and didn’t take step-by-step photographs, but simply took pictures for my own interest.
I’ll tell you how I made the platband, using my own technology and the size of our window.
Tool used:
- electric plane
- electric jigsaw
- drill
- Spade drills of different diameters
- clamps - 4-6 pcs.
- drill D 4 mm
- a circular saw
- square
- pencil
- awl
- A4 paper - 10 sheets
Materials and consumables (for 1 casing):
- self-tapping screws 16 mm long - 8 pcs.
- self-tapping screws 70 mm long - 2 pcs.
- board, pre-dried, 25 mm thick and 150 mm wide - 7-8 m
- dowels - 45 pcs.
- waterproof glue for wood
- sandpaper - approximately 10x20 cm
- plastic corner (the upper 10 mm bracket is ideal for attaching a mosquito net to a plastic window) - 2 pcs.
Preparatory stages
1. Creating templates From the photos I had, I chose the one I liked and reworked it in my own way. You can, of course, draw your own individual frame, but first you need to read a little about the amulets of Rus', about the symbols of Beregini, the Sun, etc. All this is present in Russian frames.
Photo that served as source material
Our windows have an internal size of siding frames of 88x88 cm. This was the starting point for the calculations. Therefore, the side parts should be exactly 880 mm in height and no wider than 140 mm (limited by the size of the board). The length of the upper and lower parts was determined by eye, the main thing is that they all fit together beautifully. Using Photoshop, I made a sketch of the platband in natural size.
2. Dividing a sketch into details in Photoshop
The Bereginya amulet is one of the elements of the casing Some of the templates
I transferred the drawn details onto thick paper and cut out the templates.
3. Preparation of blanks
I sawed the board according to the length of the templates with a small margin. When sawing, be sure to select sections of the board without large knots. I planed these blanks to a thickness of 20 mm and drew the outlines of future patterns on them.
I cut it out with an electric jigsaw and a narrow file. The saw blade tilt adjustment must be set to “0”, so there will be no burrs along the edges of the cut. Pay attention to the shape of the teeth; other teeth produce a poor-quality cut with burrs along the edge, and cleaning it with sandpaper along all the curves is only a punishment for some sin.
Jigsaw file
Before you start cutting, you need to drill holes in the sawed areas with a diameter of 8 mm for inserting a file. Then drill out the round parts of the future voids with a suitable diameter drill bit. This is easier than cutting out with a jigsaw, especially if the diameter of this part is small. You can't turn around with a jigsaw. And only after this you can begin the main work with a jigsaw.
Patterns for carved platbands - creating a template
In order for the carving pattern on the entire window to be symmetrical and identical, it is necessary to make a sketch or template for the carving. Creating a template for a decorative frame is not difficult; it is more difficult to decide on the variety of designs and ornaments presented on specialized websites and stores.
Pattern templates for carved trims
For those who are carving for the first time, you should not choose complex patterns. A large ornament without too small or elaborate details is what a beginner needs. Ready-made templates can be copied completely or you can come up with something new based on individual parts and their combination.
You can make your own templates in several ways:
- Processing with a graphic editor. You can create a finished image of the desired scale using Photoshop.
- Print or make a photocopy. The selected pattern is enlarged to the desired size and printed on a printer.
- Manual method. Manually transferring a drawing to a template using linear scaling.
Templates for carved frames are best made on cardboard or thick paper.
For all elements of the ornament, our own life-size template is made.
You can transfer the pattern from the template to a wooden base as follows:
- Cut out the stencil with scissors, and, attaching it to a wooden board, trace the contours with a pencil.
- Draw the outline of the design using carbon paper.
- If you don’t have carbon paper, you can transfer the pattern imprint onto the wood by pressing firmly on the pen. A faint mark will remain, which is outlined with a pencil for clarity.
- The design on a wooden board should be placed across the grain, this will protect the carved elements from cracking.
- The slotted areas on the workpiece can be painted over with a pencil.