The originality of carved frames for windows and doors is striking in its spirituality. If you are not afraid of carpentry and want to make wooden trim with your own hands, then all that remains is to come up with a composition for framing.
Below are sketches of carved frames in a small size and mediocre quality. But these templates can be downloaded for free. The main idea is the idea, and the template can be made to the desired size.
Material for platbands
Carved platbands are made mainly from coniferous wood. The best option is pine, it cuts normally, is inexpensive, and is durable due to its high resin content. In principle, you can use any other coniferous board, but it is better not to try with spruce: it is too fibrous and cannot be cut even with the sharpest tool.
You can also make carved frames from hardwood - linden (the softest), poplar, maple, oak, cherry, etc. But you need to be able to work with each species, get your hands on it, and there is no guarantee that you will get something digestible, and hardwood is expensive. That’s why window frames are often made from pine. You just need to pay attention to the quality characteristics.
Carved window frames - a way to make your home unique
If you have wood or a board that has been lying around for 3 years or more, you can use it: it is already definitely dry, it just needs processing and calibration. If you don’t have woodworking equipment at home (thicknesser and circular saw), you will need an edged board. Wood of the first or highest grade is suitable for carved platbands. This means that there should be no knots, chips, or resin pockets on the board. Take chamber-dried wood with a moisture content of no more than 8-12%. This is not sold in the markets; you need to look for it at sawmills and construction stores.
Why kiln drying? Because it is dried in a special chamber, quickly removing moisture. At the same time, some of the boards crack and bend - these are rejected, the rest are sold. If you make platbands from chamber-dried wood, they will definitely not be damaged or cracked.
Basic Rules. What not to do
Below is a list of rules that will help you avoid the most common problems.
It is recommended to use a board 3-4 cm thick as the starting material. Do not immediately grab onto complex patterns
First, it is better to practice on ordinary round parts that are easy to make with a drill. The width of the workpiece should be such that it is enough to cover the ends of the walls and protect it from moisture. Carved elements should be placed along the grain of the wood - this will prevent cracking. When choosing a stencil, it is better to pay attention to patterns with large elements, because
small ones will look crumpled, as a result of which the finish will not have the desired decorative effect.
Moreover, it is advisable to first familiarize yourself with photographs of different products. This way you can find a suitable option or get inspiration for creating something yourself.
Platbands
Tools
To make carved platbands with your own hands, you will need the following minimum set:
- drill with a set of drills;
- electric jigsaw with soft start and a bunch of different wood saws;
- chisels;
- sandpaper with grains of different sizes;
- flap disc made of sandpaper for wood on a drill.
You can make these carved window frames with your own hands.
To reduce the time it takes to create carved patterns and polish, it is better to have a router and a grinding machine.
Finishing
Carving wood beautifully is not everything.
Attention! It is important to finish the products so that they not only look impressive, but can also maintain an attractive appearance for a long time.
To protect wood from ultraviolet radiation and atmospheric moisture, it can be coated with oil, wax, colored varnish or paint. It is better to give preference to the first two options, since the carved product processed by them looks the most advantageous and noble.
Wood protection oil
Before applying the protective coating, the wood is sanded until smooth and tinted with stain - it applies much more evenly if applied with a spray. Well, varnish or wax will give the carving a final soft shine.
You can make your own wax mastic by mixing 1 part beeswax with two parts turpentine and heating it all in a water bath. Decor treated in this way will look gorgeous and last a long time.
One at a time or in bulk?
Carved platbands usually consist of repeating elements. At least two vertical slats on each window are made identical. And since several windows are usually decorated, a lot of identical elements are required. If you are going to make slotted trims, you naturally want to cut out several pieces at the same time, stacking the boards and somehow securing them.
The applied carved platbands are also interesting
The desire is understandable, but difficult to implement, and the benefits over time are not as great as it seems. The first difficulty is that home craftsmen usually have jigsaws that are not very powerful. To cut through several boards, you have to move the saw more slowly along the intended pattern. On straight lines the speed is still tolerable, on curves it is low. And the smaller the bend radius, the slower you have to move the file. If you work with one board, there are no such problems. So, in terms of time, if there is any gain, it is very small.
One more thing. Even thick, good, expensive files with a large thickness of the workpiece are deflected. So, when cutting several boards at the same time, the quality of the slot on the bottom (or two) remains a big question.
Adviсe
- If you are just starting to work on a stencil on a platband design, you should choose a simpler design with large shapes. The smaller the drawing, the more complex it is. It is good to try elements of the design from through holes.
- Open elements are cut out with a jigsaw.
- Beech, larch and oak are expensive and difficult to process, but they have a long service life.
- The easiest material to process is linden.
- The material most often used is pine.
Related article: Roller blinds from bottom to top on plastic windows
The procedure for manufacturing a platband with slotted threads
Using a template, transfer the desired drawing onto the board (read below for where to get it, how to enlarge it, and how to make a template). If necessary, we correct it and draw out the details well. Next, we will describe the procedure step by step.
Slotted thread without backing board. To make the drawing more clearly visible, a large difference in color is needed
Removing wood from the slots in the pattern
- To do this, we drill large-diameter holes in those places where the wood will need to be removed. The diameter of the hole should be slightly larger than the width of the jigsaw blade (usually 12-14 mm). The drill should go vertically downwards, make sure that the hole does not go beyond the line (but small errors are not scary).
Here is the main stage of cutting out the platband from wood - We insert a jigsaw file into the slots and cut out the pattern along the marked lines.
Since the carving will be viewed from afar, some inaccuracies are not fatal, but it is still worth striving for the ideal.
Making a curly edge
Some platbands have a smooth edge. Then we skip this stage. If the edge is figured, you will have to do some more work with a jigsaw.
- After about 5-7 cm, we make perpendicular cuts of the “extra” part of the board to the intended line of the casing. Greater precision or straight lines are not needed; we try not to cross the drawn line.
It’s easier to make a figured edge - Starting from the right or left, we make a cut along the intended line. The sawn pieces fall off during the process, so the work is not too difficult.
If the cut is complex, there may be unattractive places left. It’s not scary, we’ll modify them later where necessary - with chisels, the same jigsaw, emery. When you are satisfied with the result, you can move on.
Final revision
Owners of wooden houses probably know everything about how to process wood. But, just in case, let’s repeat the general rules again.
- We polish. Grind using any available method. Faster and best of all - with an eccentric sander, slower - with an emery wheel on a drill and a flap attachment, very slowly - with your hands and sandpaper. Ideally, we combine two methods - using a sander we process the horizontal surface, and the recesses with a flap attachment and, where it is missing, with our hands.
We polish and bring it to normal condition - We prime. Since the wood must be protected from fungal beetles, exposure to rain and sun, it must be coated with a protective impregnation. Look for any for external use. It is best to soak the workpiece for a few minutes in a bath of solution. If this is not available, use a brush to go well through all the slots.
- Let's paint.
The choice of paints and varnishes is very wide. Suitable for any outdoor use. But keep in mind that opaque paints will have to be renewed periodically - once a year for sure. And this means removing the old paint, priming, painting again. The situation is simpler with wood oils - they do not form a film on the surface of the wood, but are absorbed into the fibers. The coating also needs to be renewed, but just clean it from dust and cover it with a new layer. And the processing frequency is less. Disadvantages of wood oil - higher price, fewer colors.
This is the result of labor
And then - installation of the carved platband. It depends on the chosen type: you can immediately put it on the wall, or you can put it on a backing board, and then on the window.
Sampling through holes
The first step is to trim the edges of the workpiece and make holes in the center. Everything is simple with the edges: we cut out the excess with a jigsaw, retreating 1–1.5 mm outward from the marking line for subsequent processing. To cut out shapes in the center of the plane, drill the part at the very line of each cutout, then select the inner contour with a jigsaw.
For making large holes, it is wise to use core drills. In this case, it is necessary to mark on the template not the contours, but the centers of the circles into which the centering drill bit of the crown will be installed. A similar technique can also be used when making oval holes or elements with small rounding radii: a complex bend is drilled with the appropriate radius, and everything else is cut out with a jigsaw.
When the excess parts of the workpiece are cut out, the cut edges must be carefully processed with a rasp and then with sandpaper. It is recommended to use bars of square, round and rounded profiles, which are filled with sandpaper. This way you'll be less likely to fray the edges and will be able to get straight corners on each edge.
Rectangular ribs look rather rough, so they are smoothed with chamfers and slopes of different profiles. The easiest way to diversify the product is to go along the external and internal contours of the casing with a figured cutter. But manual processing options are also possible:
- to remove a chamfer, walk along straight edges with chips, keeping the angle of inclination of the handle to the part constant;
- a semicircular convex bevel can also be made with chips, changing the inclination of the blade, or use a concave cutter for this;
- a concave semicircular joint is made with a chisel or cutter with a rounded edge. Such elements must be cut out in stages, removing small chips layer by layer and carefully controlling the depth of the tool and the tilt of the handle;
- if the descent has a profile of a complex shape with several convex, concave and straight elements, this profile is divided into several stages and cut in a strict sequence, starting from the widest outer part and ending with the deepest and shallowest tier.
How to enlarge a template
Simple carved platbands can be made without templates. There will be several examples in the video - it shows how to draw and cut. But not everyone can draw more or less complex patterns on their own. It takes skill and talent. The easiest way is to find a diagram, print it in the desired size, transfer it to cardboard and cut it out. You will get a template that you can trace.
The second way: copy from a photograph. Not all diagrams can be found. Some, especially antique window frames, you will not find anywhere. If you have at least some drawing ability, you can copy them.
Even such an ornament can be copied... if you have the skill
Questions may arise about how to increase the size of the found diagram or template. There are three options:
- Using any graphic editor. The simplest one - Paint - is available on any computer running Windows (the “Image” tab, the line “Change image size”, select “centimeters” and enter the desired length (height) in the box. The resulting file can be printed. If the printer is small format, It may be necessary to split it into several pages.Them should then be glued together and, based on the resulting drawing, a template should be made.
- Using a photocopy. Copiers have a zoom function.
- Taking graph paper, transfer the drawing to the desired scale. To do this, divide the original image into squares with a side of 0.5 or 1 cm (can be printed on a piece of checkered paper). Then we transfer the lines to graph paper, increasing them in the required proportion.
The first two methods are faster. But when scaling, the picture may turn out fuzzy and blurry. It can be corrected manually, or drawn in some editor, for example, CorelDRAW. Watch the video to see how to do this. Just an example of drawing a diagram for carving.
Types of decorative strips
For the external framing of windows and entrance doors, platbands made from the following materials are used:
- wood, thick plywood;
- metal;
- Styrofoam;
- polyurethane.
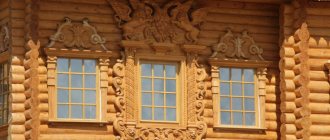
Wooden cladding, which has adorned log houses for centuries, remains popular to this day. It is performed in two styles - Russian, where beautiful carvings with rich ornaments prevail, and Finnish - more laconic. The latter is distinguished by the straight shapes of the elements and a small hinged visor, as shown in the photo:
Framing in Finnish (left) and Russian style (right)
Reference. The scope of application of wood strips is not limited to log houses. Now they can be found in country cottages built from timber and brick, including those with plastic windows. As the photo shows, the openwork pattern looks great even on a stone wall.
The main advantage of wood is not ease of processing, although this also matters. Another thing is important here: carved platbands, made according to an individual sketch, will give the facade an exclusive appearance that you will not see anywhere else. This is a good reason to start making your own, because ordering such products from a specialist will not be cheap. This equally applies to metal flashings - you can also cut them yourself if desired.
Window cladding made of polystyrene foam and plastic is a more modern way to solve the problem. And although polymer elements for windows are not exorbitantly priced and are easy to install, they are completely devoid of individuality. The reason is clear - many enterprises have mastered the production of polyurethane decor.
Facade decor made of polyurethane
Schemes, templates, patterns
Narrow edge elements
Decorative elements for vertical or horizontal strips
Schemes for cutting out wooden trims
Cut-out elements for window decoration
Schemes of patterns for decorating brackets
Scheme of carved platband
What can happen and options for vertical slats
More brackets
Towel or side patterns
Possible schemes
This is a non-cut thread
Jewelry options
Drawings and diagrams
Welted, overhead, with crowns
Central elements for vertical strips
Three more options
Different styles, but no doubt spectacular
The style is completely different...
Varieties
Plastic trims vary depending on the design, material, manufacturing technology, installation method and location. In addition, there is a difference between products for different types of windows: what is suitable for PVC glazing will not always be in harmony with a wooden window or door.
For plastic windows
Typically, these are plain products of white or dark brown color, made of sheet plastic. The main requirement for such cashing is compliance with the appearance of the building and covering the installation joints.
For wooden windows
For window blocks, special frames are produced from wood that fully imitate the most common types of wood. In addition to the external similarity, such products have the appropriate texture, which makes the platband material visually practically indistinguishable from the imitated original.
Craft Basics
If you look at some photos of the works, you can clearly see that the authors used several methods of wood processing at once - when making various elements of decor or the exterior of buildings, flat-relief patterns with raw edges are rarely found, which means more than one or two technologies are used.
To begin getting acquainted with the basics of the craft, let’s remember how each of us held a jigsaw in our hands and cut figures out of planks or plywood. This is called the simplest slotted thread. More complex jobs will require more tools than a jigsaw and a dozen spare files, but the principle remains the same.
We select tools and devices used to create patterns
When performing this type of carving, a variety of cutting tools are used, such as ordinary knives and chisels. But working with such tools is very labor-intensive and tiring. Therefore, drills and saws are more popular for such purposes, and the type of saw can be different - from a jigsaw to a hand saw, depending on the size of the template you created.
Nowadays, craftsmen rarely use manual labor when performing large-scale work. Convenient household power tools are often used, such as an electric drill, a hand router and a jigsaw. Using a jigsaw, work is done quickly, easily and efficiently. But with such work it is impossible to do without a drill used to pre-drill holes for the file. Working with a hand router is not so easy and productive; moreover, it requires preliminary skills in handling this power tool. But the carving is much better quality and there is no need to make preliminary holes in the workpiece.
There are also more original ways to create a slotted pattern on a wooden workpiece. One of these methods is burning. The essence of this method is to literally burn through a pattern on wood with highly heated nichrome wire. The disadvantages include the specific burning smell, the need to cool the working tool, which causes the work to take a little longer, as well as noticeably charred edges of the finished pattern.
A more advanced method of this method can be considered laser cutting, which is distinguished by the high quality and accuracy of the resulting pattern. However, the use of this method is only possible when purchasing very expensive equipment, which is why this type of work is now not very often used in practice.
In conclusion of the article, I would like to show you the amazing work of a very experienced master, who depicts in his works not just abstract drawings, but very accurate and detailed copies of animals.
Finishing slopes with plastic panels
Finishing of window slopes inside can be done using plastic ceiling panels or multi-layer sandwich panels. The installation of this material is so simple that it is possible to finish the inside of plastic windows with your own hands. How to make slopes for plastic windows in a house will be described below.
PVC panels are most often used to finish slopes from the inside.
Sandwich panels are better than ceiling panels due to the presence of a layer of insulation inside. However, ceiling ones also have thermal insulation qualities due to the air chambers between the internal stiffeners.
Installation and repair of slopes inside a building using these finishing materials is possible due to their qualities:
- PVC slopes are durable;
- the use of panels for finishing window slopes gives them an attractive, neat appearance;
- finishing options can be very diverse thanks to a wide range of colors,
- which have external surfaces of panels;
- it is possible to install plastic on arched structures;
- Repairing plastic slopes is not difficult;
- ease of installation - window openings are finished with your own hands, and installation does not take much time;
- PVC is easy to process;
- slopes lined with plastic on the inside are easy to maintain;
- finishing window openings with this material increases the energy efficiency of the window system;
- The interior decoration of windows prevents them from fogging and freezing.
Installation
How to install internal slopes for windows made of PVC panels is shown below.
- remove excess polyurethane foam using a stationery or construction knife;
To remove the remaining foam, use a stationery or construction knife along the perimeter of the window opening near the frame using self-tapping screws and fix a wooden block;
A wooden block is secured around the perimeter of the frame; we attach the starting profile to the block;
A starting profile is attached to the block along the outer perimeter of the window and a rail is installed;
The rail is fixed along the outer perimeter of the frame, first it is better to insert the side elements;
The side panels are installed first, then we insert the top panel, bend it, foam it a little and fix it in the required position;
A small layer of foam is blown between the upper slope and the PVC panel
fix the side parts in the same way; After the structure has dried, the corner parts are decorated with decorative elements - corners or platbands.
Corners are covered with platbands
Sandwich panels can be installed in the same way or without a starting profile. In this case, the panel is placed in a groove cut in the mounting foam. This installation method is relevant when it is not possible to place the block around the perimeter of the window frame.
Application area
Widespread use of framing around various openings has found itself in doors and windows. The location of the planks can be either on the outside of the street or inside the room.
Basically, the same type of platbands are installed, but the threads may differ. And at the same time maintaining the general theme. For example, in a children's room, the bar will have a bunny. Flowers are carved around it. Then the teddy bear in the kitchen should also be framed with the same flowers.
Now the brand is considered to be plastic double-glazed windows. Some people manage to put a wooden plank on them. In this case, you need to paint it white or choose a double-glazed window made of wood.
The strips around the window opening perform several functions:
- They unite all the buildings in the yard into a single style.
- Reduce heat loss.
- Protect from dust and litter, moisture, draft.
- Increases sound insulation.
- I emphasize the uniqueness of the residential building.
- An opportunity to express the traditions of a region, family, country.
- The ability to visually stretch and expand the house.
- They add completeness to the construction.
- Cover the assembly seams.
In the days of our ancestors, home owners firmly believed that window slats not only had a beautiful and original appearance, but also provided protection from the evil eye and evil spirits
Therefore, we paid close attention to their production and tried to make them only in a unique form.
Window trims - step-by-step description of design selection and installation tips. Top 100 photo ideas
Initially, platbands were conceived as an element of facade decoration, and were intended to cover gaps and cracks between the wall and the window frame.
In addition to the utilitarian function, platbands have always had a decorative and aesthetic function of decorating the building.
Carved wooden cornice “Grape”!
Hello, dear and respected Guests.
Today I want to show you how we made a carved wooden cornice, which will definitely decorate any kitchen, children’s room, even a living room!
I show it so that our customer does not have any doubts that our work is exclusively manual! Handmade exclusive from a valuable type of wood - Manchurian walnut, using carving elements from acacia, cedar and Amur velvet.
By decorating your window with our carved wooden cornice, you seem to invite Nature itself into your home - its wealth and beauty, its freshness and purity, filling the vacuum that has formed in the life of a person cut off from its origins!
We will assemble and cut the wooden cornice “Grape” - this is a carrier with leaves and bunches of grapes!
In the Far East, you can pick grapes in the forest: after frost, they become so tasty! In general, our nature is so rich and varied: several types of nuts, berries and mushrooms. Write a book about beauty only if)))!
The first thing we do is prepare the material.
We saw it into bars and glue it together so that our carved cornice does not move or twist! After all, he will have to decorate someone’s space for many years, and maybe even centuries! I'm not joking at all: with proper care, it can serve and decorate your home for centuries (this plastic bursts and crumbles after a few years), because... the quality of our work corresponds to original Russian traditions!
Now we can see what the cornice will be like (I have already cut out the shape of the supporting cornice with a jigsaw).
This photo shows what the cornice consists of - the roof, the load-bearing one, which we will cut, the block from which we will cut the Rope element.
So we begin the carving itself: with a semicircular chisel we cut off the chamfers at all the holes and with a straight chisel we cut off the chamfer at the leaves, separating them:
We chamfer the entire cornice using a wide semicircular chisel:
Here you can see how we shaped the leaf, cut out the veins and teeth of the leaf:
And so we cut out the leaves on the entire carved supporting cornice:
For the carved rope we make cuts (our rope is made of Amur velvet - a valuable type of wood that throws perfectly!):
Now we cut out the cuts, i.e. remove excess with a wide chisel:
We clean up our wooden carved rope (give it full volume):
Hand jigsaw
The tool has a fairly simple design and low cost. A jigsaw is a U-shaped metal structure with a mechanism for securing and adjusting the saw blade (Photo). Today, hand-held jigsaws are available for sale, the frame of which is made of sheet metal and pipes.
Hand jigsaw
A modern manual jigsaw is equipped with a mechanism that allows you to secure files, creating different planes for sawing. However, the tool has a number of disadvantages, the main one of which is rapid overheating and wear of the saw blades. Therefore, we recommend purchasing several dozen files at once.
We also recommend buying a vice or clamps - the workpiece must be well secured. For interior work (for example, cutting out an oval or circle), you will need a drill whose radius should be slightly larger than the width of the file. It is also worth purchasing or making your own auxiliary board, which will protect the table and help position the workpiece as conveniently as possible for the operator.
Features of the sawing process
Doing the job requires good lighting. It is advisable to prepare the tools in one convenient place under the right hand, without cluttering the space with unnecessary details.
Sawing should begin with the internal elements of the design applied from the stencil. To perform slotting work on plywood, holes are first made in some places on the contour.
When cutting with a regular hand jigsaw, hold a piece of plywood with your hands. When working with an electrical apparatus, the workpiece is fixed on a workbench or table using a vice. If you have experience working with an electric jigsaw, cutting is easy and quick; As a result, the lines are smooth, neat, requiring minimal subsequent sanding.
The presence of stencils, a good jigsaw and the desire to start cutting - all this together can bring pleasure to the work process and the result both to the master himself and to loved ones or customers.
We determine the required dimensions of the future ornament.
It should be remembered that for house carvings you should not choose sketches with small details. Small elements will reduce the durability of carved products and will be lost against the large background of the facade, since house carvings look beautiful upon a holistic inspection of the building, from a distance.
The size of a separately located ornament is determined by the place where it will be located. And here, I think, you will not have any difficulties.
Therefore, I would like to focus on ornaments in which the pattern is repeated several times, the so-called ribbon ornaments. Such ornaments are used to decorate the piers of roof slopes and eaves
To place a pattern in a ribbon ornament, it is necessary to determine the width of the pattern in order to place a whole number of them at a given length. Those. the distance at which the ribbon ornament will be placed must be divided into X equal parts, the size of which will correspond to the width of the pattern.
This calculation is done quite simply:
• The total length of the ornament, for example 5365 mm;
• Desired (approximate) width of the pattern, for example 105 mm
We divide the total length by the length of our pattern.
In our example, 5365 / 105 = 51.09 pcs. - it turns out to be a fractional number. Now you need to take an integer amount close to the calculated one, either 51 or 52.
Then we divide the total length by the accepted number of patterns and get the exact width of the pattern.
For example: for an even quantity – 5365 / 52 = 103.17 mm.
Now we return to the graphic editor and change the width of our pattern to the calculated value. Notice that the height has automatically changed. If this is not the case, then your block has been removed.
Figure 2. Setting dimensions