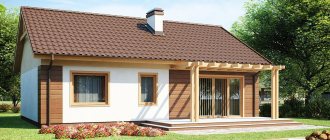
Wooden houses are rapidly gaining popularity among owners. People are striving to return to using natural and environmentally friendly materials for housing construction.
Along with the construction of a private house, the issue of installing windows becomes relevant. How to choose windows for a wooden house?
Wooden windows
Every homeowner faces the question: what material of windows is more practical and better? The choice is between wooden and PVC windows.
Let us list the advantages of windows made of wood:
- Wooden windows are in perfect harmony with the building itself, preserving its original naturalness and natural beauty.
- Wood is a clean, safe material.
- Natural ventilation is created between indoors and outdoors by installing windows with wooden frames.
- With proper care and timely processing, wooden frames can last for quite a long period of time.
There are also a number of disadvantages of using wooden windows:
The tree is exposed to adverse environmental factors.
Manufacturers often use low-quality materials to make frames, which is why windows quickly lose their original appearance, crack and become deformed.
Wooden frames require regular treatment and painting.
Basic tips for doing the work yourself
Recommendations from craftsmen who know all the intricacies of measuring and installing window structures will help you get the right result:
If you have accurate information, you can choose the window model, the type of opening mechanism, the color of the frame, the type of glass unit, and the finishing of the slopes.
The result of the measurements taken should be:
- Correct opening parameters.
- Correct calculations of window structure sizes.
- Quick and high-quality installation of the frame, window sill, ebb, mosquito net.
Plastic windows for a wooden house
Modern plastic windows in a wooden house also have both pros and cons. Here are the advantages of PVC frames:
- Metal-plastic, which is used to make windows, is a very strong and durable material.
- If we compare wooden frames with plastic ones, we can note that the latter have much better sound insulation.
- Plastic windows are easy to install and maintain.
Among the shortcomings, only external qualities can be highlighted. Many people prefer wood to plastic because they do not accept the combination of a wooden house with plastic windows.
Despite this, manufacturers of PVC windows still found a way out of this situation and began to produce frames of suitable colors and shades.
Turnkey construction of houses: the right decisionArtificial stone countertops
- Combisystem Gardena
Its texture is also similar to wood. Another disadvantage of metal-plastic frames is the complete lack of ventilation.
Recommendations from experts
Experts who have filled openings dozens of times have developed a number of useful recommendations that will help beginners.
- It is not always possible to choose a finish to disguise the insert inside the house. You can solve this problem for free and effectively - put a cabinet there or hang a large picture.
- Matching the timber, log or block house color to the wall should be done after installation. The paint will cover up any defects obtained during installation and will capture part of the wall, making the insert almost invisible.
- An original way to disguise an opening from the inside and outside is to install a false window. You can equally successfully use previously dismantled blocks, decorations, and even professional painting.
- It should be possible to access the contents of the frame for inspection and periodic replacement of insulation. The optimal solution would be a shield on hinges or screwed to the wall with self-tapping screws.
It is quite possible that the home owners will sooner or later want to return the window to its place. With a frame insert this won't cause much trouble.
Window trims
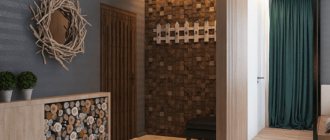
The main function of platbands on window openings is facade decoration. Take a look at the windows for a wooden house, and you will see that with platbands the design of the building looks absolutely complete, adding individuality and uniqueness to it.
These products have a beautiful and attractive appearance and, in addition to decoration, perform the following functions:
- Windows are highlighted, emphasizing their beauty.
- I visually change the shape and size of the openings. This parameter is important when you need to reduce or increase the size of the opening to achieve a harmonious appearance of the building.
- Platbands are able to emphasize and accentuate the features of the overall design of the house.
- Platbands cover the gaps between the wall and the window, preventing cold air from entering the room.
For many homeowners, installing windows without trim is completely unthinkable, despite the fact that this type of decor goes far into the past.
Thanks to the wide range of window products on the construction and finishing goods markets, everyone will select platbands of the required design and in accordance with their taste preferences.
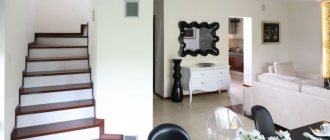
Which staircase to choose for a private house to the second floor: types and varieties of materialHigh pressure washers
Well in the house: advantages and disadvantages
Fastening slopes to polyurethane foam
The installation procedure is as follows:
- measure the dimensions of the slope;
- cut out the sandwich panel in accordance with these dimensions with a margin of 0.5 cm;
- excess foam is cut off after installing the window unit;
- Make a furrow 0.5 cm deep along the window in the foam;
- try on the panel, insert it into the groove, align the edges;
- remove the sandwich panel, and apply polyurethane foam to the wall, having previously moistened it with water;
- apply foam from bottom to top, departing from the corner 1 cm. You do not need to foam the entire surface, but only part of it: along the edges and in the middle. The fact is that the foam expands, taking up free space. If you do not leave room for its expansion, the foam will squeeze out the slope;
- moisten the foam with water from a spray bottle and lay the panel on it; attaching to the wall with masking tape;
- other slopes are mounted in the same way;
- The cracks are filled with sealant.
How to care for plastic windows?
Despite the fact that PVC window frames do not require careful maintenance, this does not mean that they do not require attention.
If the features of caring for glass do not depend on the material of the frame, then caring for plastic has its own nuances:
- Under no circumstances should plastic be cleaned with abrasive materials or aggressive detergents. A warm soapy solution is a great way to remove stains on a plastic frame.
- The seal also needs to be wiped with a damp cloth and treated with lubricant.
- All moving parts of the window require lubrication annually.
- The drainage holes, located at the bottom of the frame and designed to drain excess moisture, must be checked and cleaned if necessary.
We prepare tools and materials
We will need the following:
- Powerful drill and screwdriver.
- Level (preferably laser).
- Chisel.
- Roulette.
- Gloves.
- Polyurethane foam (or similar material).
- Pliers.
- Spacer bars (you can make your own).
- Anchor plates.
- Hexagon (it will be needed for final adjustment of the fittings).
- Anchor screws.
Photo of beautiful windows in a wooden house
How to build a house with a garage - interesting layout options with advice from experts (photos and videos)- The best frame houses - photo review of the most convenient options for housing, here you will certainly find a layout for your home!
- Which flexible tile is better? The answer to this and related questions is in the review, find out what the difference is and what is better yourself! (Photo and video)
Did you like the article? Share

0
Preparatory work
As in other cases, the manufacture of a metal door begins with paper work, in other words, we have to create a drawing.
In order for the drawing to be accurate and true to reality, you have to decide on the dimensions.
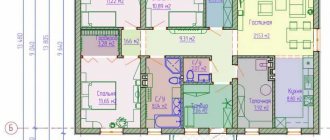
The design diagram of the front door offered for review will introduce you to the names and locations of the main components and elements.
Preparing the diagram
A drawing of a metal entrance door is a large-scale diagram of the door leaf, according to which the assembly and installation of the product will be carried out, with the dimensions of the door frame, the location of the stiffeners and hinges marked on it.
We arm ourselves with a tape measure and take measurements from the doorway.
The standard door size is 90 x 200 cm; if the actual dimensions of the opening are significantly larger than the data, it makes sense to install a separate block on top or on the side of the door leaf.
The side block can be made solid or hinged, and the top block can be covered with sheet metal, glazed or lattice.
We also apply all this to our drawing.
The dimensions of the door frame should be 2 cm smaller than the doorway - this will be the installation gap in which the installation of the block is adjusted to avoid distortions. Below is a sectional diagram of a metal door.
Most often, the door is attached to 2-4 hinges, their number depends on the weight of your structure.
Hinges can be external or hidden; the second option is more difficult to manufacture and requires certain skills.
Since we are trying to make a “door for beginners,” we will focus on the first option.
To distribute the load evenly, the hinges should be made at an equal distance from each other, and the top and bottom hinges should be located at a distance of 15 cm from the edge of the door.
You can make stiffening ribs in any direction - horizontally, vertically or in a mesh, as well as diagonally - everything is at your discretion.
The ribs must be made so that they do not pass through the places where the lock, peephole, or door handle will be installed.
You determine the number of ribs yourself; it must ensure that the door does not bend under its own weight, otherwise the door will require repairs after some time.
So, the drawing is ready.
Preparing materials and tools
Having decided on the dimensions, we prepare a set of tools that we will need during the work, calculate the amount of materials needed and go to the store.
We offer you a sample list of tools:
- welding machine;
- drill;
- a set of screwdrivers or a screwdriver;
- Bulgarian;
- clamps;
- files or grinder;
- trestles or door table for assembly;
- measuring instruments (corner; tape measure, etc.);
- building level.
For a standard size metal door you will need:
- steel sheet 2-3 mm thick - 100 x 200 cm;
- metal corner 3;2 x 3;2 cm – 6 running meters. (for door frame);
- profile pipe 5 x 2;5 cm - about 9 l.m. (for the door frame and stiffeners);
- metal plates 40 x 4 cm, 2-3 mm thick - at least 4 pieces (for attaching the door frame to the walls);
- door hinges;
- lock;
- accessories;
- anchor bolts;
- anti-corrosion coating;
- metal paint;
- polyurethane foam.
Choose fittings and locks to suit your taste. Manufacturers offer a large selection of locks, the most reliable of which are considered three-sided.
A lock with bolts on three sides is, of course, more difficult to install, but it is also not easy to break into.
If you are making a metal door for a utility room (shed), then you can make a lightweight, economical option - in this case, instead of a profile pipe, a thick reinforcing rod is used for the stiffeners.
Choosing a mounting method
An important condition for filling openings with bricks is to ensure a reliable connection between the new structure and the old one. There are two binding methods:
There are two binding methods:
Scheme of ligation of sutures.
- ligation of sutures;
- anchoring
Bonding seams with an existing structure is used to seal brick walls. To do this, at the ends of the doorway it is necessary to knock out bricks to a width of at least 12 cm. Niches are formed into which new stones will fit when the opening is filled with bricks. If the partition is folded into half a brick, then it is enough to knock out the finishing halves in every fourth row.
The dressing method is not very suitable for sealing window openings, because they are made in a load-bearing wall, folded into 1.5-3 stones (thickness from 250 mm). Here it is more appropriate to perform anchoring: using a hammer drill, drill holes in the side ends of the structure and hammer pieces of periodic profile reinforcement into them.
The diameter of the connecting reinforcement is from 6 to 10 mm, the depth of immersion into the thickness of the structure is at least 100 mm. Anchoring is performed every 3-4 rows; it is most convenient to do it during the construction of the partition so that the seams of the new and old masonry coincide. This method is also used for connection with concrete walls.
Step-by-step instruction
Each material requires a specific algorithm of actions in order for the result to be the most productive.
How to cover with paper?
The procedure can be performed in two ways:
- The first is to tear the paper into pieces and twist thin flagella. Using a knife or screwdriver, insert the flagella into the cracks. To make the work easier, it is recommended to wet the paper.
- The second way is to shred the paper and soak it in water. Then squeeze out, add clay (in the same amount) and crushed chalk (2 parts) to the resulting volume. The result is putty with good plasticity, which can be used to seal even small cracks. Seal the paper insulation on top with strips of paper or fabric.
Nowadays, people more often use masking tape or window tape for sealing.
Working with foam tape
The step by step process looks like this:
Selecting a tape with the required parameters - length and width. The length is equal to the perimeter of the cracks being sealed, the width is the size of the voids.- Preliminary cleaning of places for sticking tape from dust and degreasing with alcohol or acetone. Drying. The tape is only effective on dry surfaces.
- If the foam tape does not have a self-adhesive base, then it is first placed in the cracks and then secured with adhesive tape.
- If the tape is self-adhesive, then you need to carefully remove the protective layer and glue the tape to the desired location.
The seal maintains quality for 3 years.
Using polyurethane foam
This material is very convenient for areas with large heat losses - bridges between the frame and the frame, under the sill and the window sill.
- The first stage is preparation. Use a vacuum cleaner to carefully blow the dust out of the cracks.
- Moisten the work area to better polymerize the foam.
- Using a gun nozzle, foam the grooves.
- After the foam has hardened, cut off all excess and protruding parts with a knife.
- Cover the top with a layer of finishing material.
Important! After foaming the window, the composition expands quite strongly.
Polyurethane foam can be used to seal cracks on the inside and outside of a wooden window. Filling should be done from bottom to top.
How to insulate with sealant?
The method is suitable for eliminating cracks at the joints between glass and sash.
It is best to choose a colorless sealant . Process description:
Remove the slats or glazing beads securing the glass. Start with the bottom ones, then remove the side ones, and lastly the top ones.- Remove the glass.
- Thoroughly clean the inside of the sash from dust and dirt.
- Apply silicone sealant.
- Reinstall the glass.
- Attach new glazing beads.
It is recommended to work with thick gloves.
Installing new, smaller windows
The opposite case is when the new window is smaller than the old one. The need for such a replacement often arises when renovating bathhouses and utility rooms.
Several solutions are already possible here, among which there are simple and complex options.
By simple we mean those situations when changes in size occur within a small range.
Plastic extensions for expansion
That is, if it is necessary to move the window to the left or right by a few centimeters, then the resulting void can be filled using special expanders (if it is a PVC window), or by increasing the thickness of the casing strips with ordinary boards of suitable thickness.
Let us formulate the main rule for such changes in size: the planned displacement of the window must be such that the resulting voids in the frame can be covered with platbands.
It should be noted that any attempt at such changes will be accompanied by difficulties in finding optimal proportions in the external design of the window, which will be extremely difficult to find with increased or uneven frame thickness.
Therefore, in order for modified window openings to look correct and beautiful both from the outside and inside, a much more complex technology should be used, based on replacing logs in the crowns.
Sealing existing openings
For example, if there is no longer a need for any of the doorways in the house, then it must be closed. You can close the openings in the internal partition using ordinary drywall or other similar material.
However, if the opening is in the outer part, then it is impossible to do without a major filling of the opening. In such a situation, special blocks and bricks will come to the rescue.
The opening must be carefully prepared before the sealing process. The plaster should be completely removed: starting from the lowest base to the slopes and inconspicuous corners.
New so-called grooves are created in the brick opening for future masonry. Half the brick should be removed on every 4th row. Holes are created in the inner walls of the concrete into which 9-10 mm reinforcement is driven. This is done to strengthen the bond with the brick material.
The wall covered with brick is left to harden for a day, and only after a day they begin to plaster. Initially, the areas of the walls freed from plaster will have to be primed.
During the plastering process, steel mesh is used every 240 mm. Steel structures are used to further strengthen the structure. Next, the wall is sprayed with cement, and the mixture (mortar) begins to be applied. The number of layers of plaster should depend on the correspondence between the levels of the previous and existing walls.
But! Be careful! Each subsequent new layer can be applied only one day after the previous layer has hardened. Before each application of a layer, the surface should be well primed, and the other side of the wall should be plastered.