Be patient, get ready to check the details and carefully draw every line. You need to make a drawing, which means that every movement of a pencil on paper must be precise and correct.
Drawings are checked for compliance with GOST and the Unified System of Design Documentation (ESKD), according to which graphic documents are produced. You won’t be able to understand the design rules right off the bat, so before work, carefully study the GOST requirements for drawings.
Lesson No. 11. How to draw on a computer. Graphic editor Paint
Earlier I wrote that various actions on a computer are performed by using the corresponding programs.
So you already know that text is written in a program - a text editor, the simplest of which is called Notepad. You can even draw on a computer using a program - a graphics editor. A text document with a name is a text file. Similarly, a graphic document, such as a photograph, drawing or drawing, is a graphic file. Work with this type of documents is carried out in a graphic editor. There are different graphic editors, just like text editors. One of the well-known programs is the graphic editor Photoshop, which has great capabilities. This program is paid, again far from cheap, sometimes it can be installed on a computer when you purchase it and, of course, is included in the price. There are other free graphic editors that are not inferior in capabilities to the Photoshop editor.
The simplest program is a graphics editor, supplied with the Windows operating system and installed on your computer, called Paint. For all its simplicity, the Paint graphic editor can do many useful, interesting and beautiful things. Having mastered this editor, you can later easily use other cooler graphic editors. Using the Paint graphic editor, you can view photos, copy them, cut out part of the photo, write an inscription, and also create your own multi-colored drawing or painting (if you have artistic abilities), design a personal greeting card, draw a garden plan, etc.
Place the cursor on the “Start” button in the lower left corner of the monitor screen, move the cursor higher until the inscription “All programs”, the inscription will be highlighted in blue. A column with a list of programs will appear on the right. Move the cursor to the right in this column and select the inscription “Standard” from the list; the inscription will be highlighted in blue. Another column with a list will appear on the right. Move the cursor to the right in this column and select the inscription “Paint” from the list; the inscription will be highlighted in blue. Click on this inscription.
Attention!
This tutorial was previously written for a previous version of the Paint program included with the Windows XP operating system. Currently, the Windows 10 operating system includes a new version of the Paint graphics editor. The interface (appearance) of the editor has changed, the layout of the panels and some inscriptions have changed. The principle of operation of the program remains the same. I will show some changes for Windows 10 here in red text, accompanied by new pictures. Read everything else from the previous text.
To open the Paint program in Windows 10, move the cursor to the “Start” button in the lower left corner of the monitor screen, move the cursor to the inscription “Windows Accessories”, click on it and select Paint, click.
A window will open, at the top of which there is the inscription “Untitled – Paint”. In order to expand this window to full screen, select “View” in the top line, select “Zoom” in the drop-down menu, and click “Large”. A large white field appeared in front of us - a space for work. When you zoomed in, not the entire field fit on the screen; scroll engines appeared at the bottom and right. By clicking on them with the left button and holding, you can drag the sliders one to the right, the other down to view the entire image. If this seems inconvenient to you, return the previous scale.
A window will open, at the top of which there is the inscription “Untitled – Paint”. In order to expand this window to full screen, select “View” in the top line, select “Zoom” in the drop-down menu, and click “Enlarge”. When you zoomed in, not the entire field fit on the screen; scroll engines appeared at the bottom and right. By clicking on them with the left button and holding, you can drag the sliders one to the right, the other down to view the entire image. If this seems inconvenient to you, return the previous scale. Next, click “Home”.
In the upper left corner you see a toolbar, and in the lower left there is a color picker. Your cursor on the white field has taken the shape of a pencil, and the button with the image of a pencil is pressed on the toolbar. Select any color from the palette by clicking the mouse and move the cursor across the field. The pencil will draw a line with the selected color.
A color palette appeared at the top right, the “Tools” panel appeared at the top left, and the cursor took the shape of a cross. Click on the pencil in “Tools”. Select any color from the palette by clicking the mouse and move the cursor across the field. The pencil will draw a line with the selected color. Choose a brush instead of a pencil, change the color from the palette.
Select a brush instead of a pencil, change the color from the palette, select the brush size at the bottom of the toolbar (try different ones), move the brush across the field.
Below the pencil there is a button with a spray icon. Click on it and change the color. Briefly click on the white field, another time click and hold longer. Depending on the duration, the spray will be less or more filled. The spot size is also selectable at the bottom of the toolbar.
Click on the arrow in the “Brushes” tool, a panel with different options will open, one of them is “Sprayer”. Briefly click on the white field, another time click and hold longer. Depending on the duration, the spray will be less or more filled.
If you select one of the lines in the Thickness panel, it will determine the size of the spray spot. The thickness of the brush is also selected.
Similarly, select the “Line” and “Rectangle” buttons, and set the line thickness at the bottom of the toolbar. To draw a line, place the cursor, click and, without releasing, drag further.
In the “Shapes” panel, select the “Line”, “Rectangle” buttons, at the bottom of the toolbar, set the line thickness in the “Thickness” panel. To draw a line, place the cursor, click and, without releasing, drag further. To view an enlarged picture, click on the magnifying glass on the toolbar and click on the image. At the top of the toolbar there is an "Eraser" button, click on it, then drag along the drawn lines to erase them. You can also select the eraser size in the Weight panel by selecting the line thickness.
To draw a rectangle, place the cursor, click and, without releasing, drag along the diagonal of the rectangle. Using the “Ellipse” button you can draw both an ellipse and a circle, practice. There is also a “Rectangle with rounded corners” button. When you hover over the buttons, read the tooltips. The polygon is drawn like this. Click the Polygon button. Place the cursor on the field, click and, without releasing, drag to the next corner of the future polygon, release, click again in the same place and drag to another corner, etc. The resulting closed polygon (any closed contour) can be filled inside with color . Click on the Fill paint can in the toolbar, having previously selected a color, and click inside the outline. There is also a “Curve” button. Select it. Place the cursor, click and, without releasing, drag, for example, from top to bottom vertically, release, you get a vertical straight line. Move the cursor to the line, for example, in the middle, click and, without releasing, drag, for example, to the left. Let go, you get a concave blue line.
It's time to save our experimental drawing. Click "File, Save As", double click on the "My Documents" folder, there is a "My Pictures" folder in it, open it. Place the cursor in the “File name” line and enter the name, for example, “Figure_1”, do not put quotation marks, do not put a space, instead of a space put an underscore (at the top of the keyboard while simultaneously pressing the Shift key with your left hand) or a dash. Click "Save". The file name “picture_1.bmp” will appear at the top above the white work field; the computer has added a dot and the extension “bmp”, which is used for this picture file in this graphic editor.
To view an enlarged picture, click on the magnifying glass on the toolbar and at the bottom of the panel, click on the desired magnification scale. At the top of the toolbar there is an "Eraser" button, click on it, then drag along the drawn lines to erase them. You can also select the eraser size at the bottom of the panel. After you have erased something, click “Edit, Undo” in the top line, everything will appear again. Thus, the program allows you to undo the last three actions. You can delete everything drawn in another way. Click “Edit, Select All,” then press the “Del” key on your keyboard. Try it, then return the drawing using the “Edit, Undo” method. Click “Edit, Select All” again, the cursor changes to a cross. Place a cross on the picture, press the left mouse button and, without releasing it, drag the entire picture to the free field. To remove the selection (the dotted line around the picture), click on the free field outside the dotted line.
After you have erased something, click the “Undo” arrow in the top line, everything will appear again. Thus, the program allows you to undo the last three actions.
You can delete everything drawn in another way. In the top line, open the “Select” arrow and select “Select All”.
You can return the drawing using the “Return” arrow.
To remove one of the shapes, open the “Select” button at the top and select “Rectangular Area”.
To delete one of the shapes, click the “Selection” rectangle on the toolbar, place the cursor in the upper left corner above the shape and drag it to the lower right corner, release. The figure is highlighted with a dotted line, press the “Del” key. Undo the last two actions: deleting and moving the picture. Save the document: “File, Save.” Now click on the “View, View Drawing” button. To return to the previous state, left-click on the picture field.
It's time to save our experimental drawing. Click "File, Save As." In the previous version it was possible to select only the BMP format. In the new version of the Paint editor, other saving formats have appeared, with other extensions. You can use any of them, there are some differences that are not significant for you. The most commonly used JPEG format, providing a small file size.
Windows 10 doesn't have the same My Pictures folder, so click Pictures and create a new Pictures folder, double-click it and save the picture.
If you have artistic abilities and skills, you can draw a portrait of yourself, or an animal, or a flower, and then use it as an avatar, for example in a real-time communication program. To create your own avatar (if you don’t have a photo on your computer), you can draw some geometric pattern or symbol.
Select your pattern using a rectangular selection, click "Edit, Copy to File", your "My Pictures" folder will open, give the file a name, for example "avatar_1", click "Save". The system will add a dot and the letters “bmp” to the name. You already know that these letters are called extensions and are used to help the computer understand which program should open a given file. The "bmp" extension corresponds to the Paint graphics editor. The file “avatar_1.bmp” is in the folder. To see how it turned out, click "File, Open", click on the avatar image, then "Open". Read how to insert an avatar in lesson No. 10.
Select your pattern using a rectangular selection, click on the “Crop” button at the top, then: File, Save As, Image in JPG format, your “Pictures” folder will open, give the file a name, for example “avatar_1”, click “Save”. The system will add a dot and the letters “jpg” to the name.
If you want to paint a picture or draw a sketch of the layout of your garden plot, but in the process of work you are afraid that you will spoil everything that has already been drawn, I recommend that from time to time you save intermediate versions of the work under different names, for example, “plan_1, plan_2, plan_3” etc. The final result of the site plan can be called "plan_done", and after reviewing, when you are sure that the sketch is complete and correct, delete all intermediate options. To delete an unnecessary intermediate file, go to the “My Documents, My Pictures” folder, select the file, click on it, then press the “Del” key.
Let's summarize the acquired knowledge and skills. You can draw pictures and pictures on the computer, as well as sketch. These steps are performed in the Paint graphic editor program, which comes with the Windows operating system and is installed on your computer. During the drawing process, you can select a tool, change the thickness and color of lines, and also erase unnecessary details with an eraser. By selecting part of a picture, you can delete it. This graphic editor also has the ability to undo the last three actions. In the next lesson we will learn how to write text on the drawing margin and work with photographs. To go to the next lesson, click on the link How to sign a drawing on a computer, insert a photo into it, or create a postcard Larisa Viktorovna Vyskubova, 04/09/11. Updated 02/26/18
Any design begins with the creation of a drawing. Agree, no one will build, say, a bridge without first designing it and making all the necessary calculations. Before putting it into production, any part must be developed, drawn, and all its necessary parameters determined. What do you think this means, dear friends? This means that if you are a “techie”, then you cannot do without the ability to draw in most percent of cases.
The need to draw gives rise to natural questions: what, where and how to create a drawing? Which program is the best?
Modern programs for creating drawings and diagrams, as well as other graphic objects, will be discussed in this article.
A drawing is a projection image of a certain object to scale on a specific storage medium, made using graphic samples.
The times when an engineer or architect came to work, took a sharpened pencil and stood with it at the drawing board all day, creating a drawing, are gone forever. Now in our information age, everyone, or the majority, sits at their personal computers and laptops. And there is a very good reason for this - the existence of many computer-aided design (CAD) systems.
These software products almost completely eliminate the need to draw directly by hand. The finished drawing, even if it is in the largest format, can always be printed on a plotter specially designed for this purpose.
Registration of work
The main rule for implementing graphic documentation according to GOST requirements is not to invent your own rules. If you doubt anything, re-read the requirements or seek advice. Each point must be justified.
1. Selecting a format. Buy a special sheet. The dimensions are indicated in the assignment or specified by the teacher. If the size is not provided, take the draft drawings and distribute them evenly across the sheet, maintaining the rules for the layout of objects (correct arrangement of views, minimum distance between objects, other GOST requirements). If the drawing does not fit, then you need to change the scale of the object or the sheet format.
2. Selecting a sheet and its orientation. Check the length and width of the sheet with the specified values in the GOST 2.301-68 table. Even a slight deviation from the table data can lead to errors in constructing a graphic image. According to the task and format, determine the required orientation of the sheet.
3. Main inscription. Draw a frame and table in accordance with the ESKD. On A4, place the inscription along the short side of the sheet.
GOST 2.304-81 is dedicated to fonts.
They rarely get it right the first time. First, practice drawing fonts on graph paper, understand the principles of writing each character. To make your work neat, mark the lines for writing. One proven option is to take a compass needle and gently press the paper at an angle, but without scratching or damaging the surface of the sheet. The width of the letters can also be marked with a compass, making small injections on the paper.
4. Draw the objects. Transfer images from drafts using thin lines. It is better not to outline objects with thick lines right away: if you have to erase, a mark will remain. Lines made with a pencil that is too soft can simply be smudged.
5. Lines. Each line in the drawing has a purpose, name, and thickness. Follow GOST 2.303-68. The work will be made easier by mechanical pencils with leads of different thicknesses.
6. Designations. Enter all designations of dimensions, sections, scales, shading, etc. in accordance with GOST 2.306-68 and GOST 2.316-2008. Pay special attention to the number of required sizes and the image of the arrows.
Checking the drawing
- Check with the previously drawn up plan to see if all the work has been completed.
- Erase extra and auxiliary lines.
The most popular drawing programs
So, let's look at the most popular electronic means of creating drawings, their pros and cons.
With this product you can create two-dimensional and three-dimensional drawings, while Autodesk AutoCAD allows you to render three-dimensional objects at the level of full-fledged 3D graphics editors. In addition, Autodesk AutoCAD provides the ability to work with 3D printers, a truly wide range of functions for professional design, and the ability to work with layouts. The disadvantages include fairly high system requirements. Thus, you will not be able to use the Autodesk AutoCAD package without a sufficiently powerful PC. At the same time, however, Autodesk specialists were able to make their product as accessible as possible through the ability to work with Autodesk AutoCAD online. Having uploaded the data to the server, you can edit your drawing by simply connecting to the Internet and having, as it were, a portable program for creating drawings on your mobile phone. Moreover, a new, improved version of the product is released almost every year.
Autodesk AutoCAD works with several file formats. The most common format is DWG (closed format for editing drawings).
As negative points, again, we note the high system requirements.
Disadvantages of DIY Design
It is possible to design a private house yourself. It must be taken into account that design work is a complex process that requires serious knowledge, skills and experience. Organizations engaged in design receive the appropriate SRO approval. This is logical, since the safety of life and health of people living in the building depends on the quality of the developed design documentation.
The experience and professional knowledge of the designer allow us to select the optimal solutions in terms of cost and reliability. It is difficult to imagine that a person engaged in design for the first time will be able to offer more effective options. As a result, the costs required for the construction of the building increase, or the level of living comfort and durability of the building decreases. Taking into account the above, the most appropriate option is to invite a specialized organization, the competent choice of which will allow you to obtain a high-quality result at minimal financial costs.
Other drawing programs
Working in nanoCAD
The CAD systems discussed are the most common. These products allow you to solve many similar problems. In addition to Autodesk AutoCAD and Askon KOMPAS, which are the most powerful CAD systems, you can also pay attention to the Nanosoft nanoCAD program. We noted this program for the reason that it has the simplest interface. Yes, the software capabilities of Nanosoft nanoCAD are not so high; this program is focused on working with two-dimensional drawings. However, the main functionality of the program complies with CAD standards, and the availability of a free version and ease of use make Nanosoft nanoCAD a product worthy of attention.
Which program to choose for creating electronic drawings depends on your capabilities, goals, and skills. The fact remains: if you are burning with desire and interest, you will be able to master any, even the most complex product. And if you know the goal, you will definitely find the means to achieve it.
Drawing and engineering graphics are one of those subjects that are not easy for everyone. Almost every student who has studied drawing knows the situation when a test or test is just around the corner, an urgent need to make and submit a drawing, but it is not ready. We also know such situations firsthand. That is why we are always ready to help you out in difficult times and complete a drawing according to all stated requirements in any required format and in the shortest possible time.
In the field of computer-aided design, computer drawing programs have appeared that provide the construction of high-quality drawings of varying complexity. They require quite impressive knowledge, but now, to create any drawing, it is not necessary to visit the design departments; any person, without much effort and even at home, can do this work without any problems.
Preparatory stage
Start working on a rough draft. It is more convenient to sketch with graph paper or on squared paper.
1. Understand the task. Read the manual, remember the teacher’s recommendations. A consistent plan of what needs to be done and in what form helps to get started.
2. Complete the necessary drawings. Construct the required images in thin lines. For convenience, take colored pencils, felt-tip pens and highlight zones (this helps solve problems in descriptive geometry). If you make a mistake, erase extra lines and dots that may confuse you.
Autodesk AutoCAD - the flagship for creating drawings of varying complexity
AutoCAD is one of the CAD programs that is truly in demand in the design field. Every year, developers introduce various changes, making working with this software more comfortable and making it possible to create drawings of the highest complexity.
Functionality
Depending on the version of the program, the user will be able to create 3D or 2D drawings of varying complexity. It is worth noting that initially this product was designed to create 2D graphics, but at the moment, it is in no way inferior to the capabilities of powerful software that allows you to build 3D layouts.
As for two-dimensional graphics, AutoCAD is the leader among such software and can rightfully be called the best program in the field of creating high-quality drawings. If the user needs to import drawings into other programs, the AutoCAD developers have provided the ability to save projects in three extensions: DWG, DWF, DXF.
The main advantages of this software in the field of CAD include:
- a huge selection of tools for high-quality drawing;
- possibilities of using cloud services;
- importing EXCEL tables;
- installation is possible not only in Windows, but also on other platforms;
- ensuring work with layouts;
- support for 3D printers.
The negative aspects of this product include:
- the considerable cost of this software;
- A powerful computer is required for comfortable work.
AutoCAD is used in almost all organizations that require the creation of high-quality drawings and layouts. Download the official version of the program.
"KOMPAS" is represented by a variety of software tools that can be used in various fields of activity. Using this software, you can create not only drawings, but also all kinds of mechanisms, as well as the design of buildings and structures.
Key Features
This program allows you to export and import projects, which allows you to use the created work in other CAD products.
The creation of drawings is carried out in three-dimensional space. But with any changes and adjustments, changes also occur in two-dimensional space, and the user can easily print any section of the part in full accordance with the construction in 3D graphics.
Project documentation is created on the basis of a ready-made project, which complies with all domestic standards.
It is worth noting that this program is most widely used in the Russian Federation. This can be explained by the fact that all documentation complies with the norms and standards of the Russian Federation.
- a relatively simple graphical interface will allow you to quickly understand the specifics of this program;
- it is possible to connect various libraries and templates that will make your work easier;
- developers regularly release updates that improve the program and make it easier to work with;
- a huge number of design tools.
The main disadvantages, as in AutoCAD, are:
- impressive cost of the product (although a stripped-down version is available for educational purposes, which costs much less);
- huge demands on computer resources.
KOMPAS is ideal for constructing individual mechanism components, drawings, and design documentation. Official website of ASCON.
This software product, compared to its competitors, is easy to use. And although the graphical interface has a lot in common with AutoCAD, nanoCAD was created entirely independently and without copying any tools from other CAD systems.
As a rule, this product is most in demand for educational purposes, where every user can easily understand the intricacies of designing and creating drawings.
Advantages of nanoCAD:
- low purchase cost compared to other design systems;
- open source code allows you to independently modify this product;
- there is a free version;
- fully adapted to Russian design standards.
Flaws:
- functionality is inferior to competing products;
- Problems running DWG files.
This product is used by users and specialists who need to create high-quality drawings and design documentation. Thanks to the availability of a free version, any novice designer can try his hand at it. Official website of Nonosoft.
In this article we will review 3 popular programs for drawing on a computer: we will consider the pros and cons of each. as well as the scope of application.
In the era of digital technology, manual drawing has become an anachronism. The practice of completing projects on a personal computer and then printing them in the appropriate format has long been popular. And with the creation of 3D printers, it became possible to bring three-dimensional models to life.
The main feature of this type of drawing is accessibility. The work can be done by both beginners learning the basics and seasoned professionals who make their living by designing.
A wide range of programs is available to personal computer users. Mostly automated, which makes people's work easier and increases the productivity and quality of the original circuits. Below is a list of popular, easy to learn, functional applications.
How to make a house plan correctly
Solving such a problem is a creative and interesting undertaking. All family members will be happy to take part in it.
Initially, decide on the volume of the building, the presence of a basement, garage, second floor or attic. Match your wishes with your financial capabilities. Decide on your individual preferences.
Decide what material the walls, foundation, and ceilings will be built from. The thickness that must be transferred to the plan in the future depends on this. Find out the possibilities of connecting communications and creating a sewer system, and a place for a well. Armed with all this knowledge, proceed directly to creating the diagram.
AutoCAD
The software manufacturer is Autodesk. The application is popular among design departments, computer-aided modeling and everything related to production, installation and construction. When applying for a job in a serious enterprise, an employee will have to deal with AutoCAD. The program is available to amateurs, beginners, and professionals. The software does not stand still, constantly receiving support from developers. Updated versions are released annually with improved functionality, expanded capabilities, and an interface improved according to user comments. This careful attitude of the manufacturer led to the popularity of the software.
Functional properties
When working on a computer, the application allows you to create two-dimensional and three-dimensional projects. The latter provide unprecedented visualization, which is mastered by advanced image editors.
2D models developed in AutoCAD are unique. The output is detailed drawings, where all the nuances will be taken into account. Experts note that projects created using Autodesk digital technologies are distinguished by their quality.
Formats that AutoCAD works with
Three main ones:
- DWG is an editable binary file format that stores 3D and 2D project data.
- DXF is an open format that allows data exchange between computer-aided design systems.
- DWF is a format from Autodesk. Has an open structure. Needed for printing, viewing and editing projects.
Advantages and disadvantages
The software’s functions fully rehabilitate its high cost. Companies and private professionals part with money without regret - the software pays for itself on investment. Drawing enthusiasts and beginners prefer to work in publications with limited functionality or a free trial version, which is available online and available for direct download.
Advantages
- A large number of tools and various functions is a real Mecca for professionals and people who are passionate about design.
- The ability to integrate with Excel tables has been implemented.
- Access to cloud storage.
- Supports most operating systems, including mobile ones.
- Integration with 3D printers.
- There is the ability to work with layouts.
- Availability of a free version.
Flaws
- High cost of the complete product.
- High system requirements - not every computer can handle it.
Scope of use
It is vast and growing every year. Autodesk products are used in construction, manufacturing, medicine, clothing design - anywhere that requires excellent quality drawings. Educational institutions of various fields devote a lot of time to teaching AutoCAD.
Communications
The supply and distribution of electricity, water supply, gas, sewerage, ventilation, information cables leaves an imprint on ease of use and ease of maintenance. Having an approximate layout of objects in the basement and on the first floor, you can already understand how pipelines, air ducts and wires will be laid.
Sometimes you have to adjust the layout in order to simplify and optimize the highways. There are many restrictions and rules for laying, for example, gas pipes. They will have to be taken into account. And it is advisable to develop a system such as wastewater disposal with the possibility of easy maintenance and replacement.
It is also necessary to take into account that all products have a service life limit. And if not you, then your children will sooner or later be forced to update the entire system.
Appearance plays a significant role. A popular method is installation in specially designed niches. Modern materials can solve all problems.
If improperly done water supply and waste disposal do not lead to big troubles, then problems in the supply of gas and electricity can provoke fatal consequences. Therefore, it is better to entrust both the creation of the plan and its execution to competent organizations.
COMPASS
Russian 3D development. The uniqueness of the application lies in the implementation of automated computing technologies when working on projects. The user receives a set of utilities that will help create high-quality, original drawings.
A distinctive feature of KOMPAS is its computing core. The program contains signatures that are oriented towards the state standard in the field of drawing and design. The output is work performed strictly in accordance with GOST of a certain type.
The application allows you to draw a separate part, an entire mechanism or structure.
The platform supports an extensive list of formats. works closely with design bureaus, where he uses a variety of applications. The consequence of this interaction was the possibility of integrating drawings designed by KOMPAS into third-party applications.
The finished project is a three-dimensional model. After its creation, accompanying documentation is generated automatically. This makes work easier, eliminating the need to create each document with your own hands, and eliminates design errors.
KOMPAS-3D ASCON is widely used among professionals and amateurs. What is not surprising is that the application has many positive aspects.
- Completely in Russian. This feature is important for beginners - if you don’t know any function, you can guess its presence directly.
- It is easy to learn, and the speed of creating projects is at a high level, being a leader in this indicator.
- Development and improvement does not stop for a minute. Developers take into account user wishes when improving the application.
- Connected libraries: mechanical engineering, instrument engineering, construction, KOMPAS-electrician and others.
- The range of tools is wide and will satisfy the needs of any professional.
- The program is aimed at Russian users.
- The full version of the product is expensive - the price of the latest version is about 65 thousand rubles.
- Not weak requirements for personal computer resources.
COMPASS is used by professionals. But there is a less functional (cheaper) version of the product. For the personal purposes of amateur users, there is a Lite edition, where there is no ability to connect libraries, and the set of drawing tools is limited. KOMPAS is used by domestic enterprises. But in recent years, a trend has emerged according to which ASCON products are being abandoned in favor of Autodesk.
How to make a house foundation plan
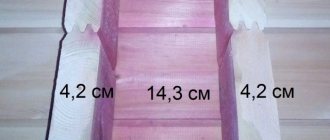
The task is similar to the previous one, only a little simpler. The location of the load-bearing walls and the laying of the water supply depend on what the foundation will be.
By drawing a drawing of the support, highlighting the thicknesses of all the walls, we get the basis for creating further rooms.
To choose the right foundation contractor, use the convenient builder search on the Building Companion website. You will find examples of completed projects and customer reviews for each contractor and can request an estimate of the cost of the work. Find a builder to arrange the foundation of a turnkey house »
There is an option not to be constrained in choosing the layout of a residential building by the outlines of the foundation. Then you will have to place a permanent ceiling on the support. In this case, the location of the partitions in the space above will not depend on the selected type. And for professional advice, you can contact a design company.
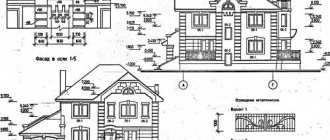
Basic kit drawings
- AR-1: General data;
- AR-2: General data (continued);
- GP-3: Situation plan M 1:2000;
- GP-4: Base plan M 1:500;
- GP-5: General plan M 1:500;
- GP-6: Improvement plan M 1:250;
- AR-7: 1st floor plan;
- AR-8: 2nd floor plan;
- AR-9: Facade 1-3;
- AR-10: Facade VA;
- AR-11: Facade A-B;
- AR-12: Facade 3-1;
- AR-13: Section 1-1;
- AR-14: Section 2-2;
- AR-15: Roof plan;
- AR-16: General view (Perspective);
- AR-17: Wall developments with ventilation ducts;
- AR-18: Specification of elements for filling openings;
- AR-19: Floor Inventory.
Working drawings of VK (water supply and sewerage)
- Common data;
- Water supply and sewerage 1st floor plan;
- Water supply and sewerage 2nd floor plan;
- Water supply and sewerage system diagram B1, T3, K3.
, Where,
- B1 – domestic water supply;
- T3 – Hot water pipeline;
- K1 – Domestic sewerage.
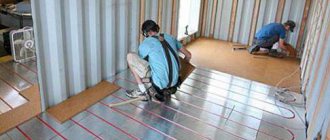
Working drawings of OV (heating and ventilation)
- 1-2 General data;
- 3 Heating by radiators 1st floor plan;
- 4 Heating by radiators, 2nd floor plan;
- 5 Heating “warm floor” 1st floor plan;
- 6 Heating “warm floor” 2nd floor plan;
- 7 Heating system diagram;
- 8 Connection of distribution manifolds No. 1, No. 2 Heated floor;
- 9 Ventilation of the 1st floor
- 10 Ventilation of the 2nd floor
- 11 Schematic diagram of the combustion chamber
- 12 Fragment of the furnace plan, distribution comb;
- 13 -14-15 Equipment specifications
- There is a table of heat transfer resistance of external walls.
- There are specifications for materials and equipment.
Now more details.
Attic and roof
The main element that protects a building from precipitation is the roof. At the same time, it plays an important decorative role. The shape, design, materials used are very significant. The space under metal tiles or ondulin is often empty. In many cases, creating additional living space is a good solution. Without changing the angle of inclination, it is possible to place full-fledged rooms with dimensions half as large as those on the first floor.
This solution allows you to increase your home by one and a half times at minimal cost. If changes are made to the roof, this figure can increase to 1.8.
External protection against precipitation must fulfill its main function: reliably withstand rain and wind. In Russia, a very important parameter is the ability to withstand the pressure of the snow layer. In some years, the cover creates forces of up to 1 ton per square meter. Therefore, it is not worth saving on load-bearing structures.
Recently, the minimalist style has become popular. It involves creating a flat roof. This is a rather expensive solution, because the snow does not have the ability to melt and melts as it accumulates from the heat coming from the technical level. The ceiling is made of solid concrete slabs that can withstand heavy loads. Waterproofing is carried out using a layer of bitumen.
Modern realities make it possible to create a very diverse roof and attic design. Only your preferences and financial situation can limit your imagination.
Design it yourself or with the help of an architect?
If the owners of a future country house have specific wishes for the layout of their future home, determined by their lifestyle, the number of family members, their habits and characteristics, it makes sense to think about a standard project and involve an architect to draw it up.
If you plan to design a beautiful one-story house made of timber without any special frills in the design, you can use standard designs, compiling it yourself or selecting one of the ready-made versions taken from the Internet to suit the characteristics of the site on which construction will be carried out.
If the future owner of a new wooden house is not confident in his abilities or is afraid of making a serious mistake that will cost considerable expenses to correct it, it is better to entrust the work to a professional.
How the project is approved before construction begins
So, you made a sketch of the house yourself and, after making more than one attempt, you were able to draw up the plan correctly. Most likely, the project will not be accepted in this form. The number of nuances in construction is so great that even professionals are not immune from minor mistakes.
The best solution would be to provide your experience, wishes, and, based on these parameters, order a working project from a specialized competent organization. The service will allow you to avoid many formalities, for example, electrical wiring and gas supply require certification. In addition, the specialist will most likely notice little things that you did not attach importance to. This will save you time and money. The path from an idea to a document with legal force is quite long and requires a lot of specific knowledge.