11083 0 7
Andrey September 2, 2016Specialization: facade finishing, interior finishing, construction of dachas, garages. Experience of an amateur gardener and gardener. We also have experience in repairing cars and motorcycles. Hobbies: playing the guitar and many other things that I don’t have time for :)
Wooden houses have a number of positive qualities, including environmental friendliness, high speed of construction, etc. At the same time, they also have some disadvantages, in particular, during the heating season such buildings are very uneconomical, since although wood has low thermal conductivity, the walls are still quite “cold”. This problem is solved by additional thermal insulation, so below I will tell you in detail how to properly insulate a log house so that the house is not only warm, but also durable.
Insulation of a log house
Insulation methods
At first glance, insulating a house made of logs does not represent anything complicated - it’s enough to just cover the walls with insulation. But, in fact, this procedure has a number of nuances and requires strict adherence to the instructions. Otherwise, the structure may quickly rot and become unusable.
| Type of insulation | Peculiarities |
| External | In this case, the insulation is located outside. This method of thermal insulation is the most optimal. |
| Internal | In this case, the insulation is located from the inside. This thermal insulation has a number of disadvantages:
Therefore, internal insulation is used either as additional or in extreme cases, for example, if you categorically do not want to change the appearance of the facade. |
Below we will consider both insulation options.
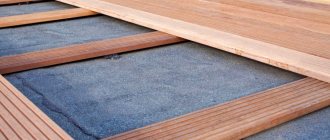
Floor insulation scheme
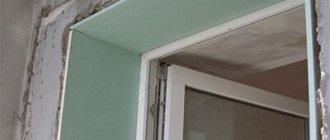
Vapor barrier: importance of application
Insulation of the walls of a wooden house begins with the installation of a vapor barrier layer. This process is necessary because during the first year of construction of the structure, the moisture content of the wood changes greatly. Typically, log houses are allowed to dry for 12 months. When the humidity of the tree changes, shrinkage occurs, namely: cracks and deformations appear, the size and shape of the logs change.
This process lasts for five years. As a result, the tightness of the grooves and joints is broken. More often this applies to houses made of laminated veneer lumber or hand-cut logs.
Selection of material for vapor barrier
If the house is made of wood that has been machine processed, then the following can be used as a vapor barrier material:
- aluminium foil;
- polyethylene film;
- roofing felt
If the timber is laminated veneer lumber, then there is no need to install additional vapor barrier. This is due to the fact that during production, laminated veneer lumber is dried to a minimum moisture content. Such houses shrink slightly and there are practically no deviations in the grooves and joints.
The most budget-friendly and popular option for installing a vapor barrier on wooden walls from the inside is a technology using ordinary polyethylene film. In this case, its thickness is chosen to be more than 0.1 mm.
Despite its cheapness, this option disrupts the microclimate in the house due to the presence of a shell made of airtight material.
Finishing the bath with warm plaster
An alternative option for finishing the facade of a bathhouse is warm plaster, which is a solution based on cement, expanded clay chips, perlite sand, powdered pumice and granulated foam.
Facade plaster has many advantages:
- high sound and heat insulation characteristics;
- good adhesion to any type of base;
- installation without the use of reinforcing mesh. Exceptions include deformed areas of the façade;
- resistance to rotting, burning, mold formation, infestation by insects and other pests;
- does not require preliminary leveling of the surface.
The disadvantages of the material include the following:
- impressive weight;
- high price;
- limitation on the thickness of the decorative layer - permissible thickness no more than 5 cm;
- the need for finishing primer and painting;
- the need to strengthen the foundation of the building.
The plaster is applied to the cleaned surface manually or by machine. Each subsequent layer is applied after the previous one has completely dried.
When using insulating boards that have a sufficiently high density, for example, polystyrene foam, fiber cement or tightly compressed glass wool in mats, which will later be covered with plaster on top, wall sheathing is not necessary.
Approximate scheme for insulating walls under plaster
Most often, this principle is applicable on smooth brick or reinforced concrete walls. In this case, the plating is done as follows:
- On the wall of the house, at the height at which the insulation will be installed, a metal holder profile is fixed, selected according to the thickness of the selected insulation boards. The profile is leveled to a perfectly flat horizontal level;
- the walls are cleaned of dust and, before applying glue, moistened with water for better adhesion;
- then pre-diluted special glue is applied to the insulation boards;
Insulation boards can be mounted with construction adhesive
- the first row of slabs is installed on a metal profile and pressed firmly against the wall;
- the next row is installed on the first according to the brickwork system - in a dressing;
- having secured two or three rows of slabs with glue, each of them is additionally secured with dowel fungi;
- further work continues according to the same system to the very top. Then the insulation is installed on other walls in the same way;
- When the layer of glue under the insulation has dried, it is necessary to glue all corners of the building, window and door slopes with corners with reinforcing mesh. They are fixed with the same glue, its excess is removed with a spatula;
Reinforcing corner
- after the corners have dried, the reinforcing serpyanka mesh must be secured to the entire insulated surface;
- The surface on which the serpyanka sheet will be glued is coated with a thin layer of glue. A reinforcing mesh is fixed on top of it, smoothed with a spatula, and excess glue is also removed;
- when the surface dries well, it needs to be covered with polymer plaster, a layer of 2-3 mm;
- The final stage will be the application of decorative plaster, selected in the appropriate design style of the building.
Plaster prices
Plasters
Sheathing a house using sheathing
An insulating facade system using lathing, can be installed in one or two layers. The position of the frame bars will depend on how you plan to install the decorative cladding.
Installation of façade sheathing
- To install the sheathing correctly, it is better to first mark the wall. In this case, you need to take into account the width of the insulation mats.
- Then bars or metal profiles are mounted on the surface of the walls.
- If you are sheathing a wooden wall, then before laying insulation, you should attach a vapor barrier film to the entire surface of the walls.
- Next, insulation mats are laid between the sheathing bars. If necessary, they are secured to the wall with mushroom anchors.
Insulation is placed between the sheathing guides
- Having installed the insulating layer, a superdiffusion membrane is stretched on top of it, securing it to the sheathing bars with the staples of a construction stapler.
- Next, you can install decorative cladding material.
Another option for installing the sheathing is done a little differently.
- Markings are also made on the wall and hangers are fixed along it at a distance of 40-60 cm from each other. Their edge holders should protrude from the wall to the thickness of the insulation and wooden blocks that will be attached to them.
Facade insulation scheme with installation of sheathing on metal hangers
- These elements will be fastening not only for the bars, but also for the installed insulation.
- Insulation mats are marked and cut in places where they will be placed on metal elements.
- Then the insulation is mounted on the wall, and a diffuse membrane is stretched and secured on top of it.
- Next, wooden sheathing bars are installed in the hangers, they press the insulation tightly against the wall and secure them in metal holders with self-tapping screws.
- Decorative sheathing material is also installed on top of this system, using the installed sheathing bars as guides.
We suggest you familiarize yourself with: Electrical wiring in the bathhouse - selection of circuit diagram and installation rules
Laying inter-crown insulation
Installation of insulation is an important stage of construction work, on which the strength and comfort of the future building depends. The installation technology is selected individually and depends on the processing characteristics of the logs (timber, rounded logs, etc.) and the type of insulation. In addition, there are basic rules that must be followed when installing all types of material.
How to lay inter-crown insulation correctly
- Insulation should be installed only in the warm season.
- The surface of the logs should be thoroughly cleaned and dried before performing work.
- You should not lay the material in a layer that is too thick or thin (it is important to find the “golden mean”), otherwise the logs will not settle as needed, or the walls will be constantly blown by the wind.
- The work is performed from below along the entire perimeter of the log house, first from the outside, then from the inside. The material is laid on the log, secured with a stapler if necessary, and the next log is placed on top. You cannot lay insulation on each wall separately, as in the future this threatens to distort the entire structure.
- The insulation should not roll into thin strands - its edges should protrude slightly, and after finishing the work they are pushed inside with a chisel.
Correct installation of inter-crown insulation
About a year later, after the building has given the necessary shrinkage, the procedure for laying insulation must be repeated.
Internal insulation
We have dealt with external insulation, now we will look at how and with what to insulate a log house from the inside, starting with the walls. So, for these purposes you need to prepare the following materials:
- insulation – as for external insulation, mineral mats are the best choice;
- slats with a cross section of 20x20 mm;
- boards;
- vapor barrier film;
- material for wall finishing - lining, plasterboard, etc.
Thermal insulation of walls from the inside
It must be said that this technology resembles the installation of a curtain facade, however, it contains its own nuances:
- before insulating the walls from the inside, they also need to be caulked and treated with an antiseptic compound;
- slats are placed on the prepared wall. As a rule, they are arranged in horizontal lines in increments of a meter and a half;
- then a vapor barrier film is attached to the slats. The vapor barrier must be stretched so that an air gap is formed between it and the wall. To fasten it, a construction stapler is usually used;
- then vertical posts are attached to the slats according to the same principle as installing the frame on external walls;
- Mineral mats are laid in the space between the racks. If they fit tightly, then they do not need to be fixed with dowels;
- then a vapor barrier film is attached over the racks;
- At the end of the work, the frame is sheathed with clapboard or other material.
This completes the insulation of the log house walls from the inside.
Thermal insulation of the ceiling from the inside
Ceiling
Finally, I will tell you how to insulate the ceiling from the inside. For this you will need the same set of materials as for floor insulation. The operation is performed like this:
- work begins with dismantling the ceiling lining and sheathing;
- then a vapor barrier film is attached to the floor beams and boards located in the attic;
- then mineral mats are laid in the space between the beams. They can be secured with slats;
- then a vapor barrier film is attached to the slats;
- At the end of the work, the ceiling is sheathed with clapboard, plasterboard or other material.
Here, in fact, is all the information about how and with what to insulate a log house inside.
Preparatory work
When the insulation is selected, it is necessary to purchase all additional materials necessary to work with it and prepare the tools. To insulate a bath you may need:
- construction knife;
- roulette;
- level;
- hammer;
- brushes and/or spatulas;
- sledgehammer;
- construction mixer;
- container for mixing solutions;
- work clothes, mittens, rags.
It is better to make a list of everything you need after it has been determined how best to insulate the walls of the bathhouse, floor or ceiling, and all the necessary materials have been purchased.
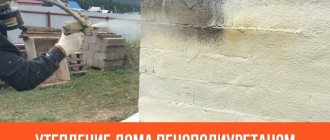
How to insulate the foundation of a bathhouse?
Polystyrene foam is excellent for foundation insulation. But we must not forget that the insulation crumbles and is afraid of mechanical damage. To protect it from the outside, it is necessary to make a protective partition from boards or bricks.
Foam plastic is optimal for insulating the foundation. It does not allow water to pass through and the foundation will be reliably protected.
Polystyrene foam has proven to work well as insulation for the foundation of a sauna on loamy and clay soil. Since moisture does not get inside the material, it will protect the base of the bathhouse from moisture and heaving in spring and winter. But you should not use insulation when the groundwater level is higher than usual and flooding cannot be avoided. Moisture getting under the foam cannot evaporate and the foundation will begin to collapse.
The thickness of the foam for insulating the foundation of a bathhouse is chosen according to your region, so for the middle part of Russia 50 mm is suitable. In the corners of the structure, thicker material of 100 mm is used, since heat loss in the corners is the highest.
Progress of foundation insulation work:
The foundation is first excavated and cleaned of dirt. Apply a primer made of bitumen mastic and a waterproofing agent, for example, liquid rubber, to the wall. The coating is left to dry for 1–2 hours.
The foam is attached directly to the foundation wall using bitumen mastic or a polymer-based adhesive. The slabs begin to be laid from below, and they must rest on a hard base. If the foundation is just being built, then a protrusion is specially left for the foam slabs. For the old foundation, gravel is added on which the slab will rest.
The joints and the part that is glued are completely lubricated with bitumen mastic. On sale you can find foam boards with an L-shaped lock. These are easier to glue together and the protection will be more airtight.
When the slabs are laid, they are once again covered with bitumen mastic and a protective partition is made. It's easier to install boards, but they will rot quickly, so use brick. A half-brick wall is made from it along the entire foundation. Among modern materials, geotextiles have performed well. It is simply rolled out along the foam and the protection is ready. But the price of geotextiles is high.
The entire structure is buried on the side with soil and a concrete blind area is made on top. Making such insulation is labor-intensive, but the bathhouse will be protected reliably.
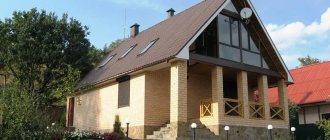
Types of decorative cladding
Modern materials make it possible to create an imitation of brickwork on a wooden wall, or, on the contrary, to transform a brick house into a wooden frame. For this, claddings such as siding made from different materials, wooden lining, block house, thermal panels, ceramic or stone tiles and others are used.
Clinker thermal panels are one of the modern materials for insulation and decoration of facades.
House covered with clinker thermal panels
They have appeared on the construction market relatively recently, and have already gained wide popularity. This is not at all surprising, since they have many positive qualities.
- One of the main advantages is that this material performs two functions at once: insulation and decorative cladding.
- The panels perfectly imitate brickwork and are produced in a variety of colors, so they can be matched to any style and taste.
- They give the surface absolute neatness and aesthetics.
- This type of cladding is convenient and relatively easy to install on the wall.
- Thermal panels can be used to cover any surface - wood or brick.
- The light weight of the panels makes it possible to do without additional strengthening of the foundation of the old building.
- Since the materials have a low percentage of water absorption, the façade can be washed from sludge with water under high pressure.
- The tightness of the panels on the wall does not allow cold air to penetrate to the wall of the house.
Thermal panels have a polyurethane foam or polystyrene foam base onto which clinker tiles are pressed. The warm substrate increases the thermal insulation qualities of the panels by two to four times, and creates an optimal vapor-permeable microclimate for the walls, which allows you to preserve the material from which the house is built for a longer period.
The structure of the panels is a layer of insulation and decorative tiles “like brick”
- Clinker tiles protect the insulation base from external factors such as wind, precipitation, and direct solar ultraviolet rays.
- Clinker panels are very securely attached to the wall and can last 45-60 years without repair work, without losing their original appearance.
- The panels are assembled into a single plane using existing locking joints (tongues and grooves), which ensures tight adhesion.
Installation of panels is quite simple and intuitive
- Straight, wall thermal panels and corner elements for them are produced, which facilitate the task of decorating the corners of the building, making them absolutely neat, not different from the general appearance of the walls.
Thermal panels are equipped with the necessary additional profile elements
- Thermal panels are reinforced with plastic guides that prevent deformation and mechanical stress of the facing material.
Installation of thermal panels
- Before you begin installing the panels on the wall, it is necessary to inspect it for various bulges, significant depressions and chips, which can greatly impede quick installation. Therefore, it is necessary to bring the surface of the walls to a perfectly smooth state.
Inspection of walls before installation of thermal panels
- When installing panels on surfaces that have large irregularities, for example, the walls of a log house, they are covered with a lathing made of wooden beams.
Installation of clinker thermal panels can be carried out directly on the walls or on the lathing
- In this case, it is very important to correctly calculate the location of the sheathing elements so that the fastening of the panels is successful. There must be at least three sheathing bars per panel to be secured to create the required sheathing rigidity.
Dimensions of thermal panels, places of fastening to walls
. The diagram clearly shows the places of fastening to the wall or sheathing and the dimensions of the panel itself and the protruding locking ridges.
- After the wall surface is completely covered, the seams between the individual tiles are filled with a special grout. This completely isolates the insulation from external influences and gives the wall design the look of natural brickwork.
What is the best way to cover the gable of a bathhouse? The answer to this question depends on what material was used to manufacture it and decorate the facade of the building.
- The wooden pediment is sheathed with any material with preliminary waterproofing of the surface.
- Concrete and brick pediments have no restrictions; the only requirement is leveling the surface and installing sheathing under the cladding.
The pediment cladding is made with the following materials:
- professional sheet;
- siding;
- bitumen shingles;
- block house;
- stucco.
The finishing material is attached to the pediment on a prepared surface, on a wooden sheathing or aluminum posts.
To decide what material to cover the facade of a bathhouse with, it is important to take into account not only your financial and technical capabilities, but also the design features of the structure. At the same time, all the work on installing the cladding can be done independently, the main thing is to follow the basic rules and recommendations.
Step-by-step instructions for laying inter-crown insulation
Typically, installation is carried out in two stages: initial insulation, which is performed during the construction phase of the building, and the so-called caulk, that is, secondary insulation. It is necessary to caulk the walls at least twice: immediately after completion of construction and about a year later, after the building has completely settled.
Primary and secondary caulking of a log house
Stage one. Preparing tools
To install inter-crown insulation, a set of special tools is used, which can be purchased at any store. The main requirement is that they should not be too sharp or rough so that the blades do not cut the material or pull it out of the seams.
Caulking tools
- Flat blade. Used for sealing joints and cracks in a log house.
- Flat chisel. Necessary for sealing seams in corners and shaped elements of a building.
- Triangular caulking with a groove. With its help, rollers are formed from insulation.
- Narrow thick wedge. With this tool, narrow cracks are enlarged to make caulking more convenient.
- Wooden mallet. Needed to tightly drive the sealant into the gaps.
- Construction stapler. Fastening strip materials to logs.
- Sharp scissors.
Basic list of caulking tools
The material that will be used for insulation must be dry and packaged in airtight packaging. The exception is moss, which should be slightly moistened before work.
Stage two. Primary installation of insulation
Primary caulking of seams
The initial installation of insulation is carried out at the construction stage of the building, and the algorithm of actions is as follows.
Step 1. If tape or roll insulation is used to insulate the log house, it must be cut into strips (they should be about 10 cm wider than the logs).
Step 2. Lay moss or tow in an even layer along the entire length of the log so that the material hangs down on both sides by about 5 cm. When using tape insulation, it must be laid on the log with the same margin and secured with a stapler. The second tape is laid overlapping on top, so that there are no gaps at the joints.
Laying insulation
Step 3. After the entire row around the perimeter is covered with material, the second crown is laid on top.
Step 4. Once the entire frame is completed, you can move on to caulking. Twist a roller from the insulation and push it into the gap with caulk - it is important that it is not interrupted and is continuous along the entire length of the frame.
The principle of caulking is simple - tightly fill the inter-crown gap with a sealant
Stage three. Caulking seams
After completion of construction work and shrinkage of the building, caulking of the seams is carried out - additional insulation, for which several technologies can be used.
Caulking technique
Caulk with tape insulation
| Step, no. | Description |
| Step 1 | Stand near one of the ends of the building, place the end of the tape on the ground and move to the other end, gradually unwinding it. The tape should run smoothly, not twist or stretch, but sag slightly |
| Step 2 | Return to the beginning, lift the tape and tuck it between the crowns with a chisel or other tool (do not caulk the gaps, but lightly tuck the material). As soon as the entire wall has been passed, you should cut off the tape with sharp scissors, leaving a margin of 10-20 cm |
| Step 3 | At this stage it is necessary to caulk the wall, but do it very carefully so that the tape does not go into waves. This is done until the entire tape, along with the reserve, disappears into the gaps |
| Step 4 | Repeat all the processes described above, starting from the first stage between the same crowns (you can freely lay several more tapes there, regardless of their thickness and density). Typically, caulking walls only on the outside requires four times more material than is used for primary insulation during the construction process |
Insert insulation into the seam
After the insulation laid in the grooves becomes very dense (almost like wood), the work can be considered complete.
Conclusion
As we found out, there are several simple and effective ways to insulate a log house. Each of them allows you to make your home more comfortable and economical in terms of energy consumption for heating. However, it is still advisable to insulate the log house from the outside, and at the same time strictly adhere to the technology outlined above.
Additional information on this topic is contained in the video in this article. If you have any difficulties during the process of insulating a log house or have any questions, ask them in the comments, and I will be happy to answer you.
Why is such a procedure carried out?
Before you engage in sheathing, insulation of walls and foundations in a bathhouse, you need to understand why this is necessary. Thermal insulation allows:
- Keep the room warm.
- Prevent destruction of the building foundation due to exposure to moisture. Liquid penetrating into the micropores of the foundation under the influence of temperature changes expands small holes, forming cracks.
- Increase the rigidity of the base.
- Warm up the floors of the building.
- Reduce heating costs.
- Normalize the room temperature.
Insulation is not necessary when the bathhouse is built without a foundation (mobile or lightweight construction).
In addition to its practical purpose, thermal insulation of the base is necessary to give the building a finished look.
It is important to take care not only of insulating the base. The base also needs treatment
Covering a house with siding
Another fairly popular way to transform a facade is to install siding. It is produced in various types, imitating wooden and stone wall coverings.
Siding gives the house a neat, finished look.
It is produced from different materials using two technological processes - monoextrusion or coextrusion. The first of them is the molding of siding panels from a homogeneous mass, and the second is the production of two-layer elements. The top layer of material is protective from external influences, and the bottom is the basis of the panel.
We suggest you read: Exercises in the pool for the abdomen and sides
Truly high-quality siding has a whole range of advantages:
- it is resistant to mechanical stress, such as shocks and scratches, while at the same time having good elasticity;
- The material is fire-safe and resistant to thermal extremes. The high performance qualities of the material allow it to be used in various climatic conditions;
- siding is not susceptible to the formation of colonies of microorganisms or damage by insects;
- high-quality material is not seriously affected by ultraviolet rays, so it does not lose its original appearance for many years. The service life of siding is about ten years;
- the panels provide reliable protection for the building walls from wind and precipitation;
- the material does not require special care and can be easily tidied up with a stream of water under high pressure. The surface itself does not absorb dirt;
- siding can give any facade an aesthetic appearance. Numerous shades and the possibility of combining them open up great possibilities for design solutions;
- the material is non-toxic and therefore harmless to human health;
- In addition, compared to other materials, siding is quite easy to install and affordable.
Operational features of types of siding
Siding for cladding facades is made of vinyl, aluminum, thin steel, cement-cellulose pulp and wood-based materials.
Metal siding
- Aluminum and steel siding is mainly used in industrial facilities, but is also used for finishing private homes. The material is produced in a variety of colors, so it will perfectly decorate any facade of the house.
Wood composite siding
- The facing material from wood fibers and their connecting components is made by pressing raw materials under high pressure and then coated with protective paints. This siding is also well suited for cladding the facades of private houses.
Fiber cement siding - great for covering plinths
- A cement-cellulose version of the cladding material is most often used for cladding the basement sections of a building.
The most common is vinyl siding
- The most popular and affordable is vinyl siding. It is widely used for finishing private buildings, and it justifies itself with a long-term operational period and other positive qualities. Since this material is purchased and used more often than others, it is worth considering in more detail.
Vinyl siding
This type of siding is produced in the form of stacked panels-strips that have a perforated edge through which they are attached using nails or self-tapping screws. In addition, the strips have a latch lock for connecting adjacent panels to each other.
The material is available in the form of one, two or three “boards”, which simplifies and speeds up the installation of siding on the wall.
Siding - decorative panels of a standard size: width - 22 cm, length - 125 cm. The material can be metal or vinyl, has more than 10 colors.
To cover a bathhouse made of timber with siding, you must first install a profile frame or wooden sheathing on self-tapping screws. All installation work can be done independently. The surface of the walls is carefully treated with antiseptic compounds to prevent the formation of mold and harmful microorganisms.
The siding is installed in a horizontal position with a distance of 20 cm from the foundation of the building.
Covering a bathhouse with siding has the following advantages:
- protection of the facade from precipitation;
- resistance to temperature changes and fading;
- inertness to deformation and mechanical damage;
- Fire safety;
- absence of toxic elements;
- good air permeability;
- low level of moisture absorption;
- accessibility of installation.
However, the material has some disadvantages:
- high cost of individual fixing elements of the structure;
- the appearance of deformations and play due to violation of installation technology;
- the need to create a flat surface for fixing the panels.
Synthetic materials
The performance properties of many synthetic insulation materials are inferior to natural ones, but in the range of similar materials it is quite possible to choose high-quality options. In this case, it is very important to take into account the features and purpose of the building, since the wrong choice of insulation can lead to unpleasant consequences.
Mineral wool
Mineral wool is the cheapest option, but it can be used exclusively for insulating facades. This material is not suitable as inter-crown insulation for houses made of wood (especially timber). Firstly, when compressed by crowns, it quickly loses its thermal insulation properties, and, secondly, the moisture absorption of its fibers tends to zero. The disadvantages of mineral wool are especially noticeable when insulating baths, so in this case it is recommended to choose another option.
Mineral wool is an inexpensive and practical thermal insulation material, but it is better not to use it as an interventional insulation material.
Prices for mineral wool
Mineral wool
Izover
Isover is the same mineral wool, but with improved performance characteristics. This is a popular insulation material today, which, however, has some features and disadvantages. So, in places where there is practically no gap, it shrinks greatly and loses its thermal insulation properties, but when insulating large gaps it performs its tasks well. In addition, Izover has several valuable advantages: it is not flammable, does not rot, does not attract birds, and is very easy to use. However, this modern material has one significant drawback: it is not very environmentally friendly, and at the slightest damage it releases dust that irritates the skin and mucous membranes. In the case of insulating baths, Izover also cannot be called a successful solution, as it has the ability to accumulate moisture, and in the absence of a vapor barrier, it gets completely wet.
ISOVER insulation
Polyurethane foam
Polyurethane foam is sometimes used as insulation for wooden houses, which has the following advantages:
- quick and easy to install;
- glues logs well, thanks to which they subsequently do not “creep” or warp;
- unlike moss or tow, it seals corners well;
- One-component foam does not burn and does not emit harmful substances.
Polyurethane foam
If we talk about the disadvantages of polyurethane foam, they include:
- the material is not elastic, so microcracks may appear in the wood over time;
- foam does not tolerate frost well and begins to crumble at low temperatures;
- when exposed to ultraviolet light it turns to stone and fades;
- If you compare foam with natural insulation, its environmental friendliness will be very low.
Most often, polyurethane foam for insulating log houses is used in combination with other materials, and installation is carried out in two ways.
Method No. 1. The timber is laid half a meter apart, and upon completion of the work it foams. Thanks to this, the crowns dry faster and do not require subsequent caulking. The inside walls are insulated with linen material.
Method No. 2. Before using foam, joints and cracks in the walls are sealed with tow and the building is allowed to settle well (usually this takes about a year and a half). After this, five-centimeter cracks are made in the tow, the grooves are foamed and the seams are sealed with sealant.
Sealing cracks with sealant
How to choose synthetic insulation?
If the question arises about using synthetic inter-crown insulation, it is best to focus on foreign-made materials, in particular Finnish synthetic felt. It has good thermal insulation characteristics, does not rot, does not get wet and does not contribute to the proliferation of harmful microorganisms.
Felt
Bathhouse cladding with imitation timber
Imitation timber is a type of lining that is used for cladding facades. Board dimensions: thickness – 1 cm, width – from 10 to 16 cm.
A distinctive characteristic of the material is the presence of a central groove to relieve stress in the wood, which helps extend the service life of the finish.
Imitation wood is made from various species, but coniferous wood is considered the best.
The main advantages of the finishing material include:
- environmental safety;
- affordable and quick installation;
- resistance to aggressive substances and damage;
- aesthetics;
- variety of standard sizes - width, length and thickness;
- high thermal insulation characteristics;
- long service life.
But even such a practical material is not without significant drawbacks:
- the need for periodic treatment with antiseptics and fire retardants;
- susceptibility to fire and rot;
- the possibility of deformation due to insufficient drying or the use of low-quality raw materials for manufacturing.
The log house of the bathhouse is sheathed horizontally with the tenon facing outwards. This type of fastening is resistant to deformation and moisture penetration. The material is mounted on a flat surface using wooden or metal sheathing. Before painting, the imitation wood is carefully sanded with fine-grain sandpaper.
Covering a bathhouse with a block house
It is a type of imitation wood whose outer side is rounded. The factory technology for drying block house panels provides a standard humidity of 12%.
Advantages of a block house for external cladding:
- environmental friendliness and naturalness;
- attractive appearance;
- affordable price;
- simple and easy installation;
- convenient sizes.
There are practically no negative aspects to such coverage. In some cases, they are associated with a violation of installation technology or low quality wood that was used for its production.
The panels are installed on a pre-prepared wooden frame at a minimum distance from each other of 65 cm. Fixation is carried out from the foundation to the roof using self-tapping screws. The finished coating is sanded and treated with protective varnishes or paints.
Finishing the bathhouse with wooden clapboard
The traditional material for exterior finishing is wooden lining. This facade has an aesthetic and modern appearance and fits well with any architectural style.
Finishing the outside of a bathhouse with wooden clapboard has the following advantages:
- environmental safety;
- durability;
- high noise and heat insulation;
- low thermal conductivity;
- accessibility of installation.
Before decorative finishing, the outer walls of the bathhouse are treated with fire retardants and antiseptics, which do not contain hazardous components.
The sequence of cladding with wooden lining involves the preliminary preparation of a frame made of thin wooden slats. The lathing is fixed to the bath strictly according to the level to prevent possible deformation of the finishing material. The outer boards are installed first, then the central part is filled.
The lathing is mounted on screws or nails. Additionally, each slatted structure is treated with an antiseptic compound to protect against rotting. The gaps between the slats are filled with wooden inserts or wedges.
Wooden lining strips are mounted on the finished sheathing, with the first part being installed horizontally and strictly level. At the bottom, the lining is fixed with nails or screws, and in the center - with a hidden fastener.
Finally, a properly sheathed bathhouse frame can be treated with varnish or a coloring composition of the desired shade.
Covering the bathhouse with plastic panels
To quickly and cheaply cover a frame bathhouse, you can use decorative plastic panels. The plastic facade has an attractive appearance, and its performance characteristics are not inferior to siding.
Plastic panels have the following advantages:
- low cost;
- wide choice of colors;
- resistance to corrosion and rotting;
- low hygroscopicity;
- no need for additional treatment with antiseptics;
- frost resistance;
- practicality and wear resistance;
- accessible and easy installation;
- simple maintenance.
Despite the positive aspects, such material is not without its disadvantages:
- low air permeability;
- susceptibility to mechanical damage, deformation and fading;
- high flammability.
Plastic panels are mounted on a pre-installed slatted frame. Before starting work, the surface of the bathhouse is carefully treated with compounds to protect against fire and rotting.
Tags: sheathing, outside, log house
« Previous entry