New, and in this case, forgotten old, wood concrete is returning to the building materials market. As practice has shown, building a house from wood concrete blocks with your own hands is a good prospect for building a strong, warm and reliable private house.
The disadvantages of brick and concrete walls are known to everyone; wooden houses are not affordable for everyone. An alternative to the above is wood concrete. Containing 80-90% wood chips, combined with a cement binder and modified with chemical additives, wood concrete eliminates the shortcomings and enhances the advantages of wood and concrete.
Wood concrete was created and tested in the middle of the last century, and its production is regulated by GOST 19222-84.
Building a house from wood concrete with your own hands
Technologies for the construction of private houses from wood concrete
A house can be built in two ways:
- Construction from arbolite blocks . In this case, industrially manufactured ready-made wood concrete blocks are used;
- Monolithic construction from wood concrete . The use of this technology involves the formation of permanent formwork and subsequent pouring of wood concrete mortar into it.
Often the decision is made to make wood concrete with your own hands. Before starting work, it is important to make sure that the blocks have gained the strength and hardness necessary for work.
To build a house from monolithic wood concrete, you need to study the technology of constructing monolithic walls. The remaining stages will be identical to block construction.
In this article, we will focus on a detailed description of the first option.
How to build a house from wood concrete blocks with your own hands
The main stages of work in the form of successive steps from A to Z.
Reinforcement of arbolite blocks
To give greater rigidity to wood concrete masonry, experts recommend making reinforcement. To do this, use a plastic mesh or rods made of metal. With the help of reinforcement, the corners of the building, openings, and wall joining points are strengthened.
It is not necessary to reinforce the wood concrete masonry. But builders carry out this procedure every three to four rows .
Rules for building a house made of wood concrete
As you can see, wood concrete blocks do not create difficulties during the construction process. The main thing is to know some nuances, which we will briefly list:
- wood concrete is hygroscopic. He is literally afraid of constant exposure to water. This means that wood concrete needs waterproofing;
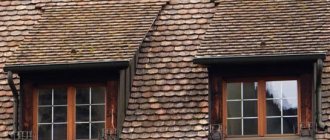
- mandatory arrangement of a base with a height of 500-600 mm;
- mandatory removal of the roof by 300-500 mm in order to protect the wall from water;
- wood concrete does not shrink;
- increased requirements for vapor barrier (in rooms with high humidity);
- low-density wood concrete blocks (thermal insulation) can be used for the construction of one-story houses. With a larger number of floors, it is necessary to have load-bearing structural elements capable of supporting the weight of the floor and structure. It is easier to use construction blocks;
- The block needs to be moistened before installation, otherwise it will draw water from the solution. An alternative is to use a more liquid solution, but it is difficult for a beginner to work with;
- for masonry, classic cement mortar or a special mixture is used;
- Wood concrete is not good friends with concrete. It is necessary to either use wood or add special additives that promote rapid setting of cement;
- Doesn't work well with metal. Metal protection from corrosion is required;
- can be used for the construction of a bathhouse;
- wood concrete is excellent at cutting, sawing, drilling and holds nails and screws;
- mandatory external and internal finishing of the wall made of wood concrete.
Laying subsequent rows
After the first row is laid, wait at least four hours for the solution to fully set and harden. After this, you need to put a reinforced mesh on top, which is typical for the first row.
The next rows of blocks are laid much faster, the process itself is simpler. After all, you can start from any place, not from the corners. You need to check the level, but not every time - from time to time. But you can use the same pattern with corners and construction cord, if that’s more convenient. The main thing is to always maintain the same seam size and make sure that it is small. The blocks should lie horizontally, without slanting to the side.
Each subsequent row of blocks is laid only after the previous one is securely fastened.
Common mistakes in building a house from wood concrete:
- entrusting construction to non-professionals. The main reason for subsequent dissatisfaction with the operation of a house made of wood concrete. Negative reviews of a house made of wood concrete are quite fair in this case;
- incorrect block selection. A loose block will shrink greatly, causing the walls to bend vertically;
- absence of reinforced block before the ceiling. Leads to uneven distribution of load on the walls - uneven curvature;
- poor block geometry. Leads to excess consumption of masonry mortar and finishing plaster;
- construction of a plinth made of cellular concrete. This does not provide adequate protection of wood concrete from moisture.
As you can see, all errors are caused by an attempt to save money during the construction process. However, you need to save wisely!
Knowing the construction technology, and most importantly its nuances, you can build a high-quality house from wood concrete with your own hands.
First row of masonry
The first row of blocks must be perfectly protected from moisture penetration. Before laying wood concrete, you need to determine how many blocks you need to take on one row of the wall, and also how many you need to cut with a chainsaw. Apply five to six millimeters of mortar with a ladle and level the layer. It is important to remember that some of the mixture will inevitably seep into the cavities located between the chips. This means that the seam itself will be approximately 3 mm, and if laid especially carefully, it will not be more than 2 mm.
The first block should be laid, checking its correctness with a square, and then using a level to ensure its evenness. If there are errors, you should correct them using a rubber mallet. You should forget about metal tools, since they are not used in this case. They will leave an unsightly dent that will not paint the building at all.
The same procedure should be repeated at all corners of the building. After the corner blocks have been correctly installed, you need to stretch the construction cord between them. This will help you quickly lay out other elements of the first row, since you won’t need to check with a level every time: orientation to the cord is enough.
The side of the corner block must be coated with the solution and the next element must be adjusted. And so on. Check the cord regularly.
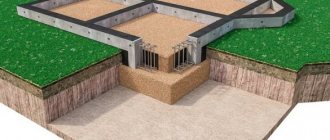
Foundation
The use of wood concrete in the construction of walls removes restrictions when selecting the type of foundation. That is, in fact, you can use any type of foundation, but experts insist: it is better to focus on a strip or combined version. The technology for creating the foundation of the standard, there is no point in describing it in detail.
Do not forget to first analyze the soil, including the depth of freezing and the groundwater level. And, of course, it is necessary to calculate the dynamic load (snow, wind) in advance. Do not neglect the tables - they will help you make correct calculations taking into account the selected type of foundation and its dimensions.
A little history
The idea of combining the warmth of wood and the hardness of stone has visited people more than once and was realized in different ways. Since time immemorial, adobe has been known - a brick made from clay and plant additives, straw or reed. In the dry Central Asian climate, houses made of this material last for centuries, withstanding summer heat and winter frosts.
A successful option that combines both materials was developed in Holland in the 30s of the last century. It quickly spread around the world under the Durisol brand. In the Soviet Union, they tried to produce similar blocks back in the 30-40s, but their quality was low due to technological shortcomings (low-grade cement, incorrect chip format, mismatched equipment).
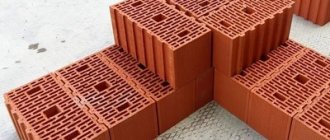
High-quality domestic material was developed, standardized and certified in the 60s; it was called arbolite (from Latin arbor - tree). Modern factory-produced wood concrete blocks, produced in compliance with technology, are an effective material with a set of unique properties. The reputation of wood concrete suffers, as a rule, due to the products of folk craftsmen.
Industrial production blocks Source tr.decoratex.biz
Correctly tensioning the mooring thread
By the way, the blocks between the corner ones can also move apart both horizontally and vertically. And just to prevent this from happening, a mooring thread will again come in handy, which is stretched between the corner blocks and serves as a beacon for all the other blocks. Between them, Sanya already laid out three intermediate blocks without my help. This nail between the mooring and the edge of the block is needed to create a gap of a couple of millimeters between the wall and the thread.
Nail between mooring and block
If the thread leans against it, the blocks will move it outside the house and you won’t have a straight wall. Therefore, please make sure that the thread hangs and does not touch the blocks.
An important point: the thread sags and sways in the wind, so the better you tighten it, the smoother the wall will turn out.
Instead of a hanging nail, you can slightly pull the nail out of the edge, and you will get a gap between the edge of the block and the mooring.
Arrangement of nodes and jumpers, partitions
At the junctions of internal walls and partitions, we establish connections using fiberglass reinforcement bars with a diameter of 10-12 mm. Either by embedding them in advance into the wall, or after the mixture has dried, we insert them into the drilled holes, or, if the wood concrete is still soft, you can do without drilling, or drive the rods in with a hammer. For partitions, we narrow the formwork and move it up to 15 cm. This thickness of wood concrete for partitions is sufficient for good sound insulation and is quite reliable in strength.
I recommend: Question: How to protect concrete walls from mold?
In areas of window and door openings, we supplement the formwork by installing a shield at the top of the opening, supporting it with racks. In this place we lay a mesh of four fiberglass reinforcement rods with a diameter of 14-18 mm. We make the distance between them 10 cm and leave a protective layer (gap) of 10 cm on each side. The ends of the rods should extend beyond the edges of the opening by at least 20 cm.
If the opening is expected to be loaded with floor beams, we cover it with a wooden beam or a ready-made monolithic concrete lintel.
In areas of window and door openings, we supplement the formwork by installing a shield at the top of the opening, supporting it with racks.
Tooling and equipment
To fill the wood concrete, we first need formwork. Laminated technical waterproof plywood or moisture-resistant OSB-4 with a thickness of 14-16 mm is suitable for it.
The total length of the formwork should be at least enough to fill the longest wall of the house. And ideally for the entire or at least half of the perimeter of the house.
Ideally, there should be enough formwork to fill a row along the entire perimeter of the house.
For compaction, we will make or buy a manual tamper. Its heel should be square with a side length of 15-20 cm, and a total weight of 7-10 kg.
To mix the mixture, you will need a concrete mixer, or, of appropriate size, a container for manual mixing.
You can't do without scaffolding and ladders. A board made of a board 50 mm thick and 40 cm wide is enough so that a person can calmly stand on it and work as a tamper.
And, of course, you will need shovels, buckets for feeding the mixture into the formwork, a tape measure, construction squares, a construction bubble level and a hydraulic level or level.