The classic hipped roof, even today, remains unusual for Russian latitudes and is reminiscent of the overseas way of life. That is why it is most often built in order to give the architecture of a residential building a special effect in terms of style and perception, it is advantageous to distinguish it from monotonous, familiar buildings.
In addition, a hipped roof - built with your own hands according to all the rules - in practice has a large number of advantages, especially for the harsh Russian latitudes. Let's take a closer look?
Varieties: hip and tent structures
The class of hipped roofs combines two types of structures that resemble a square and rectangular envelope in plan.
The first variety is called tent, the second - hip. Compared to their pitched counterparts, they are distinguished by the absence of pediments, called gables in the roofing industry. In the construction of both versions of hipped structures, layered and hanging rafters are used, the installation of which is carried out in accordance with standard technologies for the construction of pitched rafter systems.
Characteristic differences within the four-slope class:
In a hip roof, all four slopes have the shape of isosceles triangles, the vertices of which converge at one highest point.
There is no ridge as such in a hipped structure; its function is performed by the central support in layered systems or the top of a hanging truss. In a hip roof, a pair of main slopes has a trapezoidal configuration, and the second pair is triangular. The hip structure differs from its tent-type counterpart in the obligatory presence of a ridge, to which the trapezoids are adjacent at the upper bases. Triangular slopes, also known as hips, are adjacent to the ridge at the top, and their sides are connected to the inclined sides of the trapezoids.
Based on the configuration of the roofs in plan, it is clear that hip structures are usually erected over square buildings, and hip structures over rectangular houses. Both soft and hard roofing materials are suitable for covering. The characteristic square or rectangular shape is repeated in the drawings of the rafter system of a hipped roof with a clearly marked arrangement of elements in the plan and vertical projections of the slopes.
Often, hip and hip systems are used together in the construction of one building or effectively complement gable, lean-to, sloping and other roofs.
Structures with four slopes can rest directly on the upper crown of a wooden house or on the Mauerlat, which serves as the top frame of brick or concrete walls. If you can find upper and lower supports for each rafter, the roof frame is constructed using layered technology.
Installation of layered rafter legs is simpler and more accessible for an inexperienced home roofer, who needs to take into account that:
Issues of fastening the Mauerlat and the closely related method of installing rafter legs according to the rules are resolved at the stage of designing a house. If the building does not have an internal load-bearing wall or it is not possible to build reliable supports for the central part of the roof, nothing will work other than a hanging rafter system assembly scheme. True, in most cases the layered construction method is used, for the implementation of which it is necessary to provide in advance a load-bearing support inside the structure.
In the construction of rafter systems for hipped and hipped roofs, specific structural elements are used, these are:
Diagonal rafter legs forming the spinal connections of the slopes. In hip structures, diagonals, also known as slanted rafters, connect the ridge girder consoles to the corners of the roof.
In tent systems, sloping legs connect the top to the corners. Rafters, or rafter half-legs, are installed perpendicular to the eaves. They rest on diagonal rafters and are located parallel to each other, therefore they differ in different lengths. Narozhniki form the planes of tent and hip slopes.
Diagonal rafters and flanges are also used for the construction of valleys, only then concave corners of the roof are arranged, and not convex ones like hip ones.
The whole difficulty of constructing frames for roofs with four slopes lies in the installation of diagonal rafters, which determine the result of the formation of the structure. In addition, the slopes must withstand a load one and a half times greater than ordinary rafters of pitched roofs.
Because they also work as a skate, that is, as a support for the upper heel of the skaters.
If we briefly describe the procedure for constructing a layered frame for a hipped roof, then it can be done in several stages:
Installation of a mauerlat on brick or concrete walls.
The process of installing a mauerlat on walls made of logs or beams can be eliminated, since it can be successfully replaced by an upper crown. Installation of a central support for a hipped structure or a supporting frame for the main part of a hip roof. Installation of conventional layered rafters: a pair for a hipped roof and a specified design a row solution for a hip structure. Installation of diagonal rafter legs connecting the corners of the systems with the top of the support or the extreme points of the ridge. Manufacturing to size and fastening of the flanges.
In the case of using a hanging frame scheme, the start of the construction of the tent frame will be the installation of a triangular truss in the center. The installation of a four-slope hip rafter system will begin with the installation of a number of roof trusses.
How to assemble: construction methods
Hip roofs are erected in two ways. The fastest and most expensive construction method is to assemble a support frame from pre-fabricated wooden rafter sections.
A specialized enterprise, under an agreement with the developer, takes measurements on site, then, based on them, prepares sections of the frame in its workshop.
The company delivers structures to the construction site and assembles the roof as a constructor .
This installation method is certainly effective and time-saving. Its only drawback is its high cost. For a construction site owner who has experience in construction and owns tools, it will be much more profitable to do this work with his own hands.
Practice shows that self-assembly of the rafter frame allows you to save significant financial resources , although it will take much longer than with the first installation method.
For small buildings, for example garden gazebos with a square plan, the rafter frame is assembled on the ground. Then, using a simple winch (pulley hoist) and a leash, the roof is lifted and pushed onto the top of the building.
Dutch roof: classic four slopes
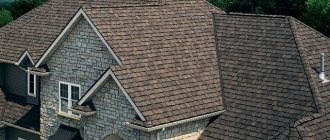
The Dutch or hip roof is considered a classic option, which is particularly resistant to wind and snow.
The surface of a standard hip roof forms two trapezoidal slopes on the long sides and the same number of triangular ones on the short sides. Unlike a hipped roof, this form, according to modern architects, is considered more aesthetically pleasing.
The hip roof rafter system involves the installation of four slanted rafters - diagonal support beams that run from the two tops of the slopes to the upper corners of the building.
But the half-hip roof, in turn, comes in two types: when the side slopes cut off only part of the end at the top, or already at the bottom, that is, the half-hip itself can be a triangle or a trapezoid, and is called Danish or half-hip Dutch.
Half-hip Dutch roof: particularly stable
The half-hip Dutch roof is both a variant of both a gable structure and a hip roof. It differs from the classic version by the presence of truncated hips - triangular end slopes. According to the rules, the length of the hip of a Dutch roof should be 1.5-3 times less than the length of the side trapezoidal slopes.
The advantage of such a roof is that it is possible to install a vertical dormer window, and at the same time there is no sharp projection, like a gable roof, which, in turn, increases the roof’s ability to withstand extreme wind loads.
Half-hip Danish roof: European traditions
But the Danish half-hip roof is a type of purely hip roof. In this case, only the lower part of the end slope is mounted, and a small vertical pediment is left under the ridge.
The advantage of this design is that it allows you to abandon the attic windows in the roof that are problematic in terms of waterproofing and provide natural lighting to the attic by installing full vertical glazing, which is especially fashionable now.
Hip roof: ideal proportions
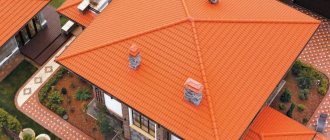
A hip roof is usually installed on buildings that have the same length of walls, which form a square perimeter. In such a hipped roof, all the slopes are shaped like identical isosceles triangles, a roofer’s dream, in a word, and a builder’s nightmare.
The fact is that the construction of a classic hip roof is even more difficult than that of a hip roof, because here the rafters must all converge at one point:
Calculation of the volume of the attic space
Before starting construction of the attic floor, you should check the drawing for compliance with SNIP rules. According to the standards, 50% of the room under a hipped hip roof should have a ceiling height of 2.5 m.
The usable area includes parts of the attic with a floor height of at least 2.5 m. Areas of the room with a distance from floor to ceiling of 1.5 m with a roof slope of 30° are taken into account, 1.1 m - with 45°, 0.5 m - with 60°. The remaining areas of the room with a lower height are taken into account in the formula with a reduction factor of 0.7.
To determine the main part of the volume of the attic space yourself, you should divide the space into geometric shapes. Formulas for calculations can be found in school textbooks. The dimensions of imaginary figures are taken from the drawings of the plan, facade and sections. The classic hipped hip roof consists of two pyramids with an offset center and one truncated. The volume of a hipped hipped roof is much easier to calculate. The figure formed by the roof frame is a regular pyramid with a square base.
Stage I. Planning and design
Before making a hipped roof, be sure to think through all its details, down to the smallest detail. Be sure to build even the simplest hip roof structure according to a ready-made drawing. The fact is that the finished gable roof has almost noticeable defects and distortions, but if you make a mistake somewhere in the construction of the same hip or hip roof, then the diagonal rafters simply will not meet at the ridge and it will be extremely difficult to correct this.
Therefore, if you know special programs, create a 3D model of the future roof directly in them, and if not, then just prepare a detailed drawing and it’s good if a professional helps you with this. All the details of such a roof must be calculated - down to the smallest detail!
By the way, today it is quite fashionable to make not only the roof hipped, but also its individual functional elements:
Creating a Project
Before starting construction, it is necessary to create its design and drawings in order to avoid errors during the installation process. After the length and width of the house are determined, the following calculations are made:
- Calculation of slope angle. This indicator is determined based on three conditions - wind load, amount of precipitation and the selected roofing material. For areas where strong gusty winds blow, choose a slope angle of less than 30 degrees to reduce the windage effect. In areas with heavy precipitation, on the contrary, you should prefer steeper slopes, from 60 degrees and above, so that water and snow do not accumulate on them. For zones with a temperate climate, like central Russia, a hip roof with a slope of 40-50 degrees is suitable. For each roofing material, the minimum permissible angles of inclination of the slopes are calculated, presented in a reference table, which must be consulted.
- Calculation of the height of the ridge. To determine the height of the skate, you will have to remember your school geometry lessons. Since we have already determined the angle of inclination of the slopes, and the base was known to us, trigonometric elementary formulas will help to calculate it.
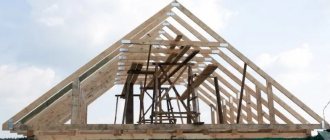
Stage II. Preparation of structural elements
So, if you have taken a ready-made roof drawing or sketched it yourself and are confident in the future quality, it’s time to prepare the necessary elements of the rafter system. And to do this, first let’s figure out how they are called correctly.
So, the first thing you will have to take care of before building a hipped roof is the Mauerlat.
This is a square or rectangular beam that you will lay on the top of the walls around the entire perimeter of the house. It will become a support for the rafters, which will transfer the load to it, and it is this board that will evenly distribute the weight of the entire roof onto the walls of the house and the foundation. The ideal option is to use a beam with a section of 15 by 10 cm as a mauerlat.
Next, you will build the rafter legs - this is the main element that will create the slope of the roof. Standard rafters are made from boards 50 by 150 mm, and diagonal ones - 100 by 150 mm.
You will also need ties, the main task of which is to prevent the rafter legs from moving to the sides. You will fix the puffs themselves and connect them with the lower ends, and for this, stock up on boards measuring 50 by 150 meters.
But from above, both the diagonal rafter legs and the standard rafters will converge and be secured to each other in the ridge. To do this, take a beam 150 by 100 mm.
Next, in the center of the two opposite sides there should be a transverse beam - a bench, which serves as a support for the racks, and they, in turn, support the ridge girder. A timber with a cross section of 100 by 100 mm or 100 by 150 mm is suitable for this purpose.
The slopes will become a support for the rafters, which prevents them from moving. You should install them at an angle to the stand; to do this, take the same material as for the bench.
Next, an important detail will be the rack - the vertical element of the roof frame. It will serve as a support for the skate. Make it from the same material as the Mauerlat.
Don't forget also about the wind board - this is a horizontal element that connects all the lower ends of the rafters together. You will need to nail it to the rafters along the inner perimeter of the roof and in this way emphasize the line of the slope. A 100 by 50 mm board is suitable for this purpose.
But for the outside you will need another board - a filly, made of the same material. This board received such a strange name from the times when it was carved in the form of horse faces.
But the most unusual and complex element of a hipped roof is the truss, which gives rigidity to the entire structure. Its main task is to connect all horizontal and vertical elements. It is also mounted at an angle, and is made of 100 by 100 mm timber:
And finally, if we are talking specifically about a hip roof, then the only element that is present exclusively in hip roofs is the flaps. They are shortened rafters that rest on a diagonal rafter leg. You can make them from a 50 by 150 mm board.
In life, all these elements look like this:
Also think about insulation, waterproofing film and additional roofing elements:
Plan for laying supports on the Mauerlat
Depending on the material used to construct the walls of the building, the mauerlat can be laid in various ways.
General recommendations are:
- In the upper part of the walls made of gas silicate or foam concrete blocks, you need to pour a reinforced concrete belt in which to place anchors for subsequent fixation of the Mauerlat.
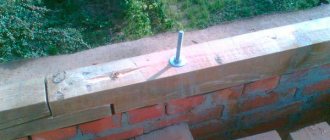
- When constructing brick walls, a side of 1-2 bricks is made in their upper part so that a recess is formed in the center of the wall for a wooden frame. As the bricks are laid, wooden plugs are placed between the bricks, to which the Mauerlat will be fixed with brackets.
For the Mauerlat you will need a beam with a cross section of 100×150 or 150×150 mm. When planning the use of space under the roof, thicker beams should be used. The frame elements are joined with oblique notches, followed by reinforcement with nails, screws or screws, and in the corners with staples.
Next, you need to place the ceiling elements on the Mauerlat. They are made from bars with a cross section of 100×200 mm. The central beam is laid first. If the length of the lumber is not enough, it is made from two pieces of timber. Moreover, the connection point should be on a supporting element, for example, a load-bearing wall.
In this case, the beams are laid in 60 cm increments. As a rule, the box has non-ideal dimensions, so the spacing between the beams can be slightly adjusted to smooth out imperfections. The distance from the walls of the house to the outer beams located on both sides should be 90 cm. This is required for the installation of outriggers.
Extensions are attached to the end parts of the floor beams. For convenience, they are first placed only in those places where the rafters will be installed later. They are fastened to the surface of the outrigger mauerlat with nails, and to the beams with dowels, large-section nails, and self-tapping screws, after which the fastening is reinforced with corners.
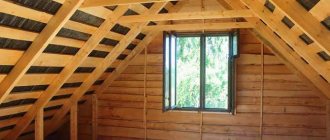
Stage III. Installation of attic floor
Often the headstocks of hanging rafters or hangers, which work in tension in a hip roof, must be made of steel. To do this, special wooden purlins are suspended perpendicularly to the clamps of the wooden rafters.
And wooden beams are suspended perpendicular to the purlins, after which beamless lightweight fillings are laid between them. Therefore, if you want to reduce the roof load on the hanging rafters or roof truss, you need to choose suspended floor structures.
For steel trusses, the suspended ceiling must be made fireproof, using steel beams.
Prefabricated reinforced concrete slabs should be laid between such beams, and light insulation should be placed on them. To increase the fire resistance and durability of such load-bearing structures, they must be made of reinforced concrete. Moreover, it is better to make the most reinforced concrete load-bearing structures from large-sized prefabricated panels, so as not to take risks.
Material selection
The roof structure is made of larch or pine. For residential buildings, it is preferable to purchase first-grade wood, for outbuildings - second or third. It is undesirable to use timber with knots and cracks for the frame. All workpieces should be treated with antiseptics. Board section sizes:
- Mauerlat, ridge, racks, truss – 100x100, 100x150, 150x150;
- Puffs, fillies – 50x100, 50x150;
- Sheathing and wind beam – 20x100, 25x150.
The amount of material is calculated using formulas. Having received the calculation results, it is worth purchasing a board with a small margin. For continuous sheathing, use plywood or OSB with a thickness of 12–15 mm. Most types of roofing materials are attached to it: ondulin, metal tiles, corrugated sheets.
Stage IV. Installation of ridge girder
When calculating the ridge run, take into account the following nuances:
If the building has permanent longitudinal walls, or at least two rows of internal pillars, then two purlins are made.
At the same time, many rafter structures can be composite in length, and crossbars are used to increase rigidity. If the building does not have internal supports, then inclined rafters cannot be made here. Therefore, special construction trusses are used, to which the attic floor is simply suspended. In this case, the rods, which are located along the upper contour of the trusses, form the upper chord of the construction truss, and along the lower contour - the lower chord.
The truss lattice itself now forms vertical rods and braces - inclined rods that are located between the upper and lower chords. Moreover, such trusses are not necessarily made only of wood; on the contrary, steel reinforced concrete ones are quite popular today. During the construction process, the trusses are installed at a distance of 4-6 meters from each other.
The simplest version of such trusses are truss trusses, which consist of rafter legs, a vertical suspension, headstock and tie rods. If the width of the building is large enough, construction trusses or truss supports are used during installation. But then the attic floor cannot be covered with beams that will rest on the walls alone. Such a structure must be suspended on steel clamps to the lower chord of the truss, or to a tie, in order to thus form suspended ceilings.
This photo illustration clearly shows exactly how the rafters need to be attached to the ridge and ridges:
Stage V. Installation of standard and diagonal rafters
So, the diagonal rafter legs rest directly on the ridge, depending on the following conditions:
Additionally, for reliability, the slanted rafters are secured with metal wire twisted several times.
On the ribs, the installation of ridge elements must be done in the same sequence as on a regular roof ridge. Those. install the rib element with a closed end, place the ridge elements in the lock and secure them mechanically. But at the intersection of the ribs and the ridge of a hip roof, it is customary to install Y-shaped ridge elements, although starting and ending ridge elements can also be used instead.
But only cut them along the contour when they are secured to the edge, and mechanically secure the joints. Be sure to treat with primer and mineral coating from the standard repair kit. Also, when installing ridge elements, do not forget to leave a gap on the ribs or ridges of a hipped roof to allow air to escape from the under-roof space.
All the same principles must be observed when building a hipped roof of complex shape:
You can do it! Please ask your questions in the comments.
Mounting the Mauerlat
This element is an important component of any pitched roof. There are two options for installing it - reinforce it or use concrete blocks or a wooden base.
The first option involves laying an armored belt on strong walls made of concrete materials. Studs are inserted into the concrete to mount the Mauerlat. The belt is laid narrower than the walls, so that there is room for insulation. Before installing the Mauerlat, waterproofing is laid.
The second method is to use staples, pins, or wire for fastening.
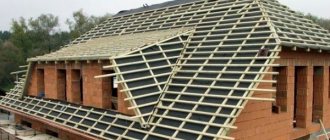
Construction of a hip rafter system
Let's look at one of the common examples of a hip roof with layered rafter legs. They will have to rely on floor beams laid on top of the mauerlat.
Rigid fastening with a notch will be used only to fix the top of the rafter legs on the ridge girder, so there is no need to strengthen the Mauerlat fasteners. The dimensions of the box of the house shown in the example are 8.4 × 10.8 m. The actual dimensions of the roof in plan will increase on each side by the amount of the eaves overhang, by 40-50 cm.
Construction of a 4 pitched hipped roof using the example of a gazebo
For a square gazebo 4.5 * 4.5 meters, we made a hip roof covered with soft tiles. The slope angle chosen was “floor material”, taking into account snow and wind loads - 30°. Since the structure is small, it was decided to make a simple system (in the figure below).
The distance between the rafter legs is 2.25 m. For rafter lengths up to 3.5 m, a board of 40 * 200 mm is needed. A 90*140 mm beam was used for the strapping.
Scheme of a hip roof rafter system for a gazebo
The rafter system was assembled on the ground, secured to support posts, then a solid OSB flooring was installed, and then covered with flexible tiles.
First, we assembled the harness that will be attached to the support posts. Next, we installed rafters that rest on the middle of the frame.
The procedure here is as follows: in the middle we place a stand, on top of which the rafter legs will be joined. In this version, this rack is temporary, we only need it for a while - until we connect the first four rafters in the center. In other cases - for larger houses - this rack can remain.
The procedure for assembling a hipped 4-pitched roof: assembled the frame, attached the middle rafter legs to it
We take a board of the required section and lean it against the stand in the place where they will connect (depending on the desired angle of inclination).
We mark how it should be cut (at the top, at the joint and where it joins the harness). We cut off everything unnecessary, try it on again, and adjust if necessary. Next, using this blank, we make three more of the same kind.
Now you can begin to assemble the rafter system of the hipped hipped roof. The most questions arise about the junction of the rafter legs in the center. The optimal way - reliable and not too complicated - is to take a piece of timber of a suitable cross-section, make an octagon out of it - for joining eight rafter legs (four corner and four central).
The size of the edges is according to the cross-section of the rafter legs
Having fixed all four central elements of the rafter system with nails, we perform the same operations with the corner rafters: we take one, try it on, cut it out, make three copies using the template we made, and mount it.
The rafter system of the 4 pitched hip roof has been assembled
Using the same principle, we make half-legs (shortened rafters). If desired, all connections can be further strengthened with corners or metal plates, then the rafter system of the hipped roof will be more reliable and you will not be afraid even in the heaviest snowfalls.
The tests were successful
We install the assembled system on the gazebo posts, fasten it with nails, corners, and secure it with slopes. After this, you can install the sheathing (in this case, solid) and lay the roofing material.
Installation of slanted rafters - drawings
The diameter of the diagonal rafters coincides with the dimensions of the ordinary elements. Since in our example the slope of the trapezoidal slopes and hips is different, one of the sloped legs is placed slightly higher than the other.
The process of creating and installing slopes is as follows:
- Using laces, we outline additional lines for marking the cut, pulling it to the corners and the center of the slope from the top point of the ridge beam.
- Determine the angle between the top of the corner stem and the lace. This will be the angle for the bottom cut (α). The upper cut (β) is calculated using the formula: β=90º-α.
- We take a piece of board and cut one edge of it at an angle β. Having attached the workpiece to the place where the upper parts are joined, we combine its edge with the lace. We mark the excess and saw off.
- In another blank for the lower heel, we saw off a section at an angle α.
- Using the templates obtained, the first diagonal rafter is cut out. If there is no whole board of the required length, the element is assembled from two pieces. They are spliced using an inch board, 1 m long, placing it on the outside of the rafters. The finished element can be installed.
- The second half of the diagonal rafters is made in the same way, not forgetting that it should be placed slightly lower than the first. The junction of the two halves of the slope should not coincide with the section where the boards are joined into one piece.
- The boards are joined with nails at a distance of 40-50 cm.
- Next, you need to draw a saw line along the lace on the rafter so that it can be joined to the adjacent diagonal element.
The manufacture of the remaining 3 parts is carried out in the same way. Supports are installed under each of these rafters in the places where the beams meet the corner extensions. Additional supports near the ridge are required if the span exceeds 7.5 m.
Video instruction
Sources:
https://krovgid.com/montazh/chetyrexskatnaya-krysha-svoimi-rukami.html
https://krovgid.com/montazh/stropilnaya-sistema-chetyrexskatnoj-kryshi.html
https://krovlyakrishi.ru/vidy-krysh/chetyrexskatnaya-valmovaya/kak-sdelat-kryshu-svoimi-rukami.html
https://krovgid.com/montazh/chetyrexskatnaya-krysha-svoimi-rukami.html
https://krovgid.com/montazh/stropilnaya-sistema-chetyrexskatnoj-kryshi.html
https://krovlyakrishi.ru/vidy-krysh/chetyrexskatnaya-valmovaya/kak-sdelat-kryshu-svoimi-rukami.html