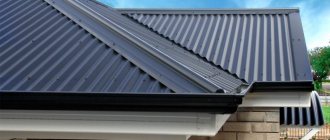
The roof is one of the most important architectural structures of any building; the duration of operation and comfort of living depend on its reliability. Only experienced builders should design and assemble a rafter system; any mistake can have very dire consequences.
Attaching the Mauerlat to a brick wall
What it is
You can explain what it is in the construction of a Mauerlat as follows. This structure serves as a connecting element between the roof of buildings and the walls, and therefore specialists take its arrangement very seriously. Another task of the Mauerlat can be called reducing the windage of the roof to a minimum - this means that it can be torn off by strong winds.
There is a practice of building houses without a Mauerlat, when the rafters are attached directly to the floor beams. In this situation, all loads from the roof structure are directed to the supports of the rafter system, and if there was a Mauerlat, they would be evenly distributed on the walls.
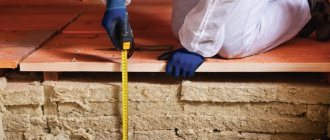
Application of underlay and waterproofing
When the wall comes into contact with the Mauerlat structure, contact occurs between substances that differ in their ability to conduct heat. Because of this, condensed moisture accumulates in these areas. Contact with water leads to wood rotting, so it is extremely important to install waterproofing that separates lumber from structures that differ from them in performance qualities.
The most common means for this purpose are roofing felt and roll products containing bitumen. They are always laid out in a couple of layers. Roofing material can be rolled out along a wall plane or fastened to a timber structure. In the second case, a strip of the required dimensions is marked and separated from the roll using a hacksaw, and a stapler and staples are used for fixation.
An inter-crown seal made of flax and jute is sometimes laid on top of the waterproofing layer. The Mauerlat can also be mounted on a polyethylene foam lining. This material copes well with insulation and waterproofing. Another technique to protect timber from rotting is to treat it with liquid rubber.
Materials for making a Mauerlat
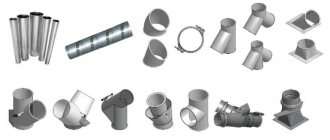
This roofing element is made from:
- wooden beam;
- I-beam;
- metal products or channels.
The choice of material depends on the weight of the roof being erected:
- The beam can have a section measuring 10x10, 10x15, 15x15, 8x18 or 20x20 centimeters. It is placed under the rafters along the perimeter of the roof and thus evenly distributes the load on each point of the walls of the house. When choosing a wood material for a mauerlat, pay attention to ensure that the length of the knots on it does not exceed 2/3 of the thickness of the timber. These places on the wood will not respond well to tension and cracks will appear as a result.
- Bonded boards, from which murlats are made - roof fastenings, are used in the construction of light frame houses, when heavy loads will not be placed on their roof. To save money, experts recommend using boards connected to each other instead of solid timber, which is heavy.
- Sometimes, instead of timber, beams made from steel pipe products are used to make a mauerlat for a gable roof. In this case, the wooden part of the Mauerlat does not extend beyond the perimeter of the building. Tubes are attached to its ends, which become the main support of the roof structure. Pipes must meet certain requirements: small cross-section; high strength and high quality steel alloy.
In the latter case, holes in the rafters are created strictly along the axis; their diameter should be 10 centimeters less than the height of the rafter leg. If this does not work, then steel elements should be additionally attached. The main advantage of this design is that the wooden part of the Mauerlat is protected by the roof.
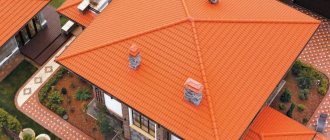
Brick gables
Often the gables of houses are made in the same way as the walls - from brick. This approach not only transforms the house in terms of aesthetics and external perception, but also helps relieve the weight of the roof and distribute the roof loads on the structure. In this option, the method of installing the Mauerlat also changes - it is laid only on the side walls with fastening using one of the generally accepted methods.
Additional fastening points are made through pre-prepared mounting holes in the gable array; they will take part of the lateral loads. Of course, this does not apply to hip (hipped) roofs.
Methods for laying Mauerlat on walls
After the decision has been made on what the Mauerlat should be, its production begins. You also need to decide on the need for a reinforced belt. They do it on walls whose strength is in doubt, so that the future roof has reliable support.
There are 2 options for laying the Mauerlat:
- without armored belt;
- installation on a reinforced belt.
If the work is planned to be carried out on aerated concrete, which is considered a fragile material for walls, this is not easy to do. Experts advise constructing a structure for the Mauerlat using concrete or durable brick to provide a solid base for the connecting element.
Preparing to create a reinforced belt
Its thickness is calculated taking into account the projected loads acting on the roof of the building. They can be permanent (the weight of the rafter structure and roofing pie) and temporary (wind and snow). In any case, the width of the reinforced belt cannot be less than this parameter near the walls.
To get a strong belt, you need to use cement grade M400 and higher. It should be filled in one go. To prepare the mixture, take cement, pre-washed sand and crushed stone in a ratio of 1:3:3. Plasticizers are used as additives to reduce the water content in the solution and, as a result, increase the strength of the armored belt.
It is important that this element is laid continuously on both sides of the external walls of the building. The formwork for it can be building blocks that have a U-shape. Also, to complete the outer row, sawn blocks with a width of up to 10 centimeters are used. You can build formwork from OSB boards and even use standard wooden boards.
Calculation of standard sizes of rafter beams
The size of the beam depends on the following factors:
- wall perimeter;
- roof structure;
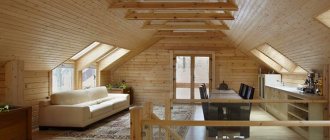
- intended use of attic space (residential or non-residential);
- climatic features of the region.
The Mauerlat is selected so that its width is at least 1/3 of the thickness of the walls. The length is selected according to the length of the wall. If this is not possible, it is permissible to connect two beams of the same length. To ensure reliable fixation, the connection is made with an approach: grooves are cut out at the edges, making up half the thickness of the beam, after which the beams are fastened together with nails.
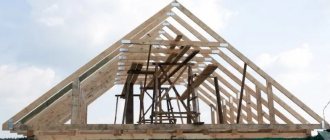
The procedure for attaching the Mauerlat for a gable roof
To install the Mauerlat on frame or timber walls, screws, self-tapping screws or nails are used. To provide additional strength, perforated connecting parts are used.
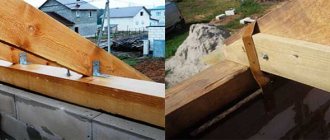
If the house has a large area, and the roof will have a size of about 250 “squares”, then to attach the Mauerlat they use studs - threaded metal pins. They are installed every 2 meters and along the edges of the element.
First of all, for the armored belt, a concrete screed is poured around the perimeter of the walls, and then the pins are sequentially embedded so that the height of each of them is at least 3 centimeters greater than the thickness of the Mauerlat. Only after this can the Mauerlat be firmly fixed using nuts and washers.
In addition to them, metal staples are easy to use and are durable. We should not forget about the possibility of using anchors and twisted wire, which have excellent tensile properties.
Builders consider the simplest method of fastening to be using wire rod:
- Several rows before the very top of the masonry, pieces of wire are laid out between the brick rows so that their length is sufficient to tie the mauerlat after the walls are finished erecting.
- After completing the installation of the connecting element, the remaining ends are hidden between bricks in the thickness of the wall.
Mounting can be done differently:
- Reinforcement pins are embedded in the armored belt - they should be located below the height of the Mauerlat.
- 4-5 centimeter studs or long bolts with cut off heads are welded to them.
There is another method, which involves embedding studs or pins into them while laying the walls. But this option is only suitable for small roofs.
Completion of masonry
The wall structure at the top can end with an even horizontal cut or a special protrusion for the Mauerlat. The second option is preferable when building a small private residential building, as it slightly reduces the labor costs for installing the upper frame of the structure with a mauerlat.
Each method of completing masonry is acceptable and is not considered erroneous.
Smooth edge
In the case when the mason has completed the construction of the wall at one level, the mauerlat is attached to the masonry from the inside. After installation and fixation is completed, the outer part of the wall is insulated. You can fill the upper edge with expanded clay concrete, insulate it with foam plastic or other material - this is the choice of the developer, which does not have a significant impact on the wall and roof structure.
Brick laying with a ledge
The outer part is built higher than the inner part, as a rule, by the thickness of the Mauerlat - this creates resistance to thrust forces and ensures thermal insulation of the house. The method is convenient for self-construction, and is used for thoughtful construction of a building by one contractor.
Regardless of how the upper surface of the wall is laid out, a waterproofing layer must be laid under the Mauerlat.
Arrangement of a reinforced belt
After the concrete has hardened, a beam is placed over the rods protruding from the reinforcement. Even on the shortest wall, there must be at least four 12 mm rods in the armored belt for attaching the Mauerlat. When choosing pins or wire, the belt must also be made with reinforcement.
The thickness of concrete when constructing an armored belt cannot be less than 5 centimeters. As soon as the mixture is poured, it is necessary to ensure that air cavities do not form in it, which can be seen by the bubbles that appear.
This process violates the homogeneity and strength characteristics of the armored belt, but it is necessary to lay the mauerlat on it, which in fact is the foundation of the roof. Air bubbles will disappear if you pierce the not yet hardened concrete with a reinforcing bar. After 10 - 12 days, the formwork is removed after the mixture has hardened and become strong.
Next you need to do waterproofing. As an insulating material, roofing felt is laid on the finished armored belt.
How to attach a Mauerlat to aerated concrete without an armored belt
There are several reliable and proven methods for securely fastening mauerlat beams to aerated concrete walls. Recommended options include:
- Use of studs with embedded elements;
- Laying timber using annealed steel wire;
- Schemes that allow you to secure timber using chemicals;
- Use of dowels.
For your information! In addition to the options listed, you can secure the Mauerlat using anchor bolts.
The structure that bears the main pressure of the roof is called the Mauerlat.
To ensure the strength of buildings, it is important to securely fasten the Mauerlat.
The technology makes it possible to attach the Mauerlat to expanded clay blocks without an armored belt and to the surface of a concrete reinforcement contour. Various technological methods are used to fix the timber. It is necessary to take a responsible approach to the choice of fastening method to ensure reliable fixation of the roof structure.
How to properly lay murlat on walls
There is a certain order in how to correctly place the Mauerlat. When constructing a gable roof, it is mounted on the finished building frame parallel to the ridge along the entire perimeter of the walls. During installation, the main task for the home craftsman is to check the levelness using a level.
When even the slightest unevenness is detected, it must be eliminated: protruding areas are cut off, and those below the required level should be raised using linings.
Then they begin to prepare the timber, which will become the Mauerlat. The wood is treated with a disinfectant and fire retardant and dried well. The timber is applied to the place of fixation and marks are made where the holes will be drilled. Individual sections of the Mauerlat are connected into a common structure with a direct lock and additionally fastened with nails. At the corners, the timber is fastened with an oblique cut or using a straight lock.
After laying the Mauerlat, they begin to build a “bench”, for this:
- Measure the distance between the opposing parts of the Mauerlat.
- The resulting value is divided in half and the middle of the span is marked.
- The marks are connected so that the axis of the “bench” is formed.
Focusing on it, they begin to build the lower run. It would be more convenient to completely make a “bench” with the bottom girder in a horizontal position, and then lift it and secure it vertically according to the axis of the floor.
Chemical anchors
The essence of the method is the use of special chemicals that harden quickly, have excellent adhesive properties and a long service life.
Industrially produced mixtures have a high price and a long service life (up to 50 years). However, there is a cheaper way to replace it - use epoxy resin and hardener.
After a day, such a homemade mixture acquires its final strength characteristics. The following brands are known that produce chemical anchors: “Technox”, “Tecscal”, “Fischer”, “Hilti”, “Sormat”.
There are the following types of industrially produced chemical anchors:
- Ampoule. A special capsule is inserted into the drilled hole for the anchor and then the anchor is drilled. The capsule collapses and upon contact with air its contents harden within 45 minutes.
- Polymer compositions in tubes. Their use is carried out using a dispensing gun.
- Chemical anchors. They provide for drilling a cavity in the wall material. The cavity resembles a cone, narrowed at the top. It is filled 75% with a special compound and then the anchor is screwed in.
The high cost of this method is more than compensated by its performance characteristics.
Avoiding cracking of wall material due to the absence of thrust loads is one of the main advantages of using chemical compounds.
Popular methods of fastening rafters
Earlier in the article it was already explained what a roof plate is and why it is needed. Since it distributes the load on the roof, attention must be paid to the process of attaching the rafters to it. The integrity of the roof depends on it, which, if installed poorly, can deteriorate over time; it will begin to sag or put an increased load on one of the walls.
Two technologies for laying rafters are used:
- Tough . This option does not allow the rafter legs to move. To ensure stability, a hemming block is used to prevent shear. Thanks to the use of metal corners, elements of the rafter structure cannot move to the sides.
- Sliding . This method of installing rafters is necessary when the house was built from logs or timber, which begin to settle over time. In this case, the Mauerlat is not used, but only the upper crown of the wooden frame. If you apply hard technology, within a year the roof will lose about half of its strength because it will begin to leak.
Rigid option for fixing rafters to the Mauerlat
Usually, when arranging roofs, wooden rafters are installed, since they are the most affordable and easy to process. But wood has a significant drawback - it absorbs moisture and swells. True, after drying it returns to its original size.
It is important to correctly install the rafters on the Mauerlat of a gable roof and secure them so that, with increased humidity, the so-called expansion force does not form, which will lead to a significant reduction in the durability of the structure.
The goal of this technology is to eliminate the slightest possibility of the rafters moving. Therefore, the saddle of the cutout is firmly pressed against the Mauerlat and secured with nails, driving them in at an angle. It is important that these cutouts have the same shape and do not exceed a third of the width of the rafters.
Sometimes a meter-long beam is hemmed under the rafters, which also serves as a stop, and a metal corner is used for fixation.
How to attach the Mauerlat to aerated concrete without an armored belt? Some tricky tips
When it comes to arranging the roof, methods of how to secure the Mauerlat to aerated concrete without an armored belt begin to interest many future homeowners who have chosen aerated silicate blocks for the walls. A reinforced layer between the roof and the main part of the house is certainly necessary. But it is quite expensive, and it takes a lot of time and effort, since the matter is quite labor-intensive. And if there is a workaround that allows you to do without her equipment, why not use it? You just need to know what to do first. How to fasten the Mauerlat to aerated concrete without an armored belt,
and whether to decide to take this step can only be done by knowing exactly what you are risking and how safe your home will be as a result.
The panels are additionally fastened with transverse ties in increments of one meter. You can fill them more often so that the boards do not fall apart under the weight of the concrete material.
Sliding (hinge) mount
Each wooden house shrinks in its own way. Over time, a structure made of laminated timber will sag the least, and a fresh log house will sag the most. In this case, shrinkage occurs unevenly and this negatively affects the condition of the rafter system. Installing a sliding mount helps to avoid distortion.
In a residential wooden house, after prolonged rains, the wood begins to swell, and in winter, as a result of loss of moisture, it dries out. This means that roof misalignment often occurs during the operation of the house.
At the same time, the following settle to varying degrees:
- south and north sides of the house;
- parts of the building that are constantly in the shade and in the sun;
- the side exposed to moist air from a nearby body of water, and the drier side;
- a wall blown by the wind and one in front of which there is another building.
Throughout its entire service life, the geometric parameters of a wooden frame are constantly changing. This happens especially strongly in winter. Thus, if the rafters on the upper crown are rigidly fixed, then the snow load will greatly bend the roof structure.
To avoid this, they use a special metal part that looks like a loop, called a “sled.” When the geometry of the log house changes, this fastening element moves relative to the guide, and the rafters settle without causing damage to the entire structure.
Sometimes roofers create a sliding angle using other time-tested methods. A gash is made in the rafter leg.
The beam is installed with a cut on the upper crown and fixed using:
- staples;
- crossing nails in the mauerlat;
- fixing steel plates;
- vertically driven nail.
A good alternative to sliding supports is forged wire twisted twice. It behaves well in tension and gives the elements of the rafter structure a certain degree of freedom.