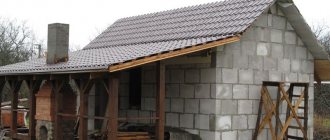
When, back in the 17th century, the French architect Francois Mansara proposed constructing living spaces under the roofs of buildings instead of traditional attics, he most likely did not even imagine how durable and popular his idea would be. Today, almost 400 years later, the construction of houses with mansard roofs is carried out in almost all countries of the world. And this trend is not abating. On the contrary, more and more homeowners are choosing architectural projects with attics. There is a simple logical explanation for this. A do-it-yourself attic roof is original, stylish and profitable.
Mansard roof
What is a mansard roof
According to SNiP 2.08.01-89, an attic is a floor in the attic space, the facade of which is fully or partially formed by the surface (surfaces) of a sloping or sloping roof.
Note. A wooden attic is considered a floor, and by adding it to an existing private house, you automatically transfer it from a one-story building to a multi-story one. Therefore, we are required to document these changes.
The attic roof, unlike other types, is both a flat roof and a wall of a living room located in the attic. Often it has the shape of a sloping roof, consisting of two planes, but other architectural solutions are possible.
Recommendations that are better to know at the beginning of the journey
An attic floor with a gable roof is installed using exactly the same principle. Moreover, its structure is even simpler - all rafters are solid.
Next comes insulation of the roof. Of course, it can be done outside, before installing the membrane, sheathing and roof. But it’s safer from the inside - there will be no threat of precipitation and the work will be done more carefully, because successful operation depends on this.
The insulation from the inside of the room is protected by a vapor barrier film. And between it and the interior decoration, a ventilation gap is required - the interior decoration is not mounted directly on the rafters. For it, just like outside for sheathing, a counter batten is placed or a frame is arranged.
What are the types of attic roofs?
Most often, mansard roofs have the following shapes.
Single-pitch
The simplest one in terms of implementation is, of course, a pitched roof. Usually it is designed in the form of a single plane, but “broken” options are also acceptable. This arrangement of the attic roof assumes the presence of a full-fledged facade wall with window openings, two end walls in the form of right triangles. There is no back wall, instead there is a flat roof.
Gable
Installation and layout of an attic with a gable roof requires more serious construction skills, because you have to join and fasten the rafter legs not only in the mauerlat beam, but also in the ridge. Externally, such buildings are more attractive. They are often equipped with a balcony or loggia. The front and rear walls of the attic look like identical triangular planes enclosed under the roof slopes. The usable area in such buildings directly depends on the height of the facade wall and the angle of inclination of the roof. However, expanding the usable space by raising the ridge and changing the angle between the slope and the ceiling is not a completely justified solution: in this case, there is a significant increase in the cost of the structure and an increase in the load on the supporting structures.
Broken
To increase the usable space, it is much more practical to equip a sloping roof consisting of two planes. This type of roof has come into use as an attic roof. The structural features make it possible to install interior walls and ceilings at right angles. As a result, the room takes on its usual shape, which is very convenient for arranging pieces of furniture.
With remote consoles
Even the most typical project with an attic can be given an unusual look by moving one or more slopes beyond the load-bearing walls. This solution is appropriate when it is necessary to protect a balcony, terrace or entrance to a house from sunlight and precipitation. The roof overhangs are secured to external consoles or additional supports – pillars.
Two-level
It is not at all necessary to install an attic floor over the entire house. Sometimes it is enough to arrange it above part of the building. In this case, the roof will consist of several planes separate from each other, located at different levels.
Multi-gable roof
The most attractive are attics with multi-gable roofs. Structures in which several two-act roofs intersect with each other or crash into one another look like fairy-tale houses or log cabins stylized as Russian towers. However, strict options are also possible. In multi-gable attics, window openings can be installed on all sides of the building.
hip
A four-slope hip or envelope roof consists of 4 slopes: 2 triangular and 2 trapezoidal. Attics of this type have no walls at all. And window openings are located directly in the roof planes. This attic design is not very practical. Therefore, to increase the ergonomics of the entire structure, part of the roofing planes is “cut off” and gables are installed in their place. A roof with an attic of this type is called semi-hinged.
Very often the roof planes in a hipped roof are called hips. In fact, hips are external corners formed by 2 adjacent roofing planes, located at an angle. But the horizontal corner (at the very top of the roof) is the ridge.
Tent
A hipped or pyramidal attic roof is another type of hipped roof. It consists of 4 absolutely identical triangular planes converging at one vertex. Pyramid attics are extremely rarely installed in areas with heavy snow and wind loads. They are more suitable for areas with a mild favorable climate. However, due to the complex design of the rafter system, the large volume of expensive work and the significant load on the supporting structures, they are built infrequently even in warm regions.
Asymmetrical
When a house consists of two zones with different functional loads (living area + garage/workshop/gym), it makes sense to build an attic only above the living part. In this case, it is not at all necessary to install two separate roofing systems. You can make one full-fledged asymmetric roof. This will reduce the cost of building an attic and give the building an interesting finished look. An asymmetrical roof is an ideal option if you need to “hide” the terrace located next to the house from rain and sun.
With a cuckoo
Cuckoo houses or cuckoo houses are small rectangular rooms with window or door openings cut directly into the roof slopes. Initially, cuckoos were intended only for lighting attics and attics. Now, in addition to their main task, they play the role of decorative architectural elements. Buildings with a cuckoo house stand out against the background of houses with a mansard roof, made according to monotonous standard designs.
L-shaped
Buildings with two wings are also suitable for attics. Typically, such projects provide for separate half-hip, gable or sloping roofs, mating at the intersection of the “wings”.
Children's room
The easiest way is to arrange a children's room in the attic, using environmentally friendly and harmless materials.
To make the room both beautiful and practical, you should consider some points:
In addition to the fact that the materials from which the furniture is made must be environmentally friendly, the furniture design should not have sharp corners and be firmly attached.
Children's room without sharp corners
You can strengthen the floor with a soft carpet or any other covering you like.
Reinforcing the floor with carpet
It is better to choose two-tier furniture for the room; this solution will not only save space, but will also make the child’s play area very cozy. Ideal in this case would be beds with space underneath and various cabinets and tables.
Bunk bed
Lockers in the nursery
Also, don’t forget about toys that require storage space. They can be used as special tote bags, or you can come up with built-in drawers in the bed.
Toy storage areas
Attic roof design
When the construction of an attic roof in a house is planned from scratch, there are no problems with the project. All nuances are agreed upon at the initial stage. With this approach, you can design any structure, calculate its weight, the load on the load-bearing elements and select a suitable base. If an existing building is being reconstructed, then one should start from the “possibilities” of the foundation and load-bearing walls.
In any case, you need to start by obtaining permits and drawing up a project.
Such permission must be obtained even if you are rebuilding your own house, and a mansard roof is planned on the building, which you erected yourself.
In most cases, it is possible to legitimize the structure under construction after completion of construction work or when the need arises (sale, inheritance, donation). Of course, if the developer has documents confirming ownership of the land. If there are no such documents, then the building will be declared illegal and will be required to be demolished. In case of refusal, dismantling will be carried out “on their own”, and the costs will be borne by the developer.
However, changes may be made to the legislation at any time to suspend the legalization of unauthorized buildings. Therefore, it is better to start construction by drawing up a project and obtaining permits.
Attic project
Taking a standard project as a basis, you can significantly reduce the cost of constructing an attic. After all, you won’t have to pay an architect and designer for complex calculations of the rafter, fastening and energy-saving systems. However, when resorting to such a decision, remember that the standard design must be designed specifically for your area.
You can make the necessary calculations yourself, especially if you plan to build a lightweight structure with a simple roof. Using online applications and building codes, making an attic is not that difficult.
When starting to calculate the attic roof, take into account SNiP. This is not just advice of a recommendatory nature, these are rules that require mandatory implementation.
If before this you have not had to deal with constructing a roof with your own hands and calculating the rafter system, then it is better to turn to specialists. Of course, this will require additional financial investments, but it will save you from mistakes and negative consequences in the future.
Making a plan
Even if you subsequently plan to resort to the services of specialists, drawing a basic plan for the future attic will not be amiss. In this case, it will be easy to explain to the designer what kind of design you need and what you want to get in the end.
In the absence of construction skills and the necessary knowledge, you can take your favorite mansard roof designs as a basis and make a diagram or drawing that matches the size of your house.
It is ideal if you use a computer program or a scale ruler and a protractor and draw a sketch of the future attic to scale, accurately observing all the dimensions and slope of the roof. Already at this stage you will see how it will look, “evaluate” the usable area and blind areas, think over the design of the rooms and the need to install vertical partitions. Perhaps even choose a different type of roofing.
When depicting a room in section, keep in mind that in the “lowest” place the height of the vertical walls should be at least 0.9 m.
If you use a special program to calculate the height and angle of the roof, it will give you all the possible options. If you prefer to use a ruler and pencil the old fashioned way, then you will have to remember the basics of geometry.
We make calculations
When calculating a gable roof, the height of the ridge directly depends on the angle of inclination of the roof. Let's look at this dependence using an elementary example (step-by-step guide).
- The width of the house with the attic is 9 m;
- The roof angle is 30 degrees.
Need to know:
- Ridge height;
- Length of the rafter leg;
- Let’s conditionally divide our length into two equal segments (the middle of the house is the projection of the ridge);
- Each of them will be 4.5 m;
- Using the Bradis table, we convert the angle value into a relative value;
- For an angle of 30 degrees, this value is 0.58;
- Let's multiply the values of the relative size and half the width of the house and get the height at the ridge (0.58 * 4.5 = 2.61 m);
- Now let’s find out what length of the rafter leg the mansard roof has with our own hands (4.52 × 2.612 = 27.062. Let’s take the square root and get 5.22 m).
Note. When calculating, we get the length of the rafter leg in its “pure form”; to form overhangs and cornices, it is necessary to add approximately 50 cm to it.
This means that a gable roof with an attic in a house with a width of 9 m and a roof slope of 300 has:
- Height at ridge 2.61 m;
- The length of the rafter leg is 5.22 m.
According to SNiP, a room in the attic space can be called an attic only if the distance from the floor to the ridge is at least 2.5 - 2.7 m.
If this height of the ceilings is not enough, we will try to “raise” them by increasing the angle of inclination of the slopes.
- Let's take 400 as a basis and convert this value into a relative value (according to the Bradis table). In this case it is 0.84;
- Let's multiply the values and get the height at the ridge (5 × 0.84 = 3.78 m);
- Let's calculate the length of the rafter leg (according to the Pythagorean theorem: 782 + 4.522 = 34.61);
- Let's take the square root and get 5.88 m.
For a house with a width of 9 m and a roof pitch of 400:
- Height at ridge 3.78 m;
- The length of the rafter leg is 5.89 m.
By simple manipulations and searching through options, you can select the optimal value for each specific case.
In a similar way, you can make calculations for any type of roof, dividing “complex” areas into simple “triangles”.
Having dealt with the height at the ridge and the length of the rafter legs, let’s move on to calculating the area of the slopes.
For gable and single-pitch roofs, the area of each slope is calculated by multiplying the length and width.
S = A × B
For hip and gable roofs, each slope will need to be broken down into simpler shapes and the areas of the resulting “rectangles” and “triangles” calculated separately.
To facilitate and speed up the process, it is better to calculate the area of triangles using online applications. You only need to enter the initial data, the system will produce the result in a few seconds.
When calculating the roof area, do not forget to make allowances for overhangs.
Having all the data in hand, you can calculate the amount of building materials needed and make an estimate.
Determining the height of the attic and the amount of roofing material is the simplest stage of calculations. Calculations of snow and wind loads are more difficult. The cross-section of the beams and rafters used, the pitch, quantity and type of fastening material depend on them.
In this case, as when calculating the height of the ridge, you can maneuver with the values. By increasing or, conversely, decreasing the pitch of the rafter legs, you can accordingly change the cross-section of the beams used.
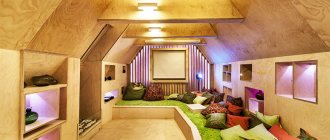
Restroom
Each owner equips the rest room according to his own taste and desires. Here are a few options that would be an ideal place to relax in the attic:
Billiards. The design of such a room is very simple to organize; you just need to install a billiard table in the center of the room, along the walls with chairs or sofas. In this case, wicker sofas are suitable. Also, do not forget about lighting, which is best installed above the billiard table.
Billiards
For those who love cinema, there is an option to make a mini-cinema in the attic. It is better to place the screen opposite the light source and, accordingly, a sofa or armchairs with a table.
Attic space for a company
Mini cinema
Recreation room in the attic
You can also arrange a bar in the attic. To do this, just place a bar counter along the wall, above which the required number of lamps is mounted and a refrigerator is installed.
IMPORTANT!
In any of the options for arranging a room in the attic, competent preliminary planning of the room will allow you to do this accurately, comfortably and quickly.
Artist's lounge
Proper room planning
Construction stages
The installation of the attic begins only after drawing up the design documentation.
Selection of materials
For the construction of attic roofs in private houses, high-quality dried wood is used. Using wet wood is fraught with warping and compromising the integrity of the entire structure. It is never possible to predict in advance which direction wet beams will bend during the drying process. And it will be necessary to bend them - it will not be possible to avoid it. Therefore, you should never save on purchasing lumber. The humidity of the board should be at least 15%. They are not allowed to have:
- Rotten;
- Falling out knots;
- Wormholes;
- Sinev;
- Resin pockets;
- Torsion and bending;
- Cracks;
- Wane.
It’s great if you manage to purchase beams and boards that have been cut with a band saw - they are smoother.
The best option for building a rafter system is larch. Strong, durable, moisture resistant, it will serve faithfully for many decades.
Coniferous species are less suitable, but much cheaper, so they are actively used in construction. When choosing between spruce and pine, keep in mind that pine is much heavier, which means it puts a greater load on the supporting structures. In addition, it is more fragile and more susceptible to rotting.
Glued laminated timber and I-beams of wood are used when installing the rafter system of gable roofing systems no less often than solid wood. They are cheaper, stronger, lighter.
Defects in lumber that you need to pay attention to
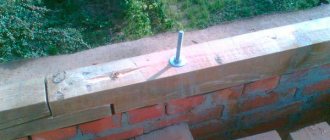
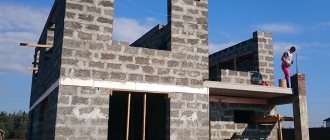
Mounting the Mauerlat
Mauerlat is the connecting link between the load-bearing walls and the roof. This is an ordinary wooden beam with a cross-section of at least 15 × 20 cm, which serves to evenly distribute the load from the roof to the supporting structures. The Mauerlat is mounted in the upper part of the building (along the perimeter) and is used as a support for attaching the rafter legs.
The installation of the Mauerlat is planned at the stage of pouring the reinforced concrete belt at the top of the building. To do this, vertical pins or fixing steel wire are placed in it.
Places for the studs are marked on the Mauerlat, checking their location, and holes of the appropriate diameter are drilled.
The Mauerlat is laid only on the waterproofing layer. Therefore, before starting work, a strip of the required size is cut from a roll of roofing felt and laid along the load-bearing walls. The cut places for the studs are fixed with moisture-resistant tape and only after that the Mauerlat is installed.
If at the stage of pouring the concrete belt, for some reason it was not possible to install the studs, you can attach the Mauerlat with anchors.
Installation of the attic frame
It is most convenient to mount the attic roof frame after a system of joists has been installed on the building, which are attached to the Mauerlat using reinforced metal corners and ninety screws. If necessary, at this stage you can lay rough boards between the joists - it will become much easier to move.
The next stage is the installation of racks and horizontal ties (attic floors). There is no single rule for their installation. Some craftsmen prefer to build them one by one, checking each one using a building level. Others first mount the outer posts, then stretch strong strings between them, forming horizontal and vertical planes, and then assemble the remaining structural elements. In any case, to give them rigidity and stability, temporary jibs must be installed.
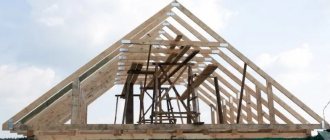
Installation of the rafter system
Attic roof rafter system
Installation of rafters begins after all the racks have been installed and fixed with horizontal beams, which in the future will serve as the basis for the ceiling. Installation of the first rafter leg takes the most time, since it is necessary to measure, apply markings and make the necessary cuts or grooves. In the future, it can be used as a template and the rest can be made according to its sample. The lower part of the rafter leg is attached to the mauerlat or joist, and the upper part to the corner of the frame.
After installing all the side legs, proceed to the installation of the ridge. To prevent excessive bending of the “attic beams” during its installation, temporary supports are placed under them and boards are laid for easy movement.
There are several options for assembling hanging beams. They all have the right to exist. However, if you have never had to do the roofing yourself before, it is best to first remove the bars in the central part of the gable on both sides of the building and secure the ridge girder between them. It will become a support for fastening the upper sections of the hanging logs, the lower ones will rest on the racks with the attic floors. As in the case of layered beams, it is advisable to make a template and use it to make the remaining rafter legs.
Installation of sheathing and roofing
To prevent moisture from penetrating into the premises, a layer of waterproofing material (water barrier) is placed on top of the rafter legs and secured with wooden beams with a cross-section of 50 × 50 mm, nailing them to the rafters. A so-called counter-lattice with a ventilation gap is formed.
Then the sheathing boards are stuffed and the roofing material is laid. The final step is installing the ridge, wind boards and filing the bottom of the overhangs.
Insulation
It is advisable to insulate the roof only after the gables have been mounted and the window units have been installed. The choice of insulation is an equally important step. It is possible to ensure a favorable microclimate in the room and minimize heat loss only by installing high-quality insulation of the required thickness.
The first layer of insulation is placed in the spaces between the rafter legs, trying to ensure that it fits as tightly as possible against them. The second is “staggering”, ensuring that the seams do not coincide anywhere. To prevent the formation of cold bridges, the attic rafters themselves are also covered with heat-insulating material, fixing it with horizontal slats - purlins.
Vapor barrier of attic roof
Water vapor penetrating from the premises to the wooden and iron elements of the roof, as well as moisture from the street, affects them with destructive force. To minimize negative phenomena, after installing the insulation, a vapor barrier layer (vapor barrier) is attached to the top of the fixing slats. It is covered from above with a rough wall or any decorative material.
Heat, hydro and vapor barrier
An attic roof differs from a regular one primarily in that it has an attic, but it is only a small under-roof space between the covering and the internal thermal insulation. Moreover, it is necessary to thermally insulate an attic gable roof. After all, now this is a used living space, and where people live, there is always water vapor. They come out of a person's breath, a cup of coffee, ironing and for many other reasons. And in combination with the warmth of the living space, this is far from the best option for any roofing.
Further, the rising warm moist air heats the roofing so that in winter the snow easily melts on it. And melt water begins to flow not only into all the cracks and cracks, making its way inside, but also rolls down along the roof itself - to the colder eaves, where the snow has not melted at all. There it freezes again, finding itself without a warm attic below, and ice forms.
Consequences: clogged and destroyed gutters, huge icicles and snow constantly falling on your head. That is why, since you are planning a residential attic, include its insulation work in the project: heat, hydro- and vapor barrier. Moreover, all this needs to be thought through carefully: the attic roof quickly loses its heat due to the large area of contact with the environment. Therefore, it is important to create one continuous insulating circuit around the entire perimeter.
Rafter system
Tilt angle
The classic version of roof slope angles
The angle of the slopes affects not only the height of the ridge. The degree of snow and wind load depends on its size. The lower this indicator, the greater the load the snow cover has on the supporting structures of the building. As the angle of inclination increases, the snow load decreases, but the wind load increases.
Types of rafter systems for sloping roofs
There are two main types of truss system design.
Hanging structure
Types of hanging rafters of an attic roof
When the rafter leg rests only on the mauerlat (in the lower part), and the upper part is joined to the mirror paired rafters. To give the structure additional rigidity, such a system is fixed and expanded with special elements: fillets, spigots, headstocks, and puffs.
Layered system
In a layered system, the rafter legs have two supports: at the bottom - a mauerlet or logs, at the top - a ridge girder.
How to calculate a sloping roof
The principle of calculating a sloping roof is no different from the above calculation of a gable roof. The only additional step in this case is breaking down complex links into simple components.
To determine the height of the ridge in the “triangle” formed by the hanging rafters and the attic floor, we will use the same formula as in the first case. Let's convert the angle value into a relative value, according to the Bradis table, and multiply the resulting number by a value equal to ½ of the attic base (half the distance between the posts).
We calculate the length of the rafter leg using the Pythagorean formula.
A2 + B2 = C2
Where A and B are the height at the ridge and half the distance between the posts, respectively, and C is the length of the rafter leg.
We calculate the layered rafters either by the angle and height of the rack, or by the Pythagorean formula.
Just as in the first case, by selecting options, we will choose the optimal dimensions of the attic and calculate the area of each slope.
What section of rafters are required?
To determine the cross-section of the rafter legs and the distance between them, in addition to the constant load, consisting of the weight of the structure itself (the mass of roofing materials, thermal insulation layer, steam and water barrier, rafter legs and sheathing), you will need to calculate the magnitude of the temporary load (snow, wind, people).
To do this, use the map to determine in which zone the building is located.
Using the table, the estimated weight of snow cover for a specific area is found.
Using the formula, the snow load is calculated.
S = Sg × μ
Where:
- Sg calculated weight of snow cover (according to the table);
- Μ – coefficient depending on the angle of inclination of the roof.
If the slope of the slopes is more than 60 degrees, then the correction factor is not taken into account. It is believed that snow does not linger on such roofs.
- If the roof slope is less than 250, the correction factor is 1;
- For a roof slope from 250 to 600, the correction factor is 0.7.
To calculate the wind load, a special map and tables are also used:
| No. | Building height in meters | Zone A | Zone B | Zone B |
| 1 | Up to 5 | 0.75 | 0.5 | 0.4 |
| 2 | From 5 to 10 | 1 | 0.65 | 0.4 |
| 3 | From 10 to 20 | 1.25 | 0.85 | 0.55 |
- zone A – open area (steppes, forest-steppes, deserts, tundra or forest-tundra, coastal areas);
- zone B – urban areas with buildings, forests, artificial and natural high-altitude obstacles;
- zone B – urban areas with densely located multi-storey buildings.
Using the formula Wp = W × k × c determine the wind load for a particular case.
For buildings located in difficult climatic zones (with a lot of precipitation and strong gusty winds), the calculation of snow and wind loads should be carried out more carefully. To familiarize yourself with the basic rules, watch the thematic training video.
Tools
To carry out the work you will need the following tools:
- Electric drill;
- Screwdriver;
- Saw;
- Jigsaw;
- Grinder with a disc for wood;
- Chisel;
- Axe;
- Building level;
- Plumb;
- Measuring instruments and pencil.
Elements
In order not to make the reader confused in terms, I will give a few more definitions. Here are the main elements of the rafter system:
| Image | Rafter structure element |
| Mauerlat: a beam laid on a main wall or monolithic ceiling that serves as a support for rafters. | |
| Rafters: Sloping beams that serve as support for the roof. Hanging rafters (that is, resting only on the walls of the building) allow you to build a roof up to 6-6.5 meters wide. Layered rafters (with intermediate supports) allow you to increase the span up to 12 meters with one support and up to 15 meters with two supports. | |
| Crossbar, or tie : a beam that tightens the rafters of a gable roof. Its task is to prevent deformation of the rafter system in the event of heavy snow loads. | |
| Post : A vertical support under a rafter to ensure its stability in strong crosswinds. In addition, studs usually serve as the basis for the frame of the side walls of the attic. | |
| Beam : a horizontal beam on which the posts rest. |
Dormer windows
Attic window with a combined opening system
According to the requirements of SNiP, the glazing area in attic-type rooms must be at least 10% of the total surface area of the walls and roof of the house. But if the installation of ordinary double-glazed windows is allowed in gables and cubby houses, then only special dormer windows are suitable for installation in the roof.
Types of dormer windows
- Windows balconies;
- Hinged windows;
- Cornice windows;
- Panoramic double doors;
- With a combined opening system;
- Mid-turn.
Layout
The stairs are key. Its position must be linked to future floor beams. If the pitch of the rafters allows, we simply orient it between the beams. Otherwise, we design a reliable, convenient entrance to the attic.
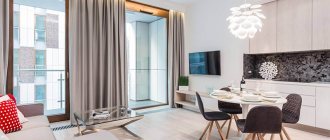
At the planning stage, it is useful to think about the interior. At this stage, decisions are made about partitions and additional natural lighting - skylights. Of course, it’s too early to think about decoration, but the engineering part should become clearer - what functionality will be implemented.
In the attic you can set up an office with a corner for practicing music Source pinterest.co.uk
After all, the features of such rooms are: broken-sloping ceilings, their reduced height, unusual walls and non-standard lighting.
Therefore, a specific layout of the premises is necessary, and in them, correct distribution - zoning of space:
- For basic life activities, bright and well-ventilated rooms are allocated.
- Uncomfortable areas are equipped as storage areas .
- Place “unusual conditions” at the disposal of children .
Interior design and ultimate comfort are created by skillful use of the potential of finishing materials, furniture and accessories.
Number of boards for making sheathing
The lumber used is standard; both hardwood and softwood can be used to make the sheathing. Standard lumber:
- Coniferous species - length 4.5 and 6 m.
- From deciduous trees - no more than 5 m.
- Coniferous species for special needs - 9 m long.
Based on this, we can say that for a house 8 x 10 m, a roof slope 10 m long requires two 6 m boards. It is imperative to take into account an overhang of at least 20 cm.
But all boards are usually sold not in pieces, but in cubic meters. To find the volume, follow these steps:
- Count the number of boards needed to make the sheathing.
- Convert all linear dimensions to meters for further calculations.
- Multiply the number of boards by all the dimensions of one.
For example, you need 10 identical boards measuring 200 x 20 mm and 6 m long. 200 mm is 0.2 m, 20 mm is 0.02 m. You need to find the product 0.02x0.2x6x10 = 0.24 (cubic. m).
The total mass of wood from which the sheathing is made can also be calculated and this will not be difficult. So, at a relative humidity of 18%, a cubic meter has the following mass:
- Spruce – 450 kg.
- Cedar pine – 440 kg.
- Common pine – 510 kg.
- Siberian fir – 380 kg.
- Caucasian fir – 440 kg.
It is recommended to use the average weight of rafters and sheathing when calculating - 500 kg per 1 cubic meter. m. Therefore, if you need to spend 10 boards to make the sheathing (based on the calculation above), then their mass will be equal to 0.24 x 500 = 120 kg. This is the total mass of the entire sheathing structure.
How many rafters are needed?
When calculating the number of rafters, you need to take into account the linear dimensions of the house, as well as the roof area. Be sure to install the rafters at the same distance. Standard rafters made of wood with a cross-section of 50 x 100 mm are mounted at a distance of 70-80 cm. Provided that the leg length is over 6 m. If the rafter leg length is 3-6 m, then they need to be placed at a distance of 1.2 m.
When calculating sloping and gable roofs, you must adhere to the following parameters - the cross-section of both side and ridge elements should be from 50 x 100 mm. When making calculations, you need to take the average density of wood at a relative humidity of 18%. This is 500 kg per 1 cubic meter. m.
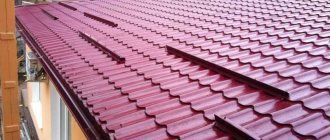
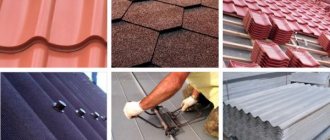
Choosing a roofing covering
There are subtleties in choosing roofing material for such a roof. So, soundproofing qualities are important here. After all, constant noise and periodic rumble from raindrops can bring a lot of discomfort.
The roof covering should be as light as possible, because the attic roof itself and with its internal filling already puts a lot of pressure on the foundation.
Read more about the choice of coatings in this article.
How many rows of sheathing are needed?
So, let’s say you decide to use a 200 x 20 mm edged board to make the sheathing, and the distance between adjacent rows is 200 mm. Therefore, three rows of sheathing need to be laid on one meter. But what if we increase the distance between adjacent rows (for example, make it 300 mm)? Only two rows will fit on one meter. If you are calculating a broken system, you will need to add two more rows - cornice and ridge.
The distance between the rows must be maintained the same for maximum strength. After all, you need to take into account the fact that the entire system must withstand both the mass of the roofing material and the effects of snow and winds. And most importantly, with the same distance between the rows of the sheathing, you will be able to install the heat-insulating cake with the highest quality possible.