Any car owner knows how important it is to keep the car in a safe, protected place. Such a place is often a garage, which allows not only to protect the car from acts of vandalism and theft, but also to protect the vehicle from precipitation and solar radiation. In addition, it allows the car owner to conveniently repair the vehicle with his own hands at any time of the year. Brick garages are especially popular today among car owners. Read below to learn how to properly build a brick garage yourself.
Types of garages
The main and most popular material for building a garage is brick. It is fireproof, has good strength and is resistant to various negative weather influences. Do-it-yourself brick garage - this is exactly the kind of construction that will be discussed in detail today.
Drawing of a brick garage.
The first thing you need to decide is the type of construction. How many cars will be placed in it, the possibility of placement, the availability of free space, and so on - you need to think about all the nuances and choose one of the following types of brick garages:
- separate building;
- built into housing;
- extension to the house.
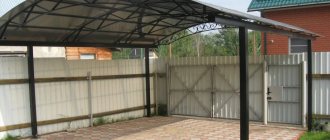
A separate building is the most popular option. It is being built as a separate building, electricity, heating and water supply (if necessary) is also its own. Buildings of this type are usually located in the most comfortable place for entering and exiting the yard.
The best option is in line with the fence, at the level of the site, so that the gate of the building goes directly to the road.
Built into the house. A garage of this type is planned initially and is built along with the house. Among the advantages of this type of construction, it is worth noting the ease of entry - directly from the house, as well as the absence of the need to lay additional communications.
Extensions to the house. They are also very convenient, since they can be entered both from the front and from the side, directly from the home. Another plus is that they are heated together with the home thanks to a common water supply and power supply system.
In view of the demand for the first type - a separate building, it will be considered in detail.
Required materials and calculations
To build a brick garage, you need to choose the right materials. When purchasing consumables, pay attention to some additional characteristics:
- Strength and reliability: cheap bricks, low-quality cement mix and garage doors will lead to the fact that the brickwork is deformed or the building can be “opened” by intruders.
- Fire resistance and moisture resistance: those characteristics that are 100% realized. The materials that ensure their implementation must be of high quality.
- Beautiful appearance: a building lined with facing bricks does not require additional finishing, which minimizes material and physical work.
The correct calculation of materials is carried out through the use of special forms, however, they are complex and difficult for an ordinary person to understand. There is another option: determine the expected thickness of the walls and, based on the size of each fragment, calculate the number of bricks needed. It is also taken into account that some areas are laid out in 1 brick or half a brick. The interior decoration is completed after the garage walls are ready. It is easier to calculate materials for work based on the square footage of the room.
If you are planning a brick cellar, you must determine in advance the size and quantity of additional materials.
The first stage is the project
The construction of any building begins with planning, and a brick garage will be no exception. A project is not always a huge roll of paper with many detailed drawings on it. It is important to simply understand what needs to be built and how.
Sometimes an ordinary piece of notebook paper on which the future structure is drawn is enough. The main thing is the guideline that you will follow.
The first thing that needs to be taken into account at the design stage is the tasks that the building will perform. Will it be used only for car parking, or will vehicle repairs and repair work be carried out there? Will there be a cellar, inspection hole or attic in it? All this should be taken into account and recorded on paper.
Garage standards
Let's start with the size of garage buildings, depending on the dimensions of the car for which they are being built. There are so-called minimum standards, which are characterized by the distance from the machine to the internal surfaces of the walls of the building.
- The width of the building is the width of the car plus 70 cm on each side.
- Length is the length of the car, plus 50 cm on each side, measured from the bumpers.
- Garage height for a passenger car: 2-2.5 m, for a truck – the height of the car, plus half a meter.
For passenger cars, the optimal dimensions of the building are: length 6 m, width 4 m, height 2.1-2.5 m. We take them as the basis for our story. Of course, these are just the minimum parameters. That is, garages can be built wider and longer, two- or three-story. It all depends on the customer’s requirements; there are no other selection criteria.
A mandatory communication network that simply must be present in the garage is electrical. To do this, it is necessary to install a distribution panel inside the building, from which a lighting cable and a separate line to the sockets are diverted. The first section is usually equipped with four lamps: two ceiling and two side. The second is either 2 or 4 sockets.
Standard red brick garage 6x4 m Source youla.ru
It is possible to install water supply into the garage and, accordingly, sewerage. This is a serious bonus in increasing the comfortable maintenance of the car.
As for the inspection pit, everyone has recently abandoned this building element. The thing is that repairing modern cars is the work of professionals who use special equipment and tools for diagnostics and repairs. The only thing you can do inside your own garage is to recharge the battery. And for this purpose an inspection hole is not needed.
Second stage - marking
The drawing of the future brick garage is ready, now its dimensions need to be oriented on the ground. For this you will need:
- long tape measure;
- sledgehammer or heavy hammer;
- 10-15 pegs about 40 centimeters long;
- about 40 meters of durable cord.
All the tools are ready - we clear the place for construction. Next, focusing on the garage drawing, we hammer stakes into the corners of the future building according to the dimensions, and then connect them with a cord. The result obtained will become a guideline for the construction of the garage.
Roof structure
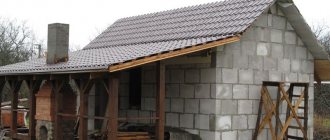
When building a garage, pitched roofs are especially popular. This is a cheap and practical option for installing the upper part of the building. To make a pitched roof, care should be taken about its construction at the stage of erecting the walls, so the opposite end walls must be of different heights. For a garage 6 meters long, it is optimal to make the tilt angle 50 degrees. This can be achieved by making a slope of 5 centimeters for every meter of long walls. To visually assess the angle of inclination, you can pull a rope by connecting the ends of the building.
When installing a roof, wooden beams are required, which should be approximately 0.2 meters longer than the width of the garage. They are laid in increments of 0.8–1 meter, repeating the slope of the walls. Wooden boards are installed on top of the beams. It is important to ensure that there are no gaps between them and to nail them as tightly as possible.
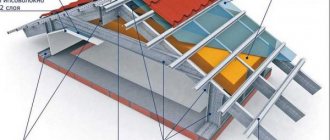
It is necessary to lay waterproofing on the boards, for example, roofing felt. Sheets of material are overlapped and secured with nails. Next, they begin laying the roof. The choice of material is rich. The following types of roofing coverings are used for the garage:
- slate;
- ondulin;
- corrugated sheeting;
- various types of tiles.
All types have a fairly long service life and differ only in price and appearance.
The third stage - earthworks
According to the markings, it is necessary to dig a trench in the ground for the foundation. If the garage is simple, you can get by with an ordinary shovel. If it contains a pit or cellar, it is better to use the services of an excavator.
For a do-it-yourself brick garage, a conventional strip foundation with a width of at least 40 centimeters is quite sufficient. Depending on the terrain and soil freezing during cold seasons, the depth can range from 60 to 12 centimeters. The optimal depth is one meter.
The walls of the dug trench must be smooth and vertical, the bottom must be solid. To improve the quality of the final foundation, it would be useful to pour a cushion of sand or crushed stone 5-10 centimeters thick at the bottom and compact it thoroughly.
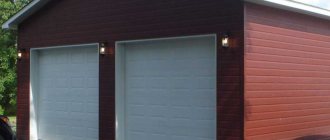
Gate installation
Gate hinges
Both sliding and swing gates are acceptable for garages. First you need to weld the door frame to the garage slopes. This must be done clearly at the level so that there are no distortions in the structure. Next, we weld the hinges to the frame; gates made from a frame covered with sheets of metal can now be placed on them. Let us remind you that the gates should be insulated with polystyrene foam.
It is worthwhile to prepare well theoretically before starting independent work on constructing a garage.
Stage four - pouring the foundation
An affordable and simple foundation, optimal for pouring a garage, is rubble concrete. It is done very simply - rubble stone is laid in rows in a finished trench, after which each row is filled with cement mortar. And so on until the very top is filled.
A properly made foundation is the key to the durability of the garage, since the likelihood of cracks and the degree of shrinkage of the building itself depends on its quality. For this reason, when making a brick garage project and bringing it to life, you should not skimp on materials.
For the solution, the highest available grade of cement, water, plasticizer and sand are used. To make mixing easier and increase the speed of work, it is better to use a concrete mixer.
Approximate ratio of components for high-quality concrete:
- 10 kg of cement;
- 30 kg of sand;
- 40-50 kg of crushed stone or gravel.
Add water, focusing on the desired consistency of the solution.
You can fill the foundation without using rubble stones, but then you will need more mortar, and you need to add reinforcing mesh in the trench itself.
Creating a plinth
The purpose of the garage basement is to protect the garage from cold, moisture and other weather hazards in the future. It is recommended to make it approximately two rows of brick high.
Brick laying should be done directly onto the cement mortar. The main requirement for the construction of a plinth is evenness. Usually, a building level is used to check the plane. If desired, the erected base can be decorated with either plaster or siding.
Fifth stage - laying walls
Scheme for creating a brick wall.
A month has passed - the foundation has completely dried out, and you can start laying the walls. Depending on the region, you can take a thickness of one and a half bricks for colder areas, and one brick for areas with a warm climate.
When installing, it is important to follow several rules:
- No distortions - the masonry must be extremely even.
- Having decided on the scheme for laying sand-lime bricks, stick to it until the work is completed.
- The mixing of the solution must be correct and the same throughout the entire work. Once you have chosen the ideal proportion, maintain it constantly.
- The thickness of the seam should not be more than one centimeter. For ease of laying, you can use a sample strip 8 millimeters thick when laying out the bricks.
To work you will need:
- shovel;
- buckets;
- a large capacity container for mixing mortar or a concrete mixer;
- pick;
- bricks;
- Master OK;
- fishing line or lace;
- plumb line;
- building level.
To build walls, chain masonry is used, when one row of bricks overlaps the seams of another row. In the outer row you can use facing bricks. It is necessary to start laying from the corners, laying them out using a building level.
Next, a fishing line is stretched between the resulting angles. It should be flush with the top of the brick. It is important that the lace is pulled tight enough and does not sag.
Now you can begin the laying itself. New rows of bricks are placed from the corners flush with the line, adjustment is carried out using a pick or trowel. After the row is laid along the perimeter, the lace rises to the level of the next brick and the work continues.
We pay special attention to the corners and the strictly vertical level of the walls, for which we use a plumb line.
If the roof is planned with one slope, it is necessary to ensure the required level of slope for water drainage. To do this, we make the height of the end walls different, and the upper cut of the side walls is inclined. For example, for a garage six meters long, the normal tilt angle is approximately 30 centimeters.
To do this, a slope of five centimeters is made on every meter of the slope. To maintain the normal level of the slope, you can use a cord.
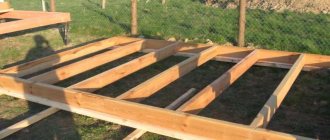
Video description
The video shows the technology for forming a wooden garage floor with subsequent installation of corrugated sheeting:
Roof
At this stage it is necessary to erect the roof. With gable and single-pitch structures, everything is more or less clear. As for the flat roof. In principle, screed mortar must be poured onto the floor slabs so that it creates an inclination angle of no more than 5°. And the roofing material is laid on this dried surface. Most often it is a roll type, but you can also install corrugated sheeting by laying a thin sheathing of boards 100 mm wide underneath it.
Laying rolled roofing material over a poured screed Source moydom.net.ua
Stage seven - pouring the floor
Self-leveling flooring and concrete subflooring are the two main types of flooring most often used in garages.
To install a concrete floor, the top layer of soil in the room is removed, a layer of sand about 10 centimeters thick is poured in and compacted tightly. To prevent water entering the garage from lingering on the floor, you can make a slight slope towards the gate, about 2-3 degrees.
After compacting the sand, a waterproofing coating is laid on it (roofing felt works well), and a concrete screed about 10-15 centimeters thick is made.
Important! The garage floor must be strong and resistant to stress, so it should be reinforced with reinforced mesh. The grade of concrete for the floor is also as high as possible.
Brickwork drawing.
As an alternative flooring option, some use wood, but cement screed is still most often used. To complete this, the site is covered with large and small crushed stone, compacted well and cement mortar is poured in two stages.
The first layer, about five centimeters thick, is poured immediately, after which it must be allowed to dry for several days. The second layer is twice as thin and is much less dense. It is leveled and waited for complete drying.
Self-leveling mixtures, which can be used instead of a second layer, are now becoming increasingly popular.
A blind area of half a meter is made outside. It is done similarly to the internal floor; a thickness of about five centimeters is sufficient. Its purpose is to drain liquid, so we maintain the slope.
That's it, the construction of the garage is complete. If desired, the walls are plastered and whitewashed by electricians after installation.
Strengthening
The creation of additional measures to strengthen the walls is required after 2 years of operation of the garage, when the shrinkage of the walls is completed. Sometimes, after going through this process, cracks appear in the masonry, which lead to the destruction of the structure, making the room cold and allowing moisture to pass through.
There are several ways to prevent these consequences:
- Reinforcing the opening . The part most susceptible to destruction is the wall on which the gate is supported. If there are no cracks in the surface, a metal frame is installed on fastenings. The opening along the edges is protected with a channel, and metal anchors are installed every 20 cm.
- Reinforced concrete jacket . It is used for garage walls that are already covered with cracks and are a real threat of collapse. To create, you will need reinforcing mesh and cement mortar. The mesh is attached along the entire perimeter of the walls, then it is covered with 1.5-2.5 cm of solution. The concrete layer may be larger, but its application will require special equipment.
Screed. It is used if the verticality of the walls is broken during the construction process or after shrinkage.
For implementation, reinforcement rods (diameter 25-30 mm), couplings and end fastening nuts are used. A groove 4 cm deep is drilled in the wall at the level of the ceilings along the perimeter, couplings are attached, and a rod is placed inside. It is recommended to heat the cords with an autogen before starting to tighten.After tightening, secure with nuts, fill the grooves with foam. The fasteners are covered with cement mortar. To form the encircling reinforcement, metal plates are also used, which are fastened with bolts and connected to each other with lanyards. At the corners they are connected to channels. This belt is considered tougher and more reliable.
- Steel clips . They are used when it is planned to build a superstructure over the garage. To implement this you will need: metal vertical posts, round fittings or strips of metal. The racks are fixed at a distance of 1.5 m from each other, reinforcement or strips are pulled between them (they are attached to the racks and to the wall in the center of each cut). To make the fixation more reliable, use cement mortar for the posts and lintels.
Strengthening the masonry during its creation is carried out only with reinforcing mesh or rods inside the horizontal seams.