Articles
All photos from the article
After building a garage, its space remains free for literally a matter of days. After which various objects begin to appear in it, which were previously freely placed in another place. In order not to turn the room into a dump, it is best to use racks along the walls, which will not take up much space and will allow you to organize the things that have accumulated on the floor.
The structure can be made from metal, plastic or wood, and today we will talk about the latter option. You will learn about their varieties, characteristics and how best to make sure that their functionality is used at 100%. We would like to warn you right away that a wooden rack does not pose any difficulty for the average man; everything can be done with your own hands in a short time.
A wooden rack in the garage is a convenient way to store things of various sizes and weights
Layout, diagrams, drawings, ideas
In the garage you need not only a rack, but also a workbench and a stand for hand tools - all kinds of keys and other small things, of which there are a lot and it is difficult to come up with a specific convenient storage place.
The workbench can be made in the center of the rack. This is convenient - everything you need will be at hand, you won’t have to constantly go to the shelves.
Garage shelving with workbench is convenient
The workbench can be part of the system, or you can make two separate modules, between which you can install the required table. If you don’t like this arrangement, you can change the configuration - at least put it at an angle.
As for the tool stand. There is a factory option - a perforated sheet of metal with holders hung on it. The idea is very good except for the price.
Comfortable))
As usual, there are also several homemade projects (what would a garage be without them) on the same topic. The ideas are simple to implement, maybe not so elegant, but convenient:
- On boards, chipboard sheets, plywood, place nails under each tool. To avoid confusion about where to hang something, trace the instrument in place and paint it with some color.
Everything is in order and in its place
- For heavier equipment - large keys, etc. You can use a mesh onto which you weld hooks from wire. Nail the mesh to the wall.
Option for heavier and bulkier tools
- Make a bar with holes cut in it into which tools are lowered.
This tool stand is very easy to make with your own hands.
And if desired, all this can be put on wheels - to make the tool stand mobile. This is the case if during the warm season you prefer to work with the machine outside.
You can easily roll back to where you want
Well, for inspiration... so that all the tools are in place))
Full order))
Wooden shelves with metal frame
Rack with metal frame
An alternative design option, which is a more expensive, but at the same time more durable and durable solution. The racks in these shelves are made of metal, and the surface of the shelves itself is made of wood or any materials of wood origin.
Such a rack has a higher resistance to moisture and mold. It is more resistant to heat and fire. Moreover, by using metal parts, they can be made dismountable, which will allow you to change the appearance of the structure according to any desire of the garage owner.
Materials and tools needed for work
Corners for shelving in the garage
The racks of such a rack are made from rectangular pipes or from a profile with a width of one of the sides of 5 cm. A 30 mm corner is best suited as crossbars.
The frame is made from a corner, and the thickness of the shelf should be from 1.5 to 3 cm (along the height of the corner). Crossbars made from angles can be attached to the guides in different ways - by welding or using bolts. It all depends on the wishes of the owner.
If you need a durable structure, then welding is preferable; if you require the versatility of the product with the possibility of its further modernization, you should use bolts. The use of bolts allows, for example, to change the height of each level.
Shelves can traditionally be made from any material on hand - from pine to OSB. For reasons of strength, their thickness should not be less than 12-15 mm.
For work you will need the following set of tools:
- drill (screwdriver)
- Bulgarian
- wood hacksaw
- corner
- level
- welding machine (optional)
Manufacturing procedure
Shelf frame from a corner
It is best to assemble the rack in a free room, and it is advisable to empty the garage of unnecessary things and remove the car from it.
After assembling the frame, it should be screwed to the wall. The assembly sequence is as follows:
Based on the finished measurements, the material of the racks and corners for the shelves is cut using a grinder. The racks are marked in those places where shelves will be attached to them. The corners are screwed to the racks using bolts (or welded in the case of a stationary structure)
In this case, it is extremely important to maintain a connection angle of 90°, otherwise the structure will turn out skewed. Similarly, the racks are connected to each other using crossbars, but at the same time, right angles must be maintained not only between the racks and crossbars, but between the crossbars and the previously attached corners. The assembled structure is installed on its place and screwed to the walls and floor. This can be done, for example, using anchor bolts. The metal frame is sanded using a grinder with an appropriate brush attachment and coated with a primer or paint containing a primer
At this stage, in order to facilitate the labor-intensive process of mechanically cleaning the frame from rust, you can use a chemical rust converter. Typically, converters require a day to dissolve the rust; after which it is possible to paint the surfaces without any mechanical or chemical treatment. After the paint has dried, shelves are cut out of wood or wooden materials and adjusted in size to the finished frame structure. The shelves are sanded, painted or varnished, and then attached to the frame using bolts or self-tapping screws
VIDEO: DIY universal shelves
Shelves in the garage: order comes first. General design issues, simple options, step-by-step instructions for making your own (75+ Photos & Videos) + Reviews
General design issues
Building a garage with your own hands: details about each stage. Description, step-by-step instructions, drawings of the roof, inspection pit, interior arrangement (75 Photos & Videos) + Reviews
Rack with shelves
First of all, you should forget about the first ideas that come to mind - creating the simplest hanging shelves, with a load or area that can accommodate all the property currently contained in the garage. Firstly, this is not rational from the point of view of their manufacture, and secondly, over time, the volume of things stored in the garage increases, so new and new designs will have to be made.
Therefore, it is immediately necessary to plan the design of the shelves in such a way that it is:
- universal
- expandable
- as easily movable as possible
That is, it is advisable not to make each shelf separately, but to make an entire rack consisting of several shelves as a single structure.
How to make beautiful and unusual shelves on the wall with your own hands: for flowers, books, TV, for the kitchen or garage (100+ Photo Ideas & Video) + Reviews
Rack with cabinet
The next important question is what the design of the rack will be - collapsible or not. Typically, non-removable structures are more durable and can withstand heavy loads, however, their disadvantages include difficulties in expansion, dismantling and transportation.
Collapsible structures are less stable, their rigidity is far from that of non-collapsible ones. Often, for additional stability, such structures have to be attached to walls. However, they have two special advantages - easy expandability and mobility. In addition, thanks to their modularity, shelving can be made in a variety of sizes.
In this case, the choice depends solely on the desires of each person.
Principles and possibilities of arranging a car garage
The main purpose of a garage is to store a car. This means that first of all, the car owner must eliminate possible attacks on the property stored inside, that is, ensure the safety of the latter. An equally important issue is the correct climate regime in the garage space - the condition of the car should in no case depend on the vagaries of the weather or the appetites of harmful microorganisms such as fungus or mold. Another principle of organizing the situation in the garage - ergonomics - says that everything under the roof of the structure should always stand, lie or hang in its place, without interfering with the passage, travel, cleaning or car care process. With all this, it is imperative that the premises be clean and orderly, which are the key not only to the health of the car owner, but also to his safety when visiting the garage and performing all kinds of business or repair operations.
In accordance with these principles, at the first stage of arranging a garage you will need:
- Install a reliable locking system on gates and windows, if any.
- Insulate the structure of the structure or organize high-quality heating of the interior during the cold season.
- Carry out interior decoration with reliable, durable and easy to clean materials.
After completing the finishing work, you can begin the final stage of arrangement - organizing the interior of the garage. To do this, you need to draw up a detailed plan of the premises and determine what and how exactly will be stored in it, in addition to the car.
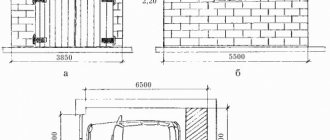
Garage plan for a car with estimated dimensions
As a rule, the wall farthest from the entrance to the garage is allocated for racks and shelves. If the dimensions of the room allow, it is advantageous to equip the side walls with shelves
If there is a lack of free space in the garage, special attention should be paid to the space under the ceiling, as well as above the car itself. Shelves equipped on the upper level will allow you to relieve the lower part of the room by storing things that need to be used from time to time.
Wooden shelves on a metal frame under the garage ceiling
The configuration and dimensions of the racking system depend on the size of the garage and the needs of its owner. The materials from which the shelves will be made must be strong enough to support the weight of the items being stored. For example, tiers can be made of thick plywood or boards, and the frame can be made of metal pipes or corners, but other options are also possible.
Wooden shelving system for a garage
The method of assembling and installing the rack system depends on the material used to decorate the garage, as well as the design features of the structure itself. In many cases, shelves are hung on the walls, and racks are installed directly on the floor. However, shelves can also be hung from the ceiling, while to increase the stability of a separate rack, its frame is often equipped with fastenings for walls, floors and ceilings.
Open Hanging Garage Shelving System
Heating type
- Electric oven. It combines advantages and disadvantages: the easiest to operate - just press the switch button, but the most complex and expensive to install. For use in winter, the structure must be additionally insulated.
- Gas heater. Simpler and cheaper than electric, the only drawback is that you need a gas source.
- Wood burning stove. The use of heating from a wood-burning stove is the most popular, since it is the simplest and most economical option, which also coincides with the idea of proper relaxation by most compatriots. It can be either internal (the simplest design and operation, but takes up part of the volume of the font), or external (more demanding during installation and operation, but does not take up space in the font).
What materials are garage shelving made from?
The service life of the structure depends on this condition. Wood and metal are commonly used. Let's look at what material you can use to make tool shelves in your garage with your own hands.
The material used to make the shelving depends on where and how you are going to place it.
- Metal. It is durable, strong and can withstand any load. But with excessive humidity, it quickly begins to deteriorate without preliminary anti-corrosion treatment. It is very easy to care for such a structure; you just need to wipe off dust and treat it with stainless steel;
- Wood. It is better to make them hanging shelves. Not suitable for heavy structures. It is best to opt for oak, pine or birch. It is better to secure the boards using iron corners. In a dark and damp room this is not the best option, since after some time the wood begins to rot;
- Plastic. Perfect for storing light weight items. For example, in the form of containers or boxes. Plastic is lightweight, which allows the structure to move freely. But this material has a significant drawback - its fragility. With little physical impact it breaks easily;
- Combination of several materials. Usually it is metal and wood. This is the best option, since together you can get the highest quality and durable design.
If you are planning to build a large rack to store heavy items (such as tires), then it would be optimal to use a steel structure.
In addition, you can use improvised items: plastic containers, flower pots, and so on.
If necessary, you can buy ready-made shelves or make them yourself.
If you properly process the wood, these shelves will last in the garage for quite a long time, and you won’t have to complain about them.
Choice
First of all, you need to decide on the material for the structure, the final size, which depends more on the room, and the loads that will be placed on the rack. The set that you will receive in the store depends on all this.
The most interesting thing is that some stores may even offer you to assemble this entire structure after delivery, which again is a nice bonus. Personally, I am sure that, if time allows, it is better to assemble the rack that you chose in the store yourself - time passes, and men simply change toys.
Types of shelving designs
The type of design depends on the availability of free space, the purpose of the rack, the material it is made of and the intended method of storage system. Designs can vary both in the method of assembly and in the type of racks.
Stationary shelving system
It is installed in a specific location on a permanent basis. Such designs are designed for heavy objects - they can withstand heavy loads.
Before installation, it is very important to carefully consider the location of the rack and draw diagrams that take into account all the dimensions and area of the garage itself. Such systems are assembled once, usually using brackets
Mobile mobile racks
Such a system, if necessary, can be moved or transferred to any place without unloading. This is very convenient if you need the tool outdoors. The rack is equipped with special rubberized wheels with a diameter of 10 cm. If desired, they can be fixed, limiting the possibility of movement.
Collapsible models
The shelves of these racks can be mounted to any height using nut or bolt fastening. Among car owners, such designs are considered the most acceptable option. They can be easily disassembled and adjusted at will, changing the height, and also rearranged to any place in the garage.
Hanging or wall shelves
They are attached to the surface of the ceiling or wall anywhere. They allow you to save space and make the most efficient use of free space. A similar structure can be assembled from a corner and hung on special hooks.
Rotating models
This interesting option can be installed in a room where you want to emphasize a certain style. These racks can rotate, providing access to tools and materials from any side. This setup visually resembles a rack of CDs or postcards.
Closed
Such designs protect against the loss of small items and tools and create the appearance of order. They can accommodate both valuable tools and various unsafe materials. In addition, such structures protect stored items from excessive dust.
Closed shelving is made of plastic, metal or wood. Inside they can be divided into cells.
Open
They allow you to quickly access any parts and objects - everything is in plain sight and there is no need to open and close the doors. The structures can be wall-mounted or suspended. To securely fix them, you need to install anchors in advance.
Separate tool cabinets
They can be made in the form of open cells, hooks, magnets or installations with holes. Heavy spare parts and tools cannot be placed on such panels. But they are ideal for storing small items that you need to always have on hand.
Partitions
The interior of the kitchen and living room begins to be thought out from the junction of two zones. Here are some of the methods and objects that delimit the space: installing a bar counter; a kitchen island; a large table; installing a low partition. Designers advise installing a wide counter, since you can sit at it like at a regular table, and high chairs are quite suitable for the whole family. However, in small rooms (16 sq m), narrow counters are installed. Kitchen islands are convenient to use, but are only suitable for large kitchen-dining rooms (25 sq m or 30 sq m). Capital low partitions are installed only if it has been decided in advance what they will be used for (for example, as a TV stand).
Types and purpose
Professionals recommend carefully considering all the details for making shelves and racks with your own hands, this also applies to the type of construction.
Most products are needed to store tools or parts of various sizes.
At the same time, there are several types of classification, the first of which talks about the design features:
Open. Necessary for quick access to a certain thing. The open type of shelves is divided into wall-mounted and hanging. Wooden or metal bases are hung on the wall using corners, the fastening of which can be dismantled or permanent. Special anchors must first be installed on the wall to hold the entire structure.
It is recommended to divide into cells for certain types of tools or small parts. For example, it is possible to sort different types of screws.
Common materials used are wood or metal. In rare cases, the structure can be made of plastic. However, based on practice, the ideal option would be to implement a combined type design.
The following assembly options are suitable for making your own:
Removable or mobile. The shelves form a rack with wheels on the lower tier. The mobile base will ensure optimal load distribution.
- Permanent. The shelving system is designed for specific areas that need to be pre-allocated. To do this, you should initially create drawings that involve dividing the garage into several parts. The standard option includes one-time assembly and fastening of the integral structure with brackets.
- Collapsible products. They are convenient because they can be expanded and easily dismantled in case of replacement or renovation of the premises. The height and number of shelves can be adjusted, and it is also possible to rearrange the shelves to a new location.
- Attic shelf. Hanging shelves are made of a corner and a metal profile, which serves as a base. The entire structure is usually attached to the ceiling or beams, thereby saving space in the garage compartment. For fastening, you will need to install special hooks; they need to be driven in or welded to the ceiling beams. This way they can be easily disconnected if necessary.
- Rotating products. These structures are not intended for storing large items. Their main advantage is saving time in searching for suitable parts. For example, self-tapping screws or nuts.
When choosing a product, you should start from the parameters of the room. It is also necessary to remember that the more, the better, the more spacious and convenient.
Preliminary preparation
You should start by preparing a drawing. You can do it yourself, using, for example, frames offered for sale as a basis. It is necessary to calculate the overall dimensions of the shelves and the parameters of the base for them.
Moreover, their dimensions should be based on preliminary measurements of the space in the garage. If you take these measurements correctly, you can consider that half the job is already done.
Construction and arrangement of a summer kitchen at the dacha with your own hands: projects, design, arrangement, with barbecue and barbecue (60+ Photos & Videos) + Reviews
Shelf drawing
- At the same stage, it is necessary to think about how the shelves will be connected to the frame, and the frame itself will be further strengthened by attaching it to the walls or floor.
- An important parameter here will be the height, since, in the case of low ceilings, it is advisable to make the frame height up to the ceiling, leaving no free space.
- Determining the distance between shelves is one of the important design points, since it is this that determines the rationality of distributing things across levels.
- Traditionally, the lower ones are made the most spacious: large and heavy equipment is placed on them; in addition, they are often used to store wheels and rims.
- Usually the following rule is used - the higher the shelf, the less weight should be placed on it and, accordingly, its height is lower. This can be explained quite simply – by increasing the stability of the rack as a whole.
- We should also talk about the depth of the shelving. Shelves that are too narrow make the entire rack impractical, and shelves that are too deep make it much more difficult to access. The optimal depth is 50-60 cm.
- The width is usually determined by the tensile strength of the material from which the shelves are made. There is no need to make the rack too heavy by making shelves more than 1.5 m wide (this will require too thick iron or wood so that they do not sag under the weight). Usually the width is about 90-150 cm.
Let's look at the most popular shelving devices that you can make yourself.
Assembly of metal and wooden structures
Planning to make a wooden or metal rack or shelves with your own hands is half the battle. You will need to realize your plans, build your dream, and translate it into wood or metal.
The assembly of homemade products is often not given due attention, being carried out in a hurry, so “home” designs, for all their advantages, look unattractive, worse than factory ones. Before installation, the iron frame is finally adjusted, sharp edges are sanded, and preparations are made for future painting. Suitable installation methods include welding, bolting - anything that will provide the required rigidity.
It is easier to work with wood - it is fastened with nails, self-tapping screws of the required length, and corners. It is better to drill holes, keeping in mind the tendency of the material to chip and split. For wood, a prerequisite is treatment with compounds that prevent rotting and fire. The chosen assembly method must guarantee:
- relative ease of implementation;
- reliability, structural rigidity.
Taking into account these nuances, building a rack is not as difficult as it seems at first. If, of course, you plan correctly and provide for as many little things as possible that may affect the progress of work in the future.
Features of assembling metal shelving
Metal racks can be welded or assembled with bolts. There are usually no problems with welding. If a corner is used, the joints can be overlapped - a difference of 3-5 mm when laying shelves is unnoticeable. If you wish, you can cut out the excess in one of the shelves and butt weld, but trimming takes a lot of time, and you still won’t see much of a difference.
How to cut corners for a smooth connection
When assembling a frame for a bolted shelving, the order is as follows: first, assemble the squares of the sidewalls and shelves separately, then screw them together. It is advisable to have at least two bolts for each connection - for greater rigidity (less play).
If you assemble garage racks from a profile pipe with your own hands, the procedure is different. First, the sidewalls are assembled, and short crossbars are attached to them. You get two rectangles with crossbars. Then they are connected by crossbars.
Methods for bolting profile pipes
See the photo for how to make connections. In one case, welding is still needed - weld the heel pad, in another you can do without it - cut out the "ears", bend them and cling to them.
There is another way - special crab systems. These are metal plates with recesses molded to fit the profile. Pipes are placed into the grooves, then the two plates are bolted together.
Crab systems for profile pipes
Such a connection is unlikely to withstand very heavy loads, but there is an undeniable advantage - you don’t have to drill a bunch of holes in the metal. In a profiled pipe this is certainly easier than in a thick-walled corner, but it still takes a lot of time and effort.
By the way, the bolts used are M8 or M6, so large holes are required for them. It is easier to first drill with a thin drill, then expand to the desired size with a thick one. But even with this order, you will need a significant number of drills. To make them overheat less and break less often, place a jar of water nearby and periodically lower the drill into it.
Welded
Used to create large metal shelving. It has impeccable reliability and the ability to withstand even the most severe loads. Most often, shelves of this type are used to store large items.
There is one significant drawback - during redevelopment, it is often not possible to fit such a rack into the new space due to the non-demountable design. So if you love change, there is reason to think about choosing a different type.
Bolted
The main advantage of such a shelf is mobility. All parts are bolted together and can be easily dismantled if necessary. However, even with perfect assembly, there may be some play at the connection points. It is either present immediately or appears over time under the influence of the mass stored on the shelves.
The disadvantages of this design can be overcome by fixing it to the walls.
Combined
Typically found in spacious garages and technical rooms for car repairs. Most often it is formed through the so-called build-up - when there are more and more tools and storage items, but there is no other place for a new shelf and is not expected.
Sources
- https://www.yaprofi.net/polki-svoimi-rukami/
- https://stroychik.ru/garazh/polki-i-stellazhi-dlya-garazha
- https://www.asusfone.ru/svoimi-rukami/samodelnyj-stellazh-dlja-hranenija-v-sadovom-sarae-iz-staroj-mebeli
- https://postroika.biz/24568-stellazh-iz-dereva-svoimi-rukami.html
- https://garazhmechty.ru/polki-v-garazhe-svoimi-rukami.html
- https://1dacha-sad.com/delaem-stellazh-dlya-garazha-svoimi-rukami
Drawings and options
Many shelving drawings are available on the Internet. But in order to choose the right one, you need to decide on the future use of the structure. For storing tools and spare parts in the garage, a rack measuring 500 x 2000 mm with four shelves of 450 mm each is suitable. But for a cellar with conservation, you can make more shelves - every 300 mm. Warehouse structures require an individual approach, taking into account the size of the stored boxes.
The most common shelving options are:
- design 500 x 1800 mm with four shelves;
- rack 600 x 2000 mm with three shelves;
- combined models measuring 500 x 1800 mm with a high shelf at the bottom of 700 mm and three shelves for small parts of 350 mm each.
If the items for which the rack is designed will constantly change in size, then there are universal designs where the distance between the shelves is adjusted. To do this, several holes are drilled in the main racks at the level of future shelves. Only the main frame (cube) is welded, and all internal elements are bolted. This way you can add or remove the number of shelves, as well as change the distance between them. This is especially convenient to do if the main racks are from a corner. Holes are drilled in them and the shelves, and for fixation two bolts are used on each side.
If you need a long rack, it is recommended not to make it on the entire wall, but to leave small gaps of 100 mm from the side walls to make it more convenient to install the metal structure in place. There are no strict size restrictions on the depth of the shelves, but it is worth considering the convenience of retrieving items. For example, if the depth is 1000 mm, then not everyone has enough arm length to reach the part under the wall. But if the structure stands in the middle of the workshop, and there is access from both sides, then you can make shelves 1500 mm deep.
The height of the racks is made individually. It all depends on the materials available and future use. But in any case, it is not necessary to make the height up to the ceiling, because the upper part can also serve as a shelf, on which only a small threshold (150 mm) is provided so that the objects located there have somewhere to rest, if they are located vertically.
There are combined models of shelving, where there is a high shelf for large items (engine, wheel) and small parts. The reinforcement under the shelves depends on the future weight of the load. If these are heavy car parts, then it is worth welding an additional jumper under the middle of the shelf. Based on this, the number of main racks is determined. Excessively large spans will lead to sagging and deformation. But if the design is made for small parts, then the outer racks are quite enough.
Wood shelf
Wood is more environmentally friendly and economical compared to metal
The most common solution for arranging a garage is the installation of wooden shelves. The choice of this option is due to the availability and low price of wood: bars and boards. In order for the structure to be aesthetically attractive and safe to use, all its elements are pre-treated: leveled, sanded, coated with a fire-retardant composition.
Design + drawing
Drawing of a wooden shelf
Designing a shelf made of wood is no different from a similar process in the manufacture of metal structures. The dimensions of the parts are chosen at your discretion. The most convenient are shelves whose length corresponds to the distance of an outstretched arm. The height can be any, up to the ceiling. The easiest way to design and manufacture a permanent wall structure. It is installed in a corner or on a plane.
Required tools and materials
Before starting work, the tree must be planed
To work with wood you will need:
- drill or screwdriver;
- drill;
- hacksaw or jigsaw;
- sander;
- bubble level;
- construction square;
- ruler and tape measure;
- simple pencil.
Materials for making a simple wall shelf 110 cm long, 30 cm high and 25 cm deep (width):
- planed boards 16 mm thick;
- wood screws;
- dowels for fastening to the wall;
- brackets
- fire-retardant composition.
Manufacturing instructions
Surface preparation in full swing
Step 1. Using a jigsaw or hacksaw, prepare two blades for the side walls. Between them there will be two horizontal shelves. The distance between them is equal to the height of the end ones.
Step 2. Prepare canvas for horizontal shelves.
Step 3. Process the parts with a grinder.
Step 4. Cover the workpieces with a fire-retardant composition and allow drying time recommended by the manufacturer.
Step 5. Start assembling the structure and lay the bottom sheet on a flat horizontal surface. Take a ruler and a simple pencil, measure 8 mm on the right and left, draw two parallel lines.
Step 6. On each line from above and below towards the middle of the canvas, measure 5 mm and put marks.
Step 7. Drill 4 holes at the found points.
Step 8. In a similar way, mark the surface of the top shelf and drill 4 holes in it.
Step 9. Install the left end shelf on the bottom shelf. Connect the parts with self-tapping screws.
Step 10. The right end board is attached in a similar way.
Step 11. Place the top shelf on the resulting structure and attach it through the previously drilled holes.
Step 12. Brackets are attached to the upper part of the back surface of the end boards.
Step 13. Try the shelf against the wall, make markings for the dowels.
Step 14. Drill holes in the wall.
Step 15. Screw in the dowels.
Step 16. Hang the shelf.
Based on the proposed step-by-step instructions, you can make a structure from several shelves, strengthening it with vertically installed bars with a section of 40x50 mm or 50x50 mm. In order to give the shelf stability, it is attached to the wall with anchors or dowels.
How to assemble a rack from an aluminum profile with your own hands
Assembling a rack with your own hands from a profile can be done even by a person taking up this task for the first time. It is easier to work with than wood.
The main advantage of the modular design is the ease of assembly from a ready-made kit
Materials and tools
To calculate how much material is needed, first sketch out a sketch indicating the dimensions and number of shelves. Profile dimensions are selected depending on the expected load. To connect the parts, you will need self-tapping screws with press washers, since their fastening is more reliable. It is better to take pointed ones, since drill ones make large holes, so the strength is reduced. Shelves are made from boards 2 - 3 cm thick, 10 mm or more plywood, OSB sheets no thinner than 12 mm.
To work you need to stock up on tools:
- Tape measure, pencil or felt-tip pen, square for checking angles.
- Metal scissors for cutting profiles.
- Screwdriver. If you screw in each screw manually with a screwdriver, it will take several days to assemble the frame.
- A wood hacksaw for cutting shelves. The process will speed up if you have a circular saw or jigsaw.
Build process
When the materials and tools are prepared, begin assembly:
- On the profile, mark the length of the racks, crossbars, and crossbars along the width of the shelves. To prevent the rack from turning out crooked due to errors with the dimensions of the workpieces, you need to re-check the correctness of the markings.
- On the side walls of the profile, cuts are made to the base and bent at this point. The workpiece is cut along the fold line.
- Longitudinal cuts are made on the crossbars to a depth equal to the width of the profile of the vertical supports. Internal bends, if any, are cut off.
- The crossbars are inserted into one another to form a rectangular cross-section. The cut ends are bent 90⁰. You need two of these parts for each shelf. They are installed on both sides of the frame.
- The assembly of the sidewalls, so that there are no distortions, is carried out on a flat surface, possibly on the floor. Cross members are inserted between a pair of vertical supports. After checking the corners, each bend is screwed with 1 - 2 self-tapping screws.
- After both sidewalls are ready, the rack is assembled from the profile. First install the lower crossbars, then the upper ones. If no distortions are found during inspection, the rest are fixed. It is more convenient to screw in the screws by placing the frame on its side. Having secured the parts on one side, it is turned over to the other.
- On profile racks with wide shelves, additional supports are installed from below in the middle of the lower crossbar. After determining the height, bends are made on them and screwed with self-tapping screws.
- After measuring, the shelves are cut. To increase the rigidity of the frame, cutouts are made in the corners so that they extend onto the side crossbars. To fasten wood, it is better to use self-tapping screws with fine threads.
We make it with our own hands
Shelves in the garage can be made with your own hands, starting from the very beginning, or you can purchase a ready-made structure and simply fix it in the place you need.
Wall shelf
To attach such shelves, you must use special brackets. They can be of various shapes. Your task is to choose those that can maximally compensate for the pressure of the load, as well as distribute the load over the entire surface of the wall. To mount it, you need to measure a horizontal line on the wall, focusing on it and then attaching the bracket in the future. It is recommended to use anchors for installation; this is more reliable than choosing self-tapping screws. When all the necessary fasteners are installed in place, you can proceed to installing the shelf, which can be wooden or plywood.
Making a wooden rack
Some people prefer to make their own wooden shelving in the garage. It will cost less than metal, but will not be as durable and the service life may also be shorter. In addition, you will have to tinker a little with the wood.
A wooden rack is best made from oak or other hardwoods; pine is often used, but it has lower strength. Please note that the material must be dry and free of fungus, mold or cracks. This is a must.
However, here it is better to start from personal convenience
As with a metal frame structure, when making a shelving unit from wood, it is also important to plan the shelves to store large and heavy items underneath.
Drawing for assembling a shelving unit in a garage.
Before you make a rack in the garage from wood, you need to prepare the tools:
- measuring tools and a pencil or marker for marking;
- electric drill or screwdriver;
- wood hacksaw, saw or machine;
- fastening materials – bolts, nuts, screws, special glue;
- grinding machine or sandpaper;
- metal corners are optional, but will help further strengthen the wooden structure.
In addition, you will need tools for processing wood: primer, varnish, spatula and brush.
The assembly process begins with cutting the wooden elements into pieces of the required size, let's start with the bars for the frame. Then the parts need to be sanded, and then the metal corners must be screwed to the posts using self-tapping screws and a screwdriver.
If the corners are not used, then it is quite possible to replace them with pieces of timber with a section of 5 by 5 cm. At the next stage, the transverse bars will be attached; they will serve as the basis for future shelves.
Next, a water-repellent composition, primer and, after complete drying, varnish or paint are applied to the frame.
The next step is to manufacture the shelves according to the previously prepared drawing. Paint is applied to the finished boards and, after drying, they are attached to the “skeleton” of the product with self-tapping screws. The rack is placed on “legs” and attached to the wall for reliability. Be sure to treat it with a fire retardant, which will protect the wood product from fire.
Preparatory work
Like any construction project, the construction of shelving with your own hands should begin with the creation of a project. You immediately need to figure out where it is most convenient to place the structure. It’s good if you can completely free one of the walls of the garage to accommodate it. The height of the racks, as well as the distance between the shelves, will depend on the number and weight of things that you plan to put on them. For example, the lower shelves are usually made higher and left for car tires, cans, etc.
Knowing the height of the garage, you can determine the height of the structure, since they must be the same. Depending on this, the number of shelves that can be conveniently placed is calculated and their approximate height is determined. Typically, the distance between shelves is from 30 to 55 centimeters. The lower shelves usually have a height of no more than 1 meter. The length of the racks should be equal to the length of the garage wall minus 10 centimeters, which will make their installation easier.
The width of the shelves should not exceed 1.5 meters, otherwise they will sag. Most often it is made about 1 meter. The depth of the shelves is usually 60 centimeters, which allows you to store most things, preserves and tools on them. To store small and low items, you can make shelves of shallower depth - up to 40 centimeters.
Prefabricated structures
Prefab structures are the easiest way to organize shelving in your garage. Today they can be purchased at any hardware store, and they are presented in a wide variety of solutions. The designs can have almost any color or imitate other materials, such as wood (see photo). Prefabricated shelving is usually made of galvanized metal, which is necessarily coated with anti-corrosion mixtures. The undeniable “advantages” of such structures are resistance to excessive humidity, reliability, the ability to withstand heavy weight, as well as fire resistance, which is especially good if flammable mixtures are stored on them.
Prefabricated shelving can either be all metal, or its shelves can be made from other materials: wood, plywood or chipboard. Such structures are sold only disassembled, so when you come to the garage, you will need to assemble them yourself. All necessary elements, except a screwdriver, can be found in the kit.
It is worth noting that it is best to assemble the racks in a horizontal position, after which they just need to be put in place. First, vertical racks are assembled, then shelves are attached to them at the required height. The shelves need to be secured with bolts and nuts, inserting them into the required holes and screwing tightly. For greater stability of the structure, it is recommended to use metal corners, as, for example, in the video.
Metal frame with wooden shelves
If for some reason prefabricated structures are not suitable, you can easily make strong and durable shelving for the garage with your own hands. To create a frame, metal is necessarily used, as, for example, in the photo. Individual metal elements can be connected to each other by welding or using bolts. The second method, although more labor-intensive, has its advantages. In this case, you can easily change the height of the shelves. If this is not necessary, then it is better to use welding.
Shelves for shelving can be made from several materials. These can be wooden boards approximately 2 centimeters thick, plywood or chipboard. Wooden elements must be impregnated with special mixtures that will protect them from exposure to excessive humidity and all kinds of insects. In addition, the shelves can be painted or varnished.
All work on creating such racks can be divided into several main stages:
- Cutting metal using a grinder.
- Marking vertical posts and shelf mounting locations.
- Welding corners.
- Coating with anti-corrosion mixtures and painting all metal parts.
- Cutting wooden shelves.
- Painting of wooden components.
- Attaching shelves to the frame using self-tapping screws.
- Installation of the structure on the legs.
Wooden structure
Wooden shelving is made only if you really need to save money. For vertical posts, timber with a thickness of at least 10 centimeters is usually used, and for shelves - wooden boards with a thickness of at least 2 centimeters, chipboard or plywood (see photo). Although, if you try really hard, you can make a fairly reliable structure with your own hands, but it will not be as durable as a metal one. It is worth noting that wood ignites very easily. Therefore, it is not recommended to store flammable mixtures on such shelves.
Schemes for placing shelves in the garage
One of the stages on which, if not everything, then a lot depends, is the arrangement of shelving, the choice of a place for arranging shelves. It will depend on this whether additional elements in the garage will bring freedom from the “trash” accumulated in the corners and on the garage floor or will add problems with free movement, parking of a car or motorcycle.
An old, proven method is to draw a floor plan on paper, taking into account the opening of the gate leaves and possible movements of people. Most often, without compromising the free space, the far wall located opposite the entrance is used for storage. And already in this section of the garage they allow their imagination and sense of beauty to unfold.
When planning the placement of shelves vertically, do not forget that the step should ensure ease of use and not be too frequent or overly stretched.
If there is not enough space, it is permissible to hang shelves around the entire perimeter, but you must remember that any accidentally dropped can or bolt will “land” on the car body or may lead to injury to people in the room.
Helpful tips for efficient tool storage
And a few more tips, a kind of instruction on how to ensure convenient storage of the tool:
If the room is made of bricks or blocks, then it is best to place a shelf for storing tools on a plastered wall to avoid the accumulation of condensation between the back wall of the shelf and the wall of the house.
The height of the shelf - shield is calculated based on the height of the garage owner. This calculation will allow you to easily access any tool.
For maximum comfortable use, it is better to make all shelves open.
Combining a shelf-board with pegboard elements, i.e. boards with perforations, will provide additional fastening for tools.
After reading this article, all that remains is to grab the tools and start creating the desired shelf. In this process, you can completely rely on your imagination and experience, or you can use photos of shelves and tool holders. The main thing is to believe in yourself and the result will certainly be achieved.