Motion sensors in everyday life are actively used in security and alarm systems, for economical power consumption in lighting systems and other needs. If their operating mode is violated, do not rush to call a specialist or send the device to a service center for repair. In most cases, a malfunction occurs due to changes in the environment or in the power supply circuits; the consequences of this can be easily eliminated independently. It is rare that individual elements on boards, microcircuits, transistors, relays and other parts that require the intervention of professional specialists break down. But to properly troubleshoot and configure, you need to understand the general operating principle of these devices.
What problems might occur?
During operation of the alarm system, a situation may arise that the motion sensor does not work. If this happens, you need to repair the device as soon as possible, because a non-working device will not be able to protect the area in which it is located.
The main malfunctions that may occur when using motion sensors include the following:
- The security device does not operate when moving objects appear in its sensitive area;
- The output relay contacts do not switch when the sensor is triggered;
- the motion sensor does not turn off when a moving object leaves its sensitive zone;
- gives false positives or turns on and off spontaneously.
DIY motion sensor repair steps
Repairing a motion sensor involves several steps to restore its functionality. The number of these stages will depend on the complexity of the breakdown and the cause of its occurrence.
Before removing the sensor and starting its repair, you need to make sure that nothing at its location interferes with the correct operation of the device. There should be no heat-generating, light-emitting or moving elements in the sensitive zone. It may be that installing one of them leads to incorrect operation of the sensor. You should make sure that there are no visible signs of mechanical damage on the device body, and that its focusing lenses are not contaminated with dust. It is possible that they are not able to effectively focus IR radiation onto a sensitive sensor, which leads to the sensor not “seeing” a moving object.
It is also important to check the settings of the security device, because if they are set incorrectly, the device will trigger falsely, not trigger at all, or be constantly on. There are three settings on the sensor panel:
- by light level - this setting determines the sensitivity of the sensor sensor to infrared radiation;
- according to the time interval of relay operation at the moment a moving element enters its sensitive zone;
- by the time during which the sensor relay remains in the on state.
If everything is fine with the location of the security device, its power supply and settings, and it is still inoperative, then you should dismantle it and look for faults in the motion sensor associated with its functional elements.
Checking the inside of the sensors yourself
After dismantling the sensor, its housing is opened and the integrity of the functional elements of the working board is checked. There should be no darkened, swollen, cracked or loose parts. The conductive paths must be intact, as well as the soldering points of the board elements. If one of the listed factors is identified, they should be corrected and analyzed why they could have occurred during the operation of the sensor.
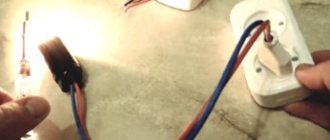
The next step is to connect power to the sensor and check the functionality of its electrical circuit and output relay. As a load connected to the relay contacts, you can choose a regular incandescent light bulb with a power of up to 60 W.
When repairing the sensor, it is recommended to turn it on through a circuit breaker with a minimum protective current of 1..2 A. You can also turn it on through a circuit breaker - this will protect against electric shock.
After supplying power to the sensor, the presence of voltage on all its functional elements is checked. A multitester is used for this.
After checking the power supply and distribution system, you should also pay attention to the output relay. Its contacts constantly switch external loads, which can lead to the contact group being worn out excessively or reaching the end of its service life.
Whether or not a relay operates may also depend on the performance of the transistor that controls its operation.
Therefore, using a tester, it is important to check the operating parameters of the transistor
Conclusion
If the motion sensor stops working, it is important to fix this problem as soon as possible so that the protected object is not left unattended by electronic security systems. If a malfunction is identified and you can fix it yourself, this can be done at home, spending a little time and a minimum of financial costs.
If you cannot repair the sensor yourself, you can always seek help from specialized repair services. It is possible that the sensor is simply no longer repairable and will have to be replaced with a new device.
DIY repair methods
The simplest option
We open the sensor and look at the boards. We check the integrity of the components. A person experienced in this matter will pay attention to the smell. There should be no darkened, cracked, swollen or loose elements
The traces of the printed circuit board must be intact. If the track is burnt out, it is restored with a jumper and the cause is determined.
We carefully examine the soldering. If the parts are not securely fastened, they need to be soldered.
Laser device
If the laser mechanism is malfunctioning, it shows the wrong level or does not work at all.
Repair is necessary in the following situations:
- if the diode is faulty;
- switches and keys do not work or are stuck;
- when the emitter malfunctions, and in situations where the laser light is weak or completely absent
If you need to repair a homemade laser, then the device is disassembled and reassembled. Do not forget to be careful when operating, especially on the street.
Industrial laser devices have been developed to build level planes on large construction sites. For household repairs, use a homemade laser level.
Electrical circuit of motion sensor dd 009
During the operation of the motion sensor, a situation arose when the sensor went into a loop after the first operation. After analyzing the reasons, it turned out that the underestimated capacity of the quenching capacitor C14 in the circuit is to blame. By the way, the designations of radio elements on the board may differ from those shown in the diagram, as well as some components. The essence of the circuit diagram is the same. As a result of the reduced capacitance of the above-mentioned capacitor, the rated stabilization current of the zener diode, which provides 25 V, was not provided and when the relay was turned on, the voltage dropped to a level that, in turn, did not provide the rated output voltage of the stabilizer 8 V, from which the quad op-amp is powered. When the relay was released, the voltage increased to the nominal value. The result is a power surge and, as a consequence, a false alarm.
Test run
Connect power to the sensor. I recommend using an incandescent light bulb with a power of 25-60 W as a load to indicate the operation of the sensor. Otherwise, if you focus on the clicking of the relay, you may not hear or understand whether it is on or off. Now we check the relays and connections.
I highly recommend turning on any devices during repairs through the minimum possible circuit breaker. In this case - 1-2 Amperes. This is necessary to avoid troubles.
A better option is to connect through a transformer (with an output voltage of 220V) or a difavtomat, this will significantly reduce the risk of electric shock (we will work with open live parts!).
Another option is through a 60-100W incandescent light bulb, this will save you from a short circuit. But it's not convenient.
I recommend your article on the use of circuit breakers.
We check that the required supply voltage is present on the power board.
I won't tell you how to use measuring instruments or how to check parts. If you have questions, write in the comments.
In addition, I urge you to be careful and remember your safety! During repairs it may get fucked up!
Once again we return to where we started the repair (point 1). There is a high probability that after inspection, soldering, and replacement of visually faulty parts, everything will work.
Motion sensor malfunctions and their elimination
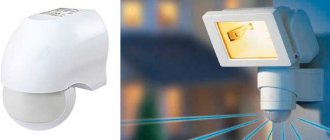
For the convenience and safety of people, motion sensors have been invented that react to the appearance or presence of a person in their area of action. When a person appears in the sensor’s coverage area, the automation is triggered and any electrical equipment connected to it is activated, for example, lighting, a sound warning system, and an alarm system are turned on. The photo shows a motion sensor, using an installation example of which I will demonstrate how to correctly connect it to electrical wiring to automatically turn on the lamp when entering a room. Appearance The motion sensor is a rectangular or round plastic box with a window covered with a matte plastic film, which is a Fresnel lens. Through this window, using infrared waves, the appearance of a person in the control zone is monitored.
Among the many devices for the home, such a device as a motion sensor does not seem very noticeable. But this little device is very important.
Another addition
On February 10, my reader Mikhail sent a photo of the sensor (see the comment for this date), in which the resistor on the board burned out when turned on:
Chinese motion sensor with a burnt resistor on the board
If anyone has such a sensor or its circuit, help Mikhail and tell him the resistor value. Thank you in advance!
I’ll add that the resistor just doesn’t burn, this is a consequence! 90% that after replacement it will burn again!
Installation and connection of a “smart” spotlight
Each spotlight must be accompanied by instructions describing how to connect it. But even if it is not there, preparing the lighting device for work will be quite simple. All electrical installation work in an existing network should be carried out with the power turned off (the switch is turned off).
We fix the spotlight at the chosen installation location using fasteners on its body or a special bracket supplied in the kit. To connect to the electrical network, we use a PVS or ShVVP wire. It must be 3-wire if the spotlight will be connected to ground. If not, a 2-wire is enough. The wire cross-section must be at least 0.5 mm2 for an LED lighting device. A halogen cable may require a larger cross-section - this depends on the power of its lamp.
If there is a socket near the spotlight with supply wires of a suitable cross-section that can withstand the load, then you can use it. It is enough to measure the required length of the cable and connect a plug to it or directly connect it to the socket contacts. But usually the wire has to be pulled to the nearest electrical distribution box. The ideal solution in any case is to lay the cable to the house panel and connect it through a circuit breaker rated at 6–10 A and installed separately specifically for the spotlight.
Connecting the lamp
When pulling the wire through buildings, we lay it in a corrugated pipe with an internal diameter of 16–20 mm, which we attach to the wall. If you need to run the cable over a long distance or to a street lamp on a pole, the method should be used aerial or underground.
The simplest way to connect a spotlight is with a motion sensor, which is built-in or rigidly fixed to the body of the lighting fixture. In this device, the sensor and lamp are already connected to each other. You just need to open the cover of the spotlight's contact box, insert the wire inside through the hole provided for this purpose and connect it in accordance with the color and letter markings:
- black or blue to the same wire and terminal with the symbol 0 or N - this is zero;
- red or brown to F or L is a phase;
- yellow-green to the terminal with 3 dashes and a stick on top - this is grounding.
Installation of a lighting fixture
Some lighting fixtures have a length of cable already connected and routed out of the spotlight body. We connect it with our wire according to the color marking, preferably through a separate terminal box fixed next to it.
If the sensor is installed separately, you will also have to pull the cable between it and the spotlight, and also connect them correctly. In this case, you also need to follow the color coding. The main thing is not to make a mistake when connecting the sensor, otherwise it can be burned. We connect its brown wire (terminal designation L) to the phase, and the red wire (contact A) to one of the spotlight terminals. We connect the second conductor of the lamp and the blue sensor (terminal N) to zero.
Power circuits
We don’t delve into the intricacies of operational amplifiers yet; we continue to explore the most obvious and probable.
In this case, this is checking the operation of the power board relay. This relay turns on, that is, a 24V voltage is supplied to its coil, if the key transistor opens. In this case S9013, npn.
It is better to check with the low-current board completely disconnected. We just turned it off when checking the power supply in step 4.
To check the operation of a transistor, its base must be connected to the emitter, preferably through a resistor. It is there (R21, 20 kOhm), or use your own, about 2 kOhm - 33 kOhm. The transistor in this case will be closed (no current flows through it), and the relay should be turned off.
Next, we check the opening of the transistor and, accordingly, the activation of the relay. To do this, through the same resistor (a resistor is required, the jumper will burn the transistor) we connect the base of the transistor to +24V. The relay should turn on.
If the transistor does not work, it must be checked with an ohmmeter by turning off the power (you can check it before manipulating the resistor). How to check a transistor - is it possible, I won’t write?
The relay may also be faulty.
Adjusting the device
Fine tuning of the sensor is carried out using the available regulators, each of which is responsible for the corresponding option:
- SENS – determines the sensitivity of the device. With its help, you can set the size of the object that the sensor will respond to and the distance to the detected source of motion. In this way, it is possible to reduce the number of false alarms when a small animal enters the field of view, or an object moves outside the controlled area.
- TIME – adjusts the duration of operation of the lighting device after activation. It is recommended to set the parameter for at least 2 minutes to prevent frequent operation.
- DAY LIGHT – allows you to select the time to turn on the lighting devices. Options available include night mode or 24-hour monitoring.
The type of fastening and design of the sensors are characterized by mobility, due to which the position of the device in space can be adjusted in four directions - up or down, right or left. Thus, it will be easy to configure the device to monitor a selected area of the territory, experimentally achieving its maximum coverage.
Scope of application
The most popular street floodlights with motion detectors today are diode ones. They are the most economical and durable. They are used to illuminate the area near private houses for the design of garden and park landscapes. LEDs look best here. In addition, they are used for lighting:
- Border areas - as one of the signaling options.
- Industrial facilities.
- Warehouses.
- Parking lots.
- Other commercial properties.
Important! Such LED lights are functional, their sizes are small, and the installation and operation process is extremely simple. They are often installed for the entrance group.
Such widespread use can be explained by the numerous advantages of the device, including:
- Durability, especially for models with diodes.
- Easy to install.
- Do not require special maintenance.
- Economical. It is achieved by turning on only when necessary, for which the motion sensor is responsible and using the most economical lighting element at the moment.
- Resistance to negative environmental influences: noise, vibration, temperature changes, precipitation.
- Possibility of customization to the required parameters.
- Installation anywhere there is a solid base.
What can be configured
Correctly setting up a motion sensor on the street or in the house will help reduce energy waste by up to 50–70%. The user can adjust the sensitivity, delay, illumination and operating angle. The first three parameters are set on the device itself.
Some may not detect one of the switches on their sensor. This indicates that an outdated model is being used. On these, the delay and one of two parameters are usually adjusted - either sensor sensitivity or illumination.
Delay time
This aspect refers to how long the light will remain on after the motion sensor to turn on is triggered. The sensor is configured according to this parameter taking into account the individual needs of the user. On the device it is usually marked with the word “TIME”. Most models allow you to set the time from 5 seconds to 10 minutes. Experienced users believe that the optimal time is 1 minute.
Setting the delay time is as simple as possible. You need to turn the regulator to the desired position. When the user has set the time, the first time the sensor is triggered, the selected parameter may not be strictly observed, but from the second start everything will work as it should.
When adjusting a new motion sensor for the first time, it is recommended to set this parameter to minimum so as not to wait a long time during the test.
Sensitivity
Sensitivity on the device is indicated by the word “SENS”. Low is indicated by the word low or min, high by high, max or +. This parameter is especially important for pet owners. Setting sensitivity is considered one of the most difficult, because you need to find the value when the motion sensor on a spotlight or other device will not respond to small objects, but will not let a person through. If configured incorrectly, there is a high probability of false positives.
Three regulators:
To begin with, it is recommended to set the indicator to maximum and test the correct operation. Then you will need to reach the correct value, gradually reducing the sensitivity.
Do not forget that if there is a large dog in the house, it will not be possible to configure the sensor so that it does not react to it. The only way out in this case is to install a motion sensor to turn on the light where the animal will not fall within its range.
Illumination
The “LUX” regulator can be used to set the lighting conditions under which the sensor will be triggered. This is necessary so that the light does not turn on during the daytime. Firstly, this is a waste of electricity. Secondly, it's not practical.
If you increase the regulator to the maximum, the sensor will only operate in the dark. This is what is best done during the first setup, and then gradually change the sensor response parameter. It is optimal to turn on the lighting when the sun has set and it is already starting to get dark, but the human eye can still see what is around.
On older device models, the “LUX” control may be missing. In this case, an additional light sensor will help optimize operation. It will need to be configured according to the same principle. Therefore, the process of how to set up a motion sensor with two controls can be more problematic than setting up with three.
Settings
SENS
Sensitivity is indicated on the case with the letters “SENS”. This setting is the most difficult. You should adjust the parameter so that the sensor does not react to small pets, but at the same time it is triggered if a person enters the room. Set the SENS control to maximum, wait until the light turns off, and check how the sensor works. Reduce sensitivity until you reach the optimal value.
LUX
The LUX parameter is used to configure the detector to turn on the lighting only when it is dark. During the first adjustment, you need to set the maximum, and in the evening adjust the optimal time period at which the sensor will operate.
TIME
Time – delay time. Detectors are sold in which the delay time increases with each subsequent switching on. First, set the regulator to minimum, then quickly check the parameters.
Bonus. Reader question about the sensor on LP8072C
Let's look at the circuit of a motion sensor on a specialized LP8072C chip, which was sent by reader Andrey (see comment to the article dated December 15, 2015)
Sensor circuit for LP8072C
I repeat his question again and answer:
I took out the sensor. Two blocks (power supply from the relay and on the other all the sensors), with 3 wires - 0.5V, 11 contact to the base.
Yes, the circuit is divided into two boards, as in the sensor at the beginning of the article. 0V - GND, on pin 5 of the microcircuit, 5V - power supply, VDD, on pin 13, and output for controlling the transistor.
Looked 13 - VDD 5v. 9 - CDS (photo diode circuit) from a variable resistor changes from 0.4 V to 2 V. 11 - there is 5V constantly - the relay is triggered and the lamp is on, does not depend on CDS.
Everything is correct so far. Just for fun, you can short-circuit the base and emitter of the transistor (for example, with a screwdriver, and the output 5V will drop across the 5.6 kOhm resistor, it’s not scary). The relay and load should turn off. This will indicate that the transistor and power circuits are working.
True, I put it on the table, soldered the wires to 0, and in series to 13, 9, 11 for the voltmeter. When I measured between 0 and 11, the sensor started working. It was possible to change the duration of lamp burning with a variable resistor.
Between pins 5 and 11? This is just a power output, the voltmeter should not affect it. It turns out that the voltmeter has bypassed the output of the microcircuit, as I recommended above by shorting the base-emitter with a screwdriver. This shouldn’t happen, either the microcircuit is faulty (most likely) or the voltmeter.
But I tried the sensor with a regular 60 W lamp. I was delighted, put everything together in the spotlight - and again it was constantly on. The burning time may become very long.
Your circuit contains an amplifier and a comparator. There are pins of two op amps here. Maybe they can be something to look at. I noticed a chain near the red wire in your RC circuit.
Yes, this chain to reduce sparking of relay contacts does not play a role in this case.
I recommend changing the microcircuit. But first, study the case when a measurement was taken and the sensor worked. The fact is that the input resistance of a voltmeter during measurement affects the circuit, and it is better if it is larger. Typically, the input resistance is about a hundred kiloohms, but cheap models can have 20...50 kOhms (depending on the measurement limit). Therefore, take a resistor of about 100 kOhm, or a little less, and connect it in parallel with the output of the microcircuit. Or between the base and emitter of the transistor.
Such a resistor must be built inside the microcircuit, or it is placed between the base and emitter of the transistor, to increase operational reliability. As in the light sensor circuit.
And the microcircuit is most likely faulty (partially), or has left the mode due to external wiring.
Photo of the spotlight and motion sensor, Andrey sent:
By the way, I have an article about a floodlight with a motion sensor, I recommend it.
And here are my articles about the design of LED spotlights and their repair.
Floodlight with motion sensor on LP8072C
Motion sensor on LP8072C
Motion Sensor. Power board
Checking the power
In the motion sensor, the 220V input power is converted into DC voltage required to power the circuit. As a rule, these voltages are 8, 12, 15, 24 V in different combinations, depending on the circuit.
All voltages are measured relative to zero. The point where you can take a zero - for example, the minus of an electrolytic capacitor at the output of a diode bridge.
In this case, you first need to check the +24V voltage (see diagram at the beginning of the article). If it is not there, you need to check the limiting (quenching) elements in front of the diode bridge, and the diodes themselves.
It is possible that the subsequent circuit “extinguishes” or adds power. To verify this, you need to disconnect the subsequent circuit from the power supply circuit.
We also check the low voltage +8V, which is used to power the operational amplifier circuits.
If it is not there, we check the circuits before it (presence of +24V), the stabilization circuits (zener diode), and test disconnect the load.
Customizable motion sensor characteristics
Adjustment and configuration of the motion sensor is carried out according to the following main characteristics:
- Angle relative to the viewing area.
- Sensitivity.
- Degree of natural light.
- The period of illumination of the lamp before extinction after initiation.
Let's consider the features of each characteristic in detail.
Corner
One of the most important parameters of the motion sensor for turning on the light, affecting its performance, is the installation angle. Modern models of detectors, as a rule, are located separately from the lamps and are equipped with brackets. This makes it possible to correctly configure the sensor according to its coverage area, ensuring that it covers the largest possible area.
At the same time, the height of the placement and its position in relation to the passage areas are no less important. For example, in a house, it is best to install the sensor in the hallway with the expectation of covering adjacent rooms (corridor, staircase, kitchen, living room, etc.) - so that at the first appearance of an object, whether it enters or exits, the lamp turns on.
Sensitivity
Adjusting the motion sensor according to its sensitivity level is the second important task when installing it. For this purpose, there is a regulator or button on the device body labeled “SENS”. Its value should be such as to prevent false alarms - on small animals, birds, tree branches, and so on.
Illumination
The degree of sensitivity to the level of natural light allows you to activate the motion sensor to turn on the lamp only at dusk. The setting is made using the knob or key labeled “LUX”. This function allows you to turn on the lights in the house or on the street only after dark, thereby saving energy from unnecessary daily consumption.
Time
Also in the motion sensor there is a delay time regulator, usually indicated by the inscription “TIME”. You can set it to a position from the minimum to the maximum value - from 5 seconds to 10 minutes. This is the period during which electrical current will flow to the light after extreme motion is detected in the sensor's field of view. It may be different for different situations. For example, for a street lamp near the house it should be maximum. Since when going out into the yard, you can go around the corner of the house or go to such a distance where the detector no longer sees the object, and the light can quickly go out, and the person will remain in the dark.
Purpose and principle of operation of the IEK infrared DD
Motion sensors are designed to detect the movement of objects in a protected space and turn on various equipment: alarms, video equipment, lighting, etc.
The device reacts to moving objects in the viewing area. The sensor records the infrared (IR) background of the controlled space. If the IR radiation field is static, the device is in standby mode. If a person appears, the photocell reacts to changes in the level of IR radiation and turns on the relay. It, in turn, closes the power contacts of the security system or turns on the lighting devices.
The basis of the DD design is a pyro-receiver and a multi-lens. A pyroelectric device is a thin plate of crystalline dielectric into the structure of which conductors are soldered. A multilens consists of many microscopic lenses. They focus IR light on one of the electrodes. With the appearance of an object, the focus changes, which causes a change in voltage in the conductors, and a relay response signal appears.
Typical faults
There are several signs by which it is concluded that there are interruptions in the operation of the device:
- the detector turns on at any time without any reason;
- does not turn off the lamp when the conditions for sensor operation are not met;
- relay contacts do not close when the sensor is operating
- stops responding in the presence of moving objects
- the sensor operates and turns off spontaneously, regardless of the environment
Doesn't turn on
If the detector does not work or the light does not come on, then first check whether it is connected correctly. Next, try to remember or find out when the sensor stopped working and under what conditions this happened. Reasons for malfunction of the device:
- voltage drop in the network
- water got on the detector: it rained or there was flooding from neighbors on the floor above
- mechanical impact in the form of a blow
- power outage in the area
- Unstable operation of the device has occurred before
Doesn't turn off
Lighting that burns around the clock is not required in apartments and private houses. It makes sense to spend time and try to repair the sensor. Often the root of the problem lies in closed relay contacts, which happens due to violations of the connection rules or installation by an inexperienced specialist. Also find out what is located opposite the motion sensor. There should be no devices that emit heat near the operating detector. After all, it is known that the device is triggered when the thermal environment changes. Do not place a heater or other devices that generate heat in front of the appliance.
Common reasons:
- It is recommended to check the time delay adjustment. The power circuit does not open if the delay regulator is set to too high a value;
- setting the brightness threshold (LUX) too high;
- there is a peculiarity in the operation of the detector's electrical circuit. If the sensor is not new and has been in use for a long period of time, the contacts do not open because there is a residual load. If the device does not turn off the light, you should disconnect the sensor from the mains voltage for half a minute;
- The degree of sensitivity of the motion sensor to infrared waves (SENS regulator) is incorrectly adjusted;
If you don't know what the values should be, you shouldn't change them yourself. The best solution is to contact a professional for help with setup.
Unpredictable on and off
When high-frequency radio signals appear in the scanning area of the sensor, the device begins to operate unstably. In this regard, it is not recommended to place the detector where devices that generate radio waves (for example, a WIFI router) operate. In the same way, the sensor device reacts to electromagnetic fields that are created by nearby starters, contactors, and welding equipment.
What to do if the listed devices need to be used within the range of the sensor. Here are the troubleshooting methods:
shielding the detector by wrapping it in foil
It is important to ground the screen; decreasing the sensitivity of the SENS regulator. Other reasons for unstable operation of the device:
Other reasons for unstable operation of the device:
- The contact has come loose, there has been an insulation breakdown or a break in the hidden electrical wiring. As a result, electromagnetic fields arise that disrupt the normal operation of the sensor;
- objects that were not initially located in the scanning zone entered the scanning zone. An example is tree branches; with a gust of wind, they easily end up in the scanner’s range of action;
- heating of the detector body under the influence of sunlight or heat-emitting electrical appliances. If the source of heat radiation cannot be removed, then a barrier is installed.
Checking power to the sensor and light source
To reduce the risk of electric shock, turn off the automatic lighting switch and only provide access to the places on the lamp and sensor where the wires are connected. They must be mechanically secured to prevent accidental short-circuiting before voltage can be applied.
Electricians, as a rule, use an indicator screwdriver to check the presence of voltage at the phase terminal. If a phase is missing, then everything becomes clear and you just need to find the reason.
However, a complete check can only be considered when the electrician makes sure that there is zero potential on the sensor. There are a number of cases of loss of zero potential, but they all come down to simple reasons, such as a violation of the integrity of the contacts on the meter, or a break in the conductor.
How to diagnose correctly
Incorrect lighting settings are the most common problem. Check the regulator on the detector body - set the indicator to a level of 300 Lux. The level of illumination cannot always be changed. The manufacturer makes them unregulated, but no one is immune from an accidental error. In this case, you should return the product to the store if you have saved the receipt.
If after adjustment the detector does not work, then the problem lies in the electrical circuit of the device. You can try to repair it yourself, or contact a professional.
Device Specifications
The technical characteristics of wireless models also include the frequency at which they operate and the type of batteries.
Technical characteristics are indicated in the technical documentation (in the passport) that accompanies any technical product, otherwise it is unlikely that it will be possible to select the necessary device.
Viewing angle
There are products with different viewing angles, both in the vertical and horizontal planes. If it is necessary to protect an object from different sides, then sensors with a viewing angle of up to 360 degrees are used. If the sensor is mounted on a wall, a device with a viewing angle of 180 degrees is sufficient. If you plan to install the sensor on a pole, then it is better to give preference to a viewing angle of 360 degrees. In this case, it all depends on what area and what object or group of objects is planned to be protected. When installed in an apartment, to protect individual rooms, sensors with a smaller viewing angle, about 90 degrees, are chosen.
Depending on the installation location and the required detection zone, select the viewing radius
If there is one entrance to the room, it is enough to install a sensor with a narrow viewing angle, otherwise you have to install several sensors with a narrow viewing angle or one sensor with a wide viewing angle. It should be remembered that such sensors are not cheap, so you should always focus on economic feasibility.
There is also such a thing as vertical viewing angle. In simple, inexpensive models, this figure is no more than 20 degrees. For more expensive models, this figure is much higher and can be all 180 degrees. Such devices are used in security systems where such costs are justified. In lighting systems, the simplest and cheapest device is sufficient. The main thing is that the sensor is installed at the desired height and turns on the lighting under certain conditions.
Radius of action
The range should be selected with reserve
The choice of motion sensor based on its range depends on where it will be installed: outdoors or indoors. For indoor use, devices with a range of about 5-7 meters are sufficient. If the sensor is installed in a yard or other location, certain factors must be taken into account, otherwise false alarms may occur. Sensors with a long range can be triggered when people move along the street, when a neighbor appears in their yard, etc. Therefore, in such cases, it is better to opt for devices with a minimum range.
Power of connected lighting sources
The sensor power should be calculated with a reserve
Each sensor is designed for a certain load power, which it can turn on/off without emergency modes. Otherwise, the device will simply fail because the controls will not withstand it.
Recently, this indicator is not so critical, since people are switching to more economical lamps, such as energy-saving or diode.
Mounting method and choice of installation location
Most often, sensors are mounted on the wall.
Motion sensors may also differ in the method of attachment. Therefore there are:
- Case products, in the form of a small box with a bracket. Such models are attached:
- On the ceiling.
- On the wall.
- Built-in models designed for hidden installation.
Such models are distinguished by the fact that they are small in size, which allows them to be installed unnoticed by others.
If you just need to turn on/off the lighting in the right place, then you can get by with cheaper cabinet-mounted devices. Miniature built-in sensors are more suitable for security systems, especially since they are also expensive.
Additional features
Some models, depending on the purpose and operating conditions, have additional functions. These functions include:
- Sensitivity threshold. It is implemented using a light sensor, in the form of a photo relay. This sensor is especially useful when installing the device outdoors. This function is necessary to ensure that the device turns on the lighting only at night.
- Protection from animals. Naturally, in every private yard there are cats and dogs. The function is necessary in order to reduce the number of false alarms when animals move. If there is a large dog in the yard, this function may not work.
- Shutdown delay. There are different devices, both with and without delay. In most cases this function is adjustable. It is quite inconvenient if a person often moves within the sensor’s coverage area, but also often leaves it, and the motion sensor also often turns the lighting on and off.
We analyze the reasons for the blinking of the LED device
Unfortunately, although LEDs are one of the most advanced lighting systems, they can also fail, sometimes the reason lies in them, and sometimes the reason is hidden in the device in which they are installed, in our case it is an LED spotlight.
Now we will try to analyze the most basic and most common causes of failure of a LED spotlight, why it can blink when combined with a motion sensor, in cold weather, when turned off or on, as well as some other reasons.
The motion sensor makes the spotlight blink
Now we will look at why a motion sensor installed together with a spotlight causes it to blink, and how to solve this common problem. Next, we will tell you about the reasons and immediately describe how to fix this problem quickly and efficiently.
So, there may be several reasons for the LED spotlight blinking due to a motion sensor:
Reason 1: Poorly configured motion sensor
Very often, having installed such a mechanism, many forget to adjust the timer on it so that it keeps the LED spotlight in working condition for some time. Since initially from the factory the timer can be set to a minimum value of one second or less.
Reason 2: Lost contact
Loss of contact after the sensor is triggered. This problem may be hidden in the connecting wires between devices or in the connection points themselves. You should check the wires for breaks and carefully secure all connections. In case of a bad connection, the sensor supplies voltage to the LED spotlight, but the flow is immediately interrupted, resulting in only a flashing light.
Reason 3: Sensor malfunction:
The motion sensor itself is faulty. This problem cannot be solved; it should be returned to the store and replaced with a working one.
Check the contacts and connections of the sensors to the spotlight
Reason 4: Continuous voltage supply
Very often, the motion sensor is constantly under a continuous supply of current, and some of it jumps directly onto the projector. A tiny part of the voltage is not enough to light the LED, but it is enough to cause blinking.
Blinks in frosty weather
The problem of an LED spotlight blinking in winter seems stupid and impossible, but it is still very common in modern models, even from the most popular and expensive manufacturers.
The reason for this phenomenon is frostbite of one of the components that is responsible for starting the LED. Sometimes even in frosts down to minus ten degrees, the LED spotlight stops working and starts blinking. Although on the packaging the operating temperature range is indicated from plus forty to minus fifty. The range indicated is of course correct, but only for installed LEDs that operate without problems in such conditions.
The cause of the breakdown may be the power supply, you can check it with a multimeter
But the trigger mechanism installed in an LED spotlight cannot cope with such temperatures, and most often elements such as a controller or starting capacitor simply freeze and lose their ability to work normally until they are completely warmed up.
To solve this problem, you will need to periodically bring the LED spotlight into the house and warm it up. The optimal solution would be to keep it in the house all day, and then take it outside in the evening.
Flashes when it is turned on
There may be several reasons for this phenomenon:
- Damaged starting LED capacitor - it should be replaced, after which the LED spotlight should work stably.
- Poor contact or break in the wires in the on position. As described earlier, the wires are checked and replaced if broken.
Motion sensor connection diagram to the lamp
Now you need to install a motion sensor in the wire gap. The wires are connected as follows: the brown phase wire is connected to the brown white wire of the sensor phase and the wire from the switch.
After applying current to the line, wait at least 1 minute. Let's give a few examples: 1. But from a safety point of view, it is the phase conductor that should break.
When motion is detected, a signal appears at the output and lasts for the set time.
The infrared sensor will pick up these waves and trigger them, turning on the lighting again. The switch disconnects the system immediately, and in the case of a detector - after a set time.
That is, in order to use the sensor during daylight hours, we set the switch to the mode where the sun is indicated. Motion sensor HC-SR with regulators If the sensor is made in a fixed housing and does not have positioning adjustment, then you need to check the technical data sheet for correct placement of the device. As a rule, this does not present any particular difficulties, since the connection diagram should be depicted on the device body. In this case, the switch can duplicate the operation of the motion sensor, as a result of which it will be possible to forcibly control the lighting.
There are three wires left - red from the sensor, brown from the lamp and the second wire from the switch. Option for a wall-mounted motion sensor Wall-mounted devices are usually mounted next to the door, directing the wiretapping zone towards it. If the layout of the room is such that the viewing angle does not allow you to control important areas, then it is recommended to connect several light sources to the DD. At the same time, do not forget about observing the markings according to the colors of the wires and the designations of the connectors, in order to avoid confusion.
Operating principle and classification
And infrared - movements past the sensor. When the switch is triggered, the lamp will go out immediately or when the sensor turns off. The electronic circuit records these changes and generates a signal for the output relay.
The advantages include ease of installation outdoors, complete safety for household members, as well as the ability to adjust the response range and very low energy consumption. Another option for studying the circuit is to look at it on the body of the device itself. These devices can be configured to smoothly change brightness immediately after closing the circuit, and turn on the lighting with a certain delay. There are cases when a ceiling detector is mounted on a wall, which leads to incorrect operation. Inexpensive to purchase, easy to install, easy to configure device. How to connect a motion sensor instead of a switch Specialized connection diagram
Automatic lighting with manual control option
To be able to control the lighting manually if necessary, the following algorithm is used:
- One power wire (zero) is connected directly to the device.
- A traditional key switch is connected on the second wire (phase) parallel to the sensor. That is, a sensor is mounted in the gap of this wire. And the key switch is connected to bypass the sensor.
- The sensor is being configured.
Connection diagram of the sensor in a circuit with a switch
According to this scheme, the light will work in automatic mode, but it will remain possible to turn it on and off manually. For example, it is used when lighting is needed in a room, but there is no movement.
Installation work
The process of installing an LED spotlight begins with choosing a location. When choosing a mounting location, consider:
- Distance from the outlet.
- Full illumination of the required area, free space in front of the lantern so that it is not blocked by trees, buildings, etc.
- The height should be comfortable for people - do not place the spotlight at eye level or below;
- The device must be protected from rain and snow with a canopy.
- There is no need to place the spotlight in a blind pocket where air will not get in; it is advisable to ensure minimal ventilation.
If there is no outlet nearby, a cable is laid from the lighting fixture.
With grounding, it must be three-wire and placed in a corrugated or cable duct (these are necessary precautions for working in atmospheric conditions). The wires are secured to the wall with staples.
For long distances to a free-standing pole, it is better to stretch a cable that is well fixed with guy wires. The power cable is already attached to it.
The process of attaching the spotlight to a wall or pole will not cause any difficulties. The spotlights are equipped with a handle – a bracket with holes for fastening. The device is screwed to the surface, after which a convenient angle of inclination of the lamp is set.
For easy access to the mounting holes, it is better to first unscrew the bracket from the lamp, secure it to a wall or pole, and only then hang the lamp.