Tiling a wall is a rather complicated process that requires careful adherence to the technology of the entire work. Leaving any of the stages unattended means that the finish will be of poor quality and, after a certain period of time, the repair work will need to be repeated. And this, in turn, will lead to additional costs of effort, time and material resources. Before laying tiles, you need to follow several rules that will help you carry out subsequent work correctly. It will also be explained whether it is necessary to prime the wall before laying tiles, in which rooms and why.
How to prepare walls in the bathroom and other rooms for cladding?
Advice
In order for the tiles to lay flat and stay in place for many years, you need to properly prepare the surface for laying.
In most cases, tiles are laid on a concrete slab . But there are situations when it needs to be laid on wooden panels, painted walls and even drywall. In each individual case, it is necessary to follow the technical recommendations for surface preparation.
Painted
If the tiles are laid on painted walls, in this case it is necessary to carry out a number of preparatory work. You need to understand that tiles adhere very poorly to enamel and water-based paint, concrete or special adhesive. Or rather, grip with such a surface will be extremely unreliable.
That is why it is necessary to clean the wall of paint as much as possible . This can be done in several ways. For example, use a hand grinder with a special disc. The same procedure can be done manually using coarse sandpaper or a spatula. But such work will take hours or even days.
There is an option to knock off the paint with a heavy tool such as an ax or a hammer drill, but together with the plaster. This will be faster, but the wall will have to be re-plastered.
Attention
One way or another, the paint must be completely removed, because if you leave even a small piece, then under the influence of water contained in the tile adhesive or concrete, the tile will definitely fall off.
If you can’t remove oil paint and you can’t remove the plaster, then there is an option to prepare the wall for tiles without removing the paint layer. To do this, the paint itself must be sanded and degreased with acetone. Large notches are made on the surface of the paint with an ax or perforator so that the tiles stick to the wall, at least through these holes in the paint.
But you need to understand that this method of preparing the wall is ineffective and the tiles can fall off at any time.
With wallpaper
In principle, tiles cannot be glued to wallpaper . It will fall off almost immediately, since the paper or vinyl from which they are made gets wet from moisture and no longer sticks to the wall. Accordingly, tiles glued to the wallpaper will not stick. In this situation, the wallpaper is completely removed. And the walls under the wallpaper are thoroughly cleaned of traces of old glue using a spatula or a hand sander.
Plastered
It's much easier with plastered walls. After all, as a rule, plaster is applied along the beacons and is an ideal surface for tiles. However, there are nuances:
- The plaster should be made of sand concrete. If it is made on a lime basis, then it will have to be removed, since this solution does not combine well with the tiles and may fall off under its weight.
- Old plaster can move away from the wall in places, forming voids and, under the load created by the tiles, will also fall off. When preparing a plastered wall for installing tiles on it, you need to make sure that there are no voids in the coating layer, and that it itself is reliable and dense.
Wooden
The need to lay tiles on wooden wall panels or floors can arise for various reasons. For example, the inability to dismantle boards or the construction of technological hatches made of wooden panels in the floor or walls. And sometimes the idea arises of laying tiles in a completely wooden house. In such a situation, wooden panels need to be properly prepared for gluing tiles on them.
Important
First of all, you need to know that no matter how firmly a wooden house stands, it will shrink on the walls and floor over the years. It can be up to 5-7% of the total area of the wall or house.
And in such a situation, any tile will definitely crack and fall off, since it does not have the same flexibility as wood. And the situation will not be saved by a special reinforcing film under the tiles and thermal joints between the tiles.
Therefore , before tiling the wall of a wooden house, a sheet of plywood, plasterboard or chipboard is first fixed to it . Moreover, the plywood sheets are fastened through so-called “sliding supports”. They do not press the sheet tightly against the wall, thereby allowing the house to “walk” without touching the interior walls with tiles.
From plasterboard
If you need to install tiles on a false plasterboard wall, then they do not require any special preparation. The only recommendation in this case is that the drywall should be waterproof, and the tiles should be glued to it with a special glue.
Bathtub enamel restoration
As mentioned above, not only the walls, but also the bath tank itself can suffer from the special conditions of the room. We mainly use enamel tanks. During operation, enamel is exposed to various influences. And once white, it turns yellow, darkens, gets scratched... Restoration work can be carried out independently, it is much cheaper than buying a new container.
Restoring an enamel coating is a complex, multi-stage task, often requiring special skills and knowledge, but at the same time it is completely doable. It is not recommended to use the room throughout the entire length of restoration work.
- The surface must be cleaned of rust, especially if the enamel is chipped.
- Afterwards, wash the container thoroughly and wait until it dries.
- Next, the bare metal areas are primed. You can use a glypthal mixture, which has good adhesive properties.
- The primer solution must dry completely. This will take up to two days. You can, of course, artificially speed up this process, but experts prefer drying under natural conditions.
- The next stage is putty. Thus, the treated area needs to be leveled with the general surface (plus 2 mm). The substance will take about an hour to dry.
- Re-priming.
- Enamelling.
The arrangement of such a specific room requires increased attention to the quality of construction and finishing materials. Walls, ceilings, and floors must be reliably protected from excessive moisture and sudden temperature changes. After all, humidity and heat are one of the main causes of the formation of fungus and mold. If you are not sure that you can handle the repair tasks yourself, entrust this task to specialists.
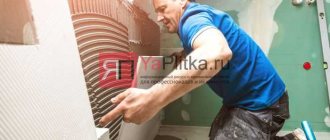
Alignment
The first step in preparing to lay tiles is to level the walls from defects. The wall under the tiles should be perfectly smooth , but often they are not very smooth, and sometimes downright crooked. That is, the wall is piled inward or outward, and sometimes the depression or mound is located exactly in the middle. This happens because the masons laying the bricks or blocks were inattentive to their work.
To eliminate such serious distortions, you need to either plaster them using beacons, or cover them with plasterboard.
- In the first case, the beacons are installed on the walls using a level and plumb line, thereby creating an even plaster sheathing. Using them in the future, it is easy to plaster the wall.
- The second method is used in cases where the differences in unevenness are 6 cm or more. It is impossible to make such a thick layer of plaster, which is why drywall is used. In the worst case scenario, if a crooked wall bursts under the influence of gravity, it is best to dismantle it and lay the brick or blocks again.
Severe deformation
The frame method of installing plasterboard is used to level bathroom walls that have large surface deformations. Before installing the sheathing, the wall is covered with a waterproofing membrane. The profiles are installed in increments of 60 cm, since the standard sheet width is 1.2 m. The slats are secured with U-shaped hangers or corners. They are placed in increments of 50-60 cm. The drywall is fixed to the frame with self-tapping screws. The fasteners are screwed in increments no wider than 30 cm.
The base for laying tiles can be made smoother with plaster, but the wall will need to be reinforced in order to better secure the applied layers of mortar. After repair and priming of the base, it is covered with a reinforcing grid. It is fixed to the surface with dowel nails. Then the wall is sprayed with liquid cement-sand mortar. Several layers of plaster may be required to pre-level the surface. They are applied only after the previous ones have completely dried. The final alignment of the partition can be done after installing the beacons.
Getting rid of cracks and dents
After leveling the wall, you need to cover up small cracks and dents .
To do this, you can use ordinary concrete mortar and a “grater” - this is a special tool for a plasterer, which he uses to rub out cracks and depressions on the wall. This kind of work is done simply - use a “grater” or “poluter” (a shorter tool), apply plaster and rub the crack on the wall with smooth circular movements. Advice
Before grouting, deep cracks must be sealed with a masking net so that the crack does not later transfer to the tile. It’s better to embroider, that is, deepen and widen the crack to the brick and seal it properly with mortar.
How long does it take for primer to dry?
To understand when it will be possible to lay the tile material, you need to understand how long it takes for the primer layer to dry. The process of drying the floor primer before laying tiles is influenced by environmental conditions, as well as the constituent components of the product itself. Drying takes from 4 to 12 hours. If the room has high humidity and the temperature is not high, then the process will take longer, and accordingly, at high temperatures and low humidity, drying will take less time.
Under favorable conditions, drying will take the following number of hours:
- Polyurethane – 8-12 (maximum limit 24 hours);
- Acrylic – 2-4;
- Epoxy – 2 hours (maximum time can reach 5 days).
The average consumption of primer compositions is 200-350 g/sq.m. m.
Drying takes from 4 to 12 hours.
Waterproofing wiring
The third stage of preparing walls for tiles is no less important - waterproofing. After all, tiles, as a rule, are placed in places where it will be damp - in the bathtub or toilet. Even if it is in other rooms such as the kitchen or hallway, then good waterproofing will not hurt there either.
- You can put so-called bitumen-based film roll material on the floor. The floor surface must be perfectly flat.
- Such material is not placed on walls, as it is difficult to glue it firmly. Typically, such a film is fused using an industrial hair dryer. For walls, coating waterproofing based on a bitumen-polymer or bitumen-rubber mixture is best suited. In essence, it is mastic that is applied with a special tool.
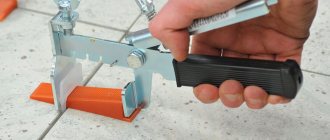
Installation of beacons
Beacons are guides along which the wedge or rule will follow. How to do them?
- Screw self-tapping screws into the wall at several points.
- Install the wedge and check the level.
- Apply a small layer of plaster along the screed line.
- When it hardens, you will get two parallel slats that will serve as guides in your work.
- Upon completion of the work, you can unscrew them and plaster the holes (but this is not necessary).
Beacons will allow you to get a perfectly flat surface without drops.
An alternative way is to screw in the screws at the same level (measure the insertion depth with a ruler), and then stretch brightly colored threads between them. The threads should intersect exactly in the center. This way, all the differences and gaps in the wall will be visible.
In order to obtain such an intersection, you need to screw in screws in different corners of the wall and pull the thread crosswise (with an envelope), then adjust the height of the screws until the threads touch.
Advice from professionals
In order for the tiles in the bathroom or other room to last for many years and not crack, professionals advise:
- Don't rush into the order of work. When preparing walls or floors for installing tiles, each layer must dry thoroughly. This will make the entire structure stronger and protect the walls from the formation of mold.
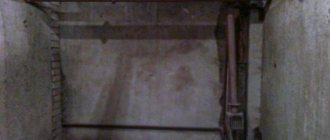
- All pipes, the so-called black wiring, are installed before installing the tiles.
- Plumbing pipes must be changed. This, firstly, will allow you to remove old and possibly rotten pipes, and secondly, it will make it possible to install a faucet or toilet in the place that is most convenient for the owner.
- If possible, that is, it is desirable, all pipes should be laid not in the walls directly under the tiles, but in special boxes along the bottom of the wall. This precaution will allow you to replace pipes in the event of an accident without dismantling expensive tiles. Moreover, the place of the breakdown will be visible, while the pipe leaking in the wall will have to be completely removed. The box can be closed with a wooden or plastic panel with tiles glued to it.
- A good master will plaster the surface for the tiles himself. After all, then, with a crooked tile, he will not be able to refer to the “crooked” plasterer.
- It is necessary to plaster the walls under the tiles. Local tearing out and filling the cracks does not guarantee that the tiles will last for many years.
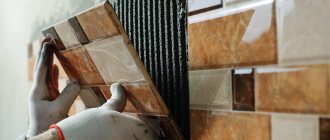
- Before gluing the tiles to the walls, they must be soaked in water for 1 to 3 hours. This will improve its grip on the wall.
- The bathroom or kitchen is very often subject to flooding due to plumbing accidents. This is why it is necessary to waterproof the floor. Experts strongly advise not to skimp on waterproofing, especially in multi-storey buildings. After all, after such an accident, the owner of the apartment will have to pay for repairs to the flooded neighbors below, and this is an order of magnitude more expensive than the most expensive waterproofing.
- Waterproofing the floor and walls is especially important if the tiles are glued to plasterboard or plywood. If there is no basic waterproofing on the walls in such a situation, then mold will inevitably appear under the panels. And this is dangerous to health.
- Waterproofing must be done between the bathtub and the edge of the tile.
There are many ways - from a ceramic border to simply filling the cracks with sealant. The most convenient device for retaining water in this case is a plastic corner. Its upper edge is mounted under the tile, and the lower edge extends onto the edge of the bathtub. It is practically invisible, but it works with a 100% guarantee. Otherwise, condensation or water will flow down the tiles and accumulate under the bathtub. - The heated towel rail must be installed at the stage of laying out the rough sewer system. Otherwise, you will have to dismantle the finished tiles. And such a device is necessary in the bathroom, even just as a heating element.
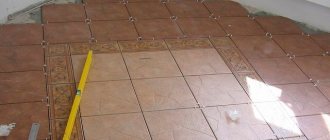
- In order for the tiles above the bathtub to look even and harmonious, you need to start laying them from the edge of the bathtub. And unevenness in the ceiling or floor will go up there and you will need to file the tiles.
AttentionIn addition, usually the ceiling in the bathroom is covered with plastic, so all the uneven, sawn tiles will go under this suspended ceiling.
- At the joints of the floor with the wall or in the internal corners of the walls, a joint called a “mustache” is used. In this case, the tiles are cut at an acute angle, so that there is room for sealant or grout. Then the water on the floor and on the benches will not go under the tiles and will not cause peeling or mold formation.
- When renovating a bathroom, be sure to provide good ventilation. There should be vents under the ceiling and under the bathroom door.
- In order not to make a mistake with the pattern on the tiles, you need to pay attention to its reverse side - as a rule, there is a pointer in the form of an arrow or dots.
Next, we suggest watching a visual video with tips on laying tiles from experts:
If you follow all the recommendations for preparing walls for installing tiles, you can carry out this work yourself without losing quality. The main thing is to take your time and measure everything carefully before each operation. Then the tiles will lie evenly and last for many years.
Follow-up preparation
To prepare the plastered surface for laying tiles, it is enough to saturate the wall with an antiseptic and primer. Puttying the base may only be necessary if it is necessary to correct remaining unevenness.
On a plasterboard wall, you will have to fill the seams with putty. The leveling mixture is applied after treating the edges of the gypsum board with a primer and gluing the serpyanka to them. After the putty has dried, the partition is treated with an antiseptic and priming compound. Then it is puttied. The dried surface is sanded and primed one more time.
Particular attention should be paid to waterproofing the lower part of the wall. It must be treated with a polymer-based composition or bitumen mastic. Now the surface of the partition is ready for laying tiles.
Required Tools
For dismantling, plastering and other preparatory work, you need to prepare tools that may be useful at a certain stage of the work.
- Hammer.
- Bulgarian.
- Building level.
- Tape measure and pencil.
- Spatula and trowel.
- Sandpaper.
- Container for mixing the solution.
- Chisel.
- Lighthouses.
- Protective clothing.
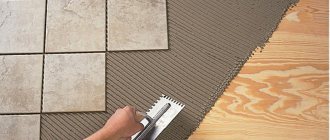
There are many types of spatulas and trowels that are used for plastering walls. It is important to remember that laying tiles is a fairly simple process, but preparing walls can be a lengthy and more labor-intensive process.
The durability and appearance of the cladding, which can last for decades, directly depends on proper preparation. Each stage of preparation is incredibly important, but it guarantees a positive result and is the key to successful and high-quality repairs.
Dismantling
This kind of work is very easy to do on your own, even without special skills. To remove old tiles, use a hammer drill to remove the old layer of mortar.
- When working with a hammer drill, it is important to use safety glasses, as flying pieces of old materials can cause injury.
- It is also important not to forget about the presence of electrical wiring that cannot be touched with a tool.
- If necessary, the old wiring is replaced with new one.
After completing the dismantling process, there should be no unevenness or bulging areas on the surface. If the walls are covered with old paint, a grinder with a special attachment is used to remove it, which cuts off the paint from the old layer of plaster.
Choosing ceramic tiles for walls
The selection of tiles is an important step not only from the point of view of the design approach. It so happens that the lower the price of the tile, the worse its geometric shape, which in turn leads to difficulties when laying it. When laying tiles of irregular shape, it is difficult to obtain uniform seams and a smooth surface without differences. This also leads to the fact that when using such a material it is difficult to achieve a thin seam at the joints of the tiles. Therefore, if the size of the joints is of great importance to you, choose either foreign samples or domestic tiles in the above-average price range. The photo below shows the differences in the shape of tiles from one pack:
Close attention should also be paid to the format of the tiles. Laying large-format tiles alone will be quite problematic. In addition, if you lack experience, you may encounter overuse of material, which, given the high cost of such tiles, will lead to unjustified expenses. For beginner tilers, it will be most convenient to work with small and medium format tiles.
In addition to size, the shape of the ceramic is also important. When choosing its type, you need to rely on the design project of the future room and the need for trimming. For example, when using wide rectangular tiles in a narrow room, you may encounter either the need to glue small fragments in the corner, or the need to double the number of tiles to finish a given wall.
All these nuances are individual for each specific room and project, so there is no universal solution for all rooms.
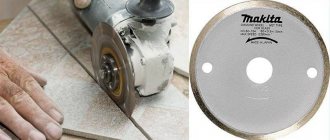
When choosing tiles, it often happens that the option you like is intended for laying on the floor. It is not prohibited to lay floor tiles on a wall, however, such tiles are often made of porcelain stoneware, which is many times stronger than ordinary ceramic tiles and is more difficult to cut and drill. This needs to be taken into account as there is a lot more cutting involved when laying wall tiles than when laying floor tiles.
The last piece of advice when choosing tiles is that when purchasing, you need to check the lot numbers on each pack of material and purchase tiles of only one article and lot number, as this will protect you from differences in the color scheme of one or another lot.
Tile sorting
Before directly laying the tiles, they are sorted to identify defects, tiles of uneven shape, differing from others in size and shades of color. This procedure is carried out for both cheap and expensive tiles. High-quality, smooth tiles are used in places that are visible. Tiles with imperfections or minor defects are allowed to be trimmed or used in hidden places.
How to plaster
The choice of plaster for interior decoration depends on the expected layer thickness.
The composition is selected based on the type of room in which the finishing is carried out. When working in rooms with high humidity, cement mortars are used, which prevent moisture from penetrating into the base material. Gypsum mixtures began to be used relatively recently, when additives were added to the composition to enhance the water-repellent properties.
- Weber cement-based plaster Vetonit" is distinguished by its high strength, ease of use and versatility. This plaster is good because it can be used for finishing both dry and wet rooms.
- Cement plaster Ceresit CT 24 Light is positioned as a “light” mixture suitable for working with cellular concrete and sand-lime brick. An important advantage of this composition is its economical consumption. Can be used for work in any type of room, as well as for external work.
- Volma Aquaslayer MN plaster is a moisture-resistant solution that contains various deliveries that provide additional moisture resistance. It is used for finishing bathrooms, saunas, swimming pools, etc.