12.04.2018 0
15306
Leveling tiles during installation is not an easy task, especially if it is done by a non-professional. To place tiles evenly and neatly on the floor or wall, you can use a special system. To do this, you should find out its characteristics, advantages and disadvantages, and also study reviews.
Basic Concepts
Previously, plastic crosses were used to lay tiles, which were inserted between adjacent elements. The disadvantage of this system is that the crosses only affect the seam distance, but they do not allow the products to be aligned in the horizontal plane.
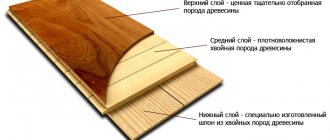
Today this problem is solved with the help of special wedges that are included in tile leveling systems. Technically, these elements themselves cannot influence the material, so they are used together with special clamps. The wedges resemble a kind of pitchfork, which consists of two guides.
There are small notches on the surface of these products that allow you to securely and efficiently fix the clamp and ceramic tiles.
Depending on the material used for manufacturing, these elements can be divided into 2 types:
- Plastic. Wedges of this type are made from various types of polymers. This makes them strong and durable. High-quality products are perfect for reusable use.
- Metal. They are not found as often, as they command higher prices. They are used by professionals who constantly lay tiles. Metal can withstand loads much better and can last as long as possible.
Consumption
The table shows the approximate consumption of the tile leveling system depending on the size (number of clamps per square meter):
| Dimensions, mm | 1200 | 1000 | 900 | 800 | 600 | 500 | 450 | 400 | 330 | 300 | 250 | 200 | 150 | 100 |
| 1200 | 6 | |||||||||||||
| 1000 | 7 | 8 | ||||||||||||
| 900 | 6 | 8 | 7 | |||||||||||
| 800 | 7 | 9 | 8 | 9 | ||||||||||
| 600 | 8 | 10 | 9 | 10 | 11 | |||||||||
| 500 | 10 | 12 | 11 | 12 | 13 | 16 | ||||||||
| 450 | 11 | 13 | 12 | 14 | 15 | 18 | 20 | |||||||
| 400 | 13 | 15 | 14 | 16 | 17 | 20 | 22 | 25 | ||||||
| 330 | 15 | 18 | 17 | 19 | 20 | 24 | 27 | 30 | 37 | |||||
| 300 | 17 | 20 | 19 | 21 | 22 | 27 | 30 | 33 | 40 | 44 | ||||
| 250 | 17 | 20 | 18 | 20 | 20 | 24 | 27 | 30 | 36 | 40 | ||||
| 200 | 21 | 22 | 22 | 25 | 25 | 30 | 33 | 37 | 45 | 50 | ||||
| 150 | 28 | 33 | 30 | 33 | 33 | 40 | 44 | 50 | 61 | 67 | ||||
| 100 | 42 | 50 | 44 | 50 | 50 | 60 | 67 | 75 | 91 | 100 |
Examples of using
Leveling system
A special system designed to level ceramic slabs during laying allows tiling work to be completed much faster. The finished surface will be smooth without any differences.
The operating principle of this system will replace the use of a set of plastic crosses, which were previously installed on the seams. The system consists of wedges, each of them has a clamp. The main element of the system is spacer wedges, with the help of which it becomes possible to regulate the position of tiles on the plane. To fix these elements, you will need a second type of wedge, which is called clamping.
Using two of these elements, it is possible to install and then secure the tile in the correct position. After laying the tiles, the surface will be ideal and very smooth.
When it is necessary to lay large tiles, such parts are first coated with a double layer of adhesive.
This system has many advantages, as a result of which it is becoming increasingly popular among professionals.
To study the feasibility of using such a system for ideal leveling of ceramic tiles, it is worth familiarizing yourself with its advantages:
- The floor turns out perfectly flat. Floor coverings with tiled cladding using leveling systems actually become smooth and even, while the aesthetics of the appearance are also improved. All this is reflected in the improved operational quality of the facing coating. The procedure for installing tiles will speed up, the work process will become easier and simpler.
- The floor surface will be covered evenly with identical seams, and the cladding will turn out to be truly chic.
- The adhesive mass is distributed evenly over the entire surface of the tile, the glue is used to smooth the floor surface. This solution perfectly fills existing voids formed on the floor during tiling work. The absence of this system will not allow the glue to be distributed perfectly evenly.
- If you lay the tiles in this way, you can prevent sagging of the tiles during operation.
- Fixing ceramic tiles in the desired position is another advantage of the system. It will be very difficult to achieve such results when laying the facing material manually. When laying tiles in the usual way, after drying, sagging and displaced areas may appear. Using a clamp to level the facing material will help you get rid of such defects when laying tiles. The tiles will be installed in the correct position and remain perfectly laid until dry.
Despite many advantages, this system still has its disadvantages:
- temporary monetary costs for mounting and removing special clamps;
- in this work process, all seams are filled with glue, so the spaces between the tiles will need to be cleaned before filling;
- It is not entirely profitable to purchase a whole system for laying tiles in small rooms.
This unique tile leveling system is available in two types. The first option is cheaper, so it is used much more often.
Typically, such an inexpensive system is used on uneven ground with differences in height. Here you will need a wedge that will clamp the base element of the system and position the tile evenly on the plane.
The price of another type of system, designed for smoothing ceramic cladding, is several times more expensive. This system stands out for its unusual structure - curved inserts. This is what allows you to achieve self-leveling without the use of additional intervention. The plates begin to align automatically, and this allows many defects to appear.
Such a system is characterized by ease of use. Of course, you will need to set aside time for installation, but the result is really worth it.
Crosses for facing work
Their main task is to achieve smooth, uniformly thick seams when laying tiles on horizontal and, most importantly, vertical surfaces. Typically, crosses are plastic parts with a thickness of 1.0 to 10 millimeters; the sizes of their sides are also varied.
There are the following types of crosses:
Traditional plastic ones can be either solid (solid) or hollow. Hollow crosses are used for thicker seams and have a significant advantage - they do not squeeze out the solution during work.
Regular crosses are convenient to use when laying with a narrow seam.
Hollow tile crosses are used for wide joints.
Crosses for laying the outer rows of tiles (top, bottom and side). They are T-shaped. This type is also used when laying tiles staggered. Although they are commercially available, craftsmen usually make them themselves by simply removing one of the sides of a regular cross with pliers.
T-crosses are used to lay the outermost rows of tiles.
Wedges for tiles. This is a separate type of detail, most often used when decorating walls with stone. When laying tiles, they can help control the thickness of the bottom joint when finishing vertical surfaces of walls and steps.
Wedges are used to level the first row of tiles and to adjust the thickness of the joints.
Crosses with jumpers. They have a higher cost, but have greater strength and allow the seams to be fixed better.
A cross with a jumper for connecting the corners of tiles in one plane.
Reinforced cross for tiles.
Reinforced cross for tiles on two walls.
Selecting crosses for tile laying work
There is a misconception that the thinner the seam between the tiles, the higher the quality of the work. This is far from true. When carrying out facing work with inexpensive material that has even a slight difference in the geometric dimensions of an individual tile, the seam is about 1 - 1.5 mm. will cause additional difficulties in adjusting the distance between the tiles. For large and medium-sized tiles, thin seams are generally unacceptable; as a result, the finished surface will not have an aesthetic appearance. In addition, some types of tiles generally provide for a pronounced seam when laying, this will be indicated by their end part made at an angle.
If there is a seam, it is easier to grout with a waterproof solution. Where there is no seam, the grout fits worse, because there is simply no room for it. And over time, moisture can get under the tile, destroying the adhesive base and the tile will peel off from the surface sooner. Therefore, crosses for tiles are very widely used when laying them.
Advice from professionals: the optimal thickness of the tile joint can be easily determined by dividing the largest dimension of the tile by 100. For example, for tiles 150x200 mm. the required seam thickness will be 200_100=2 mm. When carrying out work, it should be taken into account that usually the thickness of the seam for finishing the floor is taken to be 0.5 mm. greater than the thickness of the wall joint. So, when working with tiles of standard sizes 250x250, 200x300 and 250x333 mm. The thickness of the seam for walls is assumed to be in the range of 2.5 - 3 mm, for the floor - in the region of 3.5 - 4 mm. When using clinker tiles as a facing material, you should choose crosses that are larger in size compared to tiles; basically, they are all hollow.
Crosses are produced in packages of 50 to 1000 pieces, most often there are packages of 100 and 200 pieces. Depending on the size of the material, from 30 to 100 crosses may be required per square meter of laid tiles. Knowing the dimensions of the tiles used, you can calculate their required quantity using the following method: the number of tiles per square meter is multiplied by 4, adding a margin of 20%.
Crosses for tiles - quality, tips for choosing
When buying crosses, it is important to pay attention to their quality. Many people believe that there is no difference between cheap and expensive products and that they are all the same. However, much depends on the quality of the material used. Various types of plastic are used in the manufacture of parts. The cheapest crosses are made from low-quality, fragile plastic, and breaking off excess elements of the product, if necessary, is not difficult. But the use of such materials can lead to the cross breaking off when removing it from the seam solution, and removing small fragments can be quite problematic. More expensive parts are made of viscous, flexible plastic. Although they will have to use wire cutters to separate the elements, the possibility of them accidentally breaking off is close to zero. Therefore, it is important to take a closer look at the crosses when purchasing; this will also help identify possible defects in the form of plastic tides, incorrect geometry, or differences in the thickness of the sides.
The method of using crosses for cladding is simple: they are placed in groups of 2. on each side of the laid tile to ensure an even seam with the tiles laid next to it. If finishing is done with porcelain stoneware, then the products are laid in the corner joints of the tiles. Accordingly, there are four parts for each tile. After the solution has set (about a day should pass), the crosses are removed. The remaining holes are sealed when grouting the joints.
Laying porcelain tiles with crosses in the corners.
Using crosses for tiles when laying.
Removed crosses can be reused, with the exception of broken ones. Therefore, it is not necessary to buy them for the entire volume of work; it is enough to calculate the approximate number of products per area of tiles laid per day.
How is the system used?
Some craftsmen still use regular tile crosses, but leveling systems are becoming more effective because they are easy to use, allowing even a novice to handle the job. There is no need to use additional tools or put in significant effort.
Initially, you need to understand how to use the tile leveling system. To do this, follow these steps:
- the base on which the work is performed is cleaned of dirt and debris, and also covered with a primer;
- an adhesive composition is prepared, for which the powder is mixed with water to obtain a uniform and desired consistency;
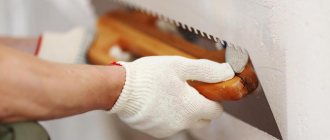
- glue is applied to the back surface of the tile using a notched trowel;
- if heavy tiles are being laid, then glue is additionally applied to the base;
- the first tile is applied to the floor, which is secured with the base of the leveling system used;
- clamps are used with a distance of 5 cm from the corners of the facing material;
- the second tile is laid;
- elements are secured on both sides using wedges;
- experienced craftsmen sometimes additionally use crosses to ensure an even seam;
- the clamp fits tightly;
- the seam is cleared of glue.
To simplify the work, special pliers are often used for the tile leveling system, allowing you to work with small wedges and other parts. For each tile, 2 clamps are usually used, and you can also use them at the junction of the four parts of the future covering.
Attention! The system is eliminated only after a day, since during this period the adhesive mixture completely hardens.
Where to buy SVP?
You can order original Karofit SVPs from the manufacturer on the website svptool.ru
SVP Karofit (Karofit TLS) is a complete analogue of RLS Raimondi and DLS, both in shape/size and quality. Production is located in Turkey.
- Karofit has a clip (clip/base) that is only 1mm thick!
- the shape of the wedges has also recently been refined and updated - now they have a sharper shape, and thanks to the directional teeth the wedges are clamped even smoother and softer
- the wedge is made of durable alloy - it is truly reusable (unlike some cheaper SVPs)
- at the moment SVP Karofit has the best price among its analogues
- the Karofit system is represented in many European countries - Germany, Spain, France, Belgium, the Netherlands, Austria, Serbia, Czech Republic, Poland, Bulgaria, Turkey, and now Russia
- Among the company's own developments are pliers (clamping tools), the quality of which has already been appreciated by hovercraft manufacturers in many countries and they have begun to equip their systems with them. Mustang LS (Spain), Pony LS (Spain), DLS (Russia), Lantelme (Germany), Tegelleveling (Netherlands) and many others use Karofit tongs in their svp
@instabur.pro recommends!
Buy SVP Karofit
What are the best tile leveling systems? A detailed review of popular products!
Each of us, when choosing a product, most often wants to see a comparative analysis of it and its competitors! In our review you will find out which SVPs are better. We hope our material will be interesting and you will enjoy studying it. Make yourself as comfortable as possible, we will try to cover the topic in as much detail as possible, so that you make the right choice and create a surprisingly smooth floor surface, to the envy of your neighbors and to the delight of your loved ones.
The Raimondi Leveling System Starter Pack includes the original clamps and wedges that started the multi-million dollar industry.
Tile leveling systems are an easy-to-use, affordable way to get started with clamps and wedges to adjust tile edges and create the smoothest possible surface without the expense or effort. Over ten years of work in this niche, manufacturers from Raimondi have always managed to keep up with the invention and production of tiles of any format. Their tile leveling systems have always been convenient to work with and much easier than installing tiles the traditional way. Raimondi tile leveling systems are more delicate compared to other tile leveling systems, but given their affordable price, you can ignore the infrequent breakdowns during operation.
The main differences between different hovercrafts according to @instabur.pro
For myself, I divided all the SVPs with which I had the opportunity to work, conditionally into two types - small (3D crosses, TLS, SVP-Nova, etc.) and large ones (DLS, Karofit, radar, etc.).
The first are Svp No. 1, 3D crosses, Svp-Nova, Tls-Profi and their analogues.
Their distinctive features are their compact size, low price, and the absence of tools for clamping wedges from most manufacturers. Ideal for working with small and medium format tiles.
I’ll say right away that I don’t use systems on one leg (Svp No. 1, 3D crosses) in principle, as they are twice as weak by default.
The second ones are RLS, DLS, Karofit, Mustang and their analogues/counterfeits.
The differences are a more powerful wedge and clamp, a higher price, due to the size it is possible to use one clamp at the intersection of three or four tiles, a convenient tool for clamping wedges (tongs). Ideal for working with medium and large format tiles.
Tool for laying tiles in the OBI online store
The OBI hypermarket catalog includes over 220 items of tools and consumables for laying ceramic tiles. Products are sold individually and in convenient sets at prices ranging from 15 to 2000 rubles per item.
This subcategory includes many different types of goods:
- Crosses and crayons.
- Spatulas and trowels.
- Chisels and wedges.
- Drill sponges and attachments.
- Plumb lines and cords.
- Cleaners and wedges.
Crosses for laying tile products are made of transparent polypropylene. Consumables of standard thickness and shape are available for sale.
Spatulas differ in several parameters:
- Dimensions (width).
- Material of manufacture.
- The shape of the working surface.
Rubber products are used for thorough grouting of joints. Devices with a serrated base are indispensable when applying glue to the lower surface of the facing material.
Plumb lines and rules are used to level the cladding during installation operations. Drill attachments are designed to thoroughly stir the adhesive mixture before use.
Order goods for exterior and interior finishing work in the OBI store using a mobile phone application.
SVP for laying tiles: how to use
To work you will need:
- Tile;
- Tile adhesive;
- Level;
- Rubber mallet;
- Notched trowel;
- Tile leveling system including clamp and wedge.
How to use the SVP correctly during work:
- First prepare the tile adhesive using the instructions. It should not be very liquid and not very thick.
- Using a notched trowel, apply adhesive to the work surface (wall or floor).
- Place the first tile on the applied adhesive and level it using a level.
- Now install two clamps on each free tile side. It is necessary to retreat approximately 5 cm from the corners.
- Lay the next tiles so that they touch the legs of the clamp tightly.
- Insert the wedge into the clamp so that the bottom of the wedge rests firmly against the surfaces of the two tiles to align the edges.
- At the end of all work where the leveling system is used, take a break so that the adhesive has time to dry completely. I recommend letting the glue sit for a day. Otherwise, at the next stage, you can easily break the entire structure, and the work will go down the drain.
- After the glue has dried, remove the wedges and the top of the clamps using a rubber mallet. You need to hit so that the side blow goes along the seam line.
- This is a reusable system, so collect the wedges to use on your next job.
- Use the hovercraft only at temperatures above +10 degrees.
During work, all stages are important, but special attention should be paid to laying the first tile. This is an important point, because later we will “dance” from this base tile. And in future work it will be impossible to correct it without dismantling subsequent parts.
When working, it is better to use a special tool rather than your fingers to level the tiles. Beginners may be wondering how to use tongs to level a tile system? Adjust the tool to the thickness of the tile and clamp the wedges. Thanks to the adjustment, they will be clamped with the same force. The tongs will relieve you from unnecessary physical exertion and muscle fatigue in the hand.
Pros and cons of SVP
Before using the SVP, you should familiarize yourself with all its pros and cons in order to be aware of everything during operation. Among the positive points it should be noted:
- Formation of identical tile joints;
- Tight fixation of tiles during work;
- Preventing shrinkage of tiles after the glue dries;
- Elimination of minimal irregularities;
- Uniform distribution of glue. This plus is especially important when you lay the tiles on an uneven surface, and the glue is distributed somehow.;
- Time-saving. Even beginners, thanks to a simple technique for laying tiles, can master the hovercraft without any problems.
There are cases when the tile joint must be larger than the SVP can provide. Then professionals recommend using plastic crosses.
But the system also has negative sides:
- You will have to suffer with removing the clamps and wedges. Monotonous work;
- You cannot do without additional financial costs for purchasing the system. If you plan to lay tiles in several rooms, you will have to buy additional clamps;
- Before removing the wedges, it is quite difficult to clean the glue from the joints;
- The slightest carelessness can ruin the entire integrity.
Benefits of use
- The main advantage of using the system is that it automatically aligns two adjacent elements at the same level, so there will be no difference in height between them. The horizontal plane is perfectly flat.
- When tile adhesive shrinks, it does not support the cladding when it dries.
- The gaps are homogeneous. In some cases it is also necessary to use plastic crosses.
- Significantly simplifies the installation speed and even an inexperienced tiler gets a professional result. But your arms should still be straight.
It is not recommended to use hovercraft at temperatures below +10 degrees.
The photo shows what happens to the glue when using SVP; when pressed, no voids are formed
Advantages
- High quality plastic, well made. The system is positioned as a separate installation technology;
- A well-thought-out design of the support platform, flexible petals allow you to securely fix tiles with a thickness of 3 to 20 mm;
- According to the instructions, nylon ties should be soaked in water for 30 minutes before use. This increases their tensile strength. After drying, they are easily removed with pliers;
- Convenient design for loosening the tie; it almost always breaks in the right place;
- The thickness of the tie is 0.8 mm, this allows you to make thin seams and adjust them with crosses.
Flaws
- The clamps are not attached securely; if glue gets in, they stop holding;
- Weak clamping force. If you try to make it larger, the ties are easy to break;
- It is difficult to continue working after a night break. If you insert the ties right away, they dry out overnight and break off easily. It is also difficult to insert them into the dried glue, since the area is large. It will take a long time to peel with a spatula or screwdriver;
- Reusable caps are only enough for 5-7 times;
- High price.
Our 5 favorite systems of 2021 (SVP):
| model | Price | Weight | Editor's Rating |
| DLS | Check price | 5 pounds | 4.8 / 5 |
| KAROFIT | Check price | 4 pounds | 4.6 / 5 |
| 3D KRESTIKI | Check price | 3 pounds | 4.4 / 5 |
| TLS | Check price | 1 pound | 4.2 / 5 |
| FARTON | Check price | 1 pound | 3.9 / 5 |
Homemade option
For those who feel sorry for paying more than 1000 rubles, you can easily try to implement a similar tile leveling system yourself. In 30 minutes you can easily make 170 homemade clamps.
- It is most convenient to make such a device from 1.7 mm aluminum wire. It twists easily and quickly, and also comes off easily.
- To make breaking easier, lightly nip the wire with wire cutters at the desired points. To avoid accidentally breaking the wire with wire cutters, fiberboard is used as a limiter
- The lower stop is made from a piece of metal plate/profile/mounting tape or other available material.
Bottom view
- The wire is twisted on top and a regular plastic wedge from the tile is inserted. To ensure that it holds tightly and moves back and forth, a spacer made from fiberboard trim is added on top.
View from above