The bathroom is one of the most frequently visited rooms in an apartment or house. When purchasing a shower stall for your bathroom, it is recommended to take into account the area of the bathroom and also take into account its design. Hence the choice of modification, shape, size, functionality, as well as the type of opening of the shower doors.
The shape of the cabin directly depends on the pallet. They come in round, semicircular, square, rectangular and pentagonal shapes. The height of the threshold and the depth of the tray deserve special attention.
As for modifications of shower cabins, there are several of them:The quality and cost are affected by the material used to make the pallets. They are usually made from steel, acrylic or composite materials.
- simple;
- multifunctional;
- with steam generator;
- hydroboxes.
Semicircular cabins are ideal for small spaces. They take up minimal space, saving space and making various arrangements possible in the room. You can choose cabins with double or sliding doors with convenient handles. For installation in a larger bathroom, it is preferable to choose square cabins with more space for bathing.
They allow you to create an elegant bathroom style using the available space for a bathtub or Jacuzzi. You can purchase a simple cabin or one with hydromassage. Changing the nozzles in such a shower allows you to enjoy needle-shaped or pulsating streams of water, affecting the skin thermally and mechanically at the same time.
Choosing a shower cabin, attention to detail. When choosing a cabin, it is recommended to pay attention not only to the elegant profile of the product, but also to pay attention to the details and their finishing. It is the handles, hinges and hangers that determine the functionality of the cabin. Parts made from high-quality materials will ensure comfortable use and stable service of the shower cabin.
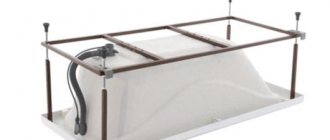
Prerequisites for the construction of the frame
Steel frame for bathtub
A bathtub frame is especially necessary when choosing a bowl with an unusual configuration. Multi-sided, round, oval models are difficult to secure. The wide sides of the product are fixed to a special frame, this ensures a stable position.
The frame is mounted to the walls or made in the form of a separate platform. Use a ready-made design or make it yourself. To install a heavy cast iron model, the support is made of bricks.
The frame for a steel bathtub makes it stronger and more reliable. Such products are thin-walled, the thickness of the sides is half that of cast iron models. The base is made of wooden beams, plywood or metal profiles. This robust structure consists of vertical and horizontal supports.
Installation of the frame provides:
- even distribution of bowl weight;
- preventing deformation of the walls of the font;
- preservation of enamel on the surface.
Acrylic products are more elegant and require reliable support that will protect them from load and deformation. The material is much inferior in strength to metal and cast iron. The bottom of the structure bends easily.
A frame for an acrylic bathtub is simply necessary, especially for thin products. The more elegant the model, the stronger the support should be. If the bathtub has an unusual configuration, a special platform is required for support.
If you liked the article, please share it
Previously on the topic:
- A vaccination bus will start operating in Lasnamäe today
- Is an orphanage better than a home?
- Is it possible to replace a shower after a workout with wet wipes: like napkins...
- Vacuum exercise, the correct technique for women and men,…
- Get your money ready: tires in Latvia can no longer be returned for free
- How to replace bread, a healthy alternative to bread, is it possible to lose weight if...
- School nurse: young people underestimate the dangers of snus, hookah...
- This week you can get vaccinated in thirteen places in Lasnamäe
Share
Materials for homemade frames
Wood frame
The stable frame for the bathtub is made by hand. This will save money and create a more reliable design. The material chosen is durable and affordable.
The most common types:
- Wooden beams are low cost, durable, and easy to process. Disadvantage: rotting due to moisture. To protect the surface, it is treated with a special moisture-resistant compound. Oak, cedar, alder, and larch are used.
- Galvanized profile, used for plasterboard construction. Does not withstand heavy loads, plays the role of decoration. The weight of the product falls on the legs and wooden beams.
- Iron profile pipe holds a font made of any material. Even a non-standard cast iron product. To make such a frame you will need special equipment and welding skills.
- The brick reliably strengthens the product and is used as a stand for cast iron bathtubs. To carry out masonry, you must have certain skills in construction.
The appropriate material is chosen depending on the type of product, wall thickness, and personal preferences.
Decorative curtain
The easiest and fastest way to cover the entire space, including the legs of the bathtub, is a decorative curtain. It masks everything unnecessary and at the same time makes it possible to get something out from under the bath at any time. In addition, the curtain is easy to maintain. You can sew it yourself by choosing a suitable material (its width should allow you to cover the bottom of the bathroom), or purchase a ready-made model. It is better to use polyester - this type of fabric leads in terms of practicality and moisture resistance.
You can secure the curtain, for example, using double-sided Velcro tape
On one side, the tape is fixed under the rim of the bathtub (most often with “liquid nails”)
On the other side the curtain fabric is attached
Another option is to install a narrow furniture pipe under the rim of the bathtub, having previously strung fastenings on it in the form of loops, on which the curtain will be held.
Curtain under the bath
It is important to note that this simple and practical option for decorating the space under the bathroom is not suitable for all interior styles. So, it will look good as a variation of country style and look extremely unprofitable in a bathroom with an ultra-modern design.
Construction methods
There are different frames for installing a bathtub:
- In the form of a stand on legs made of metal profile. Rectangular pipes are used. The structure consists of several elements that support the bowl. The set includes legs that can be used to adjust the height. Only the bottom of the bathtub is installed on the support.
- Flat frame with legs - this option is more complex and durable. The bottom rests on a profile stand, the base corresponds to the bottom of the bowl. Transverse ribs add stability. Vertical elements support the sides. Used for bathtubs of complex shapes and corner models.
- A fully welded frame is the most durable. It is a three-dimensional design that holds the bowl securely. It has several support points, distributes the load from the bottom and sides of the product. The stiffening ribs are located in the areas of the main load.
When choosing the type of support, consider:
- bath dimensions;
- configuration;
- wall thickness.
The thinner the structure, the stronger the support should be.
For a standard rectangular model, a regular frame will do. The supports differ in the thickness of the metal and the manufacturer. If the bathtub has a complex shape with hydromassage, a reinforced frame will be required. High-quality supports are made of thick, durable metal with an anti-corrosion coating.
Foot niche
When installing a screen, the comfort of using the bathtub for washing and servicing the inner surface of the bowl is reduced. In other words, the feet rest against the wall, preventing you from getting close, for example, to clean or wash large items that do not fit in the washing machine.
There are four design options to make this task easier:
- a cutout 5–10 cm high between the screen and the floor;
- niche at the same level;
- screen surface beveled downwards;
- a niche with a beveled plane in the middle part of the screen.
The video shows the technology for assembling a frame with a niche for the feet:
The main disadvantage is the accumulation of dust/dirt at the junction of the niche with vertical surfaces and floor coverings. It is possible for horizontal tile joints to shift due to an increase in the length of the inclined surface. It is also considered bad design practice.
Assembling the finished support
All-welded construction
Plumbing stores sell factory frames designed for each model.
Ready-made supports are distinguished:
- prefabricated;
- whole-welded.
How to assemble a finished frame for an acrylic bathtub is described in detail in the instructions. The kit includes the necessary fasteners.
To assemble a standard design:
- They disassemble all the elements and check their presence.
- Prepare tools: drill, screwdriver, screwdriver.
- The bathtub is turned upside down and the frame is put on top.
- Before screwing in the fasteners, mark and make holes to prevent the material from cracking.
- The bowl is inserted into the base and leveled using a building level.
- The bathtub is fixed in the frame.
After this, a siphon and mixer are installed, and the product is connected to the sewer.
If the design is not satisfactory, it is made with your own hands from wood, galvanized profile, or iron pipe.
Inspection hatch
If constant access under the bath is necessary, for example, for storing basins, buckets, detergents/cleaning products, doors or hatches are built into the masonry or frame system. The industry produces inspection hatches with hinged, sliding and tilting doors with conventional and push-type opening mechanisms.
The opening for the hatch should be made in the lower front part of the bath. This is where the sewer pipes pass, the drain and the siphon are located. If there are hydromassage jets in the bowl, you will need several hatches or a removable front panel.
Thus, you can make a screen yourself using two technologies and cover it with almost any materials. To increase the quality of service of engineering systems, doors and hatches can be added to the design.
Advice! If you need bathroom renovation specialists, there is a very convenient service for selecting specialists from PROFI.RU. Just fill out the order details, the experts will respond and you can choose who to collaborate with. Each specialist in the system has a rating, reviews and examples of work, which will help with the choice. Looks like a mini tender. Placing an application is FREE and does not oblige you to anything. Works in almost all cities of Russia.
If you are a master, follow this link, register in the system and be able to accept orders.
Preparatory stage
The frame for an oval bathtub is made by attaching it to the wall on both sides. First, calculate the height of the platform. To do this, measure the distance from the lower edges of the side to the floor.
It is necessary to calculate the load on the structure. The weight of the product filled with water and the weight of the person are taken into account. The choice of material, the number of stiffeners, and wall thickness depend on this. Next, you need to do the following:
- Boards for the base are laid around the perimeter and screwed to the floor.
- Install the racks, attach them to the base and to the wall.
- Another board is placed on top of the racks.
- Lay a sheet of chipboard or plywood and screw it around the perimeter to the frame.
- A hole is cut in it for the bathtub.
- A template is used to mark the hole.
- Cut it out using an electric jigsaw or a hand saw.
Plywood is used with increased water resistance, 15 mm thick.
The racks are nailed to the bars, and not to the base, this will simplify installation. For convenience, metal corners are used.
Nuances of gluing tiles
The final cladding of the partition formed under the bathtub is done using tile adhesive or liquid nails. The first option is applied to the back side of the tile with a notched trowel, and the second option is applied from a tube at several points along the perimeter and in its center.
The first tile of the tile is glued in one of the upper corners and leveled using a level, the rest will be placed next to it
To prevent the tiles from floating to the sides, plastic crosses are inserted between them, allowing you to accurately control the size of the seams between the tiles. The latter, after completion of the cladding, are subject to mandatory grouting. Otherwise, water will get under the ceramic through them, which will sooner or later lead to its falling off.
Profile construction device
Profile frame
A profile frame for a bathtub is the most popular option.
For production use:
- square pipes;
- U-shaped section;
- corner.
Algorithm of actions:
- Measurements are taken.
- The design is designed to ensure proper weight distribution over the entire frame area.
- Cut the profiles to the required length and fasten them together.
- The pipes are laid on the floor and welded or bolted.
- The frame frame is welded to the corners of the floor base.
- A platform made of bricks, boards, and sand is installed under the bathtub.
- Rubber is used for shock absorption so that the product does not wobble.
- The gaps between the bathtub and the floor are filled with polyurethane foam.
The edges of the metal parts are sharp and can damage the bowl. The profiles are in contact with the bathtub with the back side. Drywall and tiles are laid in the same plane.
Functionality
The screen has become not just a decorative tool that allows you to hide a network of pipes, but also a way to use space economically. Especially when it comes to small apartments, where there is always not enough space to store things. Screens are equipped with shelves, niches and grilles. They have doors.
By following the instructions for creating a screen, you can decorate your bathtub and get an original decorative element
Assembling a timber base with your own hands
Ready-made frames are not always suitable for installation. A DIY wooden bathtub stand is more durable. This is the simplest and cheapest option. You will need a beam with a cross section of 40 x 40 mm and a sheet of plasterboard.
Prepare a set of tools:
- drill;
- hammer;
- wood drill;
- hacksaw;
- screwdriver
The wood is treated with a special impregnation that protects it from moisture.
Procedure:
- They take measurements and cut parts. The upper and lower parts follow the shape of the bathtub.
- To begin with, lay out the support perimeter. This is a flat frame with stiffening ribs.
- The prepared parts are screwed to the floor with dowels.
- The corner posts are secured carefully; the main load falls on them.
- The stand is nailed to the wall along the entire perimeter.
- The upper support panel completely repeats the assembly of the lower one.
- The profiles are secured using self-tapping screws.
- Additional load-bearing walls strengthen the structure. They are installed every 0.5 m, along the longest side.
- One stand is placed on each side in the center.
After this, communications are connected, the frame is covered with plasterboard or a plastic screen. Decorate with ceramic tiles or panels.
Stationary screens
Capital or stationary wall screens are non-demountable structures that block free access to the entire space under the bathroom. They represent a base that requires additional finishing.
Screens do:
- Brick;
- chipboard;
- Plywood;
- Moisture-resistant drywall;
- Boards
A screen lined with tiles.
Such a capital device requires subsequent finishing or cladding; for this use:
- Tiles;
- Mosaic;
- PVC film or panels;
- Fake diamond;
- Paint;
- Wood finishing;
Installation on bricks
Bath on bricks
This is a reliable way to install a bathtub. The brick base does not deform or deteriorate from moisture. This stand differs from a wooden and metal frame. Installation features:
- Two brick supports are placed at a distance of 50–60 cm from each other.
- The width of the structure should not be larger than the bathtub.
- The stand follows the shape of the bowl.
- The part on the drain side is 1.5–2 cm lower to ensure water drainage.
The bowl is placed on the finished supports and firmly fixed to the wall. The gap between the brickwork and the bottom is filled with tile adhesive or polyurethane foam.
Escape hatch
It is possible to manufacture a homemade emergency removable hatch. Unlike factory analogues, it is manufactured without magnets, hinges and other accessories using the following technology:
- a window is made in the masonry, slightly smaller in size than the tile;
- at the time of laying the tiles, the back of one cladding element is covered with tape;
- After the glue has hardened, the joints are grouted with sealant.
The tiles covered with film do not stand out in any way in the general array. If access to communications is necessary, the seams are cut off with a knife, and the tiles are removed with a vacuum suction cup, as in the video below:
After repairing the drain, the lining is mounted in place, the seams are again filled with sealant.
Bath installation
When the frame is completely ready, install the bowl on it:
- A cement pad is poured onto which the bottom rests.
- Carefully lower the bathtub into the hole on the frame.
- Then connect the water supply and sewerage.
The sides of the frame are covered with panels made of thick plywood, chipboard or flat slate. The shields are secured using screws with anti-corrosion coating. Tiles are glued onto the resulting walls. The gaps between the tiles, floor and frame are sealed with sealant.
For convenience, doors are made to provide access to the pipes in case of leaks and blockages. Detergents are stored under the bathroom.
The service life of the product depends entirely on the reliability of the installation. The frame for the bathtub must be solid and very durable. It is up to the buyer to choose a ready-made design or make it yourself. You can call a specialist and entrust the installation to an experienced specialist.
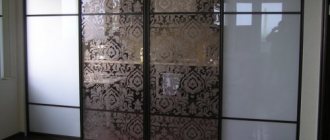
Screens with sliding doors
Screens with sliding doors are considered the most convenient and functional option. Two, three or four door panels move along guides and, when opened, slide behind each other; less common are models where the screen folds like an accordion when opened.
Bath screen with sliding doors
When opened, such doors do not take up free space in the room, which is especially important in small bathrooms. In addition, they are convenient for storing various items under the bathroom and do not interfere with urgent repairs of communications located here.
Attention! Bath screens can be equipped with one or more doors, and they can also be single or double, when behind the hinged and sliding doors there is another screen in the form of niches and shelves, which allows you to conveniently place containers and other household items.