Use of fittings
Construction reinforcement is strong enough to hold together the walls of a building, preventing further cracks from occurring. Despite this, such a technical operation will require certain skills, as well as the ability to use an electric welding machine. In addition, you will have to find the necessary information to correctly calculate the amount of reinforcement and its diameter. Calculations depend on the size of the building, as well as the nature of its damage.
Naturally, you can try and find all the necessary information, although it is better to involve an experienced construction organization. In this case, you will have to invest some money, but the calculations will correspond to a high professional level.
If the walls do not have serious damage, then in places where cracks appear, the brickwork can be replaced, and in cases of a high degree of destruction, it is better to use reinforcement, either reinforced or conventional.
Structure
A floating concrete screed consists of the following layers:
- plaster;
- finishing floor covering;
- cement-sand screed;
- a thick polyethylene film is covered so that the concrete solution does not leak into the heat-insulating material;
- expanded clay, mineral wool or polystyrene foam, polyethylene foam, performs the functions of a shock-absorbing cushion and heat insulator;
- damper tape around the perimeter of the walls more than 1 cm thick;
- floor slab.
The solution is poured onto a polyethylene film, which is laid on thermal insulation material. Concrete does not adhere to the surface of the ceiling and adjacent walls, and does not transfer shock and vibration loads to load-bearing structures.
What will it take?
In addition to the reinforcement itself, you will need some other materials, including tools:
- Fittings.
- Threaded studs.
- Nuts and washers.
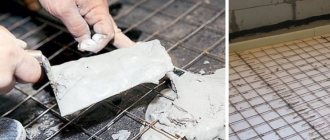
The technology of screeding a house using reinforcement is not complicated. Metal corners with holes whose diameter corresponds to the diameter of the studs are installed at the corners of the house. Studs are welded to the ends of the reinforcement, after which the reinforcement with threads at the ends is inserted into the corners, which are installed on opposite corners of the building. After this, nuts and washers are screwed onto the studs, and then the nuts are screwed on. The structure is tightened by turning the nuts. Naturally, without a special wrench, this will not be possible.
Equipment used:
- Rotary trowelling equipment with electric or gasoline drive.
- Manual or automatic devices that distribute topping.
- Rotary blade machines, popularly known as “helicopters”.
- Edge technique, which is used to process screeds near columns or walls.
Device principle
There are single- and double-rotor troweling equipment. The machines differ in the way they are controlled:
- The operator controls the single-rotor machine using a long handle. The weight of the single-rotor device ranges between 35 and 70 kg, so it is quite portable and versatile.
Important! The advantages of single-rotor technology: mobility, convenience, maneuverability and good grout quality.
- The twin-rotor machine does not resemble a helicopter, but rather a small car. It is used over large areas. The main feature of control is the absence of contact between man and machine.
Important! Disadvantages: high cost and poor maneuverability.
Wall (edging) machines are convenient for working in corners, near walls, and in the area of doorways. Their feature is the small diameter of the working tool. This equipment is equipped with low-power electric motors, so the consumption of electricity is economical.
Working tool diameter
The main classification feature for trowels is the diameter of the working tool used:
- The universal diameter is 900 mm.
- In rooms with complex configurations and small areas, discs with a diameter of up to 600 mm are used.
Important! The finishing stage is carried out using bladed “helicopters” for grouting concrete with stiffeners. The blades cut off protruding sections of the screed. The floor turns out immaculately even and smooth.
- It is advisable to use equipment with a small disk in a room with columns and a large number of corners.
Important! For a spacious room, a two-rotor machine is optimal. The simultaneous operation of two disks allows you to process a large area.
Quality of fittings and its types
Reinforcement is metal building elements that are used to form reinforced concrete building structures. The use of reinforcement and concrete makes the structure especially durable. In addition to reinforced concrete products, reinforcement is used in construction to strengthen various building structures.
The connection between reinforcement and concrete is carried out:
- By friction.
- By shift method.
- The method of adhesion of reinforcement elements during the concreting process.
- Electrochemical method.
- The method of compression with concrete after laying.
What kind of fittings are there?
There are several types of fittings, depending on the conditions of use.
There are different types of fittings:
- Straining.
- Unstressed.
And:
- Working.
- Assembly room.
- Anchor.
- Constructive.
Including:
- Transverse.
- Longitudinal.
As you can see, there are many types of reinforcement and it is very important to know which one to use in this case.
Video material
The use of specialized troweling equipment is the most progressive and inexpensive way to treat surfaces. After the finishing procedure, the floor is perfectly clean and smooth, even free of dust. The use of coloring compounds gives the floor an aesthetic appearance. The combination of work operations such as laying and grouting the floor screed helps reduce construction time. Another advantage of technology using topping is its versatility and the ability to be used on different objects.
Nature of house destruction
A screed for a building structure is necessary if the degree of its destruction can lead to further destruction of the integrity of this structure.
Typical types of destruction include:
- Collapse.
- Blockage.
- Separation of parts of a building.
Collapse of the structure
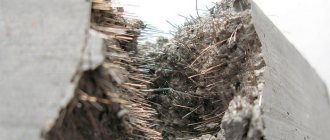
The collapse of a structure occurs as a result of the appearance of cracks in the upper part of the building, while the deformation of the walls occurs in the form of waves or can be observed over the entire surface.
This type of destruction can be partial or complete, when it is necessary to restore the integrity of all load-bearing elements of the structure. Partial destruction requires restoration of the functions of only some partitions.
Cracks in masonry. Tolerances; causes; How to make sure there are no cracks.
Important point! In any case, it is necessary to resort to a technological operation - screeding the walls in order to get rid of the destruction processes.
Damage to buildings can be light, medium, or severe.
Easy house collapse
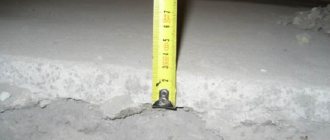
Light damage is characterized by the appearance of cracks in half the corners of the openings with deformation of the wall heads by 1/3 of their height, while the condition of the foundation is normal.
Such destruction occurs due to the excessive weight of the roof, due to the construction of another floor, and also due to the lack of a reinforced upper chord. To eliminate this problem, it is necessary to mount a steel cage, tying the building structure at the corners.
The connection of the clip is carried out on the external walls. To carry out such repairs, it is necessary to prepare materials such as steel angles, pipes, studs, nuts, and steel rods. The work consists of connecting all elements using electric welding.
Average camber
The average type of camber is characterized by the presence of the same destruction as in the case of light camber, but their total mass is about 80 percent.
Such types of destruction may occur in the absence of a reinforcing belt, as well as in cases of loads exceeding the design ones.
In this case, you will have to tighten the walls of the house along the entire perimeter, laying tightening belts in 3 levels. It is permissible to replace steel reinforcement with a steel strip, and the quality of the welds must be high.
Strong collapse
A severe degree of collapse is characterized by the appearance of noticeable cracks both in the walls of the building and in its foundation, including all the characteristics inherent in light and medium destruction. As a rule, severe collapse is a consequence of the destruction of the foundation of the building.
It is important to know ! You can avoid complete destruction of the building if you use continuous support and corner supports, including strengthening the foundation.
The foundation is strengthened by laying a reinforced frame around the entire perimeter of the foundation.
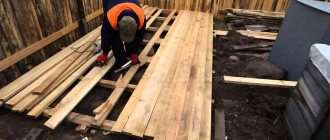
Manufacturing technology of floating screeds
To ensure the quality and durability of coatings, it is necessary to follow the sequence and technology of work:
Preparation of the grounds
We clear the floors from old coverings and construction waste.
We remove dust with an industrial vacuum cleaner.
If there are oil or technical contaminants, degrease them with acetone or gasoline.
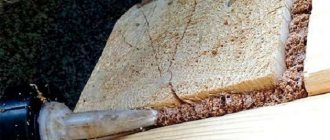
We clean, rinse and prime tile seams, cracks and damaged areas.
We repair defects and damage with gypsum, cement or polymer mortar.
Figure 3. Repair of concrete pavements.
After the repaired areas have dried, coat the surface with a primer.
Important In damp rooms, to prevent the development of mold and, as a result, premature destruction of structures, we use soil with antiseptic additives.
Marking
To ensure the evenness of the screed, mark the lines of the top of the insulation and the screed.
To do this, it is better to use a laser level. If this is not available, a water level will do.
First, we draw a horizon line on the wall, at a distance of about a meter from the floor. We take measurements of the distance from this line to the surface of the slab. Mark the highest point of the floor. Add the thickness of the insulation and set the first mark. We mark the second point by adding the design thickness of the screed.
Figure 4. Laser marking.
From these points we draw two parallel lines: the top of the screed and the insulation.
Waterproofing
Floors in dry living rooms can be insulated with polyethylene with a density of more than 100 microns.
For floors in wet rooms, it is better to use high-quality adhesive waterproofing. The best option: apply bitumen mastic as the first layer, and then roll materials.
Figure 5. Polyethylene insulation.
Important When carrying out work, install waterproofing materials on the walls by 20-30 centimeters. Pay special attention to the places where the risers pass through the ceilings.
When using polyethylene film, lay it as a whole, avoiding seams and joints if possible. Lay the canvases with an overlap of about 15 centimeters, connecting with tape on both sides.
When using rolled deposited materials, we use a gas burner. You can stick roofing felt onto bitumen mastic.
Figure 6. Gluing roofing felt.
We glue a damper compensating strip along the bottom of the walls, separating the screed from the wall and allowing it to “float”. Its width should correspond to the height of the entire pie, from the ceiling to the finishing of the floor. After all work is completed, the protruding parts of the tape are cut off.
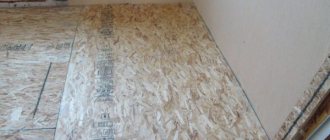
Laying insulation
As a thermal insulation layer under the floating one, we use hard mineral wool slabs, expanded clay or extruded polystyrene foam.
- We distribute the expanded clay backfill evenly along the guide beacons made of steel profiles.
Important: Spray the compacted expanded clay cushion with liquid cement milk to create a denser and tougher layer.
Figure 7. Expanded clay backfill.
- Extruded polystyrene foam (Penoplex) is the best option for insulation under a screed. It can be used both on the ground and on reinforced concrete floors.
Penoplex is characterized by sufficient strength, resistance to biocorrosion and low thermal conductivity. The closed cell structure provides complete protection from moisture. Thanks to special profiles at the ends, the material fits perfectly together without forming cold bridges.
We lay penoplex, 50 millimeters thick, in a checkerboard pattern. We glue the joints with construction tape.
We place the second layer of insulation on top of the first, observing dressings similar to brickwork so that the seams do not coincide. We control the evenness of the installation with a level.
Important: I recommend sealing the joints between the foam boards with polyurethane foam.
Figure 8. Construction of an insulating layer made of Penoplex.
Mineral wool slabs are laid tightly on the base, observing the dressing. For insulation under the screed, you can use only slabs of increased rigidity PPZh-200.
Mineral wool is made from natural components and does not emit harmful substances even at elevated temperatures, so it is ideal for insulating floors in baths and saunas. The material does not burn. It has high heat and sound insulation and a long service life.
Important It is necessary to take into account that mineral wool absorbs moisture well and when wet loses its thermal insulation qualities. Therefore, high-quality waterproofing of the material is required.
Figure 9. Laying rigid mineral wool slabs.
House collapse: what is it?
The collapse of a house is when the walls of a building are piled inside the building. There are partial and complete blockages. In this case, all work is carried out inside the house using fittings that are welded together using electric welding.
A complete collapse is characterized by the collapse of three walls, regardless of the degree of their destruction. The reason for this problem should be considered a violation of construction technologies, as well as insufficient reinforcement of the belt. To eliminate this problem, you will have to use a powerful metal structure installed using through-fastening elements.
A partial collapse is characterized by damage that touches two walls. Repair involves installing a partial frame according to the principle of installing a continuous sheathing.
Tips for installing floating screeds
When choosing a floating screed, use the advice of experienced professionals:
- Before installing the screed, plaster the walls and partitions;
- lay insulating coatings strictly level to avoid overuse of solutions;
- Gaps in the insulation that reduce the soundproofing properties of the ceiling should not be allowed;
- The absence of a damping edge tape or its ruptures can lead to the appearance of sound bridges.
Only by choosing the right floating screed material and following the technology and sequence of work will you get a high-quality, long-lasting result.
Annex department
As a rule, a combined separation of the house extension occurs, and the main symptom is the appearance of a crack at the junction of the connection between the extension and the main building along the inner corner.
The main reason is that there is no rigid connection of the extension to the house or the presence of an unreliable foundation, as well as the excessive weight of the extension, which leads to overloads. It should be noted that it is not always necessary to strictly link the extension to the main building.
Where is it used?
Often such a coating is used on a base laid on the ground.
It is advisable to install a floating screed:
- on the first floors of multi-storey buildings, as it significantly increases heat conservation and prevents noise penetration by 50%;
- if the rough foundation is laid on top of the ground or the surface tends to allow moisture to pass through;
- if necessary, reduce the load on the slab;
- when installing heated floors;
- if it is necessary to conduct communications under the screed;
- in rooms with high humidity or sudden temperature changes.
Many builders consider a floating floor to be practical and versatile; moreover, this method is more economical than installing other types of foundations.
The essence of the process
Grouting the cement screed is the final stage of constructing a concrete foundation, aimed at leveling the finished surface. This process is performed:
manually - for rooms with an area of 25–30 m2; with a trowel (helicopter) - for processing large areas.
The screed is rubbed down so that the “concrete milk” that protrudes on the surface of the damp foundation does not peel off in the future.
As the cement mortar dries, heavy particles of crushed stone and grains of sand settle, and fine suspension and liquid come to the surface. They leave uneven and empty areas that reduce the performance of the concrete.
Grouting allows you to increase the adhesion strength of different particles, avoiding the occurrence of microvoids. This result is achieved due to the vibration-mechanical effect on the material.
Manually
When grouting manually, you will need the following tools:
- Trowel is a type of trowel made of polished steel with a curved handle (can be replaced with a regular spatula). The length of an ordinary trowel does not exceed 22 cm, and the width is 17 cm. The length of the handle varies from 10 to 15 cm. A metal or polyurethane trowel. A rectangular tool with a wooden handle that looks like a plane. Its parameters: 12 by 16 cm. Grater. Narrower than a traditional grater (width is only 5 cm), but longer (20 cm). Container on wheels for even distribution of topping. Board to protect knees.
The procedure for performing manual processing is similar. However, it is worth considering the following features:
It is recommended to apply topping to the surface using a construction sieve, distributing the dry mixture more evenly than mechanically. Instead of a sealing mixture, dry cement or its mixture with sand in equal parts is often used. The screed is grouted manually in a circular motion, working the entire surface until the concrete becomes dark gray, smooth and almost dry. When working, use a popliteal board - an ordinary wooden board - to minimize marks on the surface being treated. After rough processing and applying topping, the finishing stage begins when the compacting mixture on the screed acquires a dark color.
A properly grouted floor has a uniform color, dry surface and smoothness. If minor defects and irregularities remain, then these places on the screed are rubbed with fine sandpaper.
The concrete base is considered ready when the concrete is completely dry: after 5–7 days. However, walking on the surface without fear of leaving marks is allowed after only a day.
Finish grout
Finishing grouting with a blade machine
The finishing grouting of the screed, as shown in the video above, is carried out by a helicopter with installed metal blades, which ensure optimal compaction of the surface without destroying the top layer of concrete.
The angle of installation of the blades increases from 5-10 mm during the first and second passes to 20-25 mm for the next two or three passes. Gradually the grouting speed increases.
It should be noted that it is impossible to perform high-quality finishing of the surface with your own hands using hand tools, so the use of troweling units is mandatory. High-quality concrete has a flat, smooth, almost glossy surface, as shown in the video above.
Wood plaster: how to plaster wooden walls inside a house?
Wood is an original Russian building material. From time immemorial, ordinary people built their homes from it. A log house is a visiting card of provincial Russia. Princes and boyars lived in stone chambers. The technology of insulating wooden housing and protecting walls from rotting has also come from time immemorial. Clay, straw, water and shingles for the wall are its main components. The name of the method is well known to every modern person - plaster.