A smooth, level base for the finishing coating is a prerequisite for installing floors. This is the only way to ensure its reliability and durability. In the minds of many apartment owners, construction work of this type is necessarily accompanied by destruction, dust, dirt and other consequences of work associated with pouring cement-sand screed. If we add a long wait of three to four weeks, the picture emerges not at all rosy. Is there a way out?
It may be a revelation for some, but quite often such a picture can be avoided. The solution to all these problems is dry floor screed. What is it, how to do it, what are its pros and cons - this is an approximate range of issues that we have to deal with.
Overview of the “dry” floor leveling method
The method of leveling floors by installing a “dry” screed was developed and patented by Knauf technologists more than 40 years ago. Therefore, the choice of building materials is based on ready-made offers from this manufacturer. In particular, four sets are subject to consideration:
- Alpha . The set includes only gypsum fiber sheets. They are laid on a prepared, level base.
- Beta . Additionally, sound insulation is laid in front of the precast floor.
- Vega . To level the rough surface, a layer of expanded clay is first formed; a noise-absorbing layer is not provided.
- Gamma . All types of materials are included here.
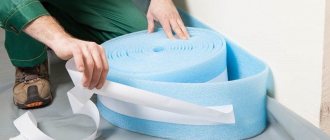
A working base means a concrete slab or boardwalk in good condition. A waterproofing protective material is laid on top of it. As a rule, a technical film with a thickness of 150-200 microns is used for a “dry” screed. A damper tape is laid around the perimeter, which will compensate for the pressure of the floor on adjacent walls.
Outer layer
A mandatory element of the Knauf dry screed is durable sheet material.
GVL sheets for “dry” leveling of floors with mounting edges Source yandex.net
With its help, they solve one of two problems. In the case without a loose layer, minor differences in the subfloor are hidden with the help of canvases. A flooring is formed on top of the granular screed to evenly distribute the mechanical load to prevent subsidence of individual sections of the finishing coating.
According to Knauf technology, the sheet material is gypsum fiber board or its moisture-resistant modification. These are canvases made from gypsum with strengthening additives and cellulose fiber reinforcement. Unlike its plasterboard counterpart, there is no surface paper shell, and the mechanical endurance of a homogeneous sheet is noticeably higher. When ready to form flooring, the sheets are made with mounting edges 5 cm wide. They are glued together with PVA and fastened with universal self-tapping screws.
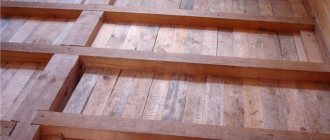
Laying gypsum fiber board sheets on a leveled backfill Source stroy-okey.ru
The table shows the general characteristics of GVL and alternative options that are relevant for installing a “dry” floor screed.
| Parameter | GVL | GVLV | GKLV | SHG | Chipboard | OSB | VF |
| Density (kg/cu.m.) | 1000-1250 | 773 | 1250 | 350-800 | 600-700 | 640-700 | |
| Strength (MPa) | 5,8 | 5,3 | 6,7 | 7 | 10 | 9 | 6 |
| Thermal conductivity (W/m*K) | 0,22-0,36 | 0,15-0,2 | 0,21-0,25 | 0,07-0,25 | Wed 0.13 | 0,15-0,18 | |
| Water absorption (%) | 32 | 31 | 28,5 | up to 30 | from 30 | from 15 | from 15 |
| Sound insulation (db) | 37 | 35 | up to 48 | 19 | 18 | 25 | |
| Thickness (mm) | 10-20 | from 12.5 | from 10 | from 12 | from 10 | from 10 | |
| Weight, kg) | from 10.5 to 12.5 | from 9.1 | from 12.5 | from 8.8 | from 8 | from 6.5 | |
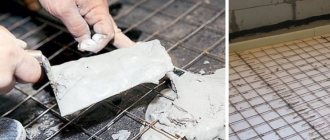
The use of GVL or GVLV with mounting edges allows you to create a durable coating using a single-layer flooring. The seams are treated with PVA glue and additionally secured with 3.8*19 self-tapping screws in increments of 25-30 cm. If alternative materials are used, subsidence is possible at the joints. To avoid this, a two-layer coating is formed in a checkerboard pattern. In this case, glue is not used. Under the flexible finish, the gaps are filled with high-strength putty.
Filling joints between gypsum fiber boards under linoleum or carpet Source pol-spec.ru
Loose leveler
According to Knauf technology, granulated expanded clay with a fraction of up to 5 mm serves as backfill for a “dry” floor. Today, there are several burnt clay backfills on trading floors. Compevit is considered the highest quality. Here the grains are round, the color of the mixture is uniform, the size is 1-4 mm, and there is practically no dust. The second place is occupied by a German brand with crushed inclusions and dust. The remaining options create smoke in the room and contain more granules with sharp edges that can damage the film waterproofing.
Expanded clay backfill for “dry” floor screed Source aviarydecor.com
Less commonly, alternative bulk materials are used for leveling. This can be foamed vermiculite or expanded perlite. For comparison, consider the basic characteristics of the grains in the table.
| Option/Nature | Clay (expanded clay) | Volcanic (perlite) | Hydromicas (vermiculite) |
| Thermal conductivity (W/m*K) | 0,13-0,18 | 0,052-0,093 | 0,055-0,065 |
| Water absorption (%) | 8-20 | 20-400 | 300 |
| Density (kg/cu.m.) | 250-1100 | 50-600 | 100-200 |
| Strength (MPa) | 0,5-5,5 | 0,1-0,6 | There is no norm |
See also: Catalog of companies that specialize in repair work, remodeling and insulation of houses
The choice of backfill is determined externally by its rounded shape and size. Grains larger than 5 mm prevent the formation of a dense mound and have a greater ability to destroy. Also pay attention to the uniformity of the composition. Dust and sand impurities subsequently accelerate the process of squeaking.
Vermiculite grains for floor screed Source kompass.com
The listed types of backfill are characterized by low water absorption and high strength. The finished mixture should not contain more than 1% moisture. It is permissible to use perlite or quartz sand if the mass meets the specified criteria.
The backfill calculation is based on the optimal height of 30-40 mm. As a rule, a standard bag of fine-grained expanded clay with a volume of 40 liters is required for a square of such a layer. If it is necessary to arrange a screed of greater height, then reinforcing gypsum fiber sheets or alternative materials are laid between the grain layers. The maximum thickness of the screed is considered to be 90-100 mm. They often gain height with slabs of extruded polystyrene foam.
Leveling backfill made of expanded perlite sand Source horodom.cx.ua
Use of liquid mixtures
Among the various mixtures for pouring floors, there are two types:
- for leveling wooden floors,
- for pouring a concrete base.
These mixtures differ in the binding agent. If you need a screed for a wooden floor, take a mixture containing fiberglass. For concrete bases, quick-setting mixtures with special additives are suitable.
This type of installation is well suited for leveling large differences in height and filling irregularities and cavities. Before you fill the floor with your own hands, you should set the initial level. Some may say that such a flowing material does not require leveling, since it itself spreads through all the cracks and forms a flat surface. This is not entirely true.
The finished solution has a fairly thick consistency. It hardens quickly and does not always have time to form an even layer. Therefore, its level is “beaten off” using metal beacons. This is done with a laser or ordinary level.
To mix the solution, it is best to use a hammer drill with a special attachment in the form of a construction whisk. For mixing proportions, see the user instructions on the packaging of the building material. Usually the solution is mixed until it becomes “thick sour cream.”
Before pouring any type of floor, clean the construction site well. It is necessary to thoroughly clean the surface of small stones, dirt and debris. After cleaning, you should wipe the floors with a damp cloth. When filling floors with mortar, it is a good idea to treat the floor covering with a primer.
When the solution is ready, it is poured onto the prepared surface. Alignment is carried out using a rule, guided by metal beacons. After filling the entire surface, the floors are allowed to rest. It is better not to touch them for a while to prevent deformation of the coating.
Pros and cons of application
Among the main advantages of the Knauf dry floor screed device are simplicity, speed of installation and low weight of the leveling coating. The first plus is especially relevant for independent implementation of the project. The second and third moments are a consequence of the lack of water in the leveling layer. That is, it does not take days for the screed to dry; in total, the materials used have a noticeably lower load than classic concrete.
The absence of water-containing solutions also allows you to save on waterproofing. It is enough to provide protection for the screed from unexpected wetting. This can be done from below using a membrane-type fabric or technical film. The covering is applied to walls about 15 cm high. The edges are laid with an overlap of 15-25 cm, taped for sealing with double-sided tape or plumber's tape.
Waterproofing the floor under backfill using polyethylene film Source tgorlovka.com
Among other things, the exclusion of water from the process of leveling the base allows for laying a superfloor using Knauf technology for a mineral and wooden subfloor in a new building or a dilapidated building. And besides dust from the mixture and cutting of sheet material, work is carried out practically without dirt.
Experts note other advantages:
- increased insulating properties of the ceiling relative to noise and heat;
- simple dismantling and replacement of the prefabricated structure;
- uniform distribution of load on the base due to the absence of local support areas.
Along with the undeniable advantages of the Knauf dry screed, there are disadvantages that impose limitations on the use of this floor leveling technology. The main drawback is low moisture resistance. Because of this, it is not recommended to pull out ceilings in the bathroom, bathhouse, basement, or balcony. The relatively low strength of the sheets is the reason why “dry” screeds are abandoned in public places.
Both disadvantages can be compensated for by moisture-resistant fabrics with increased strength. And as a finishing coating, choose facing materials: porcelain stoneware, tiles.
Laying ceramic tiles on a “dry” floor screed Source brainlyquotes.org
True, skirting boards can only be fixed to the walls, which is not relevant in the case of tiles. The gradual shrinkage of the backfill leads to the formation of gaps in the corners. A flexible plastic plinth can cover 1-2 mm, but not a solid counterpart.
Another drawback is that in case of a leak, you will have to dismantle the floor covering to completely dry the assembled screed. It is often necessary to remove the hard part of the leveling structure. At the same time, forced removal of moisture through fan heaters is not recommended. Such an action can negatively affect the strength characteristics of sheet flooring. Then it will have to be completely or partially replaced.
“Dry” floor screed is acceptable for covering a floor with utilities running along it. But regarding “warm floor” systems, professionals recommend limiting yourself only to infrared mats. Water ones are not worth it due to possible depressurization of the channels, cable ones due to the risk of damaging the insulating shell. Communications are placed in a corrugated protective pipe.
Corrugated protection of hidden utility lines on the floor Source electromontag220.ru
Dry floor screed technology
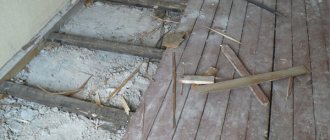
A grain mound can have a destructive effect on weak areas of the rough foundation. Therefore, the overlap is pre-prepared. The process includes several steps:
- dismantling decorative coverings and peeling screeds;
- removal of fungus, mold and rust;
- bridging cracks;
- protection of damaged areas to prevent biological and corrosion damage;
- priming of potholes, chips, faults with subsequent drying;
- filling defects with special mixtures;
- impregnation of a serviceable base with strengthening soil.
Preparing the rough floor foundation for leveling Source wp.com
The next step is to determine the height of the backfill. To do this, it is necessary to subtract the decorative finish, intermediate layer (substrate, glue), and sheet flooring from the total rise. For convenience, you can mark the floor with low and high points. Afterwards, it is necessary to remove dirt and dust that can have an abrasive effect on the surface.
To complete the preparation, polyethylene or membrane fabric is laid on the floor. A damper tape is attached around the perimeter on top. There are options with and without adhesive. To secure the latter, you can use backfill.
Laying damper tape under a “dry” screed Source krrot.net
Preparing for work
First of all, the ceiling must be repaired (if large cracks or chips are detected), and also cleaned of debris and dust. All cracks and recesses in the ceiling, as well as the joints between them and the walls, can be sealed with polyurethane foam or quick-hardening mortar. This is why the garbage needs to be removed: if the waterproofing material (and it is laid as the first layer) is laid on dirty concrete, then it can be damaged by the sharp edges of the stones and will not be able to fully perform its functions.
On a note! Despite the fact that a dry screed can be installed even on the surface of old floors, it is still recommended to remove the base that has been used for a long time and place the screed directly on the floors. Due to this procedure, you can also leave the floor at the same level - it will not rise.
First you need to prepare the base
If a dry screed is installed on top of old floors, it is important to make sure that they are still strong and reliable, not rotten or sagging. It is recommended that all floorboards be additionally reinforced with nails or self-tapping screws. As for the old screed, it should also be strong enough.
Also, even at the preparation stage, the final floor height is marked on the wall. Focusing on it, they carry out work on installing the dry screed. It is most convenient to make marks using a laser level.
Determining floor height using a water level
How to mark or mark a floor level with a laser level
Preparation also includes adapting the materials used to construct the screed to the conditions of the room in which they will be used. All of them are brought into the room where the work will be done and left there for a day. Then they will change their dimensions less under the influence of temperature and humidity, which is especially important if the materials were transported outside in the winter season.
Video description
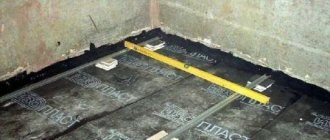
From the video you can learn about the consequences of installing stationary beacons for leveling the backfill:
Screed device
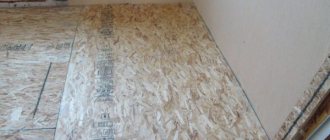
If backfill is not used, then extruded polystyrene slabs can be laid under the outer sheets of the “dry” floor. This will level the base with differences of up to 5 mm. Knauf floor insulation is also being implemented and additional sound insulation is installed.
It is also practiced to lay stone wool instead of penoplex. This can be explained by the relative rigidity of the slabs and the high thermal insulation properties of the material. However, this approach is not relevant for tiles or porcelain tiles, since the seams will soon begin to crack. A solution could be a two-layer laying of rigid sheets of GVLV or wood analogues.
“Dry” screed device with thermal insulation without backfill Source yandex.net
Conclusion
In some situations, the only correct solution was and remains a conventional screed using the wet method as it best meets the conditions of use. And nothing can be done about the phlegm, dirt and other associated inconveniences. In places where increased loads and dancing for days on end are not envisaged, dry screed and its variations can be a worthy alternative.
Dry screed is one of the suitable types of base for an infrared film floor, which is described in the article “Infrared heated floor - from theory to practice.” To prevent the heat retained by the floor from escaping through the windows, read the article about do-it-yourself wooden Euro-windows. In a video about working with floors and walls, a specialist will demonstrate a light screed device.
Subscribe to our Telegram channel Exclusive posts every week
Briefly about the main thing
According to the technology, the installation of a “dry” screed is carried out without the use of water and soluble mixtures.
Main structural elements: gypsum fiber sheets or analogues, backfill made of granules measuring 1-5 mm. Additionally, extruded polystyrene foam can be used. The bottom must be protected from moisture: membrane, polyethylene.
Due to the relatively low moisture resistance and strength, leveling floors using a “dry” screed is not recommended in places with high humidity and traffic.
Ratings 0
How can I improve the situation?
There are quite a lot of solution options today. Some are expensive, some are relatively inexpensive. The most important thing is to set priorities correctly, to understand what result and with what investment should be achieved. For example, you can use easier and faster, but expensive methods, or you can resort to the old cheap “classics”.
Basic ways to solve the problem:
Each of them differs in algorithm and, of course, price.