Purpose of beacons for floor screed
Beacons for floor screed represent the actual level of the new floor, marked throughout the entire area of the room. Essentially, these are marks (markers) located throughout the room, which are at the same horizontal level. This horizontal level coincides with the pre-made marking of the floor screed level. Beacons for screeds must be installed according to pre-made screed markings and after preparing the base of the floor for the screed.
Installation of beacons for floating screeds
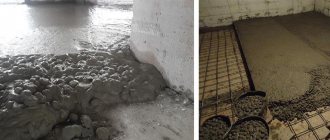
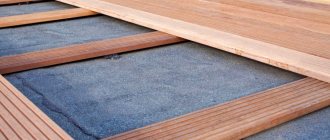
In this case, the technology for arranging the base for the finishing floor covering involves pouring a concrete mixture over a layer made of foam plastic. In addition to its main purpose, this screed design helps to further improve the heat and sound insulation characteristics of the floor covering.
In this case, self-tapping screws that are screwed into the subfloor work well as guides. Usually 24 hours after the floor has been screeded using beacons with your own hands, the fasteners are dismantled. The holes from the self-tapping screws are filled with the mortar that was used to construct the cement base. The remaining recesses must be carefully rubbed flush with the surface of the wet screed.
Types of beacons for screeds
Beacons for floor screeds come in two types.
- The first type of lighthouses is all rack lighthouses. The following can be used as slats: a square pipe, a channel, a plaster beacon, a flat wooden lath.
- The second type is professional beacons in the form of tripods (benchmarks). They are placed throughout the room. Each tripod has a retractable rod, which indicates the level of the new tie.
- Rack beacons are often used for installing cement-sand screeds, lightweight concrete screeds, and levelers. That is, where the solution requires manual leveling by rule.
- Point tripod beacons (benchmarks) are very convenient for indicating the level of a cement-polymer floor, finishing screed and self-leveling levelers. The use of these beacons requires certain professional skills.
Let's look at each type of beacon separately.
DIY installation features
Experienced builders can make a screed without beacons if they have a long level.
If you pour a screed without using beacons, you end up with a surface with differences in height, and you have to spend time and effort eliminating defects.
It is recommended to adhere to the following rules:
- at the beginning of the repair, draw up a detailed, step-by-step work plan;
- place beacons at a shorter distance than the length of the device used to level the mixture;
- use durable parts that can withstand pressure from the solution and rules;
- do not skimp on materials, as this can lead to breakdowns and disruption of the pouring plan;
- follow the technology for handling fixing compounds; haste in such matters leads to negative consequences;
- if the solution tends to settle after hardening, the beacons will serve as guides for re-leveling;
- When using wood as supports, it must be carefully treated with hydrophobic agents or several layers of waterproof paint.
If you follow the beacon screed manufacturing technology, you can count on obtaining a smooth surface on which you can lay a coating of any assembly complexity.
Rack beacons to indicate the screed level
Rack beacons are installed after marking the level of the screed, which is applied around the perimeter of the room. Beacons are flat, long slats placed on the floor throughout the room from wall to wall, parallel to the length of the wall of the room or parallel to communications laid along the floors.
The distance between the slats is selected from 1000 to 1700 mm. It depends on the area of the room and on the tool that will be used to level the screed solution.
Note: The screed is poured in strips along the laid beacons.
Even if you installed beacons one meter apart, it is better to fill several spaces between the beacons with mortar to install the screed. To level the solution, you need to use a long rule, 2-3 spans long between the installed beacons. This will not only reduce the work time, but most importantly, the quality of the screed will be very high.
Wood slats
Filling a floor using wooden beacons is done very rarely today, and dry screeding on them is done more often. This method is now almost never used. The guides are wooden beams (30 mm thick), which must be thoroughly soaked in water before use. After completion of the work, such beacons are pulled out of the set solution, and the resulting voids are filled with fresh mixture. The level is maintained according to the laid screed. To correctly position the beacons, their height is adjusted using wooden wedges, pads, and self-tapping screws.
Video:
About the floor screed tool
To work on the screed, you need a high-quality purchased tool. An aluminum rule is indispensable for this work. The rule is a flat aluminum profile, 15-20 cm wide, truncated into a cone on one side. The length of the rules varies from 50 cm to 3 meters. Bubble indicators of horizontal and vertical levels can be pressed into the rule. When installing screeds, it is better to use the rule of a length of 2 meters.
Let's return to rack beacons and consider which rack beacons are used for floor screed.
Which wire to choose
It is recommended to pay attention to such a property as elasticity. This will ensure high quality alignment, since the wire tension will be maximum and the risk of sagging is reduced. The most suitable option is stainless steel products. It is recommended to choose a material that complies with GOST 9389-75.
Alternative options:
- wire for automatic welding (diameter 1.2 mm);
- corrugated product (used when laying cables);
- galvanized (knitting) wire.
If possible, choose a product with a smooth surface. If you use wire like a cable, the rule will gradually wear out when working with it. This will reduce the quality of the alignment.
Types of rack beacons for floor screed
Wooden rack beacons
Using straight wooden slats for screed beacons is an old and not entirely accurate way to set the screed level. The use of wooden lighthouses is practically not used now, so this will be short. If you still decide to use wooden beacons to construct a screed, be sure to remove them from the dried screed solution and, after the screed has dried, seal the grooves from the removed beacons with the same solution. Don't forget to prime the furrows first.
Metal rack beacons made of profiles for drywall
As beacons for screeds, you can effectively use a guide profile for plasterboard, PN 28×27 (or any other).
The first and last beacon should be placed at a distance of 20-30 cm from the walls. The distance between beacons is 1000-1400 mm.
To install beacons from the PN 28×27 profile, you need to screw self-tapping screws into the floor along the installation lines. The distance between the screws should be 40-50 cm. The length of the screws should be such that half the length of the screw is screwed into the dowel, no less. This is for durability.
It is better to install beacons from a profile with the base of the profile (shelf) facing up. That is, just cover the screws that are screwed in. To set the level of the beacons, from wall to wall of the room according to pre-made markings, you need to pull the rope tightly. You need to set the beacon profiles along this rope, lowering and raising them, turning screws in and out. Instead of self-tapping screws, the level of the beacons can be adjusted using spacers under the profiles.
After rough alignment along the rope, check the level of the laid profiles using a long rule with a built-in level.
Important! It is necessary to check the level of profiles laid on self-tapping screws not only perpendicular to the beacons, but at a variety of angles. For all checks, the rule level must show a zero horizon.
After setting the profiles, they need to be “frozen” to the floor with a solution. First, in the places where the screws are screwed in. After the next check of the level of the beacons and drying of the solution, the profiles of the beacons must be covered with the solution along the entire length.
Note: PN profiles for beacons should be placed with the shelves facing upwards. At the same time, when setting the level of the beacons, using gaskets or screws, do not forget to take into account the thickness of the profiles (2 mm).
Metal rack beacons made of steel pipes
Another material for rack beacons is steel metal pipes. Pipes can be selected from square, rectangular or round. Basically, such beacons are used in large rooms. Pipe beacons are indispensable when constructing a concrete screed.
Technology for installing rack beacons from pipes
- Mark the beacon installation lines. The first and last beacons should be at a distance of 20-30 cm from the walls.
- Along the marked lines for installing the beacons, you need to place slides of mortar every 40-50 cm. We will smear beacons made of pipes into them.
- Next, we lay the pipe beacons on the mortar slides and, using a rope and a long rule, set all the pipe beacons according to the pre-marked screed level on the walls.
We adjust the level of the beacons by pressing the pipes into the solution or placing additional ones. We check the general level of the beacons, usually parallel to the walls and at different angles. After setting and checking the level of the beacons, we cover the beacons with mortar along the entire length. You can start screeding after the mortar under the beacons has dried.
Note: If the screed is made after the mortar has dried under the beacons, then the screed can be poured immediately between three and four beacons, stretching the mortar using the general long rule.
Metal lath beacons made of plaster profiles
Very often, plaster perforated beacons with a height of 10 mm are used for floor screed beacons.
They are inconvenient for large screed thicknesses, as they are easily deformed and bent, especially at the edges. For thin screeds, plaster beacons are actively used as screed beacons. You need to work with them very carefully, carefully checking the level of the beacons in all directions. Because of their design they are very springy.
Installation technology for plaster beacons for floor screed
The same as when installing pipe beacons. Lay out slides of solution along the line of beacons. The smaller the distance between the slides of the solution, the less the likelihood of errors due to the springiness of the plaster beacons. Then, using a pre-marked level, pressing the beacons into the solution, or placing the solution under the beacons, the beacons are set to the “zero” general level. After the slides of the solution have dried, the beacons must be completely covered with the solution. After the solution has completely dried under the beacons, you can make a screed.
Pin beacons on tripods (benchmarks)
These are professional beacons used for self-leveling floors of various types. They require professional skills and a trained eye. They are a small tripod with a moving rod in the middle. This rod shows the level of the screed. The level is set along the caps on top of this rod.
Advantages and disadvantages
Auxiliary tools and devices help make finishing work easier. This stage is not the main one, but it is important, like the others. As a result, you can obtain a coating without obvious and smaller defects.
Other advantages of using string beacons:
- Low price. Such devices are the most affordable on the market when compared with analogues of other types (for example, perforated metal profiles).
- Possibility of reuse. Fixation for the purpose of alignment with string beacons can be carried out unlimitedly, since the main structure is made of metal, it has holes for self-tapping screws with dowels, which means dismantling is simple.
- Work gets done faster.
- After removing the beacons and wire, there are no obvious marks left on the leveling mixture, so there is no need to restore the surface.
- Fast installation of the coating, even if the defects on the rough base were significant.
- It becomes possible to reduce the thickness of the leveling mixture layer.
- If necessary, the wire can be replaced if it has become unusable due to constant contact with a damp environment. This increases the service life of string beacons.
This method also has disadvantages, some of them quite significant:
- Installation process. There is a need for complex (as for similar devices) adjustment of the strings.
- Alignment is performed in a different plane—horizontal. This contributes to the contamination of the wall and floor, since the solution falls while working with the rule.
- Loss of product quality. There is a risk of corrosion upon contact with wet solution. In addition, the working mechanism (the thread that helps adjust the string beacons) gradually becomes clogged.
- There is a risk of wire bending, which leads to poor alignment quality.
It is best to consider the use of string beacons if you have experience. This will allow you to detect wire deflections in time.
Should the beacons be removed from the screed after the solution has dried or not?
To answer this question, you first need to answer another question. Why is this necessary? If you leave metal beacons in a solution, over time they will rust and in their place, dips and cracks will form.
The classic advice is simple. All beacons need to be removed from the screed, or rather knocked out. Clean the resulting furrows from debris, prime them and, after the primer has dried, seal them with the same solution.
But many companies leave plaster beacons in the screeds, on top of which a self-leveling or finishing self-leveling floor is planned. Allegedly, beacons without contact with air will not corrode. The regulatory documents say nothing about such beacons, and discussions on this matter are not within the scope of this article.
After placing the beacons, all that remains is to mix the screed solution and you can begin installing the screed.
This article is all about screed beacons! Walk on level floors!
©Opolax.ru
Other articles in the section: Floor screed
- Reinforcement of floor screed: selection of material for reinforcement
- Concrete screed, purpose and application
- Concrete floors with a hardened top layer: liquid and dry hardening technologies
- Do-it-yourself concrete floor in the garage
- Types of floor screed for apartments and houses
- Damper connection for screed
- Mixing and laying expanded clay concrete screed
- Mixing the screed mortar
- How to level the surfaces of walls and floors
Preparatory work
Regardless of the choice of the type of beacons used, the following measures must be taken before their installation:
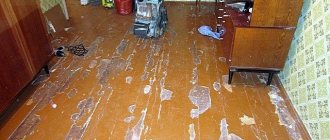
- clean the floor from the previous finishing coating and its residues;
- dismantle the baseboards;
- remove dust, various contaminants and all kinds of stains from the rough surface;
- Grind existing protrusions;
- seal recesses and cracks;
- cover the rough base with a primer mixture;
- lay waterproofing material;
- determine the zero level, put marks and proceed to the main stage of installing devices.
Steel pipes
To equip a floor where it is necessary to install powerful concrete screeds, pipes of various sections are used. Pipes can be used round or rectangular, they are durable and do not deform. In spacious rooms, it is more convenient to make beacons for the floor of this type: the zero level of the future floor is set; a cord, thread or fishing line is pulled, you should focus on it when making a tie; mounds of mortar are laid out; pipes are installed on them and slightly pressed in; the horizontal and the correct placement of the guides among themselves are verified using the rule and level; The height of the future floor is adjusted by pressing, or by placing mortar where there is not enough mixture. It is easier to set up screed beacons using square pipes.
Video:
Slides of solution
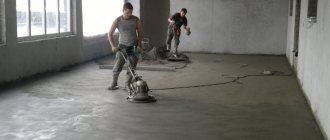
To install a semi-dry screed, it is convenient to install beacons on the floor from piles of mortar (cement-sand). Mounds of the mixture are placed in the corners and brought out below the zero level of the floor. It is imperative to maintain the distance between the tubercles no longer than the selected rule. The piles dry, and the solution is placed in the free space. The tubercles are used as guides along which the rule moves when the mixture is leveled. This is a good way to arrange thick, high screeds (6-9 cm).
Video: