Here you will learn:
- Pros and cons of potbelly stoves
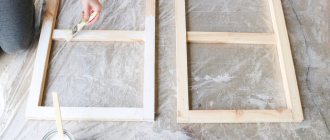
- Assembling a potbelly stove
- Installing a potbelly stove in its original location
- Construction of a chimney for a potbelly stove
- First launch of the potbelly stove
- Modernization of a potbelly stove
A potbelly stove is a homemade or factory-made stove designed for heating residential and non-residential premises. The stove has a simple design and is omnivorous - it works on almost any type of solid fuel. Having purchased or assembled this heating unit, it is necessary to ensure its correct installation. This review will tell you how to install a potbelly stove in a garage and how to properly connect it to the chimney.
Pros and cons of using potbelly stoves for heating
The potbelly stove is characterized by a whole list of positive qualities:
- Using the product you can not only warm up a large room, but also cook food;
- 30 minutes is enough to warm up the space;
- no matter in which corner the device is located, any corner is evenly heated;
- economical consumption of material for kindling, in contrast to heating the room with electricity (firewood, coal, and waste are used as kindling);
- can be made from scrap materials;
- the device is easy to use;
- installation does not require large material costs.
But, like any other device, there are negative sides:
- it is necessary to consider the chimney system;
- to maintain cleanliness, periodic cleaning of all parts, including the chimney, is required;
- A metal potbelly stove cools down quickly, so the heat is poorly retained.
The device has few disadvantages. If installed correctly, it will not be difficult to keep the stove in good condition.
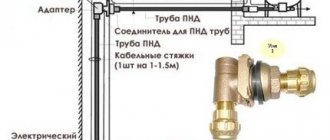
Chimney outlet through the roof
Diagram of the outlet of a stove chimney for a garage through the ceiling/roof:
As in the case of installing a chimney through a wall, when installing through a ceiling, preliminary assembly is first done in order to accurately mark the future passage through the roof. Once the installation hole is made, the steel penetration through the roof is installed.
Next, in the same sequence, the pipe is assembled and the passage through the roof is laid with non-combustible material. The passage of the chimney through the roof requires reliable waterproofing so as not to encounter leaks in the future. As in the first option, you should protect the pipe from moisture getting into it and insulate the outer part of the pipe to reduce the formation of condensation.
Preparatory work
Preparatory work involves:
- determining the dimensions of the future device;
- choice of material;
- location of the device.
Only after this the main work begins.
Drawings and dimensions
Each structural element is pre-thought out, determining the dimensions:
- It is important to choose the correct pipe diameter. The drawings note that its diameter should be 2.5 times the volume of the firebox. The volume of the firebox is measured in liters, and the volume of the pipe is measured in millimeters.
- It is advisable to install a metal screen around the stove at a distance of 60 mm. As a result, the heat will remain longer. In addition, such a design will protect against fire.
- The floor under the stove must be finished. Install a metal sheet that should protrude 50 cm from all sides of the heating device. This stage should not be neglected. A sheet of metal will protect against fire and retain heat.
- The chimney consists of two parts: vertical (1 meter) and inclined or completely horizontal (3-4 meters).
Given these dimensions, it will be possible to build a safe and useful heating structure for the garage.
Furnaces
Currently, there is a huge variety of types of ovens. The main advantage of a change house, from a heating point of view, is its limited area. With the correct design of the cabin (insulated block container), it is possible to organize full heating using low-power stoves.
In addition to power, the choice of stove is made based on criteria such as:
- Size;
- Fuel type;
- Chimney placement;
- Price;
- Operating costs (maintenance costs).
According to these criteria, the best option is a conventional wood-burning stove, such as a “potbelly stove”. They cost little, and fuel, if a successful combination of circumstances occurs, will be completely free. Operating costs are also minimal.
On the other hand, it is recommended to install such stoves in metal block containers, since an open fire in a wooden cabin can become a source of serious problems.
Installation
When choosing a change house, give preference to standardized options. In this case, it will be much easier for you to install the stove.
So, installation begins with determining the location of the furnace. It is advisable that this be a corner of the change house, since the stove should not interfere with the movement of people. However, the distance from the stove to the wall must be at least 300 mm. In addition, you should not place it near sleeping places, if any.
The stove must be installed on a base. Its function can be performed by a steel sheet on which bricks are laid. Thanks to this, the bottom of the cabin will not be exposed to excessive thermal effects, which will eliminate the risk of burnout.
The best option for a chimney is a vertical one, exiting through the ceiling of the cabin. However, you can also do it horizontally, if the design of the furnace implies this. In both cases, a hole will need to be cut for the chimney. It is recommended to protect the cut edges from external factors by edging them with thin strips of stainless steel.
If the chimney has connections, they must be sealed with special heat-resistant sealants.
Some tips
To ensure that your stove is installed correctly, consider purchasing a container unit with the stove already installed. Excellent cabins of this type are offered. Factory installation guarantees compliance with all technical standards and eliminates the risk of damaging your home during the process of removing the chimney.
It is advisable to fix metal sheets with a reflective surface on the walls closest to the stove - this will speed up the heating of the room.
You should not leave a burning stove unattended, especially when firing it “at night”: either warm up the room in advance, or organize a watch.
Systematically check the condition of the chimney: it must be sealed and free of blockages.
Naturally, the change house must provide for the possibility of quick evacuation.
Heating furnaces Properties of soapstone
Required materials and tools
To make a heating device, the following tools will be useful:
- Bulgarian;
- welding machine;
- sledgehammer;
- sandpaper;
- chisel;
- centimeter tape, marker;
- hammer drill
To make a potbelly stove, improvised materials are often used. This could be an empty gas cylinder, a metal barrel, or a milk cylinder. A simple option is to lay the device out of brick.
How to install a potbelly stove in the country
When installing a potbelly stove, remember that the metal body heats up quite quickly. Stainless steel ovens heat up less and cool down faster. Potbelly stoves, which are made of cast iron, will retain heat much longer, so they must be installed in such a way that they are visible during operation and for some time after the flame has died out.
If you install potbelly stoves on metal legs, you must remember that these auxiliary structures will also heat up. The heating temperature will be lower than that of the case, but still not too low. To install potbelly stoves in your dacha, you will need to install them on a fireproof base. In this case you can use:
Scheme of a potbelly stove stove.
- tin products;
- concrete structures;
- ceramic tile products;
- brickwork.
Fire hazardous grounds are:
- those made of plastic of any kind;
- plank or parquet floors;
- laminate bases;
- linoleum bases;
- It is not allowed to use carpet or other soft coverings.
If the house has wooden walls or panels, the stove must be installed at a distance of 1 m from them. Chimney pipes in the room are installed from 1 section, without the use of connections. If for some reason this cannot be done, you need to make a tight connection, and one section must necessarily fit into the other. If the pipe passes through the wall, you will need to make a thermal barrier from ceramics or brick. In this case, concrete can also be used, but it will crumble when temperature changes.
The fuel storage container will need to be placed next to the door to prevent sparks from entering it.
Diagram of a potbelly stove with dimensions.
Quite often, potbelly stoves in the country are used not only to provide heating. There are a large number of designs that combine several functions. Such designs include a heating stove with a cast iron stove. They can be used for cooking and at the same time for heating a country house. A household cast iron stove with 1 burner can easily replace a gas or electric stove in the country. If there is a need to feed several people at one time, you should make or purchase a stove with a continuous cooking surface or with 2-4 burners.
Ovens that have a water tank are also popular. Their design is similar to a samovar. A water container is mounted around a wood-burning cast iron stove.
Fuel selection
The size of the potbelly stove can be very different, but the mechanism of operation is similar for all. The combustion material is placed in the firebox.
The cheapest option is to heat the room with wood:
- In the firebox of a potbelly stove, logs are placed in a cage or in rows.
- Then wood chips or paper are placed in the very bottom row to light the logs.
- The door is closed and the intensity of combustion is controlled by blowing.
- Wood fuel smolders for several hours, so the room warms up completely and for a long time.
When installing some models of potbelly stoves, the use of waste oil as fuel is allowed.
A short historical excursion
Initially, a “potbelly stove” was a name given to a steel stove of a certain design, the creation of which took place during the dramatic years of the Civil War for our country. It is not known exactly which of the Russian engineers came up with a very simple, but very effective steel furnace, relatively easily made in a handicraft way from more or less available materials. During the times of “war communism”, after the urban economy with centralized heating in large cities collapsed, this tiny stove, which could be installed almost anywhere in a “bourgeois” apartment densely packed with house committees, saved many lives. By the way, the statement that the stove got its name due to excessive consumption of firewood is a stupid legend born on the Internet. In fact, the potbelly stove is very economical for its type. In conditions of a severe shortage of coal and firewood, the owner of a walnut set by master Gumbs had the opportunity to survive a terrible winter, using the precious furniture as firewood. The name of the furnace was determined by the fact that at first it became widespread among “former” engineers, office workers, and intellectuals who did not emigrate from the country. That is, according to the concepts of the proletariat, “bourgeois”.
Step-by-step DIY instructions
A traditional stove consists of an iron container with a door and a smoke outlet pipe that is vented to the outside of the room. All varieties can be made from scrap material, but the basic elements will be the same.
Classic brick
A brick potbelly stove in a garage must be installed on the foundation:
- For the foundation you need to dig a hole and fill it with a layer of sand and gravel. Then the layers are filled with cement mortar. The hardened cement is covered with waterproofing material.
- The first two brick rows are laid horizontally.
- Starting from the third row, a hole for the firebox is formed and a grate is installed.
- At levels 3 to 6, a space is created for laying firewood.
- Then several rows are made in horizontal masonry.
- The ninth, last row is laid out edgewise.
- At the last stage, the chimney and doors are installed.
It is important to ensure the flow of fresh air into the room, which is necessary for better combustion of fuel in the potbelly stove.
A brick stove is durable, does not require repairs, warms up quickly and does not cool down for a long time. The heat from the stove is distributed evenly, and the room does not cool down for a long time.
From a milk can
If you follow the instructions in the instructions, then making a stove from a milk can will not be difficult:
- prepare and clean the container (it serves as the basis for the firebox);
- make a hole for the firebox;
- when the hinges are welded, install the door;
- Closer to the bottom of the container, make a hole (11 cm in diameter) for the chimney;
- A grate made of wire is installed inside the can;
- At the last stage, the chimney is welded.
The finished stove is installed in a prepared place and lined with fireproof bricks, which will protect against fire and increase heat transfer.
From a gas cylinder
At the preliminary stage, an approximate drawing of the product is made with determination of the dimensions of the parts:
- Using a bright marker, markings are applied to the surface of the cylinder in the place where the hole for the door, firebox and ash pan is supposed to be cut. The firebox is located approximately in the middle of the structure. The blower is placed in the lower part under the firebox door.
- Draw a line that will run between the two doors. Using a grinder, cut the balloon along the marked dotted line.
- For further work, iron rods with a diameter of 15 mm are needed. A lattice is made from them and welded to the lower, cut part of the cylinder. After this, the parts of the cylinder are welded together again.
- Using a grinder, holes for the doors are made along the marked lines. Hinges are attached and doors are installed.
- At the last stage, a chimney is made. The upper part of the cylinder is cut off with a grinder and a pipe with a diameter of 11 cm is welded to the place. After that, the pipe is taken outside, making a hole in the wall or roof.
To increase durability, a layer of heat-resistant composition can be applied to the surface of the cylinder.
Potbelly stove made from a gas cylinder, vertical design
By and large, such a potbelly stove is not much different from the option described above - the difference lies only in the location of the cylinder, which has its own advantages.
- First of all, a potbelly stove is more compact and takes up less space in the room.
- This design allows you to install convective pipes of greater length, which will have a better effect on the process of heat distribution in the house. In addition, with this design of the potbelly stove, the convective pipes will not need to be bent.
A vertical potbelly stove also has its drawbacks - first of all, it is a short combustion chamber, limited by the diameter of the pipe used for its manufacture (or the diameter of the cylinder). At a minimum, this is a limitation on the length of firewood - they may have to be cut additionally. It is much more difficult to attach a burner to such a potbelly stove. And the third, most important point is the direct flow of the furnace. In fact, the flame in it is thrown directly into the chimney. This issue can be resolved, but it complicates the design. As a rule, the combustion chamber is attached to the side of such furnaces. In all other respects, it is the same design and, accordingly, all the same components.
Operation technology
When using a potbelly stove, you should follow important rules:
- maintain a safe distance between the stove and the walls;
- the chimney should only be taken outside;
- the place where the pipe goes outside is covered with solutions;
- It is recommended to place a box of sand and hang a fire extinguisher next to the device.
These recommendations will extend the life of the stove and improve safety.
Safe installation of the heating device
It is extremely important to follow fire safety rules when installing a potbelly stove. The best place is the far corner of the room, opposite the gate. The chimney is led only to the street.
You cannot place a potbelly stove near a car. The minimum distance should be 1.5 meters. It is best to lay a brick wall on the sides and front of the structure. This will not only ensure safety, but will also increase the efficiency of the stove.
If the garage walls are made of wood, then the stove is installed at some distance. The wall itself near the device is covered with a metal sheet or concreted. It would be correct to attach a metal sheet at the base of the stove.
Preparation of heating material
A popular fuel for potbelly stoves is wood. They need to be thoroughly dried and sawn. The size of the firewood should be approximately 25 cm. Store the firewood in a dry, ventilated area, protected from precipitation. Oak, birch, apple, and cherry warm up the room well. Do not use spruce or pine. They produce little heat and produce a lot of soot during combustion.
Cleaning the oven
The stove should be cleaned periodically to prevent dirt and soot from accumulating in the chimney. For the work, purchase a special chimney brush. But you can make the device yourself. A brush with stiff bristles is attached to the end of the stick:
- Before starting work, cover the opening in the firebox with a rag.
- Initially, make several movements in the chimney.
- Then they take out all the accumulated garbage.
All actions are carried out carefully so as not to damage the surface of the structure.
Conclusion
From all of the above, we can conclude that the installation of a stove in a garage must be done correctly, and all fire safety standards must be observed. Not only the long and normal operation of the heating device itself, but also safety depends on the correctness of the work on installing the stove.
You should strictly adhere to all rules and requirements to ensure normal, trouble-free operation of the furnace. It is important that before firing the stove for the first time, you must carefully ensure that there are no leaky joints and connections, and if the slightest defects are detected, they should be eliminated immediately. This will help protect against carbon monoxide poisoning and fire.
If everything is done correctly, the stove will delight and provide warmth for many years. You will be able to forget forever about working or relaxing in the garage, which previously looked more like an ice palace. In addition, the stove still remains a very efficient and economical heating device.
In addition to everything, a stove in the garage can be used for cooking. You can equip it to heat water and use it for your needs. Based on the stove, you can make full-fledged water heating for your garage; of course, this will only be appropriate in cases where the garage is visited every day. If the garage is not visited often, it is not worth using water heating as an addition to the stove.