DIY compartment doors
Installing compartment doors yourself: detailed instructions from choosing the material to checking the functionality of the system.
It is not easy to install compartment doors yourself. However, if you thoroughly understand the features of this design and the operation of all mechanisms, then there will not be any particular difficulties during its installation. The main thing is to carry out all operations in strict sequence, as indicated in this recommendation.
Various door designs of this type have been developed. Therefore, the owner of a residential property initially needs to understand what advantages and disadvantages they have.
Features of sliding door structures: all the pros and cons
If such a door is installed in a house or apartment, especially a small one, the advantages and disadvantages of the design will immediately reveal themselves.
Sliding doors have many advantages
Advantages
Flaws
The shortcomings are not so significant, but they should also be taken into account.
Firstly, there are gaps. They remain in the doorway (between the frame and the leaf) when the door is closed. This means that the following cannot be provided:
And if such a door separates the kitchen, cooking odors will penetrate into other rooms.
Secondly, when you choose a design that consists of 2 sashes, its installation becomes more complicated. After all, both halves must fit one another perfectly.
Disadvantages of compartment doors
Thirdly, you will need to check every detail extremely carefully. Otherwise, after installation, distortion will appear. Then the sash will jam, and problems will arise when opening/closing the door.
Wood finishing
I decided to use wood stain. First of all, let me say that the reason I applied the finishing material to the wood surface is because I wanted a smooth, neat piece that would show a little bit under the burlap.
I was afraid that since this part of the wood looked darker than the others, it might be visible under the burlap. Now that I think about it, I truly regret using this material. I used thinned acrylic paint.
It's been 2 weeks now, but my workshop still has this unpleasant smell from the finishing. I really hope he disappears.
I should note that I did not apply a clear coat over the stain at all. I'm not sure that this can change anything. At this stage of work, it seemed to me that this idea was a failure, but still I continued to work on my project.
Ultrasound disinfection of vegetables will get rid of germs
“Nevertheless, I am an optimist”: we remember Andrei Mironov according to his statements
Homemade cheesecake with honey in the oven: a great addition to coffee
Here's what the panels looked like after painting (photo above).
Preparation for installation work
You need to prepare all the necessary tools and materials in advance, otherwise the process of installing compartment doors will take a long time.
The first thing you need to do is prepare your tools
Tools needed
A grinder (eccentric or vibration) will also come in handy.
Procurement of spare parts and materials
Here are the parts you will need to assemble the compartment door.
Sliding door fittings
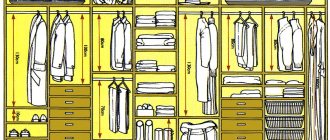
First, the owner decides on the type of design, and taking it into account, the door leaf is selected. There is a table that determines the dimensions of the canvas (typical) relative to the opening:
A hanging structure is selected. The height of the canvas should be greater than the doorway.
A cassette compartment door is selected. Then the height of the canvas should be less than the size of the opening.
A door on 2 rails is selected. You should choose a canvas larger than the opening if this is an open option. And if the design is made in a cassette version (in other words, it goes into the wall), then it should be the same amount smaller than the opening.
Table of sizes of doorways and leaves of sliding sliding doors with 1 leaf:
| Door size | Opening size | External size with trims (width, | The height of the mounting beam from | Length of embedded beam | |
| No frame | With frame | ||||
| 600×2000 | 540×1975 | 565×1975 | 704×2042 | 2047 | 1300 |
| 700×2000 | 640×1975 | 665×1975 | 804×2042 | 2047 | 1500 |
| 800×2000 | 740×1975 | 765×1975 | 904×2042 | 2047 | 1700 |
| 900×2000 | 840×1975 | 865×1975 | 1004×2042 | 2047 | 1900 |
| 600×2100 | 540×2075 | 565×2075 | 704×2142 | 2147 | 1300 |
| 700×2100 | 640×2075 | 665×2075 | 804×2142 | 2147 | 1500 |
| 800×2100 | 740×2075 | 765×2075 | 904×2142 | 2147 | 1700 |
| 900×2100 | 840×2075 | 865×2075 | 1004×2142 | 2147 | 1900 |
| 600×2200 | 540×2175 | 565×2175 | 704×2242 | 2247 | 1300 |
| 700×2200 | 640×2175 | 665×2175 | 804×2242 | 2247 | 1500 |
| 800×2200 | 740×2175 | 765×2175 | 904×2242 | 2247 | 1700 |
| 900×2200 | 840×2175 | 865×2175 | 1004×2242 | 2247 | 1900 |
Compartment door assembly diagram
Wardrobe sliding door assembly diagram
The length of the rails should be equal to twice the width of the canvas. Let's say two canvases are installed. This means that a guide equal to their four sizes is selected.
Size calculation
When assembling a sliding wardrobe door yourself, there are two options. The first is to measure the opening, think about how many doors you want to have and contact a door manufacturing company with this information. Just make sure they sell the parts without paying for assembly. The manager himself will count all the necessary materials for you, give you the dimensions and announce the amount. It's simple. But you will have to purchase everything from this office, i.e. choose from what is available.
The second way is to calculate everything yourself and look for the necessary components from different companies. It’s more complicated and more expensive, but there’s a wider choice. For those who do not like simple paths, we will describe the calculation of the components.
Doors
Calculate the width of the doors so that when closed, only one handle is visible, but it should not cover the door leaf itself. For a sliding door with two leaves, you calculate it like this: measure the width of the opening, add the width of the profile and divide in half. This will be the width of the sash.
For example, the opening is 1600 mm, the width of the handle profile is 26 mm. We get 1600 mm + 23 mm / 2 = 811.5 mm. Please note that the width of the handle profile is taken arbitrarily. It can be different in shape and, naturally, in width. When making calculations, substitute the width of your chosen structure.
How to make your own door leaf
Chipboard panels of the required size are taken. You can use one panel, or two. For example, if the doorway has a frame edging of 76.5x197.5 cm, then you need to take a canvas measuring 80x200 cm.
The door leaf must fit the size of the opening
To lighten the weight of the canvas, 1-2 squares or a rectangle are cut out of it. Glass is subsequently installed in these openings. You can create a kind of panel by inserting thin plywood.
First stage. The canvas is marked. 15 cm away from the edges, no less.
Second phase. The middle part of the canvas is removed using an electric jigsaw. For this purpose, a hole is drilled in the corner (any) of the marked figure so that a jigsaw file can be inserted.
Third stage. Along the perimeter of the door, as well as inside the created frame, it is advisable to refine the ends of the chipboard. To do this, use self-adhesive tape. Fix it by heating it with an iron.
Door leaf materials
You can choose another option: the door is made of timber, processed in advance. Fastening is done with jumpers consisting of bars of narrower sizes or of durable slats. And between them plywood or glass is inserted.
It should be understood. It may seem that a door made of timber is easier to make. This is a misconception. After all, you will need to have material that has undergone impeccable processing. In addition, the assembly of such a structure must be carried out with special care. If at least one of the conditions is not met, the door frame will initially or will soon become deformed.
Sliding door design
Assembly
When the details of the future structure are prepared, assembly can begin. How to assemble a cabinet without mistakes? To do this, a detailed diagram of the assembly and installation of the doors on the sliding wardrobe is created. Then, using a drill, you need to create holes in the sides, roof and base. Its individual parts are connected into a single frame using special fasteners. To increase the maximum level of permissible load on the cabinet, the junction of the base and top cover with the sides of the structure is reinforced with special metal corners. The back of the furniture is covered with a thin sheet of chipboard, and supports are attached to the base.
You will also need holes for pins in the side walls of the furniture. This will be required for subsequent installation of shelves inside the product. If necessary, storage systems for certain types of things are installed inside the structure: vertical crossbars with hangers, trouser racks, and the like. If the assembly stage is completed, we proceed to the most difficult part. It is the installation of doors that will be the most critical process in the entire work.
Assembly diagram
Installation of a suspended structure in stages
When the door leaf is purchased or made independently, all structural elements except glass will be attached to it. This part is installed upon completion of installation.
Step one. To embed the handles, the panel is marked on both sides. After this, the holes are cut out. The location of the handles should be carefully marked. To do this, you need to step back 3-5 cm from the edge of the door and draw a vertical line using a corner.
Step two. Next you will need to decide on the height and width of the hole that you plan to cut. After measuring the bottom of the handle, these dimensions are transferred to the door leaf, taking into account the vertical line drawn earlier.
It turns out to be a rectangle. A pen is placed on it, its position is outlined with a pencil. As a result, it is possible to determine the even and correct placement of the handle. These actions also help to round the edges of the rectangle taking into account the desired radius.
Step three. The rounded edges are drilled out. For this purpose, a round core drill of the selected diameter is used. Using this tool, drill 2 holes on the sides of the outlined shape.
The wood that remains is removed using a hammer and chisel. This work will require special care.
When two such holes are ready, handles are fixed in the canvas on both sides.
Step four. A hanging plate having a roller structure is attached to the end of the canvas. Suspension plates vary in their designs. There are those where the rollers are screwed to a hanging plate. In others, the rollers are inserted from the side, where there is a special groove.
The hanging plate itself is attached with self-tapping screws and press washers. It is taken into account that a certain distance must be allocated from the edge.
Step five. Now the rollers are attached to the bottom of the door. The designs of this element also vary.
On a note. There will be no difficulties if the rollers and guides are purchased in a single set.
Fastening the guide rail
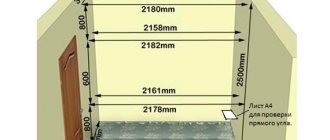
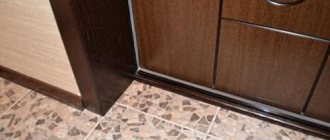
Step six. It's time to start installing the guide rails; rollers will run along them. These guides are attached to the wall and floor. But they can only be mounted on the wall, it all depends on the system purchased.
Important! The support should be fastened very securely. This element is usually buried into the surface of an already created floor. However, the support can also be fixed on top of the floor covering. Then you will have to set a low threshold.
The support becomes a board that is perfectly leveled. Its width is the same as the bottom guide. For fastenings, holes are drilled both in the floor and in the support board itself - right through.
Step seven. The bottom rail is attached to the top of the support board. A roller will run along this element, which will be installed at the lower end of the structure. The rail is represented by one or two tracks, it depends on the features of the compartment door system.
Step eight. The door should not jump out of the rail. Therefore, a stopper is installed. This is not difficult to do. The main thing here is to choose an element of the desired width. The stopper is pushed into the rail track. The top plates are curved and springy. They rest against the rail track - at its upper part.
A gap is noted between the upper plates. The roller is directed inside the track and runs over the curved part of the stopper. After this, he falls into the space formed between these elements. The second curved part prevents further advancement of the roller so that it does not jump out of the rail. This is how you can fix the door leaf in one place.
The compartment door opens easily. A person makes a slight effort to open the door, and it slides freely along the guide.
Step nine. Finally you can start installing the top rail. It is attached to a beam that is pre-attached to the wall with anchor parts.
The upper guide should be located clearly below the lower one. Therefore, when marking it, a plumb line is used. And the horizontal position is determined using a building level.
The top rail is screwed to the beam with self-tapping screws. A door with a hanging system will be installed in this rail. A door closer may also be included in the door kit. This detail will not allow the door to remain open arbitrarily.
Step ten. To make the rollers in a metal structure run more quietly, a rubber seal is fixed.
Installation of sliding wardrobe guide rails
Step eleven. When the rail guides are secured, the door leaf is hung on the suspension system. First, the upper rollers are inserted into the upper guide through the side hole. After this, the door leaf is slightly raised so that support rollers are installed in the track of the rail located below.
Step twelve. If there are two sashes, install either of them first, then the next one. After this, the motion limiter is screwed on.
Final steps. Either platbands or a camouflage box are installed.
Read step-by-step instructions for glazing a balcony with an extension here.
Prices for compartment doors
Video: How to assemble compartment doors with your own hands
Why plywood
But in fact, why did we choose plywood as the material for the cabinet?
Here are the motives that made me choose this material:
- With a thickness of 15 mm or more, it has mechanical strength that is superior to wood of the same thickness and leaves no chance for the more popular laminated chipboard and MDF;
- Parts made of plywood with a thickness of 15 mm or more can be joined end-to-end with self-tapping screws, without furniture corners. In this case, holes for self-tapping screws are drilled in the plane of one part and in the edge of the other. Both MDF and laminated chipboard are connected only with the help of fittings, and the strength of the connection is noticeably inferior to that of plywood;
- The material is moderately hygroscopic. The appearance and strength of plywood only suffers with prolonged contact with water, and this problem is easily solved by using waterproof finishing coatings. Coatings (waterproofing paints, waterproof varnishes) adhere exceptionally securely to the top layer of veneer and, unlike laminated chipboard and MDF films, do not peel off;
- By the way, about coatings: plywood is fully compatible with modern varnishes and paints, both organic and water-based;
- Finally, the price of the material played an important role in my choice. A square meter of FC plywood 15 mm thick costs about 400 rubles. Only laminated chipboard is noticeably cheaper (from 300 rubles/m2), which is completely inferior to FC in terms of strength and moisture resistance.
A caveat: plywood, even with significant thickness, can deform under bending load. When spanning over 60 centimeters, plywood shelves require intermediate posts or stiffeners.
Design features of various types of doors
Each door manufacturing option has its own strengths and weaknesses. The main advantage of sliding structures is the ability to save space, which is especially important for small kitchens. Such premises remained in old Soviet buildings; their area does not exceed 7 m2. The disadvantage of a folding kitchen door is its high price and complicated installation (for some models).
Other advantages of using sliding structures are:
Important! To install such structures in the kitchen, a certain length of the opening is required, since the canvas will fold and extend beyond the wall.
As easy as pie
Photo: IKEA
The most economical way is to leave a small (5 cm) gap between the wall and the cabinet and disguise it with a false panel, imitating a single cabinet body. To prevent the handle from hitting the wall, you should install special hinges with an opening angle of strictly 90°. This option is suitable for both the upper and lower tier. But if every centimeter counts, then a more modern and economical solution for swing doors will be the Tip-On system, which allows you to open and close facades without handles by lightly pressing.
Photo: Nolte KÜchen
PRACTICAL ADVICE
When ordering facades that open upward, try them on for yourself: if you are short, it will be difficult for you to return the raised sash to its place. For the same reason, choose folding doors carefully (they cover two panels of a high facade at once).
Materials for production
A wide variety of materials can be used to make door panels.
Such products are especially popular among consumers. MDF is characterized by a high level of practicality, good reliability and durability. Products whose surfaces are protected from moisture have the best technical characteristics.
Glass
Glass door leaves are not used in all door designs. This is due to the fact that glass has limited strength. The main advantage of such products is the possibility of various stylistic solutions, beautiful appearance, and the production of canvases with decorative inserts, for example, stained glass.
Tree
Not every property owner can afford doors made of valuable wood due to the high cost of such products. Wood has good technical characteristics - strength, resistance to mechanical stress and durability, original appearance, ease of processing. The main disadvantage of wood door panels is considered to be low resistance to moisture. To prevent the appearance of fungus and mold, the surface of the material is treated with special impregnations and antiseptics.
It is allowed to combine all of the listed materials for folding door structures. This allows you to increase the number of color solutions and product designs. High-quality fabric with expensive fittings will last quite a long time. Well-known manufacturers provide a 5-year warranty on the purchased product.
Labor costs
| № | Work stage | Number of hours |
| 1 | Assembling the vertical frame | 4 |
| 2 | Making a bed frame | 4 |
| 3 | Installation of lifting mechanisms | 3 |
| 4 | Total | 11 |
The assembly of the transformer bed cabinet was completed in 2 days.
This do-it-yourself scheme for assembling a bed cabinet will cost much less than ordering such furniture. To build such a simple but responsible structure yourself, you must have experience working with the above tool.
Source: svoimirukamimebel.ru
Sliding door selection criteria
When choosing doors to the kitchen, you need to pay special attention to the quality of the fittings, because such parts are constantly moving and are subject to wear. Before making a sliding door in the kitchen, you need to carefully select the parts that hold the panels together.
Most users give preference to foreign-made fittings (domestic analogues are significantly inferior to foreign ones in terms of wear resistance and reliability). Foreign components can last at least 10 years.
Another selection criterion is the cost of the door. The price of structures depends on the overall dimensions of the product, installed fittings, as well as the material used to make the panels. The cost of budget models starts from 5,000 rubles.
Doors must be installed by specialists, because such procedures require the appropriate tools and certain skills. Depending on the design, its installation can last from several hours to several days, so when purchasing a door you need to order an installation service.
When placing an individual order, you will have to wait a little, because door leaves made of solid wood are difficult to process. It will take a lot of time to make such a door.
Examples in the interior
The benefits of mezzanines are obvious, especially if you need to store light items so as not to load the bottom shelf. But you can find reinforced models, the use of which allows you to store more bulky and heavier things on mezzanines.
Often mezzanines are placed directly above the entrance doors. This design will decorate the entrance to the living space.
Models installed in long narrow corridors look appropriate. Moreover, such designs are very functional and practical.
Often double-sided mezzanines are installed through door blocks
It is important that the doors of the products match the interior of the room and match the style
For a children's room, hallway or kitchen, it is better to choose models with solid doors. This will protect against injury if the glass accidentally breaks.
Glass doors or stained glass doors are often installed in the living room or dining room. Book mezzanines are also usually made with glass doors that allow you to view the books located there.
In the corridor you can often see louvered doors, which allows you to hide shoes from strangers, at the same time, sliding doors will not interfere with those in a small, narrow room.
The following video talks about how to make a mezzanine with your own hands.