The roof drain is responsible for collecting melted snow, rain, and draining water from the foundation of a house, cottage, garage or other buildings. Installing a drainage system allows you to protect the facade and basement parts of the structure from destruction under the influence of moisture.
There are ready-made options for sale, but if you want to install the gutters, you can do it yourself.
Users often search for:
- Installation of a chimney in a private house
- Extension to the bathhouse in the form of a gazebo
Types of modern gutters, their pros and cons
There are several drainage systems:
- Disorganized. Due to the sloped roof, rainwater flows directly to the ground. A significant disadvantage is that splashes and moisture get on the walls, facades, and foundations of buildings, which accelerates their destruction. It is not recommended to install in residential buildings. Suitable for arranging a pitched roof for sheds, garages, and utility buildings.
- Internally organized. Such spillways are installed in high-rise buildings. Excellent for regions with harsh climates. The pipe system is located inside the walls, so the risk of ice freezing is minimal.
- External (external) organized. Common type of fastener. The product consists of interconnected gutters and pipes through which water flows from the roof.
The shapes are rectangular and round. They are sold ready-made, but they are easy to make yourself.
There are plastic and metal drainage systems.
Made of plastic
The most popular type in private and low-rise construction. The material is polyvinyl chloride (PVC) with special additives that make the product resistant to temperature changes and ultraviolet radiation.
Among the advantages of plastic models:
- a light weight;
- resistance to sunlight (the material does not lose its properties, does not fade);
- frost resistance;
- ease of fastening;
- affordable price;
- variety of details and colors.
The operating temperature range is -40 to +70 degrees.
Among the disadvantages:
- The damaged part cannot be repaired.
- Destroys and cracks with a strong impact or fall.
- Expands when heated.
- Not suitable for use in multi-storey buildings.
Despite the disadvantages, the installation of plastic drainpipes is in greater demand due to the simplicity and accessibility of installation.
Made of metal
Metal gutters are:
- aluminum;
- copper;
- zinc-titanium;
- steel (galvanized, with a polymer layer, multi-colored).
It costs less and lasts longer when galvanized with a protective polymer coating. Moreover, the polymer layer is present both on the outside and inside. The choice of colors is large.
Among the advantages of a metal drainage structure:
- Withstands sudden temperature changes in the range from -60 to +130 degrees.
- Does not burn.
- The elements are durable and reliable, resistant to mechanical damage.
- The metal copes well with strong winds and does not deform under heavy snow loads.
The main disadvantage is that if the polymer layer is damaged, the metal begins to corrode and deteriorate.
The choice of drainage elements is small, and therefore the scope of use remains limited. It is more difficult to attach than the plastic type. The price will be more expensive.
Materials used
If there is not much variety in the shapes of gutters, then the buyer is given greater freedom when choosing a material. What types of gutters are there based on the material they are made of?
Copper
Traditional material has been used by people since ancient times. Reliable and stylish copper products immediately indicate the wealth and taste of their owner, his commitment to tradition.
Advantages:
- corrosion resistance;
- strength and reliability;
- does not require a protective coating;
- high aesthetic qualities.
Flaws:
- high price;
- heavy weight.
Zinc-titanium
Steel coated with an alloy of titanium and zinc can be easily painted in the desired color. The advantages include high corrosion resistance.
Flaws:
- price;
- corrosion protection is significantly reduced in case of mechanical damage to the surface.
It happens that a coloring pigment and a polymer protective layer are applied on top of the coating. Such products are especially reliable, although they are more expensive.
Cink Steel
One of the most affordable materials. Galvanized sheet steel is easy to process. The polymer protective coating protects the sheet from exposure to atmospheric conditions and mechanical influences.
Advantages:
- price;
- strength;
- wide palette of colors;
- easy to install.
Flaws:
- limited service life;
- fading of paint in the sun.
The metal drain has an excellent price/reliability .
PVC plastic
The parts are molded from polyvinyl chloride using the extrusion method. This allows you to give plastic products the most complex shape.
Advantages:
- light weight;
- absence of corrosion processes;
- independence from scratches and microdamages.
Flaws:
- fragility;
- limited strength.
Plastic systems lead the rankings of low-cost solutions.
Gutters made of any material require the installation of snow guards on the slope.
Gutter elements
Their list includes:
- Gutter Designed to collect rain and melt water from the roof.
- Gutter plug. Attaches to the ends. Directs water down the slope towards the funnel.
- Gutter connector. They are used to connect gutters to each other. Tightness is achieved through a rubber seal.
- Universal angle. Changes the direction of water flow. It needs to be fixed on the inner and outer corners of the roof.
- Pipe elbow. Often used to neatly go around building façade elements. Changes the direction of water flow through a pipe.
- Funnel. Works as a water receiver. Connects gutters to pipes. Redirects water from the catchment to the drainage system.
- Drain pipe. Designed for vertical water flow.
- Connecting coupling. Pipe fastening element. Responsible for compensating for thermal expansion.
- Drain. Drains water from the system into the soil.
- Universal clamp. Allows you to attach the pipe at the desired distance from the house.
- Metal, plastic brackets. Required for installing gutters on the roof eaves.
- Straight or side bracket extension. Used when you need to attach the gutter bracket to the rafters or roof slope.
- Adjustable angle. Suitable for right angles and up to 150 degrees.
- Clamp for fastening the pipe to the facade of the building.
- Protective grille. Prevents debris from entering the drainage structure.
- Rotating eaves eaves for wall mounting.
The number and names of elements for different types of roofs may differ and be supplemented.
Installation of drainage from pitched roofs
A building that is not provided with high-quality drainage during construction will, in a very short time, acquire a rather unpresentable appearance under the influence of precipitation. And most importantly, the general condition of the structure will also be negatively affected, which is why mold and an unpleasant odor may appear in many places.
A drain is needed to prevent water from accumulating on the roof and falling on the walls and foundation
And if this problem is not approached with all seriousness, the following problems will arise that will require constant financial expenses:
- high humidity will cause weakening and gradual destruction of the foundation and base of the house;
- undiverted water will penetrate into the basement and constantly fill it;
- mold and high humidity will affect the health of residents;
- the noise from flowing water will interfere with a comfortable rest.
The drainage system is used everywhere to remove precipitation from the surface of roofs: flowing water from the roof enters a special gutter and then flows through drainpipes to the ground away from the building. The purpose of the gutter is precisely to collect water from the roof surface. The drainpipe provides water drainage to a specially designated place. But to install a drain, you will need not only a pipeline and a gutter, but also elbows, clamps, fasteners and other elements.
The drain consists of horizontal gutters and vertical pipes
Gutter system configurations: closed and open
The type of roof determines the design of the drainage system. For example, for a house in a suburban area that has an ordinary gable roof with a straight eaves, a simple system with two gutters and a small number of drainpipes is best suited.
But when the roof slopes have a complex configuration, the design of the drainage system becomes more complicated. In this case, to ensure the aesthetic appearance of the building, you have to resort to various tricks to ensure reliable drainage.
Closed drainage system
A closed drain is installed if the house has a hip roof. The gutters are of a single design located along the perimeter of the slopes and do not have any plugs. It is worth paying attention to the fact that water drainage from a hip roof occurs in all directions, so drainpipes are best placed in the corners of the house.
Calculation of drainpipes in a closed system is carried out taking into account the entire roof area with values rounded up.
The choice of gutter type depends on the shape and configuration of the roof
Open drainage system
An ordinary roof with two slopes will have its own gutter with drainpipes for each slope, which means the presence of two open systems.
Drainage pipes in open systems must be installed at the corners of the building and exactly in the center of the wall.
Drainage system for pitched roofs
The simplest drainage design has a pitched roof. Sediment will flow from it in one direction, so it will not be difficult to collect it.
A pitched roof gutter consists of a small line of gutters and a downspout
In houses with only one floor, a fairly common solution is to use a rain chain instead of pipes, which is less noticeable.
The chain as a drain has become very popular on the Japanese islands, as it is also an element of facade decoration. It is often made from copper. Alas, currently manufacturers of drainage system elements for the Russian market do not produce decorative elements for drainage chains.
But if you want to make such a system yourself, be sure to comply with the following requirements:
- The chain must be tensioned to prevent it from oscillating from side to side, for which purpose the lower end must be secured in any possible way.
- To avoid water getting on the finishing materials of the building, the chain must be installed at a distance of at least 0.5 meters from the wall.
The implementation of such an idea is quite simple, the main thing is to have the desire.
The drainage chain is an excellent decorative element of the building facade
Drainage system for gable roofs
A standard gable roof has gutters that are located at the corners of the house. This arrangement is most appropriate from both an aesthetic and a technical point of view.
The installation location of gutters is directly influenced by the roof structure.
The location of the drains must be selected based on the roof plan. The installation must ensure the aesthetics and reliability of the drain, but the priority is still reliability. The length of the drain pipes is determined taking into account the distance from the gutter to the drain point (plinth area or sewer well).
The installation location of the drain pipe is also determined by the length of the roof slopes. With a length of less than 12 meters, the pipe can be located at any point on the wall, except in cases where there is a window, balcony or bay window nearby. With a length of more than 12 meters - near the center of the cornice. The main thing is that there should be no more than 24 meters between the pipes.
On gable roofs with small slopes, drainpipes can be installed in any convenient places
Gutters on roofs of complex shapes
It is difficult to design drainage for a multi-slope roof, since each slope requires its own drainage system. It is these difficulties that will be discussed in detail.
The influence of the number of slopes on the design of the drainage system
In the case where the roof has a large number of slopes, and the drainage system is built at minimal cost, a large volume of water entering the gutter sharply reduces its flow rate due to the insufficient volume of the gutter itself. This causes a large load on the system design and leads to rapid freezing of water at subzero temperatures. Therefore, when designing a drainage system, it is imperative to take into account the increase in load associated with a large area of roof slopes.
Superstructures and hatches
The next difficulty is to ensure drainage on towers or balconies, since it is in these places that moisture is most likely to penetrate into the structure and freeze. That is why building minimalism is currently fashionable.
Ensuring drainage from the tower is a non-trivial task, since it is necessary to install a gutter in the form of a circle. It is almost impossible to make a metal gutter of the required diameter by bending a single piece of material. Such a gutter is made from small segments soldered together and painted in the color of the roof to hide the junctions of the segments.
And for a roof window and skylight, a gutter is not required. The main thing is to know the direction of water flow and the place of its accumulation. In the case of lucarnes, a gutter is installed only when it has a large area and multidirectional slopes.
It is not necessary to install a drain to drain water from the hatch
Gutters for drainage structures
Depending on the throughput, different markings are produced. The marking shows the ratio of the diameter of the pipe to the gutter.
The following options are considered:
- 100/75;
- 125/90;
- 150/110.
Gutters are divided into:
- semicircular;
- rectangular;
- corner.
If the first two types are responsible for collecting water from the roof, then the corner gutter changes the direction of flow.
Fixation is carried out on the outer and inner corners of the roof.
Plastic gutters can be used to make both sharp and obtuse angles. To do this, you need to cut out a part and mount the halves at the required angle. The fasteners are cold welded.
The average gutter length is from 3 to 4 linear meters. Sold individually.
They are attached to the roof with brackets and hooks in increments of 60–90 cm, maintaining a slope of 1 cm every 3–4 meters. The fewer connections there are, the faster and cheaper the installation will be.
Conclusions and useful video on the topic
Manufacturers of drainage systems care about the correct installation of their products, so they are increasingly producing videos that help you understand all the nuances of installation:
If we compare the technologies for installing gutters (round and rectangular), the design of rectangular systems looks more complicated. Some parts differ in size and configuration. For example, the thickness of the strips of brackets for a rectangular gutter is usually taken to be at least 3-4 mm.
However, from an operational point of view, rectangular systems are more preferable. With savings of 10-15% relative to the installation of round gutters, they provide greater throughput.
Do you have personal experience installing metal roof gutters? Would you like to share your experience or on the topic of the article? Please leave comments in the block below.
Methods for connecting drainage gutters to each other
There are 3 types:
- Glue. The area where the gutter is fastened with a coupling with a lock and a gasket is treated with adhesive-sealant. Recommended for use in areas that will not be exposed to direct sunlight.
- Glueless. Suitable for both metal and plastic elements. The connection is made using couplings with a durable gasket that does not require sealing.
- Soldering. Suitable for steel or copper gutters. Used by craftsmen. Not suitable for joining by beginners at home - high precision is required when processing edges.
You need to choose the connection option based on the recommendations of the manufacturer of the drainage elements. In the corners, it is recommended to use adapters with high-quality seals.
Recommendations for choosing a drainage system
In accordance with SNiP standards, water flow from 1 sq. m of roof should be taken by a transverse drainpipe of 1.5 sq. m. cm . This indicator is for central Russia. For the southern part of the country the value is 1.5 times greater.
The larger the area of the roof slope, the larger the drainage elements will need to be used.
With an area of up to 50 sq. m, it is recommended to install gutters 100 mm wide and pipes 75 mm wide. If the area is 50-100 sq.m., then gutters with a width of 125 mm and pipes from 87 to 100 mm are used. For sizes over 100 sq.m, gutters with a width of 150–200 mm and pipes with a width of 120–150 mm are taken.
Rules for installing gutters
It boils down to this:
- The gutters need to be hung at a slight angle of 3 to 7 degrees, then the water will drain by gravity.
- When fastening, a bracket is placed on one side of the slope closer to the eaves of the roof, and on the other side the fixation is made lower to form a slope. A thread is pulled between these brackets and auxiliary brackets are mounted every 50 cm.
- The gutters need to be laid with an overlap so that the edge of the top is on top of the edge of the bottom tray. This will avoid leaks. For reliability, all joints are sealed with silicone sealant.
- According to the standards, hang vertical drains at a distance of 12 m from each other. If the length of the facade is from 12 to 24 m, then you will have to attach 2 risers.
- The pipes are fastened to the wall of the house using clamps with self-tapping screws through plastic dowels. The fastener pitch for low buildings is 1.8 m, for multi-story buildings it is reduced to 1.5 m. Compliance with the vertical is checked with a plumb line.
- Pipes with trays are connected with funnels. At the bottom of the riser you need to drain at 45 degrees. The distance from the drain to the ground or blind area of the house is at least 25 cm.
The correct method of connecting parts of pipes is socket, when a pipe of a smaller diameter is inserted into a larger one. The joints are sealed.
Installation features
The technology for installing a drainage system from a pitched roof is simple, but has a number of nuances that must be taken into account. One of the most important is the correct method of fastening, because this will determine how strong and reliable the system will be. The brackets must be securely screwed to the front board, sheathing or rafters at a certain pitch. Installation is carried out until the final finishing of the roof. If they are not secured correctly, the structure will begin to sag over time, causing the gutters to leak.
Plastic roof drain
An important point is the correct installation of the gutters themselves. They should be positioned so that they are partially covered by the edge of the roof - approximately 1/3. In this case, it will be possible to achieve the most efficient collection of liquid. In this case, the edge of the gutter should be located approximately a couple of centimeters lower than the slope itself - in this case, the gutter will not be damaged when snow and ice melt from the roof.
The connection of two gutters is a moment that also requires special attention. They can be fastened with glue (if they are made of plastic), couplings and seals (for plastic or metal gutters) or by soldering (the method is optimal for copper structures).
Methods for installing fasteners for laying gutters
On a note! PVC products may change slightly in size due to temperature changes, so it is recommended to connect them so that they retain some mobility. Otherwise they may become deformed.
The drain pipe itself, located vertically, should be located as close as possible to the wall of the house and secured with clamps. This will increase its resistance to wind. Individual sections of pipes, as well as pipes with funnels, are also connected using special connectors.
By the way, as for clamps for drain pipes, in the upper part, near the roof, the pipe is fixed with a rigid clamp, and in the middle or lower with a loose clamp. The distance between them should be approximately 2-2.5 m.
The runoff can be discharged directly into an underground stormwater system through a storm well, if one is available. You can also consider other options for recycling rainwater.
Drainage planning and schemes
To understand the installation of a drainage system step by step, it is important to consider the following points when planning:
- Calculate the roof area, both total and in the section of each slope.
- Schematically depict the future installation, indicating the places where the funnels are fixed, the diameter of the gutters and the number of required elements.
- Craftsmen recommend purchasing all products from one manufacturer to eliminate discrepancies in part sizes.
- Select the system material wisely. Although aluminum and steel pipes are more expensive, they will last longer than plastic ones.
- When making calculations, take into account the standards of technical documentation, SNiP.
An important point is the location and design of the drain. Depends on the type of roof. The gable roof is equipped with two separate gutters. In a non-standard hipped roof, the perimeter becomes a solid contour of interconnected gutters.
The number of risers is determined by the length of the front part of the house. It is generally accepted that one riser is enough for every 12 m. For a larger figure, you will need to install two risers plus a compensating funnel. The last element is used, and when there are other buildings near the building or along the perimeter of the roof, it is planned to install a closed drainage system.
It is important to correctly calculate the number of long and short brackets in the form of hooks. If the roof will only be covered with material, then long hooks are fixed to the sheathing. Short ones can also be used after laying the roof, securing them to the front board.
When choosing a location for installing risers, you need to take into account the general appearance of the building so that the pipes do not spoil the aesthetics of the building. Therefore, drains are often installed in corners.
If the building frame is unusual or siding is used to finish the facade, it will be more difficult to choose the optimal location, since vertical pipes are placed next to the load-bearing supports.
Quality, guarantee and price
It is important to note that not all drainage systems are the same in quality.
As in any other case, saving on a gutter system may lead to the need to replace it. Which is almost always more expensive than buying a good quality gutter outright.
One of the important parameters when choosing is a written guarantee for the gutter.
If, for some reason, the manufacturer refuses to provide it to you, you should think about it.
For high-quality drainage systems, the written guarantee has an impressive period of 25-30 years.
The issue of price is now important. Of course, different systems have different prices.
To check current prices, you can use online stores, where prices are updated in real time. For example, in the Grand Line online store.
We perform calculations correctly
When calculating the required amount of materials, we take into account the following points:
- The standard length of gutters is 3 m. Their footage corresponds to the length of the cornices.
- One funnel is needed for each gutter.
- The number of brackets is calculated by dividing the length of the cornice into segments of 50–60 cm (this is the step with which the fastening will be carried out). Before calculating, it is recommended to leave a margin of 5 cm from the edges of the cornice.
- If the funnel is placed near the corner of the house, then one holder (bracket) is enough; when installed in the middle of the wall, two are needed.
- Each pipe branch requires two plugs.
- You will need two upper and lower elbows to assemble the riser outlet.
- If the overhang of the roof eaves is more than 25 cm, you will have to buy two pieces of pipe to connect the elbows. When suspended up to 25 cm, the knees are simply connected to each other.
- Number of pipes for the riser. To calculate it, take the distance from the ground to the cornice minus the length of the outlet and a distance from the ground of 40 cm.
- To fasten the risers you will need two main brackets and additional ones every 1.5 m.
Calculations for houses with an attic and veranda are carried out in a similar way.
Important technical points
Ensuring reliable drainage guarantees protection from moisture on the walls and foundation of the building. To ensure that the requirements for the design of drainage systems are met, SNiP 2.04.01–85 has been developed and applied. These rules are responsible for the standards for drainage arrangement:
- The horizontal clear distance between the inlets of the domestic drinking water supply and the outlets of the sewerage and drains must be at least 1.5 m for an inlet diameter up to 200 mm inclusive, and at least 3 m for an inlet diameter over 200 mm. Joint installation of water supply inlets for various purposes is allowed.
- Internal drains must ensure the removal of rain and melt water from the roofs of buildings. When installing internal drains in unheated buildings, measures should be taken to ensure heating of pipelines and drainage funnels at negative outdoor temperatures (electric heating, heating with steam, etc.). The feasibility of installing heated internal drains should be justified by technical and economic calculations.
- Water from internal drainage systems should be discharged into external networks of rainwater or common sewerage systems. In the absence of rainwater drainage, the discharge of rainwater from internal drains should be received openly into trays near the building (open discharge), and measures should be taken to prevent erosion of the ground surface near the building.
- At least two drainage funnels must be installed on the flat roof of the building and in one valley. Drainage funnels on the roof should be placed taking into account its topography, the permissible drainage area per funnel and the structure of the building.
- The maximum distance between drainage funnels for any type of roof should not exceed 48 m.
Calculation of the drainage system
The size of the drainage surface is the total area of all roof slopes or their projections. The areas of the slopes are calculated using the following formulas:
- Area of a rectangular roof slope: P=D*A, where D is the length of the slope, A is the width of the slope or its projection.
- Area of a triangular roof slope: P= 1/2D*H, where D is the length of the slope, H is the height of the ridge.
When calculating, it is necessary to take into account that if the gutter length is no more than 10 meters, one drainage funnel is sufficient, and the maximum distance between the funnels should not exceed 20 meters.
The drainage system consists of gutters, downpipes and a number of connecting and fastening elements
Roof mounting technology
Involves installing gutters on brackets:
- to the rafters;
- on the front board;
- to the edge of the roofing material;
- using additional brackets.
Let us examine in what cases it is advisable to use different types of installation.
To the rafters
Fixing the drainage to the rafters is carried out when the sheathing has already been covered with roofing material, but it is also allowed before laying corrugated sheets, slate and various soft flooring.
The fastening element is brackets with a long leg bent at a right angle.
When the roof is covered, you will have to tear off or unscrew the last row, if it is slate or metal tiles, in order to secure the drainage system to the last row of the sheathing, the rafters. When using soft tiles or ondulin, simply lift the last row to tighten the bracket.
This method is used if the cross-section of wooden rafters is from 180*50 mm.
When fastening, the roofing material must cover the gutters.
On the front board
The front board is mounted at the ends of the rafters. Width may vary.
Fastening is carried out with long brackets or hooks made of a guide metal profile and a bracket.
Special long planks with a groove are also produced. The plank is screwed to the board with self-tapping screws, and brackets fit into the grooves.
To the edge of the roof covering
In this way, the drainage system runs along the eaves of the roof. Used when a rigid material such as corrugated sheeting has been selected for the flooring.
To fasten the brackets (plastic or metal), you will need special clamps.
There are times when you cannot do without holes in the roof. Then it is recommended to put rubber gaskets under the metal clamps (if any). This way there will be less chance of damage to the roof.
Using an additional bracket
Installation is carried out when the roofing is completed. The risk of material damage is minimized. Also, additional brackets will be required if the main brackets for fastening the gutters are short.
Take a long bracket and simply bend it to the required length, fix it with a self-tapping screw to the wooden sheathing.
It is important to maintain the required distance from the center of the holder to the edge of the overhang. The recommended value is 30–40 mm. This will allow water from the roof to flow into the center of the gutter. Otherwise, water will overflow over the edges.
Types of brackets
This fastener is available in three varieties on the market:
- Long. Standard products used when roof sheathing is not installed and roof decking is not installed.
- Short. Used for installation on the wall of a house or on a front board. There is an option for attaching to the ends of the rafter legs, but this option is not the most successful, because the screws will be screwed into the lumber in the direction of the longitudinally located wood fibers. This is an unreliable mount.
- Universal. A collapsible design that can be used in any situation related to the installation and fastening of brackets. The size of the shank of the latter can be changed: increased or decreased. This is the main advantage of this variety.
Available types of brackets for fastening gutters
In what cases is drain pipe heating used?
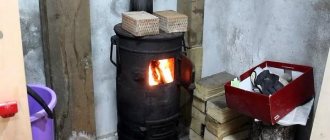
Often during a long winter, a lot of snow gets inside the drain and ice freezes. A plug is formed, due to which the thawed water cannot flow down the pipe by gravity, so it overflows over the edges and, upon freezing, turns into icicles. There is not only a risk of damage and deformation of drainage elements, but also a danger to the lives of people nearby.
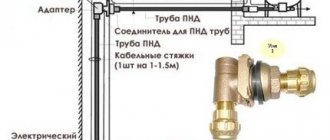
In order to prevent icing and prevent such a situation, a cable is laid inside the drain that will heat the system.
When powered by electricity, the cable generates heat. Fastening is carried out after the installation of the drain. Placed inside gutters and risers in a longitudinal position. Fixation - special clips made of plastic or metal.
A thermostat with built-in humidity temperature sensors and a power supply are supplied along with the cable. Using a thermostat, you can control the heating temperature of the cable taking into account weather conditions: reduce it when it’s warm outside and increase it when it’s very cold.
To improve the effect, the cable is also laid on the roof overhang. They do this with a snake, fixing it with clamps to the flooring material.
Complete set of spillways
The configuration and structural characteristics of the systems have a significant impact on the methods of installing gutters on the roof of houses.
What are the main elements of gutters?
| Item name | Description and installation features |
Brackets | They are used for fastening gutters; they can be fixed to sheathing boards (hooks) or to the eaves strip (brackets). The first (hooks) are made only from a metal strip and are bent to give a slope to the drainage system manually during installation. The main feature is the need for installation before the start of roofing work, otherwise the first row of coverings will have to be dismantled. Currently considered an obsolete design and rarely used. More often, brackets are used that are fixed to the cornice board or rafter overhangs. Can be made of plastic or metal. The most modern models have the ability to precisely adjust the position of the gutter after attaching the elements to the board. |
Gutters | They take water from the slopes and direct it to the funnels. They are mounted along the entire perimeter of the building with a slope of up to 4–5 mm per linear meter. They can be round or square in shape; there are options for making gutters yourself. Installation is done after completion of the roofing work. To protect elements from falling snow, snow guards can be additionally used; this is an active method. A passive method of protecting gutters from mechanical damage is to maintain the difference in height between the continuation of the roof projection and the upper edge of the drainage system element. For proper installation, it is necessary to make preliminary calculations of the roof; the parameters of the gutters are selected depending on the area of the slopes. Simultaneously with this data, you need to calculate the number of funnels. They must have time to pass all the rainwater during peak loads; one funnel per 10 m of gutter is recommended. |
Gutter turns | Most often they have an angle of 90°, but sometimes they are also found with an angle of 135°. To seal the joints with the gutter, rubber or adhesive seals are used. During installation, you should pay attention that the distance from the corners of rotation to the brackets does not exceed 10–15 cm. The strength of the system in these places is lower; a more reliable suspension is required. |
Funnels for collecting water | They are installed on gutters and direct the water they collect into vertical pipes. Correct fastening is impossible without preliminary calculation; installation of one funnel for every 10 m of gutters is considered universal. But a specific decision should be made after a careful analysis of the slope area and maximum precipitation in a given climatic zone. Funnels can be pass-through (mounted anywhere in the gutter) and left or right. The latter are installed only at the ends of the system; the design has special plugs, which simplifies the installation process and increases the reliability of the entire system. |
Elbows and tees for drainpipes | They allow you to change the direction of water flow and connect several elements of the system to one vertical pipe. They are inserted into a socket-type connection; during installation, you need to pay attention to the direction of the elements in relation to the movement of water. |
Clamps for fixing drain pipes | During installation, it is necessary to monitor the distance between the points of fixation of the elements; depending on the material of manufacture and the diameter of the pipe, it ranges from 1.2–1.8 m. The type of fixation to the facade wall changes depending on the materials of its manufacture. Clamps can be plastic or metal. |
Drainage pipes | They have different lengths, but most manufacturers adhere to the standard of 3 m. The diameter is selected taking into account the water flow; the quantity, installation location and total length are calculated before the installation of the drainage system begins. |
Installation of external drainage
A properly installed roof drain in accordance with SNiP will provide reliable protection of the facade from the negative effects of precipitation. You can learn about the types of drains, the features of their calculation and installation from the article on our website.
Prices for gutters
Gutters
Common installation mistakes
In the absence of experience, the following mistakes are most often made:
- Failure to comply with the slope of the gutters. The recommended rate is from 3 to 5 mm per 1 linear meter. If the indicator is higher, water simply will not get there; if it is lower, areas of stagnant water and debris will form, and unscheduled drainage cleaning will have to be carried out. To correct such a defect, you have to break part of the roof.
- Saving on the number of brackets. The consequence is that an overly flexible structure becomes less resistant to wind loads, with a high risk of damage and breakage. For drainage from plastic, fasteners are carried out in increments of 50 cm, from iron and other metal - every 60 cm.
- The couplings are not connected correctly. The consequence is that leaks occur in such areas. Do not neglect the use of rubber seals and you need to seal the joints with sealant. It is recommended to double fasten the brackets (on both sides).
Craftsmen do not recommend purchasing materials for drainage from different manufacturers, since the installation process may reveal inconsistencies between elements and lack of tightness of the structure.
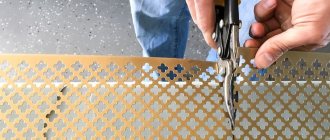
From metal profiles for plasterboard
The lightweight and durable metal profile is perfect for draining water. We find the required amount of material based on the perimeter of the roof of the house.
Profiles around the entire perimeter of the house can be attached to:
- brackets;
- wire;
- bars.
To protect against water pouring out of the gutters, it is cut into 2 parts, the end is left above the funnel and bent to make a semicircle barrier at the corner. The drain pipes and funnel will have to be made from other materials.
Step-by-step instructions for installing a drain with your own hands
Let's look at the self-fixation of the plastic system step by step.
Necessary tools and equipment
To work you will need the following set:
- metal scissors;
- screwdriver;
- hacksaw for metal or wood;
- hammer drill (to attach clamps to the wall);
- level;
- hand or electric drill;
- screwdriver;
- tape measure, pencil;
- rubber hammer;
- scaffolding;
- marker, cord (for marks);
- miter box - a tool for perpendicular cutting.
If the work is carried out with galvanization, then you will also need pliers.
Installation procedure
The recommendations are:
- We mark the places where the outer brackets are attached to the cornice. Moreover, the edge of the roof should be at a distance of up to 15 cm from the bracket.
- Now we mark where the funnels will be installed. According to the standards, one funnel goes to 50 square meters. m of roof or one funnel per slope. Place it near the edge or in the middle. We mount the bracket on the other side of the cornice. We screw the funnel to the front board or to the holder extensions (when there is no front board).
- We stretch the rope at the required slope between the funnel and the outer holder. We check compliance with the slope. We place brackets every 15 cm on both sides of the funnel.
- We fix the brackets along the remaining length of the cornice every 50 cm.
- We insert the gutters into the funnel until they snap completely into place.
- Now we insert the gutters inside with the bracket until it snaps into place.
- If the roof design requires it, we place a connector between the two gutters.
- When the funnel is attached to the edge of the cornice, in order to close it with a plug, you will have to connect these two elements with a piece of gutter. We make a section with a protrusion beyond the edge of the roof by 5–10 cm.
- Place the plug on the gutter until it clicks.
- To connect the gutters at an angle, we take a special universal angle. If the rotation is not performed at a right angle, it is better to take an adjustable angle. We seal the joints with sealant.
- Cover the top of the gutters with a protective grille.
- If there is a cornice overhang, then we connect the funnel with the pipe with two elbows and a piece of pipe of the required length. We attach a clamp to the lower knee.
- If there is no such extension, we connect the funnel with the pipe directly to each other or with a coupling.
- We connect the pipes to each other using a coupling with a gasket.
- We attach the pipes to the house with clamps every 1.5 m. To do this, screw a dowel into the facade, screw on the clamp, and tighten the clamp on the pipe.
- At a distance of 20 cm from the ground, we attach the drain to the pipe.
- On a flat roof, when the slope is adjacent to the wall, we install a rotary ebb.
At this point the work can be considered completed.
How to install vertical drainage systems
The peculiarity is that vertical drainage systems for connecting to a funnel often have several angles. Their number depends on the shape of the building.
The installation sequence is as follows:
- The distance from the wall to the funnel and the length of the coupling are determined. Two angles are selected. The lack of distance is compensated by a piece of straight pipe.
- The upper elbow must be made non-separable, that is, glued to the funnel, the others are inserted without glue.
- Markings are carried out for clamps. This is where a level comes in handy. Adhering to the vertical, points for each clamp are marked.
- Holes for dowels are drilled at the marked points. The clamps are fixed. When a brick wall has a layer of thermal insulation made of polystyrene foam, polystyrene foam or a sandwich panel finish, the length of the dowel should be enough to go deep into the wall at least 3 cm.
- The pipe is inserted. Fixed with a clamp. There are two clamps per 3 m of pipe.
- An elbow is glued to the pipe, through which water will flow onto the paving stones into a drip tray or any container. Summer residents often use the accumulated water for household purposes.
Experts advise working with plastic parts without excessive force, because no matter how durable PVC is, any impact can cause a crack to form.
Proper installation of drainage will protect the roofing and building façade from excess moisture and extend their service life. It’s quite possible to do the work yourself. Otherwise, you can order turnkey installation from specialists.
How does a drainage system work?
- The holders are attached in increments of 500-600 mm. The first and last are fastened at an angle. For more precise fastening at the lower points, you need to pull the cord to determine the location of the remaining holders.
- The installation of gutter drainage systems determines the correct operation of the entire water drainage system. The outer part of the gutter should be located at a distance of 25 mm from the roof plane. The gutter must be mounted in the holder, and the joints must be locked together using sealant. Laying is done starting from the funnel.
- To better collect precipitation, a drip is installed and secured to the rafter system, after which it is lowered 2 cm inside the gutter. To install the plug, sealant or special glue should be used.
- When installing a funnel, oblique cuts are made at the installation site. The funnel edges are connected to the front and rear edges of the gutter using glue.
- The pipes must be connected to each other and secured in the funnel using special clamps. A 2mm gap should be left between their elements.
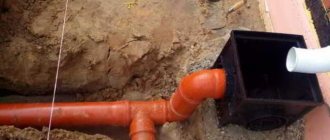
To drain collected sediment from the foundation of a building, you will need to install a small storm drain in the place where sedimentary water pours out of the drain pipe, and using ordinary plastic pipes, take it to the other end of the existing area to a filter well that was dug in advance, or simply direct it him to the street.
A pit can serve as a storm drain, which will need to be concreted or you can use completely ready-made building elements, which you can easily buy in ordinary hardware stores. The second construction option is simpler, but more expensive.