During the period of snow melting or the rainy season, the soil is always saturated with moisture, and if the site is located in a low part of the terrain, water will also flow to it from neighboring areas. At the same time, the water level in the underground horizon usually rises, so the resulting problem can be quite large. City dwellers usually do not encounter such situations, but if they have treasured suburban acres in their possession: six or a little more - depending on your luck, such an issue as drainage on a summer cottage may well become relevant. You will learn how to resolve it most optimally from the material offered here.
In this state of affairs, something needs to be done urgently
Why is site drainage needed?
Excess moisture on the site creates big problems for owners not only with obtaining a bountiful harvest, but also with safe living in the house:
- The accumulation of water at the base of the foundation provokes soil movement and can negatively affect the integrity of the building.
- Mold appears in damp basements and gradually spreads throughout the house.
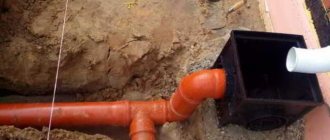
- When the groundwater level is high, the wet soil “squeezes out” the septic tank and creates problems in the waste system.
The septic tank was squeezed out by groundwater - Overwatering leads to rotting of plant roots, which interferes with the normal growth of garden crops and has a detrimental effect on the harvest.
- In an area with a strong slope, water flows wash away the fertile layer of soil.
All these troubles can be avoided if you properly equip the drainage system on the site.
Excess moisture can be caused by three categories of water. Surface – formed during rainfall that falls over a long period of time. Underground - have different levels of occurrence, the magnitude of which depends on the time of year. In winter, the water drops to the lower limit, and in the spring it rises to its maximum height. Verkhodka , this underground water does not manage to completely go into the soil, because an obstacle is encountered on its way - for example, a dense layer of clay.
Video description
Tips on how to choose drainage pipes can be found in the video:
Cost of drainage pipes
The price of drainage pipes depends on many factors:
- material
- product diameter;
- number of layers;
- presence of geotextiles.
Approximate prices for popular types of pipes are presented in the table.
| Pipe name | Diameter, mm | price, rub. |
| HDPE drainage pipe | 63 | 45–55 |
| HDPE drainage pipe with geotextile | 63 | 50–60 |
| HDPE drainage pipe 2-layer | 63 | 65–75 |
| 2-layer HDPE drainage pipe with geotextile | 63 | 80–90 |
| Perforated HDPE drainage pipe with geotextile | 200 | 260–180 |
In what cases is drainage necessary?
There are several circumstances in which the arrangement of a drainage structure is considered a prerequisite:
- The site is located on a plain. If there is a lot of precipitation in a short period of time or after a long winter the snow is actively melting, then the soil is oversaturated with moisture.
- Low place. All the water drains from higher places and remains in the lowlands for a long time.
- The site has a strong slope. Streams of water caused by heavy rains will wash away the top layer of soil, the most nutritious for plants. In such conditions it is impossible to count on a rich harvest.
- Heavy loamy soil. It retains too much moisture in the surface layer, which in large quantities harms plants.
- High groundwater level. In some areas, the aquifer is located very close to the surface of the earth.
- Concrete platforms and paths made of paving slabs. Artificial coatings, which occupy a large area of land on the site, interfere with the natural drainage of moisture.
It is preferable to carry out drainage at the initial stage of development of the site, when there are no buildings and trees have not been planted.
If the site is already landscaped, then the drainage system is carried out taking into account the location of objects and plants. Artificial drainage of water should not destroy the landscape.
Tips and tricks
As practice shows, it is most advisable to arrange deep and surface drainage at the same time. In this case, both systems will work simultaneously and with greater efficiency. Timely cleaning and proper care of inspection wells and wells will significantly extend the life of the system and the integrity of the foundations of buildings.
It is definitely worth considering that the soil in the trench area will shrink significantly in the first season. Therefore, it is not worth decorating it with permanent plantings right away. It is better to survive at least one flood season and re-level the terrain with an additional layer of earth.
To significantly reduce installation costs, drainage pipes in a dacha can be replaced with a bunch of dry branches or a structure made of PET containers.
Types of drainage
| Open (superficial) | The simplest method of drainage that does not require global labor costs. Drainage trenches are dug on the site and left open, i.e. do not cover with sand or gravel. Sometimes they are covered with decorative grilles so as not to clog the ditches with large debris. Open systems are used to drain surface water. |
| Closed (deep) | The drainage system is made up of pipes with numerous holes into which moisture enters, and wells for collecting flowing water. The pipes are placed in prepared ditches, then covered with gravel or sand. Water easily seeps through such layers and penetrates into the pipes. Next, the water flows into an equipped well or into a drainage ditch. This system reduces groundwater levels well. Sometimes, instead of laying pipes, the grooves are simply filled with gravel. |
The deep method of water drainage is divided into several types according to the design solution:
- Ray – narrow pipe beams are diverted from the central pipe along an inclined plane. Used in areas with dense buildings and dense plantings.
- Wall-mounted - used to drain water from the walls of the house. The ditch is dug at a distance of at least one and a half meters and deepened 10 cm below the level of the basement floor. The system includes several wells and uses pumps to drain water from the site.
- Ring is a complex method, because the drainage is located 30 cm below the groundwater level, and the pipes are buried around the house in the shape of a ring.
A budget option can be called point drainage . Recessed storm water inlets are installed next to roof gutters and covered with gratings. Catchments are also installed in recesses in the area where rainwater accumulates.
Summarizing
The practice of users of our portal suggests that a way out of any situation, even the most hopeless one, can be found. If you lack experience or self-confidence, you can always seek advice from experienced FORUMHOUSE members, who will always tell you what and how to do correctly during construction. And even without a large budget, with the right approach you can make a reliable and inexpensive storm sewer and site drainage system with your own hands.
A thread on FORUMHOUSE explains how to drain and drain a wetland. We also advise you to study the topic, which gives advice on choosing geotextiles for the drainage system.
Useful articles about the features of the drainage system of the foundation and site, the choice and independent installation of a drainage well, and what to do if the basement floods.
The videos contain the nuances of site drainage and tips on choosing drainage pipes.
Schemes of drainage systems
Point drainage does not require drawing up a project and can be easily formed independently, without the involvement of specialists. As a rule, a simple scheme consists of a funnel, a water inlet and outlets, which, depending on the location of the “point,” are connected to a storm sewer or a closed drainage system.
To build point drainage, you must perform the following steps:
- dig a hole larger than the water intake;
- concrete the bottom with a layer of at least 10 cm;
- place the water intake in the prepared hole;
- connect it to the drainage system;
- the space between the outer walls of the water intake and the slopes of the pit should be concreted;
- Install a grate on top of the water inlet.
Note! The plane of the grating must be at least 5 cm below the ground surface.
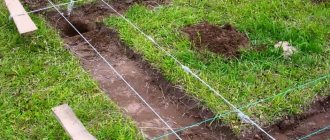
Linear surface drainage is considered the most common method of water drainage. Along pre-marked lines, trenches are dug 50 cm wide and 60-70 cm deep. The walls are not made strictly vertical - the slope is 30 degrees. Slopes are reinforced with concrete slabs, gravel, metal mesh or artificial materials. To decorate the landscape, the trench walls are lined with geotextiles with the prospect of landscaping.
Linear deep drainage consists of a system of perforated pipes that converge to the main line, which has access to the water intake. And from it the water is removed to a deep place or pumped out. The structure is located at a depth of approximately 1-2 meters, the exact location is determined by the level of groundwater.
The process of installing a closed drainage boils down to the following steps:
- dig a trench;
- pour a layer of sand on the bottom;
- lay pipes wrapped in geotextiles;
- install drainage wells;
- covered with crushed stone;
- The removed turf is placed in place and compacted.
Classic methods of pipe arrangement are parallel straight lines, herringbone, snake or trapezoid. When constructing a diagram, the highest and lowest points on the terrain are calculated. To prevent water from stagnating, it is necessary to create a slope for the structure of pipes and wells, so the system is directed from the maximum height to the bottom.
Installation of a collector well
Jheka did not immediately cut and deepen the rotary wells; he postponed it until the stage of landscaping the yard.
The collector well was assembled from two concrete rings with a diameter of 90 cm, a lid and a hatch. The rings were lowered into place using a manipulator.
Features of drainage in problem areas
There are situations when additional work needs to be done when installing a drainage system. This is due to the characteristics of the soil, the depth of groundwater and the degree of slope of the site. All these circumstances must be taken into account before starting drainage work.
If the water on the site does not drain for a long time after a snowy winter or heavy rains, then it is necessary to check at what level the groundwater . The easiest way is to drill a test well. To do this, take a garden drill with an extension and form several holes in the ground (in different places of the site, because the aquifer lies unevenly) to a depth of one to two meters.
If after 1-2 days the wells fill with water, this will indicate a high groundwater level. In this case, the drainage system must have extensive ramifications. A large amount of water cannot always quickly flow by gravity into the receiver, so sometimes it is necessary to install additional pumping equipment.
To drain water in areas located on a slope , two types of drainage are combined - open and closed. This is a necessary condition for preserving the top fertile layer, which can be washed away by water flowing down the ground. The well for collecting water is located at the lowest point in the area.
The traditional drainage design for a site with a slope is considered to be herringbone. If the area is very large, then it is advisable to supplement the drainage system with a transverse trench. The water from it should go directly into the lower well.
Water lingers for a long time on clay soils , which interferes with the normal growth and fruiting of plants. The roots rot from abundant moisture and the growth of garden crops stops. On such soil, combined drainage is used - deep and surface methods. Before filling the trenches with the first layer of sand or gravel, be sure to loosen the clay bottom.
Peat soil is characterized by a high level of groundwater. In spring, the puddles on the site do not dry out for a long time. The installation of a drainage system is considered a prerequisite for living on such a site; it makes it possible to grow crops and beautifully design the landscape. Perforated pipes are located in the longitudinal and transverse directions, the depth of the trenches for peat soils is 40-50 cm.
Price
If you have certain knowledge and experience, you can drain the site yourself. But only a well-planned drain will work correctly, draining the area in a timely and efficient manner. Only experienced specialists can eliminate many errors, correctly calculate angles of inclination and choose the optimal project in terms of material consumption. It is worth noting that drawing up a competent plan will help to avoid additional redevelopment in the future, which will significantly reduce the material costs of the owner of a personal plot.
It is best when drainage is designed together with the house Source domvpavlino.ru
The price of a finished drainage system project with installation depends on the size of the territory, the desired number of inspection wells, and the complexity of the terrain. The cost of installing a turnkey drainage system starts from 1,200 rubles per linear meter. Glubinogo - from 2700 rubles per linear meter.
Drainage project along the perimeter of the site - step-by-step instructions
Before drawing up a project, you need to know the features of the site:
- Draw a plan with the exact location of all buildings, garden paths and gazebos. Take into account the places where external and underground communications pass.
- Draw up a diagram with the dimensions of the foundations of buildings, especially carefully study the depth of their location.
- Draw a topographic map indicating relief features.
To ensure that the components of the drainage system do not damage the roots of plants, the places for planting trees and shrubs are marked on the drawing.
An example of a closed drainage structure around the perimeter of a site
- Determine the location of the natural water receiver - a road ditch or a natural reservoir.
- Dig trenches 1-1.3 m deep and 40 cm wide along the perimeter of the site to lay main pipes with a diameter of 110 mm in them. The minimum distance for trenches from the fence is 50 cm, from the edge of the blind area of the building - 100 cm.
- Dig trenches 80 cm deep and 30 cm wide in the area for perforated pipes that collect water and transfer it to the main canals. For complete water drainage, it is necessary to maintain a slope of at least 1 cm per 1 linear meter. The gap between drains for clay soil is 8-10 meters.
- Flush the channels with plenty of water. If the outflow rate is low, then it is necessary to increase the degree of slope; if water stagnates, additional drainage branches must be created.
- After checking, fill the bottom with 10 cm of river sand and compact it.
- Line the channels with geotextile, the density of which is 120-150 g/m2, and fill with crushed gravel with a fraction of 20-40 mm to a height of 5-10 cm.
- To prevent siltation, pipes must be wrapped with geotextiles or volumetric filters made of coconut fiber.
- Lay corrugated pipes and bring them to the main channels. When turning, connect the pipes to each other with fittings or crosses wrapped in geotextiles.
- Fill the drainage structure with coarse sand or granite crushed stone of a fraction of 5-20 mm.
- Fold the edges of the geotextile overlapping and cover the trench with turf.
When there is no natural water intake or artificial ravine, the collected water can flow into a storage well, which is installed in a low place on the site. If the terrain allows, then the water flows into the drainage receiver by gravity. Otherwise, pumping equipment is used to pump out water. To monitor the operation of the drainage structure and clean the pipes, inspection wells are created. They are located at turns and pipe intersections.
dizlandshafta