As usual, during the construction of a particular structure, a person who is not privy to all the features of the process has many questions. They often concern the choice of materials, as well as the method of connecting completely dissimilar elements. One of the popular questions is how to attach a board to a metal pipe. The task before the builder is truly non-trivial. The materials differ from each other, almost like “ice and fire”. Therefore, any master needs to learn about all possible (and reliable) options that can be used without fear that “connecting the incompatible” will at some point “give weakness.”
Head sizes and shapes
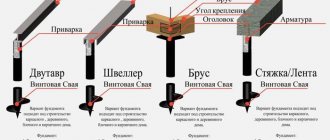
The shape of reinforced concrete piles is represented by the following types:
- T-bars.
- Square.
- Polygonal.
- Round.
To comply with the construction technology, the dimensions of the caps must coincide with the corresponding cross-sectional contour of the pile for the foundations, as well as its size. Diameter - strictly depends on the type of product.
The sizes of screw piles vary from 10.8 to 32.5 cm. They are made mainly in the form of a circle. Reinforced concrete piles are made in a square shape with a cross-section of 20-40 cm. Piles made of wood form an irregular circle with a given diameter of 18-32 cm.
The type of pile directly affects the future installation of the pile head. A screw pile is characterized by the use of spot welding, and the head of the reinforced concrete pile is poured directly into the foundation installed on the cut end. The head itself is made in a U-shaped or T-shaped form.
The choice between these two types depends on the builder's plans for installing the grillage. The T-shaped head is more universal - it is used with equal success both when installing a beam grillage and a slab grillage. If U-shaped brackets are installed, they can only support beams.
Selecting Heads
Head caps come in two types, the installation of which is used depending on the type of frame of the future structure. But in some cases, headers are not needed at all if you are going to build a house from aerated blocks. Then the piles are simply tied together with a channel and reinforced concrete slabs are laid on top of them.
If the building is frame or timber is used, then you can use welded or removable headers. The main advantage of welded products is that the pile is isolated from external irritants such as oxygen and water.
The degree of corrosion of piles with such heads is significantly reduced. Piles with welded heads are mounted with a hole drill, and necessarily include from 3 to 6 gussets, which have a disk with 6 holes. Its diameter can be 150, 200, or 250 millimeters.
Manual installation of piles for foundations requires removable heads, and also when it is known that the soil is too heavy and deeply frozen. In this case, the pile is deepened to the maximum possible, the remaining end of the pipe is cut off and a cap is installed.
Removable headrests are often made in dimensions of 150×150 mm and 200×200 mm. If the piles are angular, then heads with dimensions of 150×300 mm, as well as 200×400 mm, are allowed.
Waterproofing
The bottom beam, as well as the wooden grillage, must be properly protected from water and dampness, but it is not always possible to use creosote or other equally effective (and most often unpleasant-smelling) substances. If it is not possible to treat the grillage or lower beam with heavy fractions of oils, then it is necessary to use less effective substances, and at least 2 layers of roofing material must be laid between the foundation or iron/concrete grillage and the beam. This material will protect the timber from condensation that occurs due to temperature changes. After all, in the morning the air temperature rises, but the temperature of the foundation or grillage remains unchanged. If you use a wooden grillage, then waterproofing must be laid both under and above it. This will protect the wall from dampness and prevent mold and rot.
Installation by felling method
An operation such as cutting down pile heads is performed only after they have been driven or pressed into the ground. At the same time, they get rid of the unnecessary section of the reinforced concrete support of the foundations, which violates the horizontal level of the grillage, protruding above it.
To determine and fix the dimensions of the protruding section of the pile for removal, use a laser or hydraulic level. To do this, all pile heads are measured using one - control - support.
The most common tools for this type of installation are a jackhammer, such a device is a fairly cheap way to cut down a pile, and hydraulic shears, which require large financial costs, but compensate for this with cutting accuracy and cutting down piles occurs at a speed significantly higher than a jackhammer.
When performing an operation using a jackhammer, you need to do the following:
- Marking the log lines with a special marker.
- Outlining a furrow with a hammer and impact-cutting tool along the line of the future frame of reinforced concrete structures.
- The pile heads are cut down using vertical movements without touching the reinforcement frame.
- The finishing touch is to cut off the reinforcement, or, if necessary, weld it to the grillage frame.
Cutting down pile heads with scissors takes much less time, from 5 to 10 minutes. This is possible thanks to the special design of the scissors. After installing the ring-shaped scissors attachment along the log house marker, the cutting edge easily releases the reinforced frame from the concrete, “biting off” the concrete along an almost ideal cut line.
The process of cutting down the heads (video)
Installation by cutting method
The technology for cutting piles is universal in its own way: it is applied to absolutely any type of product (based on material): wood, reinforced concrete, metal, replacing only the nozzle of the cutting material.
Cutting piles may require both manual and machine tools to operate. These are mainly cutting tools (band and circular saws) and abrasive tools, such as a grinder. The cutting technology is the same for each tool:
- The cutting line is marked on the piles with a marker.
- The saw or grinder is turned on and the required speed is maintained.
- A groove is made along the circle marked with a marker for calibration and the tool is moved in a straight line to the center or along the ring. For safety, it is necessary to periodically use coolant.
This method for removing head caps has significant advantages, such as the availability and low cost of the tool coupled with high productivity. But when using this method, it is impossible to exclude the cutting of reinforcement along with concrete, and rapid wear of the cutting tool also occurs. You should prepare the consumables you will use in advance.
Timber tying
After purchasing, the timber must first be thoroughly treated with an antiseptic to prevent the development of mold. Also, the timber should not be easily flammable, so it is worth applying appropriate substances to it - fire retardants. After checking that the caps are in a single horizontal plane, the caps are laid with roofing felt.
Next, a strapping element is made from the beams. One beam is connected to the second, the joining device is “wood floor”, or “in the paw”. It is advisable to strengthen each corner beam with the help of metal heads attached to self-tapping screws. After laying, the timber must be attached to the pile heads.
To do this, a through hole is made in the beams in the heads, and then the final installation of the beams is carried out with bolts. It is prohibited to saw the timber if the horizontal position does not correspond to it; such a device can lead to the building being skewed.
Before erecting walls, it is necessary to lay a rolled layer of waterproofing. A device of this type will avoid the harmful effects of moisture.
Welding the head
The pile head, fixed to the support, is the last stage of installation of pile foundations. First you need to perform the following preparatory steps: the head caps are cleaned of paint using an angle grinder with a cleaning disk or a cord brush, then the horizontal fit of the head is checked using a level.
If the site is not in a strictly horizontal position, then installation cannot continue and the problem must be corrected. Most often, a device such as an inventory welding machine with electrodes with a diameter of 3 mm is used to weld the head.
The welding current range is 90-100A. Screw piles are scalded in two ways. In the first case, the channel is used as a head and welded to the top of the screw pile.
Such a foundation is mainly installed for frame buildings with a load-bearing wall width of no more than 150 mm. If the grillage beam is more than 150 mm thick, then in such cases a combination of channel and caps of 200×200 or 250×250 mm is used. Standard tip welding concept:
- Positioning the headrest in an ideal horizontal position.
- Welding of the head at 3-4 points.
- Welding the head along the entire perimeter of the pile, with the exception of a 10-20 mm segment, which serves for internal ventilation of the structure.
There are no similar entries.
Making screw piles is difficult, but it is possible. Therefore, we will take the liberty of describing this technology. And the advice of FORUMHOUSE users will help us with this.
Let's consider the manufacturing process of the main elements indicated in the drawing.
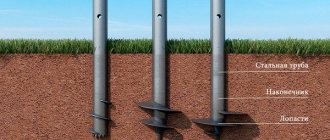
Trunk
The base (trunk) is a hollow metal pipe.
In all cases, barrels are recommended to be made of steel with a strength of at least St. 20 according to GOST 8732-74 (for ordinary structural steels). If stronger alloy steels are used, then GOST 19281 is suitable (but at home you can limit yourself to the first option).
The first thing the creator needs to do is determine the length of its trunk. Using various “tricks” he will have to find out at what depth of the construction site the hard soil is located. The most correct (but expensive) solution would be to contact a geological exploration service. But among the sociable neighbors you may find a person who has a reasonable idea of the state of the underground layers.
The length of the pipe should exceed the depth of the load-bearing layer by approximately 300...500 mm (if the pile protrudes higher from the ground, this distance may be greater). People with practical experience recommend making the length of the piles with a margin, so that later they do not have to be increased.
BSergeiM FORUMHOUSE user
We screwed 17 pieces (house 9 by 8). Site on a slope. I trimmed some of the piles, extended some and filled them with concrete.
In order to determine the diameter of the pipe, you can refer to SNiP 2.02.03-85 (with its tables and formulas). But those who are not practically familiar with the design of building structures are guided by less sophisticated calculations:
- Pipe with a diameter of 47 to 76 mm is used in the construction of light fences and all kinds of fortifications
- Piles with a diameter of 89 mm are used in the construction of courtyard buildings (gazebos, bathhouses, etc.), as well as in the construction of brick fences
- For the construction of frame houses and log buildings, options with a diameter of 108 mm are used.
At home, it is not recommended to make DIY screw piles with a diameter exceeding 108 mm (which can withstand high loads). They will require a reinforced blade, and it will be very difficult to ensure such a product with high quality if manufactured independently.
Alexey Oreshkov User FORUMHOUSE
The larger the diameter, the more difficult it is to make the screw, that is, the blade itself to bend.
The minimum thickness of the barrel walls should be 4 mm. Its calculation is simple - the thicker the better. But when choosing the wall thickness, you should remember that the pile cone will have to be bent with a hammer.
Alexey Oreshkov
I made screw piles myself, it’s really possible to do it yourself. Pipe – 68x4 mm, screw – diameter 168 mm, screw thickness – 5 mm, pitch on the screw – 50 mm, tetrahedral tip length – 150 mm. Everything is cooked very well using a semi-automatic machine.
DIY screw piles. Cone
As can be seen in the drawing, the cone is the tip of the pile. Its length is equal to 1.5 to 2 pipe diameters. This is the standard, but some make the length a little longer to make the cone sharper and the pile to go into the ground easier.
At home, the cone is made tetrahedral or hexagonal. To do this, special sectors are cut out at the edge of the barrel, which are bent with a hammer into a cone and scalded by welding.
Kostochka User FORUMHOUSE
I made a template from thick paper, after dividing the circumference of the pipe into equal parts. Then I marked the pipe with a marker and made cuts with a grinder. The result is the so-called crown. The thickness of the pipe allows it to be easily bent with a hammer. At first it turned out very clumsily, but by welding all the defects were eliminated, and the tip turned out to be completely sealed, which made it possible to fill the pipe with concrete immediately after twisting.
This is what it looks like in the photo:
Do-it-yourself screw pile, manufacturing.
As you can see, the barrel was marked using a paper pattern. It's quite simple to produce. To do this, the diameter of the pipe circumference must be divided by the number of sectors. The found value is the distance between the top points of neighboring sectors. It is easy to transfer the data onto a paper drawing and get a ready-made template. Further actions consist of cutting out the “crown”, bending the petals and welding the resulting joints.
Before bending the cone petals, small slits should be made at the base of the crown. Then it will be easier to form the tip.
Construction of screw piles. Blade
The blade is the main working part. It should be made from sheet steel 5 mm thick. Many people prefer to do this. Some people manage to make a blade 6 mm thick, but bending such a part correctly is much more difficult. The blade material is carbon steel of ordinary quality (GOST 380-71). It is optimal to use the grade 3 (it is used even in the industrial production of piles).
Now it's time to talk about the shape of the blade. Creating its geometry is the most critical stage of work. And if you make a mistake, the pile simply will not screw into the ground.
First, let's determine the internal and external diameters of the blade blank. The outer diameter of the blade (pile width) is directly dependent on the diameter of the pile shaft. Take a look at the table.
The inner diameter of the blade corresponds to the diameter of the pipe. Only the dimensions of the workpiece (taking into account the fact that it will bend to form the pitch of the screw) are slightly different from the diameter we already know. A simple solution for determining the dimensions of the workpiece is offered to us by the user of the FORUMHOUSE portal.
Ergali FORUMHOUSE user
Take a pipe and measure the screw pitch on it. After this, measure the length of the turn on the pipe, divide by Pi and get the internal diameter of the workpiece. You add the width of the blade to the inner radius of the workpiece and get the outer radius of the workpiece.
Now a little about how to determine the propeller pitch. Typically, the propeller pitch is 0.2...0.4 from the outer diameter of the blade. If the propeller pitch is smaller, then small solid inclusions in the ground will get stuck between the blades, interfering with the progress of the pile. If this figure is higher, then more effort will have to be made to screw it into the ground.
Which specific step to use depends on the type of soil into which the piles are to be screwed. It’s easier to focus on the characteristics of the soil: the harder the soil in your area, the smaller the propeller pitch should be. On sandy soil (predominant in the east of Moscow), we take the maximum step.
Once all the dimensions have been determined, you can begin marking the steel sheet and cutting out the workpiece. To cut out the contour of the workpiece, we will need a plasma cutting machine with sufficient power, and we should make sure that it is available in advance.
At the next stage, the cut blank is bent in accordance with the selected screw pitch. At home, this can be done using an ordinary vice and available tools.
FORUMHOUSE user BSergeyM
offers its own version of the blade extension device.
Screw piles: manufacturing.
Please note that the bend on the cutting edge of the blade is quite small. This is how it is always done. Such a bend is enough for the pile, like a self-tapping screw, to go into the ground.
On the part of the blade that will go first into the ground, it is necessary to make a cut at 45°. This will help the pile to easily bypass solid mechanical inclusions located in the ground.
At the next stage, the finished part is welded to the pile shaft. The seam is laid at the top and bottom of the blade. The blade must be welded perpendicularly. Otherwise, the pile will loosen the soil while screwing in, destroying and weakening its structure. And on weakened soil, the pile will not be able to cope with the loads placed on it.
After completing all of the above operations, work on creating the lower part of the pile can be considered completed.
One of the main requirements for the foundation is the creation of a single plane of supports relative to the lower foundation of the house. In the case of a pile-screw foundation, this is achieved by cutting the ends of the piles to the level and installing the caps. Pile heads are needed for reliable installation of foundation piping.
Types of strapping
The piping belt for a pile foundation can be implemented in different design options. They have their own capabilities and are designed to work with different loads and conditions.
The following types exist:
Wooden
A beam with a cross-section of 200:200 mm is used, or a pack of edged boards 50:200. The beams are installed around the perimeter of the house (under the external load-bearing walls), along the lines of the internal load-bearing walls, and also connect the remaining supports in order to equalize the loads and tie all the trunks to the common system .
Corner joints are made into the wood floor, fastening to the ends is done through a double layer of roofing material for waterproofing.
The advantages of this solution are:
- Ease of processing, availability of material.
- The wood has sufficient strength and relatively low weight, which does not load the foundation.
- Installation is possible in the field, without the use of construction equipment or even without power tools.
The disadvantages of wooden types of strapping can be considered:
- Features of wood, tendency to warp or crack, need for high-quality waterproofing, etc.
- Fire hazard of wood.
- Possibility of material damage by insects or rodents.
Despite the obvious disadvantages of wood, a timber grillage is a common and popular option.
Metal grillage
Metal binding requires the use of welding.
From an installation point of view, it has noticeable advantages:
- High connection speed.
- Durability, resistance to all possible loads.
- A wide selection of types of rolled metal, allowing you to obtain various strapping options.
Along with the advantages, metal strapping has disadvantages:
- The metal's tendency to corrode.
- The need for periodic maintenance of the structure (painting with waterproof polymer materials).
- Welded joints require the participation of a professional welder who is able to correctly select the operating mode and amperage. Otherwise, the seams will be brittle and brittle, which will create a significant danger to the building.
The main argument in favor of creating a metal frame is the high maintainability and speed of assembly of the grillage.
The cost of rolled metal and welding work is noticeably higher than that of wooden beams.
However, there are about the same number of supporters of this type of binding as there are fans of wooden parts.
The strength and stability of the metal are highly valued by users and increase the competitiveness of the material.
IMPORTANT!
To increase the strength of the metal frame, it is recommended to use additional bolted connections.
Concrete
Concrete lining is almost a full-fledged analogue of a pile-strip foundation.
The fundamental difference is the distribution of loads - on pile-strip foundations, both elements share the loads equally, and the concrete grillage of a pile foundation only transfers the load to the supports, without performing load-bearing functions as such.
At the same time, being only an intermediate element, concrete piping allows you to get the maximum effect.
It has high strength, durability, and resistance to stress.
In addition, the concrete grillage is able to compensate for changes in loads or load-bearing capacities of individual supports, redistributing or partially assuming new working conditions.
The advantages of this design are:
- Ensuring maximum load-bearing capacity of the system.
- Independence from climatic or weather conditions.
- Relatively low need for periodic maintenance.
- Durability, reliability of the material.
The disadvantages of concrete elements are:
- The complexity of creation, the need to perform various successive stages of work.
- Large volumes of materials (concrete, reinforcement, wood for formwork, waterproofing materials, etc.).
- It takes a long period of time for the lining to harden (28 days from the moment of pouring), during which further construction is impossible.
The construction of concrete piping is usually chosen during the construction of large and massive buildings, where it is especially important to ensure the strength and reliability of the belt despite the high consumption of materials and labor costs
NOTE!
For some types of piles, a combined version of the piping is often used, in which the grillage itself performs the main load-bearing functions, and the shafts are additionally connected by metal jumpers. This type of dressing is used, in particular, for screw piles. It strengthens the system and reduces the possibility of loosening or loss of traction.
Trimming piles to level
The installation of screw piles ends with cutting them relative to a single plane. Obviously, it is almost impossible to achieve the same level when screwing in several piles, so after screwing they are cut off so that the foundation plane is uniform. The plane is drawn out after all the piles have been wrapped.
Already when installing piles, you need to have an idea to what level the foundation will be raised and control the height of the end of the piles above the ground. After screwing is completed, one of the piles is selected, relative to which the height of the entire foundation plane will be selected.
It is cut perpendicular to the body of the pipe, and then all other piles are marked for cutting.
There are two main ways to derive the foundation plane:
- Using a water level
- Using a laser level
The first method is quite complicated and will require care and attention. The water level is a long transparent plastic tube filled with water. One end of the tube is brought to the reference pile so that the water level in the tube coincides with the cutting level of the pile.
Next, the tube is extended to the next pile and attached to it. The level to which the water in the tube has risen will correspond to the height of the reference pile relative to the horizon. A mark is made on the pile at which cutting will be done. The maximum deviation should be no more than 1-2 mm.
The cutting levels of all other piles are marked in the same way.
The next step will be cutting each pile itself. The optimal cutting method is using an angle grinder, the so-called “grinder”. The use of an abrasive cutting wheel makes the cut neat and even.
Before cutting the pipe, you need to make sure that the cutting plane is correct. To do this, it is best to use this technique. The pipe is wrapped in thick cardboard or similar material, so that the top edge coincides with the mark made on the pipe. Then a circle is drawn along the top edge of the cardboard with chalk or a metal marker. Before sawing off the pipe, it is recommended to make a preliminary cut along the entire circumference.
As a result of cutting the pipes, we get a set of even ends of screw piles above the ground surface. This will be the basis for forming the foundation piping.
After cutting all the pipes, it is recommended to double-check that they are level correctly. If an error occurs on any pipe, it must be taken into account in further work - mark the defective pipe and either trim it slightly, or later install an additional lining under the grillage - if the pipe is cut too low.
Fastening with liquid nails
Using glue, the timber is laid on a cement screed; such floors are made in production workshops, shopping centers and warehouses for large-sized products. The reliable floor allows the use of electric cars and forklifts. In concert halls and entertainment centers, natural parquet is laid on timber floors - this is the best option for flooring in places with large crowds of people.
The choice of glue depends on the volume of work, the size of the wood and the characteristics of the mating surfaces. The affordable adhesives “Liquid Nails” and “Moment Joiner” are popular; for small volumes of work, polyurethane foam is used. Eco-friendly glue is used in residential and public buildings.
The most important operation is the preparation of the mating surfaces; the concrete screed is pre-primed - this operation will prevent excessive absorption of the glue into the porous structure and ensure a reliable connection with the glue. The surfaces to be bonded are cleaned of dust and degreased. The timing of complete polymerization of the glue is indicated in the instructions for use.
Designers believe that when decorating an interior with natural wood, it is better to choose liquid nails than to use a drilling and slotting tool.
Functions of screw pile heads
There are several main types of tying a pile-screw foundation:
- Installation and fastening of support beams at the ends of pipes
- Connecting pipes with metal channels and beams to create a common frame
- Creation of a combined concrete grillage based on screw piles
The first type of piping is considered the most common when constructing a foundation for most buildings - from residential buildings to light outbuildings, such as a bathhouse, summer kitchen or veranda. This type of piping requires caps at the ends of the pipes.
Timber on drywall
At first glance, attaching a massive wooden structure to a wall covered with fragile plasterboard seems an impossible task. Experienced craftsmen suggest: it is necessary to install anchors with a thread for a nut in the load-bearing wall located under the plasterboard slab. The hole for the anchor fasteners is drilled in the wall through the laid gypsum sheet. Any fastener suitable for fastening timber can be attached to such an anchor. To ensure the integrity of the gypsum layer, planks are placed in the resulting gap and secured to anchor bolts intended for fastening the timber.
Head types
Heads primarily differ in their shape:
- T-shaped
- U-shaped
T-shaped heads are more common. They are a piece of pipe with a platform welded to its end. The foundation framing beam is subsequently laid on this site.
U-shaped heads are usually used for laying beams that require stronger fastening to resist lateral loads. They seem to be inserted into a square socket and fixed on the side with fastening material.
According to the method of connection with the ends of the screw pile pipes, the ends are divided into
- Welded
- Removable
From the name it is clear that in the first case, the heads are tightly welded to the pipe body at the stage of pile manufacturing. This is a rare case, since usually the foundation plane is leveled by cutting the piles after installation at the general level, as described above. After trimming, the head is put on the end of the pipe.
According to the shape of the platform on which the trim beams are installed, the heads can be divided into:
- Square
- Round
- Polygonal
The shape of the heads is mainly determined by their purpose. In most cases, square sites are used in the construction of buildings. Round head platforms are most often used to attach single pillars to them - in this case, the platform most evenly takes on the load from the weight of the structure. Platforms of a different shape are placed depending on the shape of the base of the structure, if necessary.
Heads with a square platform are considered the most common in construction.
The design of the head in general is a metal plate welded to a piece of pipe. The diameter of the pipe should be slightly larger than the diameter of the screw pile on which the head is attached. It is, as it were, put on the end of the pile, and thus the end of the pile is equipped with a kind of cap that increases the diameter of the base of the foundation. They are shaped like an inverted glass. The dimensions of the heads are usually in the range of up to 150x150 to 200x200 mm and a little more for corner piles.
To impart structural strength, the heads are equipped with stiffening ribs. These are metal strips welded onto the bottom of the platform. Stiffening ribs (kerchiefs) can have a wide variety of shapes and the number per head is from 3 to 6..
Performing Load Calculations
To calculate weight and other loads on piles, it is better to contact a specialist. He organizes the necessary geological survey of the soil on the site. Allows you to find out the depth to which you need to screw in the piles.
If the type of soil and the depth of the layer required for screw piles are known, you can make the calculations yourself:
- The approximate weight of the future building is calculated (the weight of the elements and furnishings is summed up with a 20-25% margin)
- The coefficient of snow and wind loads is added to the resulting amount (they differ for regions and are taken from local snips)
- According to the building plan, the number of external corners, internal intersections of load-bearing walls, and ordinary walls is calculated
- The total perimeter of the external and internal walls is calculated - divided by 2.5
- The result from point 3 is added to the result from point 4 - the number of required piles
- The number from point 2 is divided by the total number of piles, and the model of the screw pile suitable in this case is found from the catalog
- Screw piles have weight, they exert pressure on the ground, you need to find the total weight, divide by the maximum for the selected type in pp. 6. The number of additional piles will become known. They are evenly distributed around the perimeter.
Head with screw
Installation of heads
Installing pile heads consists of securing them to each support. Before installation, after trimming, the piles are cleaned of paint. You definitely need to check the level of the head. The site must be perfectly level relative to the horizon. Skewed heads can lead to uneven loads, skewed piping and, as a consequence, limit the durability of the entire foundation. If the platform does not fit horizontally, you should either check whether the pipe is cut correctly or the head itself. If there is a small defect, it is recommended to weld strong linings under one or another edge of the connection between the pipe and the head.
Checking the level of the site
Before welding, the edge of the head is processed with a file to remove the paint layer. It is recommended to clean the inner wall of the “glass” of the head with an angle grinder along a pre-designated line about 20 cm wide. To do this, put a cleaning disk or brush on the “grinder”. The paint on the edge of the head is better removed with a cleaning disc.
The welding process is carried out using a standard welding machine using conventional standard 3 mm electrodes. Welding current is used within 90-100A.
Thus, the work procedure includes:
- Installation of the head
- Control of the horizontal plane of the site
- Tack spot welding of the head in two or three places
- Welding around the entire perimeter
- Painting of cleaned areas for anti-corrosion protection.
It should be noted that it is necessary to leave a seam section of 10-15 mm to ensure ventilation of the head. Otherwise (since the body of the pile itself is filled with concrete), moisture will inevitably condense from inside the head due to temperature changes. If there is no ventilation, this area will become a hotbed of increased corrosion.
After welding all the heads, the foundation plane will be checked again to ensure that it is level. If necessary, it is better to re-install the head or several heads in places where mistakes were made.
After all work is completed, the strapping bars can be installed on the heads. They are usually attached with bolts - for this purpose, corresponding holes are pre-drilled in the heads.
Recommendations from experts
Before starting work, you need to look at all areas and make sure that the columns are the same height. The success of the entire construction depends on this. The height of the piles must be perfectly accurate, otherwise it will be impossible to do further work well. If any pillar is higher or lower, it should be leveled. Otherwise, in the future there may be a strong distortion of the floor in the house. The strapping connection must be made exactly in the center of the area. It is in this place that the screws are fixed. Installation of fastening elements makes the entire structure as strong as possible, so this issue should be treated with great attention
Fixing the screw in the center of the beam will prevent the wood from cracking. Before installing the beam, it is important to check that the length of the elements is correct. A wooden block that will be mounted horizontally must be twice as wide as the pile. Only then will the entire structure be especially strong and reliable. It is better not to experiment with new technological methods during the construction of a structure.
Properly performed work will provide the necessary technical parameters to the entire foundation of the house. If the master does not have confidence in his own abilities, it is better to call specialists to perform a high-quality grillage. Compliance with all rules and recommendations of specialists will ensure high strength of the structure. In order not to redo the grillage in the future, the beam must be accurately aligned horizontally. Use impregnation compounds that will protect the material from moisture. Tying a pile foundation requires a complete understanding of all stages of the process. Firmly fixed structural elements will allow you to correctly distribute further load on the building, save the house from destruction and extend its service life.
Head Features
Purpose
The head is the supporting part in the structure of the pile. After all the rods are installed, you need to install horizontal strapping on them. The rods are pipes, how do you put a base on them? This is exactly what the heads are needed for, which are placed on the rod pipe.
This design is a rectangular sheet of metal to which a pipe with stiffeners is welded. This pipe must be larger in diameter than the pile in order to fit freely on it. The plate around the perimeter has holes for fastening. After installation, a grillage is mounted on these elements.
The grillage can be based on the type of occurrence:
- Buried.
- Not buried.
- Suspended.
By type of materials used:
- Wood.
- Made from metal profiles.
- Reinforced concrete.
Types
The following types of heads are available:
- With a round cross section.
- Rectangular section.
- Polygonal.
- In the form of a brand.
The form is:
- U-shaped.
- T-shaped.
By installation method:
- Welded.
The heads are welded to the body of the pile. First, a connection occurs at three or four points, and then along a circle. An important feature is that the welding seam does not close, leaving a gap of approximately thirty millimeters. - Bolted.
Fastening occurs through a bolted connection. Hardware for fastening is best used with a galvanized coating.
According to strength characteristics:
- Standard.
- Reinforced.
The choice of this product depends on the specific construction conditions; they must be purchased taking into account the design load.
The main factors influencing the choice of this design:
- Grillage type and material.
- Types of piles used.
- Building design.
Fastening in wooden structures
Bonding of timber with various lumber is carried out during the construction of log houses, the construction of foundations for bridges, ramps, stands for spectators and in other structures. Do-it-yourself wood construction is gaining popularity; all the necessary materials are available and widely represented in the retail chain.
When constructing log houses, wooden nails - dowels - are used as connecting elements; the most common diameter is 25-30 mm. The dowel is driven into specially drilled holes “in tension”, the ends are recessed to a depth of 20-40 mm. One dowel connects three rows of masonry at once. The use of wooden fasteners when installing wood ensures a proportionate change in geometric parameters and maintains reliable adhesion during wood drying and changes in climatic conditions.
In other building forms, vertical timber assemblies are connected with “coupling-on” fasteners; the design includes restrictive pads, a threaded rod, a nut and an adjusting coupling. The connection allows you to adjust the length of the connection to eliminate gaps formed when wood shrinks. For fastening at right angles, construction staples with notches are used. This fastening is used for assembling decking, in the construction of bridges and other volumetric structures made of wood.
Timber with other types of lumber is fastened with fasteners, nails, screws, and a construction stapler is used.
Installation features
Cutting
The cutting technology can be used for rods made of any material. Wood, metal and reinforced concrete can be cut. The only difference is in the tool used. When cutting wood, a regular saw will do.
For metal you will have to use an angle grinder. When cutting concrete, a special circle is put on this machine. You can also use circular saws with various cutting elements.
Cutting equipment can be:
- Manual.
- Machine tool.
The cutting procedure can be divided into the following stages:
- A line for cutting will be marked on the pipe. It is necessary to measure from different sides. When marking on one side, there is a danger of making an uneven cut. This will become clear at the stage of installing the head. During installation it will be very difficult to bring it into a horizontal position.
- Using a cutting tool, first saw a small furrow along the cut line.
- Next, along this furrow, the pipe is directly sawed off.
This technology has certain advantages:
- High productivity.
- Low cost of cutting tools.
- Easy to implement and does not require the involvement of qualified specialists.
Flaws:
- Rapid wear of cutting discs.
- This type of work is quite traumatic. Strict compliance with safety requirements is necessary.
Installation
After all the rods are twisted to the design level and cut to the required level, the installation of pile heads begins. We put this element on the rod and draw a mark to which it sits on the pipe.
To understand how the pile head is attached to the trunk, use the association with a simple cap that covers the lid. The head is tightly applied to the pile when installing the building on a pile-screw type foundation. The installation of the head is almost complete - it is motionless. +
Installation of the head by welding is necessary so that it does not rotate during installation. Welding the heads prevents movement during the installation of a grillage or lower crown during the construction of frame houses. To prevent this from happening, the head is welded at three or four points. But this should be done not in a circle - not only will there be no benefit, but there is also a possibility of weakening the metal at the welding points. +
The head is often scalded using an inverter welding machine. The diameter of the welding electrodes should be about 3mm. The widespread use of inverters is due to the fact that it is possible to use stationary electric current, the level of use of which on construction sites can exceed 3KW. At some construction sites, stationary current is not connected, and installation is carried out using a generator. Then electrodes with a cross section of 2 mm are used. +
Attaching the pile to the beam
Before fastening to the installed piles, the timber is impregnated with an antiseptic. Installation is carried out from one pile to another. At the same time, the timber sits on the heads. It is attached to the side posts with self-tapping screws, and to the bottom posts using anchors or studs. To ensure the strength of the joint being created, the timber is knocked down with a hammer. The use of metal corners improves the mechanical parameters of the grillage.
The high strength of such structures is ensured by the use of clamps. In this case, rectangular beams are laid and secured to the pile heads. The clamps are installed on top of the beams and welded to the ends. If an eye is attached to the pile, then after laying the beam is attached to it with self-tapping screws.
Attaching the pile to a channel or I-beam
If the house is planned to be built from concrete, a channel is selected to tie the screw piles. The process of attaching the piles to the load-bearing element in this case is similar to creating a grillage from a wooden beam. However, due to the large weight of the main elements of such a design, it is necessary to use specialized equipment. Heads are usually not used when installing channel bars on screw piles. Although sometimes there are solutions that combine the use of these structural elements. The channel is usually located with the shelves down. If the opposite option is used, then the spaces between the shelves can be easily filled with timber.
When creating a grillage from an I-beam, the supporting structure is attached to the installed pile heads. This approach makes it possible to accurately install a pile foundation.
When performing installation work, welding is usually used, but traditional fasteners are a reasonable alternative. Most often, bolted connections are used in this capacity; rivets are often used.
Wooden beams are a universal building material, used as the main material in low-rise construction and the construction of various wooden structures. As an auxiliary material, it is used in residential, industrial and road construction, in the construction of bridges, ramps, frames for swing gates. A feature of timber structures is their ability to withstand heavy loads; timber is often used as load-bearing elements. The material is in demand among architectural designers and interior decorators.
The timber is laid on the ground and surfaces of various materials, mated with concrete and brickwork, and attached to metal structures. In each case, different fastening methods are used.
Welding of screw piles
Welding of screw piles occurs using a channel using 2 main methods. +
- First technique
. A good option for the head of a pile to be welded is a fixed channel. It is attached to the top of the screw pile. This technique is used for the foundations of frame houses. The thickness of the load-bearing wall structure is less than 15cm. - Second technique
. This technique is used if the foundation grillage is made of timber and logs with a diameter of more than 15 cm. Channels and heads 20-25×20-25cm are used together. The channel is welded to the bottom of the head flange with one side, and the other to the pile shaft.
Which mounting method is better?
When choosing a mounting method, consider the following factors:
- timber moisture;
- climatic conditions;
- seismic activity;
- the strength of the most frequent winds.
To attach damp (over 16%) timber to a wooden grillage, you must use only shrinkage compensators. All other fastening methods are ineffective.
After all, timber with high and especially natural humidity gives very strong shrinkage, so ordinary anchor bolts will not be able to provide high-quality fixation. To fasten timber with high or natural humidity to a wooden grillage, it is necessary to use an analogue of a shrinkage compensator, only made not from a screw, but from an anchor bolt. The same method can be used when installing timber on threaded rods. Instead of a nut and washer, you need to use a nut, two washers and a spring. The same fastening method should be used in those regions where there are heavy and long rains in spring and autumn.
In regions with high seismic activity, it is necessary to use a bottom beam with a moisture content of no higher than 12%, treat it with the most effective waterproofing and install it on the most rigid fastening (regular and anchor bolts). This will ensure sufficient strength of the entire structure. The same approach must be applied in those regions where wind speeds often exceed 20 meters per second. Neglecting rigid fastening in seismically active or windy regions will lead to the fact that the fastening will become loose under the influence of external factors and the house will begin to sway. Neglecting shrinkage compensators when working with timber of natural and high humidity, as well as in regions with frequent and heavy seasonal rains, will lead to the appearance of gaps between the flashing crown and the foundation or grillage.
Strengthening a pile-screw foundation
The pile-screw foundation is reinforced and strengthened with a channel. This is necessary for installing a foundation on slopes, large peat bogs and other similar options. Sometimes it is necessary to strengthen only a certain element of a pile-screw structure. As an analogy, you can look at the installation sites of fireplaces, stoves, and liquid storage tanks. +
To strengthen the pile-screw foundation, a 20x40mm profiled pipe is used. The pipe will provide a reduction in rigidity compared to the previously discussed channel, but it is often simply not enough. To use the pipe as a guide for a pile-screw foundation, it is welded not in one, but in a couple of levels. The trim is installed directly on the profile. You can finish the base with wooden boards. They are pre-painted and carefully treated with high-quality antiseptic solutions. +
If you have any questions when ordering a screw pile foundation, you can ask our specialist in the feedback form or by calling one of the numbers indicated in the header of the site. +
If you liked the article, please share it
Previously on the topic:
Share
Metal
Fastening wood to metal has its own characteristics, let’s consider them in more detail:
- Often, when carrying out work with their own hands, developers choose a metal channel as a reinforcing element. This option is very attractive from the point of view of reliability and simplicity of the process, you need to lay channels, and then insert a wooden beam into them; for this, the configuration of the elements must match, so sometimes the ends of the elements need to be cut. It is very important that the beams adhere well to the shelf of the channel
- Special self-tapping screws for fastening wood to metal have a drill tip and thread so that they are securely held in the material. The head can be either a screwdriver or a wrench (most often 8); to carry out the work, purchase a special bit for a screwdriver in advance.
Important! If the thickness of the metal elements is large or they have increased hardness, then it is recommended to first make holes using a drill, the diameter of which should be 2 mm smaller than the self-tapping screws used in the work.
Laying on the ground
Timber is used in the construction of underground and buried structures; structures made from this material prevent soil movement and are able to withstand heavy loads. When laying in the ground, lumber is treated with moisture-repellent and antiseptic impregnations, the most common being bitumen mastics.
To enhance waterproofing, use roofing material or water-repellent synthetic fabric such as “Armostab”, “Stabilenka”. Proper installation can prevent wood from rotting.
Aerated concrete
This material has its own characteristics, so the following fasteners are used for it:
- Special nylon dowels, which can have different configurations, to use them you need to read the recommendations given in the instructions on the package; it will indicate which drill and how deep you need to make the hole and which screws to use for fixing. This is the simplest and fastest option, and the photo below shows some configurations of products of this type.
- For more massive structures, it is recommended to use metal fasteners; they have teeth, which, when tightened, a self-tapping screw of the required diameter diverges and cuts into aerated concrete, ensuring the highest reliability.
- If a wooden staircase is attached to an aerated concrete floor, then additional reinforcement may be necessary using a threaded rod, which goes through and ensures the highest reliability.
Production stages
The sequence of technological stages is as follows:
- Stamping of blades on a special press. An alternative method is to cut the blade on a programmable machine.
- Cutting support rods.
- Decoration of the end part.
- Assembling the screw part on a welding machine.
- Welding onto the upper end of the head rod.
- Welding on a forged or prefabricated tip.
- Cleaning weld seams.
- Metal coating with zinc.
- Coating quality control.
The hot-dip galvanizing method involves completely immersing the rod in a container with molten zinc at a temperature of 460 °C. When cured, the coating is converted to zinc carbonate by exposure to atmospheric oxygen and carbon dioxide.
As a result, the surface of the metal rod is covered with a hard material that is resistant to oxidation, chipping and aggressive environmental influences.