This device, despite our brave space achievements, is still unknown to few people in our country. And for sure, only a few are interested in how to make a rocket stove with their own hands, because they do not understand the principle of its operation.
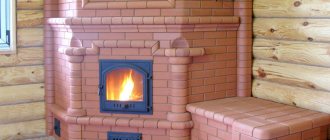
Photo 1 Rocket stove in the interior
This is a relatively new word in the domestic heating environment, coming from Germany. The key to unprecedented popularity in the homeland is a simple, cheap design coupled with high efficiency and the slightest absence of signs of soot. Considering that making your own equipment is not at all difficult, we will tell you how to do it, provide drawings, recommendations from specialists, videos and photos.
Principle of operation
Oddly enough, the name “rocket stove” itself has nothing to do with space or rockets themselves. The only analogy that can remotely remind us of this is a jet of flame rising upward in mobile installations.
The design feature of the furnace is the presence of a hood into which flue gases enter and where the final combustion of the sludge occurs. Under the hood, the temperature rises to 1000 0 C within the first 2 hours, as a result of which everything burns without sediment, and the exhaust is formed only in the form of steam and carbon. In this case, gases circulate freely through the channels without forced draft, which is usually created by a chimney pipe.
This design allows the stove to be used not only for heating the room, but also for heating food or water (on the hood). If the chimney is run through a certain area of the room, right up to the lounger, it will also heat up.
Photo 2 Rocket stove in the interior
Among the main advantages of rocket stoves are the following:
- high efficiency – 85%;
- very fast heating of the room - 50 sq.m. in 45-60 minutes;
- absence of soot and, as a consequence, soot deposits - at temperatures above 1000 degrees, everything burns without a trace;
- the ability to use any solid fuel;
- minimum consumption - at the same temperature and burning duration, a rocket stove consumes 4-5 times less fuel than a conventional stove.
The simplest rocket works according to the direct combustion formula - these are mobile structures that can be easily assembled in field conditions literally from scrap materials and can also be easily dismantled.
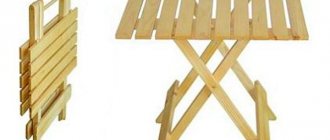
The simplest design from a barrel or gas cylinder
If we are talking only about the first stages of self-manufacturing a rocket stove (see video), then it is still worth starting the acquaintance with the simplest design. A camp stove is presented in the form of a bent section of pipe, where the fuel chamber and ash pan are combined.
Photo 3 Traveling rocket stove
For fuel, a steel plate is welded to the bottom, at the bottom of which a hole is cut for air intake.
You can use any straight cylindrical container for manufacturing - the drawing of a rocket furnace shows how the direct combustion process occurs.
Photo 4 Schematic of a traveling rocket
To increase the efficiency of the design, it is recommended to use a secondary casing. It can be made from a barrel or a used gas cylinder.
Video 1 Simple design of a portable cooking rocket stove
Brick rocket stove in 20 minutes
If you have 20-30 bricks on hand, you can make a simple rocket stove with your own hands in just a few minutes. Moreover, no adhesives are needed for masonry.
Lay out a vertical combustion chamber from brick, as shown in the photo. In this case, the dishes are placed on the hood in such a way as not to interfere with the movement of released gases
Do-it-yourself rocket-type brick oven:
Photo 5 Rocket stove made of 20 bricks
For such a design to work well, a warm pipe is needed. This term among stove makers means a preliminary run of wood chips and paper so that the pipe warms up. There will be stagnation of gas in a cold pipe, which will make heating difficult. And if the pipe is warm, then when the wood is ignited, a powerful draft appears in the channel.
For reference. The above simplest designs made from a gas cylinder or pipe have a significant drawback - vertical loading of firewood. Each time you have to move the wood into the chamber when it burns out and only then add it. Stationary coal-fired or long-burning rocket stoves already have a vertical stack, which simplifies operation many times over.
Long-burning rocket stove
Photo 6 Design of a stationary rocket furnace
DIY rocket jet stove diagram
In order to make such a unit with your own hands, you need to decide on the dimensions and structural elements.
How the rocket works:
As can be seen from the drawing, the diameter of the cap (D), which covers the top of the pipe, and its cross section (S) are taken as the basis.
Based on these indicators, the dimensions of the rocket furnace are calculated:
- the height of the drum is 2 of its diameter;
- the height of the clay coating is 2/3 of the height;
- coating thickness – 1/3 of the diameter;
- cross-sectional area of the pipe – 7% of its cross-section;
- blower area - 1/2 of the pipe section;
- the flame tube horizontally and vertically must be the same;
- ash pan volume – 4-6% of the drum height;
- The cross-sectional area of the external chimney is the double cross-section of the pipe.
- the thickness of the insulating layer (adobe cushion) under the external chimney is 60 mm;
- the thickness of the coating of the stove bench is 1/4 of the diameter of the drum;
- external pipe height – 4000 mm;
- The length of the flue directly depends on the diameter of the drum. If for its manufacture we took a metal container with a diameter of 50-60 cm and a volume of 200 liters, then the length of the flue pipe will be at least 6 meters. If the diameter is half as large, then the bed should be made up to 4 meters.
If you are making a stationary rocket stove with your own hands, be sure to pay attention to the lining of the top of the pipe. This is necessary to isolate the roaster from the walls of the oven to prevent overheating of the walls. Fireclay bricks can be used for lining.
Photos of examples of original performance
It is noteworthy that not only the walls need protection, but also the lining itself. In order to protect it from flammable gases, you can create a metal sheathing and fill it with river sand. For this purpose, you can use any available metal object - a barrel, a bucket, galvanized steel.
Sand is poured into the bucket layer by layer, with each layer being generously watered for proper compaction. When you have filled the protection to the top with sand, leave it to dry for 7-10 days.
Lining the brazier is done much faster - fireclay bricks are laid on the clay mortar, and the space between the latter and the wall will also have to be filled with sand in layers - with water and time for drying.
Pipe lining diagram
All further work on the installation of a jet-type rocket furnace continues only after not only the lining, but also the clay protection, which is applied over the top cut, has dried.
Before making a stationary structure, practice on a traveling sample. After the first experience it will become clear even if you have not read the books on rocket stoves.
Disadvantages of the heating device
- This device is often used to heat food or water - indeed, a huge amount of heat, a hot cap, why not use this idea? However, connecting a water circuit in order to heat the entire house and not a room is impossible. The design is so simple that any intervention, including a coil, will disrupt the progress of work.
- Surprisingly, such a lightweight mobile heating device is completely unsuitable for either a bathhouse or a garage. Even with its high efficiency, a camping unit will not heat the air in the steam room to the required minimum. And in a garage or warehouse it is not recommended to use devices with direct open fire.
Application area
The rocket furnace is used in mobile and stationary versions.
In addition to cooking on the go, you can use it to:
- heating of residential premises;
- fruit drying;
- heating of greenhouses;
- ensuring positive temperatures in workshops, garages, utility rooms and warehouses.
The unit is especially popular among fishermen and hunters, car rally enthusiasts and survivalists. There is a special version, the purpose of which is indicated by the name itself - “Robinson”.
How does a rocket stove work?
Despite the loud space name, this heating structure has nothing to do with rocket systems. The only external effect that gives some resemblance is a jet of flame that escapes from the vertical pipe of the camping version of the rocket stove.
The work of this center is based on two basic principles:
- Direct combustion - free flow of fuel gases through the furnace channels without stimulation by the draft created by the chimney.
- Afterburning of flue gases released during wood combustion (pyrolysis).
The simplest jet stove operates on the principle of direct combustion. Its design does not allow achieving thermal decomposition of wood (pyrolysis). To do this, it is necessary to perform a powerful heat-accumulating coating of the outer casing and high-quality thermal insulation of the inner pipe.
Despite this, portable rocket stoves perform their functions well. They do not require much power. The generated heat is quite enough for cooking and heating in the tent.
How to heat?
Taking into account the long path of the smoke removal system in a stationary structure, it is necessary to start the operating mode after preheating. When working with rocket stoves, this rule does not need to be followed. But a large oven is first heated with dry shavings, paper, and other suitable consumables. For loading, use a blower with the door open.
The degree of readiness is assessed by noise reduction. At this stage, the usual loading of fuel into the appropriate part of the furnace is carried out.
What kind of rocket stove would you install in your dacha?
PurchasedHomemade
To adjust the operating mode, use the displacement of the main hopper cover and the adjustment of the blower door. If there is a lot of oxygen, combustion is activated while simultaneously blocking the pyrolysis process. Under such conditions, fuel consumption indicators deteriorate and carbon deposits form in the riser.
It should be emphasized that it is difficult to clean a closed central channel. In the worst situation, its throughput is reduced to critically low values.
Rocket furnace designs
You should start getting acquainted with any design with its simplest variants. Therefore, we present a diagram of the operation of a mobile rocket stove (Fig. 1). It clearly shows that the firebox and combustion chamber are combined in one piece of steel pipe bent upward.
To stack firewood, a plate is welded into the bottom of the pipe, under which there is an air hole. Ash, which plays the role of a heat insulator, helps to enhance heat transfer in the cooking area. It is poured into the lower part of the outer casing.
The secondary chamber (casing) can be made from a metal barrel, bucket, or an old gas cylinder.
In addition to metal, the simplest rocket stove can be built from several dozen bricks, even without the use of mortar. A firebox and a vertical chamber are laid out of them. The dishes are placed on its walls so that there is a gap under the bottom for the flue gases to escape (Fig. 2).
A prerequisite for good operation of such a design is a “warm pipe,” as stove makers say. In practice, this means that before adding firewood, the rocket stove must be heated for several minutes, burning wood chips and paper in it. After the pipe is heated, the firewood is stacked in the firebox and set on fire, a powerful upward flow of hot gases appears in the stove channel.
Fuel loading in simple rocket furnace designs is horizontal. This is not very convenient, since it forces you to periodically push the wood into the firebox as it burns out. Therefore, in stationary systems, a vertical filling is used, and air is supplied from below through a special blower (Fig. 3).
After burning out, the firewood is lowered into the oven itself, saving the owner from manual feeding.
Main Dimensions
A visual representation of the configuration of a stationary long-burning rocket furnace is given by drawing No. 1.
Anyone who wants to build a stationary rocket stove, without being distracted by simplified modifications, must know its main dimensions. All dimensions of this design are tied to the diameter (D) of the cap (drum) covering the vertical part of the flame tube (riser). The second dimension required for calculations is the cross-sectional area (S) of the cap.
Based on the two indicated values, the remaining dimensions of the furnace structure are calculated:
- The hood height H ranges from 1.5 to 2D.
- The height of its clay coating is 2/3H.
- The thickness of the coating is 1/3D.
- The cross-sectional area of the flame tube is 5-6% of the area of the hood (S).
- The size of the gap between the hood cover and the upper edge of the flame tube should not be less than 7 cm.
- The length of the horizontal section of the flame tube must be equal to the height of the vertical section. Their cross-sectional areas are the same.
- The area of the blower should be 50% of the cross-sectional area of the flame tube. To ensure stable operation of the furnace, experts recommend making a fire channel from a rectangular metal pipe with an aspect ratio of 1:2. She is laid flat.
- The volume of the ash pan at the outlet of the furnace into the external horizontal smoke channel must be at least 5% of the volume of the hood (drum).
- The external chimney should have a cross-sectional area of 1.5 to 2S.
- The thickness of the insulating cushion made of adobe, which is made under the external chimney, is chosen in the range from 50 to 70 mm.
- The thickness of the adobe coating of the bench is chosen equal to 0.25D (for a drum with a diameter of 600 mm) and 0.5D for a cap with a diameter of 300 mm.
- The external chimney must be at least 4 meters high.
- The length of the gas duct in the stove depends on the diameter of the hood. If it is made from a 200-liter barrel (diameter 60 cm), then you can make a bed up to 6 meters long. If the cap is made of a gas cylinder (diameter 30 cm), then the bed should not be longer than 4 meters.
When building a stationary rocket furnace, you need to pay special attention to the quality of the lining of the vertical section of the flame tube (riser). To do this, you can use refractory brick of the ShL brand (light fireclay) or washed river sand. To protect the lining from flue gases, it is made in a metal shell, using old buckets or a galvanized sheet.
Sand filling is done in layers. Each layer is compacted and lightly sprayed with water. After making 5-6 layers, they are given a week to dry. It is easier to make thermal protection from fireclay, but the space between the outer shell and the brick will also have to be filled with sand so that there are no empty cavities (Fig. 4).
After the backfill has dried, the upper edge of the lining is coated with clay and only after that the installation of the rocket furnace is continued.
Jet heating unit from a propane cylinder
A rocket stove made from a gas cylinder is an easy-to-make wood-burning stove that uses fuel economically and effectively warms up the room.
For its assembly it is used
:
- empty propane cylinder (unit body);
- steel pipe with a diameter of 100 mm (for arranging a chimney and a vertical channel);
- steel profile pipe 150x150 mm (firebox and loading hopper are made);
- sheet steel 3 mm thick.
Making a stove from a gas cylinder requires the use of a welding machine. If you are planning to assemble such a rocket stove with your own hands, the drawings will help you accurately maintain the optimal dimensions of all structural elements.
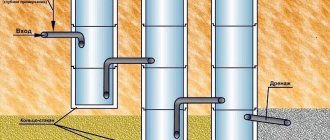
Scheme of processes in a rocket furnaceAt the preliminary stage of work, you should prepare a gas cylinder - turn off the valve, fill the container to the top with water to ensure that gas vapors that can explode from a spark are removed from the container. Then the top part is cut off along the seam. A hole is cut in the lower part of the resulting cylinder for the chimney, and in the bottom for the combustion chamber with an attached firebox. The vertical channel is brought out through a hole in the bottom, and a structure from a profile pipe is welded on the bottom side, according to the rocket drawing.
If you are installing a rocket stove from a gas cylinder yourself, you should pay close attention to the quality of the welds and check their tightness - air should not flow uncontrollably into the working stove. If everything is in order, you can install the chimney.
Such a home stove is regulated in power by the volume of fuel loading. The jet stove is put into operation by supplying air through the combustion chamber; this is regulated by the hopper lid. Next, secondary air is constantly supplied to the unit. This heating stove explodes at the end of the combustion process, since it is impossible to shut off the supply of secondary air, and soot deposits on the inner walls of the vertical channel. The casing cover is made removable so that it can be removed periodically.
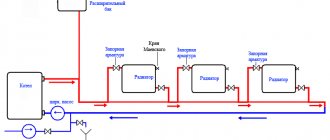
Boiler unit
A long-burning boiler can be obtained by installing a water circuit on the chimney of a stove made from a gas cylinder or other materials, but according to the same scheme indicated above. However, heating the water in the circuit of such a unit will be inefficient, since the main part of the thermal energy is transferred to the air in the room and to the containers on the hob.
An effective version of a rocket stove made from a metal barrel
If you want to create a rocket boiler for water heating with high efficiency, you will have to sacrifice the cooking function. A do-it-yourself rocket stove according to the drawing presented below can be installed in a short time.
This will require
:
- fireclay bricks and refractory masonry composition (for installing the base of the stove with a firebox);
- steel pipe with a diameter of 70 mm (for a vertical channel);
- steel barrel (for the casing);
- fireproof heat insulator;
- sheet steel 3 mm thick and a metal barrel (or pipe) of smaller diameter than the casing (for arranging a water jacket and smoke channels for heating the water circuit);
- steel pipe with a diameter of 100 mm for the chimney;
- container, pipes and connecting pipes for arranging a heat accumulator.
A rocket furnace with a water circuit is characterized by the fact that the thermal insulation of the vertical channel provides an optimal combustion mode for pyrolysis gases, while all the heated air enters the “coil” with a water jacket and releases the main part of the thermal energy there, heating the coolant.
Rocket stove with water circuit
The heat accumulator will continue to supply heated coolant to the heating circuit even after the furnace itself has cooled down. The container with water is equipped with a thick layer of insulation.
Advantages and disadvantages of rocket stoves
An important advantage of a properly constructed structure is omnivorousness. Such a stove can be heated with any type of solid fuel and wood waste. Moreover, the moisture content of the wood does not play a special role here. If someone claims that such a stove can only work on well-dried wood, then this means that serious mistakes were made during its construction.
The thermal output of a rocket furnace, the basis of which is a barrel drum, is very impressive and reaches 18 kW. A stove made from a gas cylinder is capable of developing thermal power up to 10 kW. This is quite enough to heat a room with an area of 16-20 m2. We also note that the power of rocket furnaces is adjusted only by changing the volume of loaded fuel. It is impossible to change heat transfer by supplying air. Blower adjustment is used only to put the furnace into operating mode.
FAQ
Can Rocket be used in a greenhouse?
Yes. A rocket stove is suitable for heating a greenhouse. The chimney pipe is buried in the ground. Other models are not capable of working in such conditions. For this stove, it is enough to have a small difference between the firebox (air inlet) and the end of the chimney. And there is no need for forced air supply at all.
How often should the rocket furnace firebox be cleaned of soot?
The main part of combustion products evaporates independently through the chimney pipe. You need to remove ashes from the firebox every 15–20 days.
A rocket stove is an opportunity to quickly heat a small room and cook food using a minimum amount of fuel
Assembling a rocket stove with your own hands
The easiest way to assemble a camping and garden version of a jet stove. To do this, you do not have to purchase masonry materials and prepare adobe for coating.
Several metal buckets, a stainless steel pipe for the fire channel and small crushed stone for backfilling - that’s all you need to make a rocket stove with your own hands.
The first step is to cut a hole in the bottom bucket with tin snips to allow the flame tube to pass through. It must be done at such a height that there is room under the pipe for crushed stone backfill.
The second step is to install a fire pipe in the lower bucket, consisting of two elbows: a short loading one and a long one for the gases to escape.
The third step is to cut a hole in the bottom of the top bucket that fits over the bottom one. The head of the frying tube is inserted into it so that its cut is 3-4 cm above the bottom.
The fourth is pouring small crushed stone into the lower bucket to half its height. It is needed to accumulate heat and thermally insulate the heat channel.
The last step is making a coaster for dishes. It can be welded from round reinforcement with a diameter of 8-10 mm.
A more complex, but at the same time durable, powerful and aesthetic version of the rocket stove requires the use of a gas cylinder and a thick steel pipe of rectangular cross-section.
The assembly diagram does not change. The gas outlet here is organized at the side, not at the top. To prepare food, the top part with the valve is cut off from the cylinder and a flat round plate 4-5 mm thick is welded in its place.
What types of long-burning stoves are there? From this article you will learn how long-burning stoves with vertical loading are fundamentally different and how to increase their efficiency.
Continuing the topic of manufacturing and improving long-burning furnaces (LDG), we will describe in detail devices with vertical loading. The advantages of this option:
- Compact combustion chamber.
- Using gravity at work.
- More efficient sales of fuel (firewood).
- Low exhaust temperature - no need to heavily insulate the chimney.
- Relative purity (smokelessness) of emissions means fewer problems with neighbors.
The fundamental difference between such stoves and potbelly stoves and their derivatives is the gradual combustion of fuel and, as a result, a smooth and uniform distribution of heat (in potbelly stoves the entire load flares up at once).
The two most popular varieties of PDG are “Bubafonya” and “Raketa” (rocket stove). In the first case, the energy from burning wood under pressure with a deficiency of oxygen is realized, in the second - a reactive process that occurs when there is a temperature difference.
Useful tips for making a TT boiler
- If you want to make a TT boiler universal in terms of the use of raw materials, then use a pipe made of heat-resistant alloy steel for the combustion chamber.
You can significantly reduce the cost of building a unit if you take a seamless steel pipe of grade 20.
- Before installing the boiler in the place designated for this unit, carry out the first kindling outside, equipping the boiler with a temporary chimney. This way you will be convinced of the reliability of the design and will see whether the case has been assembled correctly.
- If you use a gas cylinder as the main chamber, then keep in mind that such a unit will provide you with combustion for 10-12 hours due to the small amount of fuel supplied. So, the small volume of the propane tank will decrease after cutting off the lid and ash pan. To increase the volume and ensure longer burning time, it is necessary to use two cylinders. Then the volume of the combustion chamber will definitely be enough to heat a large room, and there will be no need to add firewood every 4-5 hours.
- In order for the ash pan door to close tightly, preventing air from entering, it must be well sealed. To do this, lay an asbestos cord around the perimeter of the door.
If you make an additional door in the boiler, which allows you to “reload” fuel without removing the lid, it also needs to be tightly sealed using an asbestos cord.
For the operation of a TT boiler, the diagram of which we attach below, any solid fuel is suitable:
- hard and brown coal;
- anthracite;
- firewood;
- wood pellets;
- briquettes;
- sawdust;
- slates with peat.
There are no specific instructions on the quality of fuel - any will do. But keep in mind that with high fuel moisture, the boiler will not provide a high efficiency.
“Bubafonya” or piston PDG
This oven received its original name from the nickname of the author, who first posted the diagram in the public domain. Whether he is the inventor of this variety is unknown. Most likely, in one form or another it has existed since ancient times, since its action is based only on the laws of physics and nature.
The peculiarity of this version of the PDG is the constant pressure of the piston, the heel of which balances and maintains a constant uniform temperature, not allowing individual areas to cool down or overheat.
Design
“Bubafonya” is something like a piston internal combustion engine cylinder in an extremely primitive form:
- Element 1. Combustion chamber (CC). An open cylindrical container (barrel, cylinder, pipe) without hatches and with a smoke exhaust at the upper boundary. The size of the KS can vary from 20 to 240 liters.
- Element 2. Piston. Steel pipe with a cross-section of 75 mm with a round heel at one end. The heel has a diameter 40–50 mm smaller than the KS, and a hole for the diameter of the pipe. In the outer part, the heel has ribs to allow air to enter the combustion area. Functionally, this part plays the role of an air duct and a press.
- Element 3. Cover. A simple steel cover with a hole for the duct pipe.
The simplicity and reliability of the design, as well as the availability of the material, made this stove the most popular among villagers and garage owners. “Bubafonya” is the record holder for the longest burning time - a combustion chamber from a 200 liter barrel with a full, dense vertical load works for 20–24 hours.
How to assemble
1. Cut off the top lid of the barrel (it must not be rotten). It can then be used under the oven lid. If it is a gas cylinder, we cut it along the junction of the head and the wall. We cut out a chimney hole 20–30 mm from the top edge and weld a channel from a 100–120 mm pipe.
2. Air duct (VD). For a compressor chamber of any size, the sufficient internal diameter of the explosive pipe is 75 mm. The length of the explosive is equal to the height of the KS plus 200–300 mm.
3. Heel. We cut out a sheet of 4–6 mm in the form of a circle with a diameter smaller than the combustion chamber by 30–40 mm.
4. Cut a hole in the center of the heel equal to the internal diameter of the explosive plus 2–3 mm. A strip edge can be welded along the edge to stabilize the piston when the firebox is loaded.
5. We weld 30x30 or 40x40 corners in the form of rays from the center onto the working surface of the heel.
6. We weld the explosive to the heel at an angle of strictly 90º on the reverse side of the ribs.
7. Weld an M6 nut on the free end of the explosive from the inside. We cut the damper along the explosive section and install it on the screw. You can use a magnet of a suitable diameter. This damper regulates the air supply to the combustion chamber.
8. We weld a strip of 20–30 mm in circumference onto the lid, like a side.
The fuel for a long-burning piston stove of the “Bubafonya” type can be any solid combustible material, but, as a rule, it is firewood. A small amount of rubber or plastic will not give a “black exhaust”, because it will completely burn out in the combustion chamber. Fuel is loaded with the piston removed, but as work progresses, the stove can be reloaded with small firewood through the explosive pipe. Safe ignition can also be done via explosives.
A problem that doesn't exist
A meticulous craftsman will try to fit the explosive under the lid, and the lid under the CS as tightly as possible and even provide seals. It was experimentally found that such “improvements” result in the inability of the furnace to work productively. The secret lies in the secondary air, which is pumped through the gaps in the upper part and provides traction. In this case, the slots act as injectors, which we described in the previous article.
Making the most of it
Convector. To remove heat from the combustion chamber (furnace), there is a simple and effective solution based on air convection.
Convection is a type of heat transfer in which thermal energy is transferred in streams or jets.
To construct a primitive convector, we will need a profiled galvanized sheet with medium wave, which we simply need to wrap around the combustion chamber. The profile waves will serve as channels through which air will flow. Heated from the stove, it will rush upward, and its place will be taken by cold air coming from the bottom of the channel. If there is no profiled sheet, you can fasten CD or UD profile trim around the firebox and chimney.
Casing. Another type of convector can be a primitive coaxial system.
Coaxial - from the Latin co - joint and axis - axis, i.e. having a common axis.
To do this, we weld brackets 40–50 mm long onto the combustion chamber, spaced 50 mm from the top and bottom. We fix a sheet of metal on them. The thickness is not critical here, since the coolant is air, and the casing itself will not heat up. Thin galvanized steel, which can be made removable, is suitable.
Structural features of furnaces
A long-burning stove is convenient because it can burn on one stack of wood several times longer than traditional stoves and fireplaces. This is directly related to its design features - it is equipped with a large firebox, and some of them burn wood under certain conditions, with minimal access of oxygen to the combustion chamber and subsequent combustion of pyrolysis gases.
Sealing the seams will prevent combustion products from entering the heated room.
Long-burning stoves have large fireboxes - a large amount of firewood and other types of warm fuel are placed here. Due to this, the frequency of approaches for laying fuel is reduced. Classic stoves and boilers with miniature combustion chambers require new portions every 2-3 hours. In the daytime you can still put up with this, but at night a person wants to sleep, and not bother with adding firewood.
The worst thing is if everyone works during the day - there is simply no one to put logs in the stove. During this time, the temperature in the heated rooms will become quite low, so the evening will have to be spent not on rest, but on kindling in order to create comfortable conditions. However, at night you will have to do the same thing as during the day - throw more and more portions of logs into the insatiable firebox of the wood-burning stove.
The operating principle of a long-burning furnace depends on its design:
- Units with a large firebox - their long operation is explained by the use of large combustion chambers, into which a lot of firewood is loaded;
- Pyrolysis units - here solid fuel is burned with a minimum amount of oxygen and forms pyrolysis gas;
- Units without pyrolysis, but with limited combustion intensity, are “bubafonya” stoves made from a barrel, which have a simple but very original device.
The stoves themselves can be made from a variety of materials - stone, refractory brick or metal.
The key to longer burning of your stove is the use of normal firewood, and not rotten logs with low calorific value. Beech, oak, hornbeam and some varieties of fruit trees burn the longest.
"Rocket" or rocket stove (RP)
Another type of energy-efficient stove is known as the “Rocket” or “Rocket stove”. It received a sonorous name because of the reactive process based on heat exchange with a significant temperature difference (and the resulting thrust), which is also implemented in rocket jet engines. This natural phenomenon is inscribed in the basic laws of physics due to its trouble-free operation.
Design
The RP always has a “knee” of no more than 90° in one form or another. That is, the chimney is located at a right or acute angle to the bottom of the firebox. It is necessary to have an air duct (AH), which is often located adjacent (through the wall) to the firebox.
Operating principle and advantages
The main difference between RP and previously described furnaces is that the temperature is concentrated not in the firebox, but in the air flow, which is in constant dynamics. The continuous draft that occurs at the heating site (elbow) introduces oxygen with the flow of combustion air into the furnace through the explosive; in the furnace, the air receives thermal energy from fuel combustion and releases it at the place of temperature difference (elbow and “surroundings”), due to which the draft supported.
In the constant RP mode, no adjustment of the air supply is required - the natural desire for a balance of processes provides a draft of exactly the strength required to realize the temperature in the firebox. The exhaust gases also exit naturally - under the pressure of heated air (therefore, the RP does not require a high chimney pipe).
We will implement the effect of heat flow reactivity in stages, making the design more and more complex.
Stage one. Pure flow
As we have already found out, the main element and condition for the existence of the flow is the channel elbow. By welding two pipes with a diameter of 150 mm or more at an angle of 90°, correlating as 1/2, we will get a ready-made “rocket” firebox with a chimney pipe. The short section is horizontal, the long section is vertical. If you light a fire horizontally, the flame will come out through a vertical pipe.
A primitive option for supplying secondary air can be organized by installing a sheet of metal on brackets inside the firebox - the hearth will be separated from the air duct. In this case, the air passing through it will enter the corner of the knee, which allows us to call it secondary. For such a device, you can weld the legs and place a grate for the frying pan on the upper channel.
Stage two. "Rocket Potbelly Stove"
We take the design described above as a basis and add one more element - a horizontal section (channel). The rectangular cross-section of channels will be more convenient to use than pipes.
Rocket potbelly stove: 1 - plate; 2 - heating and heat exchange area; 3 - air flow
In this case, the air duct can be positioned arbitrarily - the main thing is that air passes through it. These can be “cheeks” parallel to the side walls of the loading hatch, or a plate on the ribs along the bottom wall.
Next, we attach a chimney made of a steel pipe (also known as a residual heat exchanger) to the elbow and install a lid. It is difficult to accurately describe the design, since most often it is made from scrap materials. It is important to understand and implement the very principle of flow formation.
Stage three. System with vertical heat exchanger
The idea is to install a steel heat exchanger with thick walls along the path of the hot flow.
The design is an element from the second stage, increased in size, on which, instead of a vertical pipe, an empty container for dry heat exchange (ideally an empty gas cylinder) will be located. In this case, the chimney channel must be located coaxially with the horizontal element.
The horizontal element itself (firebox) can be made in different forms - stove body, pipe or box. It can serve as a pre-heat exchanger (if it is large enough). For long-term (up to 4 hours) continuous combustion, you need to increase the fuel compartment. It can be up to 600 mm in height and accept logs vertically. Combustion will occur in their lower part, and under their own weight they will gradually burn out.
Rocket stove with heat exchanger: 1 - ash pan; 2 - cold air; 3 — fuel compartment; 4 - cover; 5 - firewood; 6 — flame boundary; 7 - combustion area; 8 - heat exchange; 9 - chimney; 10 — cylinder
Primary air will be supplied through a door in the firebox area, which will serve as an inspection hatch for cleaning. Secondary - through a hole or channel in the knee, or through a channel in the fuel compartment.
Stage four. Installing the injector
Prototypes of secondary air supply channels were mentioned above. At this stage, we will install a separate channel to fully supply the flame with oxygen during the afterburning stage of the fuel.
To do this, you will need a steel pipe with a diameter of 12–15 mm, bent in the shape of a channel, which is obtained from the elements of the system. On one side it needs to be plugged and 6–8 5–6 mm holes drilled in the wall over an area of 100 mm. Then you should install the tube so that it passes through the entire system, and its “blind” end with holes is in the place where the flame reaches. The open end should exit into the “cold” part of the system and have air access. The heated metal of the tube will create draft, and fresh air will be supplied for afterburning.
Injector installation options: 1 - ash pan; 2 - cold air; 3 - firebox; 4 — fuel compartment; 5 — injector; 6 — flame boundary; 7 - heat exchanger
Stage five. Turbocharging
An air pump (possibly an old vacuum cleaner) is connected to the injector. The injector itself must have a greater throughput than with natural supply. When the pump is turned on, the flow of fresh air creates excess additional pressure, and the draft increases in proportion to the power supplied. This ensures an increase in the temperature of the heat exchanger.
This method has been known to craftsmen since ancient times - the function of an air pump was performed by blacksmith bellows.
When taking measures to develop a rocket furnace, remember that the system must be harmonious - all elements must be balanced, otherwise the metal will overheat and burn out.
Review of ready-made models
The industry produces several types of rocket stoves. Each of them has design features and scope.
Vesuvius Rocket – Soyuz
Mobile design for floor installation. Suitable for cooking over an open fire. Convenient for use in country conditions. Model weight 12 kg. The design has a built-in stand that makes it stable. The firebox is open.
Vesuvius Rocket 1(2)
Hiking and tourist models in two sizes. The optimal choice for lovers of outdoor recreation. It consists of 3 compartments: a firebox, a blower and a vertical pipe with a hob in the upper part. It is economical and has high efficiency.
Kolundrov
Portable model for use in traveling conditions. Weight 4.75. It works for about 20 minutes on one load of fuel. Easy to assemble. Includes a firebox with a blower and damper, a pipe and a burner for placing dishes. The retractable bottom allows you to quickly get rid of ash and fuel residues.
Vesuvius Rocket 3
A model with an oven, which is suitable for heating cans of canned food and preparing baked potatoes. It has an L-shape, is fuel efficient and easy to transport. Weight 8 kg.
Flint Breadwinner
An easy-to-assemble portable model designed for cooking on the go. The fuel compartment is reliably protected from moisture. The upper stand is designed for dishes of various sizes (depending on the modification). In the Ognivo Baker model, you can bake food at the same time as cooking and boiling water.
Kuzma
Compact turbo oven with the ability to disassemble for easy transportation. Model weight – 3.5 kg. The firebox is protected from rain and wind. The unit can be used in snow. It is distinguished by the lightness and strength of its component parts, efficient and easy to use.
DIY pyrolysis rocket stove made from cans
A camping wood chip burner will always come in handy, especially since it does not require special materials or skills. Even a teenager can make it. However, for those who first tackled the issue of heating with “rocket” stoves, this will be good practice, since the operating principle is identical:
- We take two tin cans of different diameters and heights (the difference is 20–25 mm).
- Cut a hole equal to the diameter of the smaller can in the bottom of the larger can.
- We make a network of holes in the bottom of the smaller jar.
- We make a belt of holes on the wall of the smaller can at 1/5 of its height from the open edge.
- We make a belt of holes on the wall of the larger can at 1/7 of the height of its open edge.
- We insert the smaller jar into the bottom of the larger one so that the bottom of the smaller one fits the open edge of the larger one. The burner is ready.
You probably already guessed that, in principle, this is a coaxial gas pipeline system. By adding various accessories to such a burner, you can increase the volume of the fuel compartment or boil water.
If you cut a hole in the wall of a larger container and install a fan, you will get nothing more than a turbocharged RP.
Using this “pocket” option, you can conduct experiments and comparative measurements - how the material burns by itself and how it burns using secondary air.
Types of stoves for different operating conditions
A rocket stove with a water circuit, brick or metal, can replace a boiler. The heat exchanger here is arranged in the upper part of the flame tube in the form of a surrounding water jacket. There are jumpers inside the jacket for more efficient heat transfer to the coolant. The design is extremely simple; it can heat households up to several tens of square meters.
A rocket stove for the garage can be made from an old pot-bellied gas cylinder or barrel. To do this, two holes are made in the selected container - one in the top lid and the other on the side surface. An L-shaped pipe is inserted inside. Having a little experience working with a welding machine, all work will take you a maximum of half an hour.
You can also make a rocket-type furnace described above from sections of square and metal pipe according to the drawing given.
Also suitable for heating a garage is the heating rocket stove “Ognivo – Khozyain”. This is a store-bought model made from aluminum corrugated pipe and ordinary sheet iron. It works in approximately the same way and allows you to warm a garage of up to 30 square meters. m.
There are no drawings of it in the public domain yet, so you can try to assemble the “Ognivo” stove with your own hands based on its photograph. You can also buy it on the manufacturer's website.
We have already said that to heat large households you will need a long-burning rocket stove with a water circuit. A small one-room household can be heated with a simpler stove and a stove bench - this way you will save space on furniture. It consists of the following nodes:
- Firebox with vertical loading - logs are placed in it;
- Afterburner is a horizontal section in front of the riser (flame tube), where pyrolysis combustion occurs;
- A riser with a hob is a vertical section with a metal body that transfers heat into the room;
- Horizontal channels - they heat the stove bench, after which the combustion products are sent into the chimney.
A rocket stove for heating a one-room house is coated with clay to create a flat and comfortable bed - here you can lay a mattress or a small blanket.
For camping use, the simplest rocket-type stoves made of metal pipes are used. They are compact, easy to light and extinguish, cool quickly and allow you to quickly prepare lunch in the open air. The main thing is not to overdo it with the amount of fuel loaded, so as not to burn the food with a high-temperature flame.
Stoves for heating summer cottages
The range of heating stoves is wide, it’s easy to get confused, so even before going to the store you need to clearly understand what functions the stove should have. To do this, it is worth understanding the capabilities of heating units.
Power
The most important characteristic, the wrong choice of which will make the stove ineffective. All heating devices have a certain thermal power, it is expressed in kW. For a normally insulated residential building, the calculation is usually made by area: divide the total number of square meters of the house by 10 and get the required power in kW.
For a country house, this calculation is not entirely suitable. When selecting power, the following subtleties must be taken into account:
- material of walls, floors and ceilings and its thermal insulation properties;
- seasonality - will the house be used in winter, or is heating needed only on cool days in spring, summer and autumn.
The greatest power of the stove will be required if the house is made using lightweight technology, and visits to the dacha are planned in winter, in frosty conditions. In this case, it is necessary to choose a stove with a power greater than the calculated one or install additional heating devices.
Long burning mode
Some wood-burning stoves can operate in a long-burning mode. It is due to a special combustion mode of fuel - pyrolysis. Pyrolysis stoves can operate on wood or pellets. When ignited, the firewood heats up, and the process of decomposition begins into a solid fraction - coals and ash, and a gaseous fraction - smoke.
Flue gases contain many combustible elements; in conventional stoves they are not completely used and exit through the chimney, heating it greatly and releasing heat into the atmosphere. Thus, the thermal resource is used at best by 60%.
In stoves equipped with a long-burning mode, flue gases are burned in a special zone, it is called smoke circulation. The smoke passes through these channels, and its combustible components burn, giving off heat to the walls of the stove.
For this process to proceed successfully, it is necessary to limit the flow of air into the firebox in order to cause smoldering of the wood and increased formation of smoke. It is adjusted using a valve on the combustion door, and the optimal mode is selected experimentally.
Body and firebox material
- The debate about which stove is better, cast iron or steel, has been going on for a long time. What is the difference?
Weight. Cast iron models have thicker walls and a massive structure, so they are heavier, their weight can exceed 250 kg. If the floor in the country house is wooden, it may need to be strengthened, which will lead to additional costs. Steel models are approximately twice as light. Corrosion resistance. Cast iron is not subject to corrosion in a slightly acidic environment - for stoves used periodically, this is a big plus. The temperature difference during kindling leads to the formation of condensation in the firebox. Mixing with soot deposited on them, water forms weak carbonic acid. Steel structures corrode under these conditions. Burnout resistance. Due to their thick walls, cast iron models are more resistant to burning even at very high temperatures. Price. Steel models are 1.5-2 times cheaper than cast iron ones.
Inexpensive models popular among summer residents are usually combined. The highly heated and corrosion-prone surfaces in them are made of cast iron, the remaining structural elements are made of steel, which allows them to combine durability and low weight. The price of such devices is in the average range.
Additional functions
The main task of heating stoves is to quickly warm up the house
- . Depending on the model, they may be equipped with additional useful features:
hob, solid or with burners; possibility of connecting a heating circuit, water or air; decorative elements that allow you to create a cozy atmosphere at the dacha - panoramic glass in the fire door, decorative inserts, forged grilles.
Whether these functions are needed or not is a matter of personal preference, but it is worth considering that their presence affects the price of the stove.
How to load fuel and operate the unit correctly
A long-burning unit differs from a traditional furnace by an increased loading volume and limited access of oxygen to the working area.
The operating time of the boiler depends on the amount of fuel loaded, so the firewood is stacked as tightly as possible, without leaving large gaps between the logs. If materials such as peat, fine coal, shavings, sawdust or pallets are used as fuel, then they are poured to the level of the smoke channel without compacting. The necessary compaction of the fuel will be provided by a heavy metal piston. Fuel loading is performed in the following order:
- remove the top cover from the unit;
- remove the air distribution device;
- load the stove to the level of the chimney;
- spray the top layer of flammable material with lighter fluid;
- install an air regulator;
- return the cover to its place;
- A piece of rags soaked in a flammable liquid is thrown inside the air channel.
Steady combustion is accompanied by smoke coming out of the chimney evenly. As the wood burns, the duct pipe moves down. It can be used to judge the remaining operating time of the solid fuel unit.
It is best to light the stove using a rag moistened with a flammable liquid.
During operation, ash and ash accumulate at the bottom of the barrel. It must be said that their quantity does not have any effect on the combustion process. However, fuel combustion products must be periodically removed, since they reduce the thickness of the filling layer. To do this, open the bottom door and scoop out the ash using a regular metal scoop.
When removing ash, leave a layer 10–20 mm thick on the bottom of the oven. This will not have a particular effect on the amount of firewood; however, it will create an excellent heat-insulating cushion that will protect the bottom of the unit from burning out.
Nuances of the top combustion boiler control system
In long-burning boilers with top combustion, the main control principle is the regulation of air flows entering the combustion chamber. Standard units are equipped with a mechanical device for this purpose. The chain driven damper is driven by the thermostat.
The thermostat in the boiler is adjusted to a certain temperature. When the coolant heats up to the desired level, the damper is automatically set to a certain position, reducing the heating intensity. It is impossible to sharply reduce the temperature, because... The coolant will continue to heat up by inertia, heating the room.
Devices with fans work a little differently. If you need to increase the heat transfer force, this can be done using a fan. The device will pump air. Due to this, it is also possible to reduce the inertia of the boiler. Control occurs automatically, and sensors record the slightest changes in coolant temperature.
The order of laying the stove-fireplace
Do-it-yourself masonry is not as complicated as it might seem at first glance. Just don't be afraid. And pay close attention to the order. Then it will be simple.
First row
We lay out the body of the stove with an area of 4x5 bricks and add an allowance for the plinth. Although you can do without it. But it’s somehow more elegant with him.
Second row
We are already laying out the finishing perimeter of the oven:
We form internal channels. On the third row
We install cleaning channels and a blower door. They are attached to wire and clay mortar, without a basalt cord:
Fourth row
select the height of the doors:
Fifth row
close the doors and install the grate. If the height of the room allows, it is advisable to make another row of masonry - a more massive floor will result. When using fireclay bricks, it’s time to start laying them. We make it only for use. We continue to build external walls and channel partitions with ceramic bricks:
6 row
— we form a tray for firewood. You can do without bevelling the hearth, as in the picture, but the firebox will work better this way. We separate the channels. Small channels are descending. The big ones are ascending. We apply an oblique dressing. You can do it without it, but it’s safer with it. If, for reasons of simplification, you begin to use oblique dressing rarely, then it should always be oriented to the outer side, as in the figure. Without connecting to the walls of the firebox. The grate is as close as possible to the combustion door. If you sink it deeper, towards the rear wall of the firebox, smoking is possible - air turbulence will block the exit from the firebox to the smoke channels.
7th row.
The combustion door is installed. It is installed on a seal - a basalt cord impregnated with clay mortar.
Rows 8-13.
Raise the firebox to the height of the fireplace door:
Rows 14-15.
A place is being prepared for the beam lintel. Many people prefer to make bevels for it directly on the spot, choosing a brick with a grinder. You can file it in advance. The first option is more accurate. The second one is less dusty and dirty.
The door cover is made as thick as a brick. Cannot be placed on anchors. Only a beam or arch (if the fire door has an arch). It is advisable to insert wire into the masonry joints:
16th row.
We begin to form a bread chamber. We overlap without iron, with a simplified wedge overlap:
17th row.
We extend it for the bread chamber. We monitor the bandaging of the slot ceiling:
18th row.
We install the bread chamber door. We place it, like the furnace, on a basalt cord:
19 row.
We continue the bread chamber. We open the passage of gases from the bread chamber into the descending channels:
20 row.
We bring the entrance to the descending channels to a height of two bricks.
21-22 row.
We block the descending channels and form heels under the vaulted ceiling of the bread chamber.
23 row.
We install the roof of the bread chamber. We leave the fireplace channel and close it with a valve with a long handle.
Attentively! The valve will get very hot during the process! That's why we put it on asbestos or basalt!
The vault will have to be cut at the top to level the masonry. Or lay out another row - if the size of the room allows.
24 row.
We bandage the roof of the bread chamber. If there is free height in the room, you can lay out another row. The minimum is shown here:
25-27 row.
We form a cap over the bread chamber. The columns under the ceiling are placed based on the location of the chimney - its location is not strictly regulated, it can be installed at any point in the stove ceiling - you need to start from the most convenient passage of the roof. Simply put: we look at the beams. Cleaning is carried out immediately - the installation point is chosen again along the pipe - preferably as close to it as possible. Not shown in the figure:
Row 28-30.
Mandatory three rows of overlap. Next is the pipe. Install smoke channel valves based on ease of use - 2 pcs. above each other to reduce heat loss:
We place two valves in the pipe, one above the other. Such duplication is necessary to form an air gap - as in double glazing. Better heat retention.
To revive the masonry in the process, you can use brick releases to make shelves on the body of the stove. Just don’t get carried away with their construction - elements protruding from the massif interfere with convection along the body of the stove:
Everything will look something like this:
When lighting for the first time, always open the valve that closes the channel from the bread chamber to the pipe. Many stove makers call it “direct stroke”. This manipulation will warm up the pipe. Subsequently, the combustion is carried out in the usual manner. When operating in furnace mode, this valve is always closed. If we use it as a fireplace, then it is always open.
Good and cozy warmth to you at any time of the year!
What types of fuel can be used
When it comes to the heating system for a temporary premises, such as a workshop or garage, two aspects are usually taken into account - economic feasibility and safety.
In terms of economic feasibility, the most accessible type of fuel today is wood. Liquid fuel, such as diesel fuel or used engine oil, is used for heating mainly utility rooms; in residential premises, the use of this fuel is limited because it has a specific smell. Coal is usually not used for long-burning furnaces of handicraft production; it is intended for heating boilers and stationary brick furnaces.
Thus, the most acceptable type of fuel is firewood or pallets - fuel from wood processing waste. And here lies the whole secret of long-burning furnaces. The fact is that to get maximum effect you need to use only dry firewood. In ordinary, freshly cut firewood, the wood contains a large amount of moisture; during combustion, it turns out that two processes occur in parallel - burning of wood fibers and drying, releasing a large amount of water vapor. The result is a large amount of unburned fuel and combustion at a low temperature. These processes do not allow obtaining the maximum amount of heat.
It's a different matter with dry firewood. The moisture content in them is minimal, which means that when the temperature rises to 300 degrees, the process of decomposition of wood into simple substances begins. This allows you to significantly increase heat transfer, as a result of which the firewood burns completely with minimal formation of soot and ash.
Means for manufacturing and the process itself
If you want to make a thematic unit, you will have to look at a lot of photos of metal stoves made by yourself, then draw up a drawing and arm yourself with:
- Welding equipment with electrodes;
- Sheet metal or “donor” structures;
- Steel corners;
- Grinder with cutting wheel;
- Large and medium hammers;
- Reinforcement with a diameter of 8 mm;
- Measuring tools - tape measure, corner;
- Use a pencil or sharp nail to draw lines.
When all the tools are collected, you can proceed directly to the event:
- Cutting a pipe and 5 rectangles using a grinder;
- Butt welding of steel or cast iron sheets with a welding machine;
- Welding the bottom to the walls, followed by checking the evenness of the finished structure;
- Marking on the walls of the barrel the places where the firebox, ash pan, and chimney will be located;
- Welding the corners to the “barrel” at a level of 10 cm from its bottom (this is necessary for installing the grate);
- Making grate bars from scraps that can be taken from a 2-centimeter diameter pipe or corresponding metal rods;
- Fixing the tubes and welding them;
- Welding two reinforcement sections at the top of the structure to organize the reflector;
- Welding the lid to the “barrel” (the first one should already have a hole for the chimney);
- Making door handles from pipes or plates;
- Making legs from corners or fittings;
- Organizing a chimney using a 135-180 mm pipe;
- Creating a rotary damper at the bottom of the chimney;
- Furnace installation.
Manufacturing a metal furnace is a completely feasible task. You just need to approach the corresponding project slowly and gradually. Then the finished result will not disappoint.
Types of heating devices of this type
Design of a mobile rocket furnace
There are several options for such equipment:
- Mobile. Such structures can be easily transported from place to place and are made from buckets, tin cans, metal pipes, etc.
- Options made from gas cylinders.
- A stationary stove made of brick (fireclay).
- Heating structures equipped with a stove bench.
Now let's take a closer look at what each of the above options is.
Portable rocket stoves
Such designs are the simplest in design. They are pipes that can be either bent or welded from individual sections. There can only be one improvement to a given design; it concerns the installation of a special partition, through which the ash pit is equipped. It provides a special slot through which air suction occurs.
Very often, a grate is installed at the bottom of the loading chamber, through which air is supplied directly to the combustion zone. A special door is installed in the opening intended for storing firewood, which is necessary to regulate the air supply.
Construction made from a gas cylinder
Rocket structure made from a balloon
This is the next stage in the evolution of reactive heating devices. Thanks to its sophisticated design, such a furnace has high efficiency and thermal power. At the same time, such a stove can be made from improvised materials. You will need a gas cylinder, several pieces of steel pipes with thick walls, and a sheet of metal 5 mm thick.
Features of the cylinder stove operation are as follows:
- Firewood is loaded into the firebox, ignited by a strong influx of air entering through the loading window.
- Combustible gases are burned directly in a pipe located inside the cylinder. This occurs due to the supply of secondary air.
- To enhance this effect, the internal chamber must be insulated, which allows the internal temperature to rise by more than 1000 degrees Celsius.
- Moving through the system, the hot gas reaches the bell, entering the outer chamber, which is a heat exchanger.
Scheme of operation of a stove structure made from a cylinder
After the combustion products have cooled, they are removed through a chimney installed in the lower part of the structure on the reverse side.
Combined design device
The combined stove is a unit made of a metal barrel and brick. In this case, fireclay brick is not used as a facing material; it is from it that the internal chambers and firebox are laid out. Thus, a stationary heating device is obtained, which is made of materials with high heat capacity, and therefore perfectly accumulates heat, releasing it within several hours.
Design with a bed
One of the disadvantages of jet stoves is that most of the heat is removed through the chimney. However, this is the problem with almost all solid fuel designs. And in this case, this disadvantage can be easily eliminated by significantly increasing the length of the chimney channels.
Diagram of a rocket stove with a stove bench
We are talking about jet stoves with a stove bench, which are an excellent embodiment of this idea. Such units can be made from rubble stone or brick, using a plastic mass made from sawdust and clay as decoration. The high thermal capacity of the materials used allows such structures to retain heat throughout the night, which, coupled with efficiency, makes such structures an excellent choice for residential premises.
This material will be perfectly complemented by the following publications:
- Review of Termofor heating stoves for home and bathhouses - the best from Siberia
- Construction of Kuznetsov furnaces, their advantages and drawings
How to increase the efficiency of the stove
Long-burning jet stoves can be made even more efficient with a little modification. If the riser (fire pipe) is covered with a metal casing, weld vertically positioned pipes of small diameter to the outer surface - they form a convector that effectively warms the air in the rooms. This modification method is suitable for metal units used for heating technical premises (for example, garages).
Any metal rocket stove can be made more efficient by lining it with brick or natural stone. The masonry will retain heat and slowly release it into the room. At the same time, it will allow you to get rid of unbearable heat if the heating is too intense.
§ 3. Continuous combustion furnaces
If the stove is heated continuously in such a way that every hour it receives from the burned fuel and transfers into the room the amount of heat required for its heating, then there will be no need for accumulation (reserve) of heat, i.e. there will be no need for a large volume of brick array.
A continuous combustion stove will evenly transfer heat to the air in the room, since its walls will have the same temperature.
In terms of their operating mode and uniformity of heating, continuous furnaces correspond to central heating radiators.
The reduction in the volume of a continuous combustion furnace is quite significant (3-5 times) compared to the volume of a heat-intensive furnace. Savings in materials, labor, transportation costs are all a result of reducing the volume of the furnace
And, no less important, the continuous combustion furnace takes up little space
Continuous combustion furnaces have some distinctive features. These include:
- loading shaft (hopper), where the fuel supply required for the entire life of the furnace is placed;
- hermetic fittings for tightly closing all openings in the walls of the furnace (furnace, blower, etc.);
- a device by which the air supply is regulated to change the combustion rate;
- a device for scooping fuel and cleaning the ash pan without interrupting the operation of the furnace.
In continuous combustion furnaces, so-called “bottom” combustion occurs.
Long-burning furnace of the Academy of Public Utilities (AKH-9) (Fig. 82). Oven dimensions 49 x 59 x 105 cm. Heat transfer - 2400 kcal/hour; weight - 350 kg. The outside of the stove is decorated with tiles.
Rice. 82. Tiled stove AKH-9 long burning
The furnace consists of a shaft 1, a firebox 4, an ash pan 7, a middle flue 8, an intermediate chamber 5, side flues 10, two upper flues 11, a collector 9
As combustion proceeds, fuel flows from the shaft onto the grate under the influence of its own weight. The firebox maintains a constant thickness of the fuel layer and a small combustion mirror. A uniform combustion process creates a uniform temperature on the outer walls of the furnace,
The shaft is equipped, in its upper part, with a door for loading fuel. In its lower part there is a firebox with a grate and a combustion door. The middle part of the grate rotates freely. This makes it easier to clean up the ash. The stove is assembled in a metal frame. The outer walls of the stove are made of glazed tiles. Their voids are filled with ceramic tiles and crushed stone in mortar. The internal filling of the furnace is made of fireclay bricks installed on edge. Intermediate chamber 3 protects the side walls and roof of the furnace from local overheating.
There is a smoke exhaust pipe in the rear wall at the level of the collecting manifold. There are holes on the front and side walls of the furnace for cleaning the manifold and flues. The openings are closed with ceramic glazed stoppers.
Combustion products rise from the firebox along the middle flue 8 into the intermediate chamber 3, from which they flow into the side flues. Then the combustion products rise along the outer surfaces of the walls of the intermediate chamber and fill the space of two gas ducts 11 under the furnace roof. The cooled gases, being heavier, descend through the same side flues 10, but along the internal surfaces of the outer walls of the furnace. The cooled combustion products are collected through special openings in the manifold 9, and from here they are removed through the pipe into the chimney.
Fuel is ignited and the firebox is cleaned through ignition door 5. Fuel is loaded through door 2. Ash is removed through ash door 6. All three doors are cast iron and hermetically sealed. The intensity of the furnace operation is regulated by more or less air supply under the grate using a slider in the blower door. One full load of the furnace with anthracite is enough for round-the-clock continuous combustion with a heat output of 1600 kcal/hour. During severe frosts, fuel should be loaded into the furnace shaft twice a day.
The stove is manufactured in a factory and delivered to the installation site in finished form. The stove can operate stably on coke, anthracite, peat or fine coal briquettes, shavings and sawdust.