Author: Yuriy Fedorovich Kolesnikov, thermal power engineer
How to build an outdoor stove with your own hands is a relevant question both for residents of non-gasified regions and for inhabitants of completely civilized places. The first are interested in the opportunity to cook food in the warm season using waste fuel (dead wood, dead wood, construction chips) - a home heating and cooking stove in the summer is not very economical, and it makes the house very hot while cooking dinner. Secondly, the opportunity to sit by the fire in the gazebo or on the lawn in a relaxation corner at the dacha or on your own property, while at the same time preparing shish kebab or barbecue ribs, without shelling out a mind-boggling amount for a turnkey branded garden stove. Both are also attracted by the opportunity to receive home-smoked products that are obviously not adulterated and are much cheaper than store-bought ones.
Which one to build?
First, let's see what kind of stove it is possible to build outdoors, taking into account the fact that it will not be heated intensively and irregularly, but will be exposed to climatic influences, freeze in winter, and it will be difficult to provide it with a high chimney. But the danger from the spread of carbon monoxide from an outdoor stove is reduced to the minimum possible, although it is not completely eliminated, especially in a gazebo, under a canopy and in calm weather. Don't forget about this: there is no stove that can be heated at random without fear of fumes. You can get burned just sitting by the fire.
Keeping these circumstances in mind, the choice of outdoor stove design is not so wide. The simplest garden stove is the well-known rough or rough stove. She can look terrifying, pos. 1 in Fig., but it can be heated with any fuel and it works properly, almost regardless of the quality of the materials used and the work: when building a rough structure, you can use broken simple red working bricks or stones from the surrounding area using ordinary cement-sand masonry mortar, i.e. .To. microcracks in the masonry have almost no effect on the technical performance of this stove. See, for example, the video below of how a 5-year-old child built a rough stove, which his family successfully uses and which can also be used for smoking. Which, by the way, not every oven allows, see below.
Video: a simple stove, a rough one, a design accessible to a child
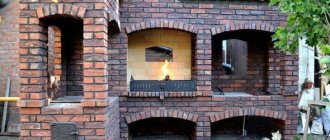
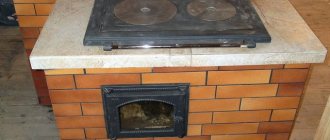
An outdoor oven at a weekend cottage is often a barbecue roaster, pos. 2. Although, as we will see later, in fact this is not a barbecue at all. Such a stove takes about the same amount or less bricks as a rough one (about 200 pcs.), and you can use red working brick in the same way, but masonry mortar, due to the, so to speak, subtlety of the structure, is already needed for the stove for the street (see .further, about technology and materials).
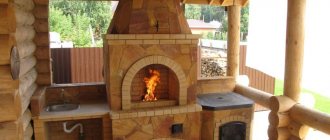
Based on the brazier, the so-called. Finnish outdoor brick oven, which is a hearth, brazier or barbecue attached to a rough stove, pos. 3. In fact, the only Finnish thing about such a stove is that the Finns were the first to think of producing them in the form of a set - construction instructions with detailed instructions and procedures, dry mixture for preparing masonry mortar, embedded parts, fittings. Now domestic kits for building an outdoor brick oven are sold in the Russian Federation. Sometimes the set also includes bricks; if necessary, hemmed/trimmed and numbered. A kit for an outdoor Finnish stove is inexpensive, and even a completely inexperienced person can build a stove from it, which is why the Finnish outdoor stoves from the kit are very popular, see for example. track. video clip.
Video: Finnish outdoor stove
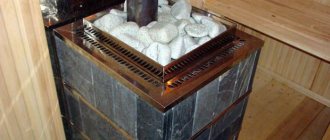
Note: a stationary smokehouse is also often attached to a wood-burning stove, pos. 4. But during use, it turns out that in the cooking mode the stove is quite gluttonous, and the quality of smoked meats is slightly above average. Why this is so and how to still combine an outdoor oven with a smokehouse, we’ll talk further.
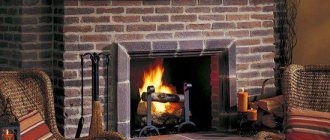
Even less common in areas is an outdoor fireplace, pos. 5. The reason is limited functionality: you can admire the flames and cook something as if on a simple fireplace, although the material and labor intensity of an outdoor fireplace is quite high. A Russian stove is built on the street (item 6) even less often. The culinary qualities of products and dishes from a Russian oven are well known, but a small Russian oven requires 2500 bricks, a large one - 3500, the design is very complex and it is not easy to protect it from bad weather. For the same reasons, Neapolitan (item 7) and Sicilian ovens for pizza and pastries are not very common in private households; In addition, these are quite highly specialized devices.
Note: much more attention for the garden and picnics deserves the so-called. mobile rocket oven, pos. 8. Rocket stoves are a special article. Here we only recall that rocket stoves exist in 2 forms - a luxury item that allows you to get a warm bed at home without building a Russian stove, and a light, compact device on which you can quickly cook dinner using a minimum amount of waste fuel. In the latter case, the degree of heating of the cooking utensil is regulated as precisely as in a gas stove.
Selection of location
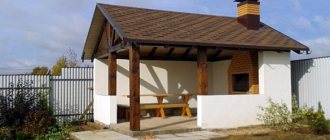
Drawing up a project begins with linking the hearth to a place on the site. The best option is to place it next to a previously built gazebo, canopy or terrace. If the yard is being developed from scratch, the stove should be assembled as far as possible from the house to eliminate the possibility of smoke and fire.
The fireplace must be located at a distance of at least 1 m from the fence, barn, garage and other combustible buildings. There should be no trees or bushes nearby, and no underground utilities under the stove. If possible, you should build the fireplace downwind of the house. It is also recommended to provide for the future availability of space for a platform, tables, benches and chairs.
Cooking questions
In order to correctly make the stove you like, and before that, choose the right design, you need to know exactly what which outdoor stove can do. Therefore, before the technical and construction aspects, we will have to be distracted by culinary issues.
Oven or smokehouse?
An oven and a smokehouse are completely different devices. The furnace is required to “squeeze” as much heat as possible from the fuel load and not allow it to be wasted in space. Therefore, furnaces are designed (perhaps intuitively, based on the experience of generations) to burn fuel to the final combustion products - carbon dioxide and water vapor.
On the contrary, what is required from a smokehouse is not high thermal efficiency, but as much smoke as possible. But not just smoke that eats your eyes. Firstly, smoke for smoking should ideally not contain solid particles of unburned fuel. The final product should be smoked, not soot-encrusted. Anyone who has seen how a good industrial smokehouse works has probably noticed that in the area where the product is loaded, there is almost no visible smoke.
Secondly, smoke for smoking should not contain substances harmful to health. It is impossible to organize this chemically when burning organic fuel, so smokehouses are built in such a way that harmful impurities either “skip” past the smoked substance, or are neutralized and settle before it.
There is an important point here: in the temperature range of approx. It is extremely undesirable to smoke at 35-50 degrees, because... It is at such temperatures that there is a high probability of acid condensation; it is formed as a result of the interaction of chemically active particles of unburned fuel, the so-called. free radicals, water vapor and air oxygen. The acidified product not only tastes disgusting, but is also dangerous to health. Therefore, a trace is distinguished. types of smoking:
- Cold – the temperature in the smokehouse is up to 35 degrees. Preparation of products - salting in brine (saturated solution of table salt) and soaking immediately before loading into the smokehouse. Smoking time – from 5-6 days; breaks are not allowed. The taste of the finished product is the highest; shelf life without the use of means and methods of additional preservation can be calculated in months and years.
- Semi-hot (semi-cold) – smoking temperature 60-70 degrees. Preparation of products - short soaking in brine. The smoking period until ready is 0.5-2 days. Taste qualities are very high; the taste and bouquet are similar to those of cold smoked products. Keeping quality up to a month; usually up to 5 days.
- Hot – at a temperature of 85-120 degrees. Product preparation is not necessary. Smoking time – 1-5 hours. The taste qualities are very high, but the taste and aroma are not the same as those of cold smoked products. Shelf life without additional preservation up to 36 hours.
Considering the above, we can conclude that, firstly, the smokehouse for an outdoor stove must be a separate device. Any stove is not a smoke generator for smoking and it is impossible to set up the smoking process from the stove only by loading fuel and supplying air into the firebox; you also need to select the length of the flue from the outlet of the stove to the smoking chamber. Secondly, to feed a smokehouse with smoke, the simplest stove with low efficiency and a smoke tooth is best suited, see below.
Grill, grill and barbecue
An open flame is the enemy of any cooked food. Burning is only the visible and palpable “tip of the iceberg”: exposure to high temperatures on food products causes hydrolysis of fats, breakdown of carbohydrates and deep denaturation of proteins, saturating food with substances that are very harmful to health. In simple cooking ovens using solid fuel, direct contact of the food with the flame is avoided in various ways. What they have in common is that the food is not only baked, but also smoked, which is why, when properly prepared, its taste improves.
Grill
The hearth oven, which is commonly called a barbecue, is actually a classic Anglo-Saxon grill, the diagram of which is given on the left in Fig. Confusion arose in Canada, where French and English were mixed together. The grill structure follows from Anglo-Saxon culinary traditions, the essence of which was exaggeratedly but accurately expressed by Stubb from Melville’s novel “Moby Dick”: “You must take a piece of meat, from afar for a moment show it a slightly smoldering coal and immediately serve the steak to me!” Remember “bloody roast beef” from Eugene Onegin? In restaurants, baked meat is still offered rare - half-raw with blood, medium - baked until soft, juicy, like a kebab, and well done - crispy in a crispy crust.
Grill, barbecue and barbecue equipment
Note: if you find yourself in the southwestern United States, there may be something strange on the menu - hanaban (pronounced hanaban). This is a kebab in spices, removed from a skewer, something like Arabic khusal.
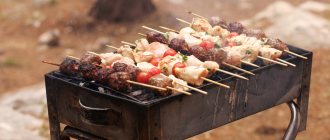
The grill is suitable for cooking rare, medium, and well done meat. This is achieved by placing the grate with the product at different levels above the brazier with coals. Coals rarely flare up, because... scattered in a thin layer over a dense floor and air access to them is limited. If they flare up, then the piece is simply moved to the side.
Brazier
Rare meat can be very tasty, but in southern countries, where pathogens of various diseases thrive, it can also be very dangerous. In addition, in many countries of the South they do not eat pork at all, and beef and lamb are rare and harsh. Hence the design of the barbecue (in the center in the figure): a holey under and partly the walls of a deep tray, a thick layer of coals. The meat is heated not only by thermal radiation, but also by a flow of hot air.
B-B-Q
In a real French barbecue (oh, those pampered paddling pools!), heat radiation is not involved at all in cooking. The design of a barbecue oven is quite complex (on the right in the figure), but reliable and multifunctional:
- Thanks to the separate cooking chamber with a hood, wind and outside temperature have almost no effect on the quality of the finished product.
- If you close the chamber portal with a flap lid, like in a Russian oven, the chamber turns into a semi-hot or hot smoked smokehouse.
- You can bake bread, cook pot roast, etc. in the oven. If salting the dish is undesirable, it is cooked in a container with a tight lid.
- Woodshed and dryer are relative concepts. Here and there you can dry mushrooms, berries, and fruits that require different drying modes. Additionally, it is regulated by dampers.
Note: pay attention to the protrusion of the hearth, which does not completely isolate the firebox from the oven. This is the so-called. a smoke tooth or jib is a radical means of reducing the dependence of the technical performance of any outdoor stove on weather conditions, see below.
Peculiarities
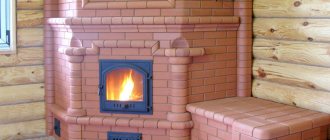
The Russian outdoor stove, unlike the classic model, is equipped with a horizontal firebox and hearth.
Its chimney is shorter, and the side walls are insulated, which increases efficiency with less fuel consumption. For ease of use, the cooking chamber in such an oven is placed on the front, and the combustion chamber on the left side. The rational design of the frying chamber allows it to be used not only for cooking or frying food, but also as a kebab maker, smokehouse for meat or fish. And if you install a damper, it turns into an oven for baking culinary products and bread.
Outdoor stove designs
Not just a stove
The simplest outdoor stove is a 2-burner stove with a tunnel firebox, divided by a smoke tooth into a flame (the firebox itself) and a smoke chamber, diagram on the left in the figure:
Diagram of an outdoor stove with a smoke tooth and smokehouse for it
House stove fireboxes are not made with a smoke tooth: it reduces the efficiency of the stove and increases the risk of carbon monoxide emissions. However, for a summer outdoor stove, both are unimportant, but the smoke tooth in its firebox is:
- Reduces the dependence of the combustion mode on the direction and strength of the wind;
- Allows you to load low-calorie waste fuel into the stove;
- Allows you to heat water on a small burner in the wind and cold and cook the first dish in a tall bowl, because at the pass above the single file from the flame chamber to the smoke chamber, a high temperature develops and a large amount of heat is released;
- Makes it possible, under a certain combustion mode (see below), to start a stove with a smokehouse; in this case, the smoke chamber works as an afterburner for the smokehouse smoke generator.
Smoke tooth in an outdoor oven
The height of the passage between the top of the jib and the plate forming the cooking surface is usually approx. 70 mm. However, the jib needs to be adjusted, which is not difficult: it is laid out in a ready-made oven from bricks (maybe not hewn) without dressing and even dry. Depending on the ratio of the size of the firebox, the diameter and height of the chimney, the optimal clearance between the smoke tooth and the furnace roof may be 15-20 mm, as for example in the photo on the right. If uniform heating of both burners is required, then the jib is placed not under the back, but between the burners, but in no case under the front - the stove will smoke a lot and will not heat.
About smokehouses for the stove
Schemes of smokehouses for a 2-burner stove with a smoke tooth are shown on the right in the previous page. rice. The height of each is 1-1.5 m; other sizes can be taken proportionally. Chimney diameter – 130-150 mm. The strainer is designed to catch soot and should be cleaned before each load of food. However, it is highly advisable to wrap the products loaded into these smokehouses with 3-4 layers of thin gauze.
In all respects, a smokehouse with a side smoke inlet is better. Firstly, it allows you to perform not only hot, but also semi-hot smoking; It is convenient to regulate the length of the gas duct from the stove to the smokehouse by connecting them with a thin-walled metal corrugated hose. Secondly, a regular baking sheet is suitable for collecting fat in it, and in a smokehouse with bottom smoke supply, the baking sheet must have an opening with a shell. You can’t let fat drip down into the smokehouse: you won’t be able to get it off later, it stinks terribly and transfers its aroma to the products.
Note: The smokehouse chimney must be equipped with a wind cap. To avoid acid dew in the smokehouse, do not smoke in cold, damp or windy weather.
Advanced plate
A 2-burner stove with a smoke chamber does not necessarily have to look like a primitive fire pit excavated by archaeologists. It can be multifunctional and technically advanced, i.e. economical. Drawings and arrangement of an improved outdoor slab for a summer house and country house are shown in Fig. Although its design is quite complicated for a beginner, to assemble this stove you will only need approx. 200 stove bricks.
Drawings and arrangement of a simple outdoor stove
This design uses a technical solution first used in a Swedish stove: the firebox and smoke chamber are separated by an oven instead of a smoke tooth; the gas tunnel above it is highlighted in red. In such a stove structure there is no room left for a woodcutter, but in return:
- The oven mode is stabilized in almost any weather from early spring to late autumn.
- Thermal efficiency is over 65%, like a good cooking and heating stove.
- It is possible to use a chimney with a height of only 1.2 m above the level of the hob.
- The heating of the burners is almost uniform and strong.
- The extensive smoke chamber is an effective afterburner, which releases heat sufficient to heat the water heating tank.
- The loss of soot in the smoke chamber when firing with waste fuel is abundant. Therefore, the presence of a cleaning hatch with a door is mandatory, but the stove interfaces with the smokehouse without any problems.
- The danger of burning from such a stove is no higher than from a Swedish stove or any other home stove. Therefore, this stove can be used as a home stove for a small room; then, instead of a smokehouse, it is constantly interfaced with the heating panel.
The masonry of the improved outdoor slab is made using clay-cement mortar for outdoor ovens with moisture-resistant joints, see below. In the smoking mode, this stove is fired from the ash pit with the firebox door tightly closed. Fuel - shavings or thin splinters (not chips!) of deciduous wood, except birch, even if it is completely healthy. Otherwise, the products will acquire a nasty taste of birch tar. The side exit to the chimney, in addition to the convenience of interfacing with the smokehouse, eliminates the formation of acid condensate in the stove.
Fireplace grill, barbecue and barbecue
Here in Fig. the order of a simple outdoor stove-fireplace, which can be successfully used as a grill, is given; red indicates stove brick, orange indicates fireclay brick. A tent over the fireplace reduces the dependence of the quality of cooked food on weather conditions. Rows 1-12 make up the woodshed; its height can be reduced to save material and work. The woodshed is covered with a reinforced concrete or stone slab 40-80 mm thick, on which the actual structure of the stove is erected (rows 13-35). Row 25 along the façade is supported by a pair of 40mm angle steel embeds.
Arrangement of a simple outdoor stove-fireplace
On the trail. rice. – arrangement of an outdoor barbecue oven (more precisely, a grill) with a hob. It is more complicated than the previous one, because arched furnace portal (rows 17-22). The arch is laid out in circles, as in the construction of a Russian stove. This barbecue oven will cost much less than the previous one, because... there are 8 fewer rows of masonry and fireclay bricks are not used. However, the possibilities of using this stove as a fireplace are very limited: the steel hearth under the fireplace will soon burn out from regular heating. It will also not be possible to cook well-done meat in this oven: due to the high thermal conductivity of the steel hearth, the coals will either go out too quickly, or, if piled on in a thick layer, they will flare up and burn the product.
Setting up an outdoor barbecue oven
Finally, onto the trail. rice. – a complex, expensive and labor-intensive, but multifunctional and efficient outdoor grill oven with a 2-burner hob; yellow indicates a clay-sand fill, like between the vault and the bench of a Russian stove. The upper smoke threshold (rows 15-20 on the B-B section) acts similarly to the smoke tooth of a classic English fireplace. In the niche between it and the portal (highlighted in pink) you can smoke food during other culinary processes: in order for acidic condensation to fall out in such a pocket, you need to load the oven in absolutely disgusting weather with absolutely disgusting fuel.
Ordering and drawings of an outdoor oven with barbecue
Handy tools
A set of necessary tools is also collected in advance. It should consist of:
- Angle grinders 230;
- Angle grinders 125 (not necessary, but preferable so as not to rearrange the wheel and cup);
- extension cord with a tee (so as not to switch sockets);
- level 80 cm;
- level 30 cm;
- metal ruler 1 m;
- tape measures 3m;
- masonry trowel;
- regular and rubber hammer;
- a mixer with a nozzle for preparing a solution or a drill with adjustable speed;
- buckets for mixing the solution;
- containers for soaking bricks;
- hand and brick rags;
- concrete mixers (although you can mix by hand);
- shovels.
Technology issues
Base
Under the foundation of the outdoor stove, they dig a pit on the bayonet of a shovel (30 cm). First, an anti-heaving sand cushion with a thickness (thickness) of 15 cm is poured into the pit and compacted, and crushed stone backfill is placed over it to the ground level. The backfill is carefully leveled to the horizon. The extension of the sides of the pit beyond the contour of the furnace in plan is from 400 mm.
Further, if the foundation of the furnace is a ready-made concrete monolith, the foundation slab is simply placed on crushed stone. If the foundation is poured with your own hands, formwork with a height of 80-150 mm is made under it. Reinforcement is standard 2-level. Solution - from M250. It is impossible to lay the foundation of the furnace flush with the ground: it will soon become clogged with soil and its “chemistry” will ruin the lower rows of the masonry, which is equivalent to re-laying the entire furnace. To avoid tripping over the threshold of the foundation, a gently sloping blind area is made of curb stone or cement-sand mortar along its contour.
If the stove is built in a gazebo, on a veranda, or generally on a wooden floor of sufficient load-bearing capacity, the removal of the stove base must be done according to fire safety rules: from 600 mm on the side of the fire door and from 300 mm on the other sides. Asbestos cardboard with a thickness of 4 mm or basalt mineral cardboard with a thickness of 6 mm or more is placed on the floor, then a sheet of roofing iron. The iron flooring is moistened with a liquid clay solution, felt or basalt cardboard is placed on it and impregnated with the same solution. Laying the furnace structure begins when the clay impregnation is completely dry.
Brick
For an outdoor stove, you need exactly stove brick: dense, well-annealed. A rough stove or a 2-burner stove with a smoke tooth, in which the firebox does not get very hot, can be made of red working bricks, incl. hollow - the stove from it warms up faster and loses less heat in vain. Sand-lime brick is absolutely unsuitable for stoves, and fireclay masonry in outdoor stoves should be avoided: due to the high moisture absorption of fireclay bricks, it is susceptible to frost in the open air in winter.
Note: why would the authors of some publications and the rewriters who are crazy about stealing their material think that a stove can be made from gas blocks, the Almighty hardly knows. This is foamed cement mortar. Under the influence of high temperatures, cement gradually but quite quickly loses water of crystallization and disintegrates into dust.
Masonry mortar and masonry
Ordinary clay stove mortar is unsuitable for outdoor stoves: it will become limp during the period of inactivity during spring and autumn bad weather. Stoves with a relaxed thermal regime (rough, 2-burner with a smoke chamber) can be laid on a cement-sand mortar from M250 (Portland cement from M500: sand 1:3 - 1:3.5); in extreme cases, it won’t take long to completely shift them. Sometimes outdoor stoves at weekend dachas are placed on the same mortar with reinforcement of 6-7 mm thick seams with 3 mm thick steel mesh. However, with more or less regular use, a stove folded in this way will last no more than 5-7 years.
To build a truly durable outdoor stove, you will have to buy dry stove mortar for laying outdoor stoves and seal it according to the instructions. In general, this is a clay-cement-sand mortar, but the quality of the clay for it must be tested in the laboratory, and the dry mixture must be prepared on production equipment. If you don't mind taking the risk of laying down a rough or slab first, a trail of mortar for laying outdoor stoves is prepared at home. way:
- White or gray fatty clay is mixed with a large amount of water and left to “sour” for three days;
- The first two days the clay solution is periodically stirred, the third day it is allowed to settle;
- The suspension is drained, and the clay sediment is pressed through a sieve with a mesh size of 1.5 mm and dried in the shade;
- Dry clay is crushed to a fraction no larger than 1.5 mm and Portland cement grade M400 or higher is added in an amount of 10-15% of the volume of clay;
- Make a “sausage” test for the fat content of the clay-cement mixture, as when preparing stove mortar with your own hands;
- Add mountain sand of fraction 0.5-1.5 mm to the dry mixture to the desired fat content. Gully and rounded quartz river sand are not suitable. Only now the mixture is ready to work.
You need to prepare masonry mortar for the stove, from a purchased or home-made mixture, in small portions so that it can be worked out in 2-3 hours, because The clay-cement-sand mortar dries and separates in the bucket. For beginners, it is better to make a bucket of mortar at a time; it will be enough for 100-120 bricks. It is better to apply the mortar onto the brick with the palm of your hand in a layer of approx. 3 mm. The squeezed-out excess is immediately removed with a finger, and the seams from the outside are cut with a wooden stick to a depth of 4-5 mm for moisture insulation, see below.
Note: the thickness of the seam between fireclay and red stove bricks is 6 mm, because the moduli of their thermal expansion coefficients (TCE) are different.
Seam protection
Neither cladding with tiles, stone or face bricks, nor plastering with moisture-resistant plaster will completely protect the masonry joints of an outdoor stove from getting wet. A radical way to protect external joints from moisture has appeared only in our time: grouting the joints with glue for porcelain tiles. The seams are rubbed down after the masonry has completely dried (20 days at 15 degrees and 7 at 25). During the drying period, a temporary canopy is installed over the oven to avoid uneven heating by direct sunlight.
As for the internal seams, to protect them, all openings/openings in the stove structure are plugged with bags filled with dry grass, rags, etc. during winter downtime. So the temperature inside will be at least a degree higher than the outside one, which will prevent condensation. In the spring, before the first start after winter, the stove is quietly heated for an hour or two with paper, shavings, dry grass, until the smoke from the chimney brightens or becomes almost transparent. Now the furnace can be started at full speed.
Mortgages and accessories
Metal embedded parts can only be walled up in furnace brickwork; There should be no mortgages in fireclay. The thickness of the mortar layer between the metal and the stove brick is also 3 mm, so the seam with the embedded part will be 6 mm thick + the thickness of the embedded part. Because seams thicker than 13 mm are unacceptable, the maximum thickness of the embeds in the furnace is 5 mm, and the minimum, according to general building standards, is 4 mm. Wire embeds can be 3 mm thick.
Deformation gaps between the brickwork and fittings (doors, flaps, latches, gates) are required to be 6-12 mm wide. Most often, the gaps are 10 mm. Deformation gaps are filled with fluffed asbestos; As a rule, for this purpose, the fitting element is wrapped around the contour with an asbestos cord before installation. They put the fittings in place as soon as the masonry reaches the level of its bottom; It is unacceptable to push the part into the finished opening! Next, the laying is carried out by circling the fittings until they close at the top of it.
In the manuals for the construction of stoves they write that the fittings in the stove structure need to be secured only with wire, because... cast iron does not cook or cooks very poorly. This is true, which is why cast iron fittings are provided with eyes and/or grooves for 3-4 mm wire. Installation of cast iron elements of stove fittings is done as follows. order:
- As soon as the masonry is brought to the bottom of the part, grooves are selected in the bricks with a grinder for the wire whiskers. The width of the grooves is 6 mm. Laying the mustache in the masonry - from 1.5 bricks, better - 2.5-3.5 bricks. The ends of the wire should not fall on the vertical joints of the masonry!
- A wire is threaded into the lower eyes of the asbestos-wrapped fittings, the piece is put in place and the laying continues;
- In the last row of masonry before the part covering the part, grooves are selected for the upper wire whiskers, as in step 1;
- Insert the wire into the upper eyes of the part;
- Lay out the overlapping row and carry the masonry further.
At the same time, in outdoor stoves that are heated irregularly and not intensively, fittings made from ordinary structural steel are quite durable, incl. homemade. This saves a lot of money, because... cast iron fittings road. It is quite legal to attach steel stove fittings by welding to embedded parts made from a steel strip or angle.
Materials and quantity of bricks
To lay a stove with your own hands, you need to purchase all building materials and stove fittings in advance:
| No. | Name | Unit change | Quantity |
| 1 | Burnt solid red clay brick | thousand pieces | 0,55 |
| 2 | Fireclay brick | thousand pieces | 0,15 |
| 3 | Oily clay | kg | 250 |
| 4 | Sand | kg | 200 |
| 5 | Cast iron blower door | PC. | 1 |
| 6 | Cast iron fire door | PC. | 1 |
| 7 | Hob | PC. | 1 |
| 8 | Stove valve | PC. | 1 |
| 9 | Chimney cap | PC. | 1 |
| 10 | Steel corner 50x50 mm | m | 10 |
| 11 | Steel corner 25x25 mm | m | 8 |
| 12 | Concrete mixture for foundation | m³ | 1,2 |
| 13 | Steel reinforcing mesh | m² | 3,5 |
| 14 | Ruberoid or polyethylene film | m² | 3,5 |
| 15 | Formwork boards or plywood sheets | m² | 3,5 |
| 16 | Nails | kg | 0,5 |
| 17 | Asbestos cord | m | 30 |
Foundation
Under a large complex, you will have to make a reliable foundation , with a depth below the freezing point of the soil (it is different for each region, you can check it with familiar builders). The foundation must be reinforced. On soils with heaving soils, it should have a trapezoidal shape.
If the garden stove is small, then an ordinary slab 10-15 cm thick is sufficient. To construct it, the fertile layer is removed, a hole 40-60 cm deep is dug, 10-15 cm of sand is filled in, compacted, after 30-40 cm of gravel. The formwork is being exposed. Reinforcing mesh is placed in it and everything is filled with concrete. It is better if the foundation is 50-100 mm above ground level.
Accommodation
If you decide to install a barbecue stove on your property, then regardless of the type of stove you choose, you first need to think about fire safety - the place where it will be installed. It should be understood that any device with an open flame, if neglected in its placement and rules of use, threatens serious burns, large fires, which result in harm to human health (often fatal), surrounding buildings and nature.
It is safest to place a resting place with a barbecue on an area that is located at a considerable distance from the main buildings (country house, outbuildings, premises with animals and birds). But this is not always convenient, especially for an open outdoor brazier and those models that are under a roof, but do not have electricity, running water and other amenities of civilization.
Gazebos with barbecues can be placed on the same foundation as the house and under the same roof. But in this case, you must adhere to all fire safety requirements for buildings and residential premises.
It is not recommended to place such devices in the following places:
- near the storage area for firewood, hay, lumber and their waste;
- near dry grass, fire hazardous debris;
- close to fences and walls;
- directly under trees and overhanging branches.
When installing a collapsible barbecue in the garden or on the street, you need to take into account the speed and direction of the wind. Smoke should not go towards neighboring buildings and houses, and in cases of installing a stationary outdoor barbecue (including in a gazebo), you should take an interest in the local “wind rose” and build a protective screen on the side of the most possible “wind blower”. Special portable protective screens are available for sale, which is the best option for solving the problem of wind direction.
You also need to take care of the convenience of using the stove in the selected location of the site.
The following questions must be addressed here:
- a free approach to the device from at least two sides, because it is always more convenient and fun to cook with an assistant;
- there should be space for a table and seats nearby;
- the ability to provide a recreation area with clean water and lighting;
- Convenient access to the place from the house.
The following points should also be considered:
- how much time is expected to be spent at the dacha (this means constantly or only in the summer) - the installation of the stove indoors or in an open gazebo depends on this;
- how many people the recreation area is designed for;
- what design to choose for the barbecue area and gazebo.
Each owner will probably have a lot of questions about the design and selection of stoves, but they can already be solved in the process of creating the interior.
Ordinary masonry of the stove
After preparing the base and familiarizing yourself with the drawings, you can move on
It is important to strictly follow the order indicating the correct position of the bricks and installation of stove fittings
With stove and bed
If you plan to bake a stove with your own hands, then the simple procedure looks like this:
- Make a continuous and even row.
- Lay out the internal compartments, design the cleaning channels and ash pan chamber.
- Place the door of the blower and cleaning chamber. Secure them with steel wire, placing the ends in the seams.
- Close the vault, block the entrances to the channels, form holes and decorate the ceiling of the bottom channel from the inside.
- Fix the grate in a large firebox. Carry out the internal masonry without mortar; it is better to use fireclay, cutting it in half in thickness. Place the door on the small firebox.
- Install the hot water tank.
- Place the grate on the small firebox and the door on the large firebox. Stretch the right wall with a strip of steel. There is no need for mortar behind a large firebox.
- Install and secure the small firebox door. Continue to output internal channels.
- This row is combined with the previous one.
- Lay out the bottom of the furnace, combine the combustion vaults. Bring the channel holes into the chamber and close the water heating tank.
- At the edge of the masonry, secure a 5x5 cm metal corner between the fireboxes. Cover the space of the large firebox behind the stove with a grate. There is no need to secure it.
- Form the chimney and the walls of the furnace. Install a damper on the left.
- Continue the algorithm.
- Form an entrance to the chimney. It will be opened by a valve (vertical). Remove the walls of the furnace and make a hole for the damper.
- Begin to narrow the masonry, blocking the roof of the chamber. Proceed with the removal of the chimney.
- Reinforce the walls with strips of metal.
- Secure the back wall with a strip of metal. Narrow the chamber vault further and prepare to lay the vault. Above the niche with the slab, lay a corner and a strip of metal - the basis for the masonry that creates the ceiling.
- Lay out the outer walls and roof of the furnace in the shape of a dome. You can install a template or weld an arch from strips of metal.
- Strengthen the wall above the entrance to the chamber with a strip of metal and surround the roof of the furnace with walls.
- Pour sand and compact it.
- Proceed to the base of the bed. Lay a sand embankment and narrow the slit in front.
- Narrow the overpipe and install a panel with a circular hole to change the direction of the smoke.
- Install the cleaning window door.
- Install the draft control valve.
- Continue to cover the space.
- Work according to the algorithm.
- Combine the overpipe and chimney on rows 27-29. Lay out the chimney before starting to form the groove. In the place where the chimney passes the attic floor, use cement mortar.
When the pipe is brought to the roof, make an otter - an extension above the roof in the form of an overlap. Close the gaps between the roof and the chimney with waterproofing.
The Russian stove with a fireplace and a stove bench is multifunctional. It gives warmth, they cook food on it, and they rest on top. Any things will dry on it instantly.
With a stove for a cauldron
Both the components and the masonry resemble a Russian stove with a fireplace and a stove bench. Refusal of the latter is beneficial due to the reduction in dimensions and a stove on which a large cauldron will fit. The order is:
- Make a level and continuous base.
- Install an ash chamber.
- Secure the cleanout doors.
- Place the grate.
- Form a flood chamber.
- Start lining the firebox.
- Start building the walls.
- Align the corners.
- Align under.
- Form a hailo.
- Place the stove.
- Build a combustion chamber.
- Close the smoke duct.
- Form the roof of a large firebox.
- Build walls.
- Continue the previous row.
- Connect the walls with the arches.
- Continue the row.
- Insulate the furnace.
- Take care of the general overlap.
- Continue the algorithm.
- Set the valves.
- Install cleanout doors.
- Continue the previous row.
- Follow the algorithm.
- Close the channel.
- Form a chimney.
- Install the valves.
All that remains is to build the pipe to the ceiling. Cover it with 2x1.5 bricks. To insulate the ceiling, non-combustible material is used - metal, asbestos.
You can build a stove with a firebox and a stove bench. In this case, the length of the combustion chamber is increased or an extension is built, inside of which there will be smoke channels.
Are you planning to build a Russian stove for yourself?
Not really
Kinds
The main criteria for determining the type of fireplace are its functionality, as well as its mobility or, conversely, stationarity.
When choosing the best option for yourself, you should consider how the hearth will be used, as well as how much space on the site such an object can take up. There are fireplaces with a completely decorative purpose or with a decorative and utilitarian purpose. Exterior fireplaces, designed to serve only the purposes of design and harmony of the soul, can be made in the shape of a bowl on forged legs, lined with stone in a circle, made in the shape of a cube and other possible shapes.
Such products can be portable; for the winter or in case of departure, the decorative fireplace can be removed. Portable potbelly stoves have a wider purpose. This model may include a kebab maker, which allows you to fry a small amount of meat. A foreign option is a barbecue grill.
According to the design technology, outdoor fireplaces can be divided into the following types:
- Equipped open fire, decorated for decorative purposes. A kind of fire that can be shaped with stone, brick or any other heat-resistant material (even special glass).
- Barbecue oven. The design is equipped with a chimney and allows you to fry meat over an open fire and over coals. In addition, you can cook any food in special fire-resistant containers. May be permanent or portable.
- Smokehouse. It is not too difficult to build such an object with your own hands. The main thing is to stick to technology. There are ready-made factory-made portable outdoor smokers that are very popular.
- Brazier. This is the simplest structure for cooking meat and other dishes over an open fire or coals. It can be stationary or portable. A permanent barbecue can be built from bricks; portable models are usually metal.
- Outdoor bread or Pompeii oven. Suitable for those who like to bake pies, homemade bread, cook pizza on the street or pita bread. In such a structure, the heat is generated not by coals or open fire, but by highly heated internal walls, which are made of heat-resistant and heat-intensive materials. The firebox has a vaulted vault and only one narrow chimney. This design collects as much heat as possible and does not release it.
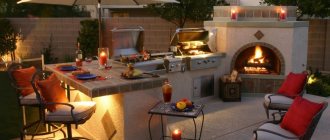
Given the wide range of possibilities for the size of a dacha plot or country estate, you can build a facility that will include several types of outdoor fireplaces at once. The most popular option is a barbecue oven with a smokehouse. This combination allows you to cook several dishes at once.
Outdoor fireplaces can be divided according to the type of material from which they are made:
Brick kilns. The most popular material for making outdoor fireplaces yourself is brick. It heats up quickly enough and then holds the heat for a long time, which allows you to cook for a long time and warm up next to the stove on a cool day. In addition, the material is easy to work with, it is relatively inexpensive and accessible.
There are several types of bricks. They differ from each other in composition, method of production of the finished product, and, consequently, characteristics
It is important that the fireplace does not crack under high heat and can easily withstand temperatures of 1000 degrees Celsius
Fireclay bricks are used directly for laying stoves.
However, this material is not suitable for lining a fireplace, as it tends to expand greatly when heated. For decorative finishing, it is better to purchase red solid brick. The smooth, uniform surface of the product, as well as various shapes for laying arches and portals, will allow you to create a beautiful and durable object.
The base, that is, the combustion part of such a structure, is laid out with fireclay bricks; decorative finishing in places where the temperature will be above 80 degrees can be made with dolomite or basalt. You should not choose materials that cannot easily withstand heat, for example, rubble granite.
Stone finishing combines very well with metal, forging, and facing brick, it can support any style on the site, it looks noble and luxurious.
Important points when installing a fireplace outdoors
To ensure that your outdoor fireplace is safe for you and your neighbors, consider the following points for its installation:
- It is not recommended to install it near bushes, trees or wooden structures. This can be fraught with negative consequences.
- It is best to choose an open space for installation that will be well ventilated.
- You shouldn't put a fireplace in a low area, because if it rains and you have to cook, you might just end up in a puddle.
General Tips
- When laying out the firebox, the thickness of the seams should not be more than 3 mm (lining).
- It is easier to erect any ceilings when using a collapsible wooden frame.
- Lay out all rows neatly and evenly, immediately remove excess solution.
- It is better to place the door on a wire, which should be walled into the masonry, leaving the ends for a tie. With them you can easily and firmly pull the fire door frame into place.
- If you need to install a damper in the chimney or install a sink instead of a countertop, do not forget to make the necessary changes to the masonry.
- If the chimney is on the roof of a gazebo or shed, insulate it with a layer of asbestos or other non-combustible material, and the entire stove must comply with fire safety rules.
- Select the clay mortar required for masonry in advance. It should be too fatty, but it should also have the necessary plasticity. As an option, you can buy ready-made masonry mortar in hardware stores, but it will cost more.
Any garden stove is laid out approximately according to this plan. It is also possible to construct a furnace from iron materials. Craftsmen even make mobile ovens on wheels from iron barrels and old gas stoves. Such ovens are usually more mobile. But they burn out much faster. Of course, the industry does not stand still, and today you can find various types of stoves for your garden on sale.
Safety precautions
To cook in a Russian oven and not start a fire or get burned, it is enough to know how to properly heat the oven and follow the rules for cooking in an oven.
How to light a Russian stove:
- It is necessary to stack the firewood in the firebox as closely as possible to each other; add firewood after the first batch has burned out.
- During kindling, the damper must be closed, the stove damper slightly open, and the ventilation damper closed.
- Do not forget to provide access to oxygen in the stove - to do this, just stir the firewood with a poker.
- During combustion, the ash door should be open approximately 7 cm.
How to cook in a Russian oven:
The stove must be heated well and the wood must be allowed to burn out; only coals without open fire and well-heated walls should remain. The first courses are prepared in cast iron pots or ceramic pots without handles. Since the food in the oven simmers and does not boil, pour a little water into the container, no more than one quarter. All dishes except bread can be cooked together
The bread is cooked separately with the door closed until baked. When cooking in the oven, it is important to use oven mitts, towels or gloves to avoid burning your hands. It is better to place and remove dishes with a special wooden shovel or grip.