At the final stage of foundation construction, a reinforced concrete base is formed over the basement part of the building. To do this, a monolithic slab is constructed using formwork, or ready-made hollow-core panels are laid using a crane to install the floor. The second option allows you to reduce installation time. In this case, it is important to check the horizontalness of the foundation using a laser level and strengthen the structure with reinforcement, the diameter of which is selected based on calculations. Let's look at how to lay floor slabs on the foundation of a building.
How to lay floor slabs on a foundation - types of slabs and nuances of technology
Novice builders do not always have a complete understanding of how to properly lay floor slabs on the foundation. Despite the apparent simplicity of the operation, there are a number of nuances.
The installation of floor slabs on the foundation is the completion of a large stage of construction work.
It is important to know that to distinguish between the basement and residential parts of the building, various methods of installing floors are used:
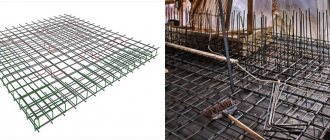
- construct a solid slab of reinforced concrete. To do this, install the formwork structure, place a reinforcement grid in it and perform concreting. Despite the increased strength characteristics, the monolithic version is characterized by increased labor intensity and high cost, and also requires an increased volume of concrete mixture;
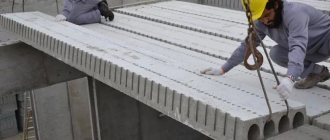
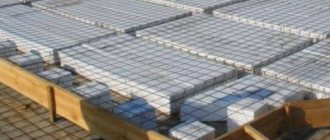
- They erect floors from standard slabs produced at concrete factories. The ceiling, formed from individual panels, is installed using lifting equipment and provides the necessary margin of safety. During installation, you should pay attention to the horizontal surface of the foundation and carefully seal the seams.
The prefabricated structure has increased strength and is used more often than the monolithic version. Wanting to reduce the estimated cost of construction, reduce labor intensity, and also complete the task in less time, they use hollow core, tent or solid slabs to form the floor.
The prefabricated structure has increased strength and is used more often than the monolithic version.
They have certain design differences:
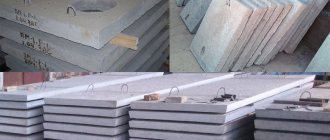
- Hollow panels are easily distinguished by their longitudinally located internal cavities. The voids have a round or oval shape. Hollow core slabs are characterized by reduced weight and do not create an increased load on the foundation of the house. Due to the presence of internal cavities, the products effectively soundproof the room and have increased thermal insulation characteristics;
- hip slabs have a characteristic U-shaped cross-section due to parallel reinforcement ribs. Reinforcement ribs increase structural rigidity, increase strength characteristics and allow ribbed panels to withstand increased loads. A distinctive feature of ribbed panels is their increased resistance to deformation;
- Solid slabs do not have internal cavities, which is easy to determine visually by looking at the end of the product. Solid panels are characterized by increased weight and are laid on a reinforced foundation. The one-piece structure, reinforced with reinforcing wire, has high strength characteristics, but has increased thermal conductivity.
It is important to understand, when planning to use ready-made floor slabs, how to lay them on the surface of the foundation. The correct installation of the panels determines the rigidity of the structure and the reliability of the structure.
Floor slabs have structural differences.
You should carefully study the installation technology and pay attention to the following nuances:
- no altitude changes. With a deviation from horizontality of up to 50 mm, the flatness of the surface is ensured by cement mortar;
- the size of the supporting surface. The size depends on the material of the walls, and is 125 mm for brickwork and 60 mm for reinforced concrete;
- reliability of fastening of prefabricated slabs. To fix the panels, anchor fastenings are used or the floor elements are connected using sling eyes;
- consistency of cement mortar. A cement-sand mixture should be used without rocky inclusions that cause distortions of the slabs during installation;
- the distance between opposite sides of the foundation. When designing the foundation, the standard length of the slabs is taken into account.
Current regulatory documents provide for the possibility of installing ceiling slabs using various methods:
- by supporting the panels along the width of the product on two parallel end planes of the foundation;
- a method of laying products on a U-shaped contour formed by the end planes of the foundation base.
With supports on both sides, it should be laid on the floor foundation
Compliance with the provisions of building codes when installing slabs allows you to avoid unforeseen situations and ensure the horizontality of the ceiling. The laying technology involves performing work in a certain sequence.
Algorithm of actions for installing slabs:
- Carrying out preparatory activities. They include delivery of panels to the installation site and their storage, as well as ensuring the level of the foundation.
- Carrying out work on the installation of panels. For this purpose, lifting equipment, necessary tools are prepared and construction materials are imported.
- Carrying out work on sealing internal cavities and joints, as well as strengthening the overlapping structure using anchoring or additional reinforcement.
There are certain nuances when performing each stage of work. Let us dwell on the features of each stage.
There are certain nuances when performing each stage of work
Types of support methods
The choice of support methods occurs at the design stage by comparing several options and depends on the type of foundation, building plan and selected modification of floor slabs, taking into account the current loads on the load-bearing components of the house:
On 2 sides of support , the most common installation method, in this case the supports are two opposite walls of the foundation on the short side of the slab.
The most preferred options in this scheme are floor slabs marked PC, designed for a specific load of 800 kg/m2.- On 3 sides. Such modifications of slabs are initially produced with reinforced end reinforcement. They are designed for corner installation on 3 load-bearing foundation structures, have a special designation PKT, and are able to withstand a specific load of 1600 kg/m2.
- On 4 sides. The slabs for this laying scheme are heavily reinforced on all 4 sides, are produced with the PKK marking, have a very rigid structure and increased load-bearing capacity. They are used exclusively in particularly complex structures that need to distribute high loads, for example, if it is planned to install additional superstructures.
For low-rise individual residential construction, experts recommend using floor slabs with round and oval-hollow internal structures, supported on 2 sides.
How to lay floor slabs on a foundation - preparing the foundation
The foundation for the floor slabs should be carefully prepared. Effective operation of the prefabricated floor is ensured only on the planned surface of the foundation base. That is why, before installing the panels, you should check the horizontalness of the foundation. To accomplish the task, a laser level or an optical version of the specified device is used.
Prepare the foundation according to the following algorithm:
- Measure the amount of elevation difference in the foundation using a level. Based on the measurements, determine the alignment method.
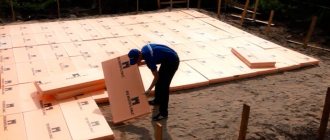
- If the height fluctuates up to 50 mm, level the surface with a screed based on cement and sand, and lay a mesh for reinforcement.
- If deviations from horizontal are more than 50 mm, lay an additional row of brickwork or fill in a concrete reinforcement belt.
For foundations made of reinforced concrete blocks, an armored belt of a monolithic or composite type should be installed around the perimeter. Controlling the horizontalness of the foundation during the manufacturing process allows you to avoid additional costs for leveling it, which speeds up the laying of slabs.
The foundation for floor slabs should be carefully prepared.
Requirements for the amount of support
The amount of support of the slabs during the installation of floors on the base of the building is one of the key safety parameters of the building structure. It must comply with the requirements of the basic SNiP No. 2.08.01, published in 1985, and with design calculations.
This indicator depends on the type of material that was used when laying the main walls and the upper straightening belt of the foundation. Factory-made material is available with several options for support: on 2 or 3 sides and along a common contour.
Standard limit for the depth of support of the PC for the foundation:
- for metal structures: 70-120 mm;
- on reinforced concrete base: 75-90 mm;
- on a stone or block base: 90-160 mm.
Important! Before starting to lay the PC, the developer must take care of the future rigidity of the building. Why make a leveling monolithic reinforced belt using reinforcement D = 16 mm.
Preparatory activities
The installation of covering slabs is preceded by preparatory work.
Do them in the given sequence:
- Prepare a place for the access of lifting equipment.
- Bring the purchased slabs to the site and carefully stack them.
- Prepare the necessary equipment and tools.
- Adjust the size of the additional panels.
Each stage of preparation has its own characteristics. Let's look at them in detail.
Work to prepare a site for placing lifting equipment includes:
- Cleaning the surface of stones and vegetation.
- Preparation of access roads for cars with panels.
- Compacting the soil and leveling the surface of the site.
Each stage of preparation has its own characteristics.
With increased soil moisture, characteristic of autumn and spring, road slabs are laid over the area of the site. This measure will ensure the stability of the crane during installation work. Delivery of panels to the site should be carried out by vehicles whose carrying capacity and body dimensions correspond to the weight and dimensions of the slabs. When transporting slabs in a truck, do not forget to place wood spacers between them.
Proper stacking of panels avoids the formation of cracks. Consider the following nuances:
- a place for storing panels should be chosen that is level;
- for gaskets it is necessary to use bars with the same dimensions;
- Do not allow hollow slabs to come into contact when storing.
To perform installation work, you must prepare:
- lifting equipment;
- rigging equipment;
- anchor fastenings;
- a sledgehammer, a crowbar for installation and a grinder;
- cement-sand mortar;
- trowel and devices for controlling horizontalness.
The installation of reinforced concrete elements on the foundation in compliance with technology will ensure a long service life of the building
The dimensions of standard slabs do not always correspond to the dimensions of the foundation. In this case, the panels are cut into pieces with the required dimensions.
Procedure:
- Mark the panel to the desired size with chalk.
- Place a wooden block under the cut area.
- Using a grinder with a circle on the concrete, make a cut according to the markings.
- Perform several blows with a sledgehammer on the top plane of the panel.
- Break the bottom plane of the panel with a crowbar.
- Use a grinder to cut through the steel reinforcement.
After completing the preparatory work, begin laying the slabs.
Video description
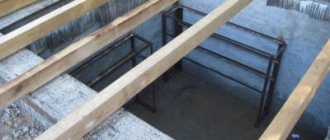
We suggest watching the following video, which will help you understand in detail the procedure for forming a hatch leading to the basement of a private house:
When cutting reinforcing elements with a grinder, you should act with extreme caution. The geometric parameters and characteristics of the tool used can cause the grinder to become jammed between the protruding parts of the reinforcement. This phenomenon may cause injury to the installer. In the absence of an autogen, a small cut is made on the sledgehammer, and then the cut site is hit with a sledgehammer.
Laying slabs on the foundation when building a house
Installation of floor slabs on the foundation is carried out after checking its horizontalness.
After checking the horizontal position, the floor slabs are installed on the foundation
You should plan the surface with cement mortar, and after it hardens, perform further work in the specified sequence:
- Lay the cement mortar on the end of the foundation in a layer of 20-25 mm.
- Sling the floor panel and move it with a crane to the installation site.
- Adjust the position of the slab using a mounting crowbar.
- Check the size of the contact area and lower the panel.
When performing installation work, you should pay attention to the tightness of the slabs.
Briefly about the main thing
Laying slabs may be required during the construction of buildings for various purposes. When performing work, the characteristics and type of mounted elements are taken into account. They can be monolithic, ribbed or hollow. The choice depends on the purpose of the structure being built, the characteristics of the foundation and a number of other factors.
Before installation work begins, a set of preparatory measures is carried out, including leveling the foundation and forming access roads for lifting equipment.
Then the installation itself is carried out, with the position of the plates adjusted and fixed relative to each other and to the base. With large opening widths, the space is filled in various ways, the choice of which depends on the characteristics of the structure being built.
Ratings 0
Fastening the slabs to each other and to the base of the house
Having completed the installation of floor slabs on the foundation, it is necessary to ensure their reliable fixation.
The elements are fastened as follows:
- by installing steel connections between floor slabs. Fastening, which increases the strength of the structure, is carried out using sling eyes;
- using an anchor fixing the slab to the surface of the foundation. This significantly increases the stability of the precast floor.
The reliability of the prefabricated floor depends on the correct fastening of the elements.
The reliability of the prefabricated floor depends on the correct fastening of the elements.
Sequence of installation work
In addition to following the rules for laying floor slabs, it is necessary to follow a certain sequence in work:
- First, it is necessary to fill the voids of the reinforced concrete slabs in those places that will rest on the foundation.
- Next, concrete mortar of a grade not lower than M100 is applied to the areas of the foundation that will come into contact with the floor slabs.
- Now you can begin directly laying the floor slabs on the foundation. It is important not to turn the slabs over to prevent elements from breaking due to improper installation.
- Installation work should be performed by 3-4 people. One worker, using a special sling consisting of four branches, secures the slab to the hook of a construction crane. For convenience, the plates have special mounting loops. Two more workers regulate the work process, laying the slab in the designed position. They also perform the detachment of the sling. If there is no eye contact between the crane operator and the workers, an additional person is hired to give commands to the crane operator. During the installation process, it is necessary to ensure that the slabs fit tightly to each other.
Learning to lay slabs correctly - performing reinforcement
Reinforcement of the overlapping structure, formed from individual slabs, is carried out to increase rigidity, provide stability and prevent cracking.
Strengthening is carried out in various ways:
- by pouring a concrete belt around the perimeter of the structure, reinforced with reinforcing mesh;
- by performing screeding over the entire floor area with preliminary installation of reinforcing mesh.
Reinforcement work is carried out on the basis of previously performed strength calculations and is carried out in accordance with the reinforcement scheme. A ceiling reinforced with reinforcement is characterized by increased reliability and a long service life.
Installation features
The main thing in laying (installing) slabs for the manufacture of floors on walls and foundations is full compliance with building codes when laying them. If at the end of the marking there are numbers “3” and “4”, then such symbolism indicates the possibility of leaning on 3 and 4 sides, respectively. But all types of reinforced concrete slabs of the PC series and the majority of products of the PB brands can be laid with support on 2 sides. The ceiling will deflect under the weight of the load. All tension is absorbed by the reinforcing frame. There will be no damage if the loads do not exceed the permissible values.
There are exceptional cases in which the installation of products is carried out on walls or a plinth with support on 3 sides (1 long and 2 short). This method is usually used if the slabs do not fit when laid out along the width of the span. It is better to resort to this method only as a last resort, but if installing the slab on the long side is minimal, it is possible. In this case, the reinforcing frame will absorb tensile stress only in a certain fragment, and not along the entire length. And not the entire slab will be subject to deflection, but its free edge and, thanks to the longitudinal reinforcement of the concrete slabs, it should not be damaged.
These were the main types of correct installation of products on the foundation or walls. For the broadest possible understanding, it is also worth knowing how to do it incorrectly. Next we will look at several such options:
- First of all, in no case should the slabs be laid against the reinforcing frame. That is, if they are located along the length of the slab, then it is impossible for the long sides to rest on the support. In such a situation, a serious violation of the integrity of the product and even its complete destruction will inevitably soon appear. The rods do not cope with the assigned mission of the main frame. This leads to complete destruction of the slab.
- It would be a big mistake to install hollow-core reinforced concrete products on walls or foundations with another support located in the span. They are designed for uniform stretching along the entire length, and if additional, one or more, supports appear, this leads to the appearance of waves with peaks on the supports, where the slab will crack. Due to the lack of a reinforcing frame in the products, deformation is inevitable. Intended for single-span use only.
It is very important not to forget that this type of flooring is intended only for strip foundations. Laying on other options, such as piles, is unacceptable. When installed at 4 points, the fittings, which are not intended for this at all, will definitely behave extremely negatively. All ends must be brought behind the support. Otherwise, not only correct longitudinal bending will occur, but also transverse bending. And, as we already know, it leads to the complete destruction of the slab. But everything can be solved thanks to the installation of additional beams, which will be placed on top of the piles or the installation of a monolithic tape. The rods will be wound behind them and the product will no longer be subject to transverse deflection.
Another very important point is that the plates must not be pinched under any circumstances. This happens when they are placed too deeply on supporting structures. In this case, uneven tensile stress occurs, and cracks will appear near the supports.
Laying technology
Installation requires special equipment. Laying is possible only with the help of a special truck crane, which hooks the slabs to special mounting brackets, or there are special load-handling devices that hook directly to the “body”. Initially, a plan must be developed in accordance with which the slabs will be laid out. It is necessary to take into account all the nuances and technological openings (including ventilation ducts), and the dimensions of the spans, and interfloor openings, etc.
It is imperative to prepare the surface of the foundation or walls on which the reinforced concrete products will rest before installation work.
Outputting the general level or shooting corners
Effective operation and long-term service of such floors is guaranteed only with completely correct preparation and compliance with all technical nuances.
What activities need to be carried out:
- Using a laser level, all probable and possible differences in the base are measured.
- Selecting an alignment option.
- Existing differences of up to 50 mm are leveled with a screed and the installation of reinforcing mesh.
- If differences of more than 50 mm are eliminated by pouring a belt of concrete or brickwork.
If the foundation was made using FBS, then, on the advice of experts, it is better to lay a monolithic armored belt along its perimeter. It is very important to align the formwork horizontally during the work process. Full compliance with it allows you to avoid additional financial expenses in the future for leveling the plane.
Waterproofing the foundation is very important. It is done qualitatively in two ways. In the first case, special penetrating compounds are added during mixing. In the second option, insulation is carried out with rolled roofing felt.
Application of the solution
The thickness of the cement-sand mixture on the foundation for laying slabs should be 20-30 mm. The proportion for preparation is 1:3, where 1 is cement and 3 is sand. You can also purchase a ready-made mixture. After mixing with water, spread over the surface that is expected to support the stove.
Laying slabs
Beginning builders do not always have an idea of how to do this correctly. It is very important to follow absolutely all installation and safety recommendations that are prescribed. And the work itself is quite simple.
- The slabs must first be secured and moved to the future installation site.
- Leveling is carried out immediately during lowering.
- It is possible to correct their position only while the slings are tensioned using crowbars during the first 10 minutes.
- Anchoring of reinforced concrete products is carried out with rods with a cross-section of 8-10 mm using diagonal, transverse U-shaped connections with the foundation and among themselves.
When calculating, specialists estimate the optimal support to be 120 mm.
Void lining
To prevent the cold from penetrating into the voids of the slabs, they must be filled. The best material for this would be a combination of brick halves with a cement-sand mixture. Another simple way is to use thermal insulation materials. This is done along the outer perimeter of the “box” of the future building. This can be done both before and after installation.
A mixture of sand and cement is also used to seal cracks that occur at the junction of slabs. And also at places of reinforcement. If the gaps are large, then the mixture should be thick and reinforcement should be additionally applied. Be sure to first install the formwork from below to prevent leakage.
Sealing seams between slabs and internal cavities
The gaps between the panels are sealed to reduce heat losses. The sealing method depends on the size of the seam:
- small gaps between the side planes of the slabs should be filled with concrete mortar or cement mixture;
- the enlarged space is filled with concrete blocks or bricks, followed by cementation.
For concreting large voids, the technology provides for the possibility of installing formwork. Sealing is carried out immediately after installation of the slabs. To improve the thermal insulation characteristics, the end cavities should also be sealed with mineral wool, rubble brick or concrete.
Installation
After completion of the preparatory work, installation work is carried out.
Important! Only workers who have been trained in safety rules are allowed to work with a truck crane. The truck crane operator must also undergo regular training and have the appropriate permit.
Laying floor slabs on the foundation is a general principle:
- The slabs are laid on a continuous layer of cement-sand mortar 2-2.5 cm thick.
- The slinger hooks the slab, then it is moved by crane to the installation site.
- The slab is placed on tensioned slings at a minimum height above the installation site.
- Installers at both ends correct the movement and direction of the slabs.
- After checking the installation location, the product is smoothly lowered to its permanent location.
- The final adjustment is made by manually moving the slabs, using mounting crowbars as a lever.
- Anchoring and other options for fixing the slabs are carried out after installing the entire floor structure.
Important! The support of floor slabs on a foundation made of monolithic concrete or reinforced concrete blocks must be at least 6.5 cm. On a foundation lined with brickwork, the support must be 12.5 cm (brick length). If the width of the foundation strip allows, the support parameters can be increased to its middle.
Our events
April 12, 2021, 13:08 RusCable Insider #217 - Agrocable facilities, Metaclay Arctic, Xinming interview, AEC is preparing a webinar, Russia’s energy transition and how to breathe in style?
April 12, 2021, 12:22 A few words about the space cable on Cosmonautics Day
April 12, 2021, 11:10 Daria Timofeeva about Metalen Arctic, polymer for the Arctic and shipbuilding, METACLAY developments, export and sustainable development
April 9, 2021, 13:45 Practical issues of the procedure for confirming the production of cable, wire and radio-electronic products in the Russian Federation
April 5, 2021, 14:54 RusCable Insider #216 - 25 years, AEK cable classifier, Moskabelmet prospects and Hengtong plans in the Russian market
April 2, 2021, 11:37 The whole truth about Marposadkabel. Yuri Kocheikhin will answer all the questions from the video “Marposad’s Trouble” live on RusCable Live!
PARTNERS
Surface preparation
1. The steps of the base must not have deviations from the horizontal. If the steps are narrow, you should not increase their width with tile adhesive - this will make the structure heavier. In this case, you should install wooden formwork and fill the steps with a mixture of small-caliber expanded clay, sand and crushed stone. The surface of a brick staircase is leveled in the same way.
2. Cladding wooden stairs with porcelain stoneware is not allowed. Some experts recommend using elastic glue or adding a plasticizer to it. This won't save the situation. The structure of a wooden staircase may not withstand the load that comes from facing the stairs with porcelain stoneware. Wooden steps do not have sufficient rigidity; this will lead to the fact that over time the porcelain stoneware coating will move away from the surface.
3. Prime the base with a deep penetration primer. The primer serves to reduce the absorption of the surface. Concrete absorbs moisture well; if it is not primed, the moisture necessary for good adhesion of the tile adhesive will be absorbed into the concrete and the adhesive base will become fragile.
4. You can start covering a new concrete staircase with porcelain stoneware only after two months from the date of its manufacture.
How to choose porcelain tiles for the floor by thickness
Porcelain stoneware with a thickness of 8–10 mm is suitable for residential premises. For the bathroom and toilet, choose 8 mm thick slabs, because they contain little heavy furniture and a low risk of falling solid heavy objects. For the kitchen, corridor, hallways and living rooms, choose porcelain tiles with a thickness of 10 mm. It will withstand the fall of a frying pan and static pressure from furniture on legs.
For shops and places with high traffic, choose porcelain stoneware slabs with a thickness of 10–12 mm. For shopping centers, business centers and office buildings, 10 mm slabs will be sufficient. They will withstand even if several thousand people a day pass through them and the pressure of not too heavy racks of goods or office furniture. For construction stores, car showrooms and hypermarkets with a large number of goods on shelves, choose 12 mm thick porcelain tiles.
For industrial and warehouse premises, choose porcelain tiles for the floor with a thickness of 10–14 mm. Such tiles are suitable for warehouses with high and heavy shelving, car showrooms, carpentry workshops, and service stations.
Scale for selecting porcelain tiles by thickness
The cost of porcelain stoneware per square meter depends on its thickness, so we do not recommend choosing excessively thick slabs for rooms with a small load on the coating. Since the thinner the porcelain tile, the less its weight, you will save not only on the purchase of material, but also on its delivery.
Life hacks and difficulties you may encounter
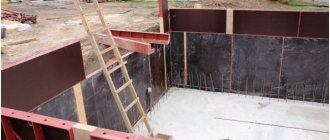
To lay a slab on a brick wall, its last layer must be bonded. The reinforcing belt can be erected using homemade formwork.
Filling the voids with mortar is required only in those areas that will go outside the building; this protects the structure from severe freezing. Installation of holes for communications must be done on the ground, when there is free access to the slabs, otherwise this may become a problem.
It is necessary to prepare the site for the crane in advance. If the soil at the construction site is loose and crumbly, then this will definitely lead to difficulties. Cranes should not be used near basements; the load on the ground may cause the slab to break. To do this you need to use equipment with a long boom.
If you need to order floor slabs, you should contact IS GROUP. We are ready to provide various designs to any region of the country. Here you can find various road slabs, airfield slabs, FBS blocks, PILES, floor slabs and many other reinforced concrete slabs. Delivery is carried out by rail. If there is no company in your city that can provide you with building materials, then be sure to contact us by phone +7 (495) 175 23 21.