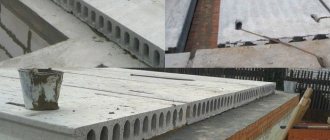
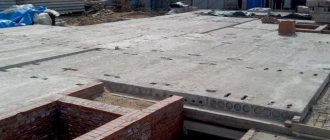
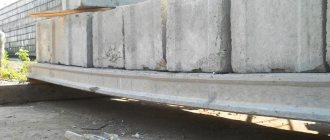
Anchoring of floor slabs is carried out during the construction of buildings made of brick, aerated concrete or reinforced concrete. Such ceilings are installed between floors, above basements, under attics. Anchoring is carried out after installing the floors on each floor, while the anchors are placed at a distance of up to three meters from each other, and they, in turn, act as fasteners for the mounted slabs between each other and on each of the walls.
Floor slab anchor
An anchor is a metal fastener made of galvanized or stainless steel, brass or other metal alloy. It is integrated into the base and secures a load-bearing element of the building, such as a floor slab. Such fasteners are used during the construction of objects for various purposes. These can be single or multi-storey buildings, industrial buildings, garage structures, etc. Anchors significantly improve strength and stability, and also extend the service life of buildings. For seismically active regions, the slinging scheme is not only advisable, but also simply necessary, because during underground tremors with high amplitude, reinforced interfloor ceilings will fail more slowly, which will help save more than one human life.
Types of designs
Despite the fact that there are many options for forming floors between floors, the most convenient and profitable in our time is considered to be the formation of floors from pre-made slabs. There are many types that allow you to achieve the required strength indicators, but it is important that all the rules for laying these elements are followed, because if the floor slab bursts, repairing it can become a complex construction task.
Over time, various defects appear in floor slabs that need to be repaired. The appearance of such defects indicates that the load-bearing capacity of the floor slabs has been exhausted.
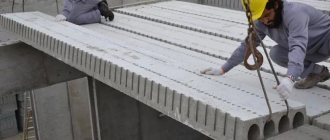
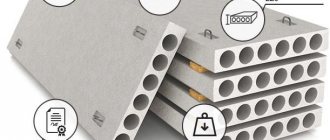
In fact, the use of ready-made floor slabs has many advantages, since slabs properly manufactured according to their production technology can withstand quite a lot of weight, impart rigidity to the entire structure and generally play a significant role in ensuring the stability of the entire building. An undoubted advantage of using reinforced concrete floor slabs is also the high speed of installation and durability of the result. In the construction of low-rise buildings, wooden floors are still used, but for the formation of high-rise buildings, in most cases it is simply impossible to find a worthy alternative to the ready-made reinforced concrete slabs widely used today, which makes such materials an integral part of any large construction. Ready-made reinforced concrete floor slabs are used both to form floors in residential buildings and for the construction of industrial facilities. There are currently several options available:
- solid reinforced concrete;
- lightweight multi-hollow;
- ribbed.
hollow;
Waterproofing cracks in floor slabs by injecting rigid polyurethane compounds.
Solid reinforced concrete is characterized by increased strength, so cracks rarely form in them, but such flooring is often used to form floors in buildings not intended for residential use, since their sound insulation is inferior to other options.
Hollow core slabs are currently the most commonly used for the construction of residential buildings, as they have several significant advantages, including sufficient length to form twenty-meter spans in buildings with longitudinal design of load-bearing walls and sufficient sound insulation. Lightweight hollow-core ones are used mainly in private or low-rise construction, as they do not have significant strength and are not able to withstand significant loads. Ribbed ones are used mainly in the construction of industrial buildings.
The type of slab largely determines the type of possible damage and the possibility of repair work.
What are the requirements for software?
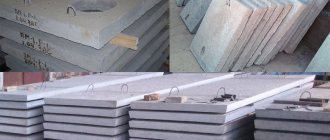
Floor panels must be durable, since they bear the main load both from the structure itself and from objects located inside.
Due to sufficient rigidity, high-quality slabs do not sag under load, which means they are prevented from breaking. When laying, pay attention to integrity: there should be no breaks or splits of more than 1 mm on the products.
Correctly selected equipment for the production of floor slabs makes it possible to obtain reinforced concrete products that prevent the penetration of moisture into the structure, are fire-resistant, gas-resistant and economical to operate. The presence of high-quality reinforcement ensures sufficient rigidity and strength of the panels, and thanks to the internal voids, the process of laying internal communications is greatly facilitated.
The main causes of cracks
Repair of coating slabs of reinforced concrete tanks: 1 – existing slab; 2 – beam; 3 – structural reinforcing mesh; 4 – new layer of concrete.
It is immediately worth noting that cracks and faults in different types of floors manifest themselves differently and can have different consequences. In solid reinforced concrete, the appearance of cracks is an extremely rare phenomenon, which, as a rule, occurs due to mechanical damage to the top layer of concrete or due to prolonged exposure to environmental factors. Repair of reinforced concrete slabs is carried out in accordance with existing damage. If small cracks or several deep cracks appear on the slab, it is quite possible to simply seal them, preventing them from enlarging. If the damage is large, then repair work is necessary to eliminate corrosion of the reinforcement and restore the damaged concrete layer. In most cases, ribbed slabs require the same repairs as solid reinforced concrete slabs.
Repair of large defects in floor slabs.
Hollow and lightweight hollow-core slabs are most often subject to various deformations. There are many reasons for the occurrence of deformations and faults of these types. Such floor slabs are more strongly affected by the influence of the environment. This leads to the fact that the concrete becomes thinner and perforations occur down to the reinforcement and voids. In addition, cracks can occur due to natural subsidence of the soil, overload, mechanical damage, initial improper installation, and so on. In most cases, such repair work is a complex construction task that requires serious calculations.
Depending on the extent of the damage, repairs may vary. If a minor crack of up to 2 mm appears, it is quite possible to carry out regular repair of the crack to avoid its spread. In cases where the concrete is severely damaged and there is a possibility of a break forming to the reinforcement, it is necessary to carry out repairs aimed at protecting the reinforcement from corrosion. If the slab bursts and then sagging occurs, most likely it is due to its overload, and in this case damage or rupture of the reinforcement cannot be ruled out, which means that it may be necessary not only to repair local damage, but also to reinforce or completely strengthen the entire floor.
In some cases, when the sagging due to deformation and cracking is critical, that is, reaches 15-20 mm, repair work aimed at strengthening and strengthening the load-bearing capacity may not give a positive result, then only a complete replacement of the slab will remain, but it should immediately be noted that This solution to the problem is very labor-intensive and not always feasible; it all depends on the length and marking of the slab, as well as its location.
There is a classification of cracks according to the following characteristic features:
Classification of cracks in floor slabs.
Due to the reason for its occurrence, which in turn is divided into:
- cracks that appeared as a result of external force during the operation of the slab;
- caused by force as a result of improper storage, transportation, installation work performed in violation;
- appeared as a result of force action when compressing concrete with prestressed reinforcement;
- technological in nature, resulting from shrinkage of concrete, poor-quality compaction of the mixture, or uneven steam heating;
- the appearance of which was facilitated by reinforcement corrosion processes.
By value:
- the appearance of which indicates an emergency condition of the entire structure;
- which help increase the water permeability of concrete;
- contributing to a decrease in the durability of floors as a result of active corrosion of the reinforcement component;
- ordinary type of cracks that do not cause concern about the strength of the structure.
If you find transverse damage on the floor slab, the best option would be to replace this element. If replacement is not possible, you can try to strengthen it.
The most popular method is to install an additional supporting wall. In this case, the danger of collapse arises from the fact that the ceiling no longer performs its tensile function.
If any type of cracks (longitudinal, transverse) are detected on devices, the restoration process must not be delayed. It is better to act immediately, then you will have more time to save the structure. This type of defect makes it clear that there is an overvoltage in the device, which can still be eliminated. Increasing the cross section helps to strengthen it.
Repair of small cracks
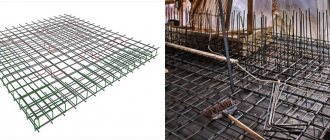
Reinforcement of a monolithic floor slab.
The formation of small cracks is quite typical for any floor slabs, but, as a rule, they do not affect the stability and strength of the floor. Such damage, as a rule, can remain on the slab for years, while the crack does not increase in size, being, as it were, in a frozen state. Despite the fact that such cracks do not pose any particular danger, you should not leave things to chance and ignore their repair, since even very thin cracks inevitably get water vapor, which contributes to further destruction of concrete. If this process reaches the reinforcement and its corrosion begins, much more serious repairs may be needed in the future.
Small cracks formed in the ceiling, depending on their depth and size, can be repaired in two different ways. If the crack is minor and there is no sagging, it is quite possible to repair the damage with putty. You can use commercial putty or prepare it yourself by mixing chalk and plaster. To carry out such minor repairs, you must first remove the decorative layer in the entire area of the crack, clean the crack with a spatula or knife and moisten it. Next, use a wide spatula to seal the crack, and after drying, sand it.
The second method of repairing small cracks is especially relevant if there are deep cracks, but it should be said right away that it is more labor-intensive. To repair deep cracks in the ceiling, it is recommended to spray the areas where the slab has burst with a solution of cement or gypsum. This method of repair is quite labor-intensive, but the result is quite durable. To carry out such repairs, it is necessary to clean the area where the crack is located and fill it with a construction syringe. After the crack is completely filled with mortar and it has dried, it is necessary to putty and sand it, as in the first case.
To repair small cracks in floor slabs, you will need the following tools and materials:
- putty knife;
- construction syringe;
- sanding paper;
- gypsum;
- chalk;
- cement mortar.
Recommendations
When sealing seams in ceilings and floors, there are many pitfalls that you should be aware of. Advice from professionals will come to the aid of the “pioneers”. Here are some of them:
- Instead of foam, when sealing seams, you can use regular ceramic tile adhesive.
- If you don’t have a painting mesh (serpyanka) at hand, a regular medical bandage or gauze will do.
- Many people use cotton cloth, which is pre-moistened with water.
- It is not recommended to use silicone-based sealants when sealing small seams. As time passes, yellow spots may appear on the treated area. In addition, it is visible through the paint. The best option is acrylic sealant. It leaves no traces.
- Before processing the ceiling seams, it is necessary to determine the installation of electrical wiring. Such measures will help not to compromise the integrity of the wiring when eliminating cracks.
Finally
Independent work on waterproofing seams between floor slabs is an opportunity to gain moral satisfaction and self-esteem. It is important to save your money. But when dealing with cracks and sealing seams in the ceiling, you need to follow the sequence of actions. Use recommended materials and tools. At the same time, observe your own safety measures, which no one has yet canceled, good luck.
Repair of reinforcement corrosion
Strengthening the ribs of prefabricated slabs: a – by embedding additional frames in hollow channels; 1 – multi-hollow panel; 2 – a groove made in the shelf along the void channel; 3 – additional reinforcement cage; 4 – monolithic concrete.
The formation of cracks and faults in various types of floors is often characterized by the appearance of reinforcement corrosion. Such damage is quite serious, since weakening of the reinforcement inevitably leads to a decrease in strength indicators, which leads to deflection and can even cause a break. Air and water vapor pass through cracks leading to the reinforcement, which causes oxidation of the metal. The corroding metal increases in volume and more cracks form, which leads to further peeling of the concrete.
Many factors can cause the formation of cracks that can lead to corrosion of reinforcement, but in most cases this occurs due to the thinning of the concrete layer. It is quite easy to understand whether there is corrosion, since in this case the edges of the cracks and the area around them turn yellow, and a characteristic yellow coating may also form. The restoration work in this case will be quite painstaking. The first step is to remove all loose concrete from the corroding reinforcing bars.
Next, the damaged reinforcing bars must be thoroughly sanded and opened with an anti-corrosion agent. In cases where there is severe thinning of the reinforcement bar due to corrosion, it is necessary to strengthen the damaged area by welding an additional piece of reinforcement. With this option, you first need to clean the area of the reinforcement from rust, and then weld a piece of reinforcement of the required length to it. It is best to use 15-20 mm reinforcement for these purposes, and, if the area allows, you can even weld several rods. The remaining edges of the concrete must be treated with a primer and the hole around the treated reinforcement must be carefully sealed with cement mortar. After the damaged area has completely dried, it is necessary to plaster the entire surface with cement-lime plaster with a layer of at least 15 mm.
Carrying out this type of repair work will require the following tools and materials:
- hammer;
- chisel;
- sanding paper;
- fittings of the required size;
- welding machine;
- putty knife;
- primer;
- cement mortar;
- plaster.
When is repair and reconstruction needed?
It is important not to miss the moment when it is necessary to repair the floors for their further use.
To do this, a number of activities are carried out, for example, inspection of the slab. A visual inspection can reveal some problems :
- nature of crack propagation;
- exposure of reinforcement;
- determine the location of cracks relative to the load-bearing columns;
- make photographic records of all defects.
Thanks to such work, it is possible to draw up an action plan and determine whether the slab requires repair or whether this procedure can be postponed. It is necessary to immediately understand which defects can be eliminated even before a problem arises. To determine this, it is enough to take measurements of the cracks during a visual inspection and survey , and measure their depth, if possible.
You can also invite specialists who, using equipment, will determine how dangerous this defect is and whether it will entail more serious consequences.
Repair and reconstruction can still correct the situation when cracks and splits are very small, when they can be restored with special mixtures. For example, slab deflections greater than the permissible norm due to loads cannot be corrected : most likely, the conclusion will include a recommendation to completely replace the floor slab with a new product.
Reinforcement
Reinforcement of the floor slab.
In cases where the damage to the reinforcement inside has reached a critical point and the slab has already sagged significantly, it is necessary to resort to more radical repairs, since in most cases the sagging occurs due to a weakening of its strength. Reinforcement allows you to achieve a significant increase in strength and resistance to the external environment without the use of heavy equipment. In addition, reinforcement is often the only way out when it is technically impossible to replace a damaged slab. In order to completely or partially relieve stress and ensure the stability of all structures in the future, when cracks and faults form in the floor slabs, it is strongly recommended to do sandwich reinforcement, which is the application of a layer of reinforcement from both the upper and lower walls of the slab.
Depending on the design load of the floor, reinforcement with a cross-section from 8 to 15 mm can be used. In addition, you need to take into account that if the thickness of the floor does not exceed 150 mm, it is quite possible to get by with reinforcement in one layer, but if the slab exceeds this figure, it is strongly recommended to carry out reinforcement in two layers. The reinforcement process itself is quite labor-intensive and almost impossible to carry out independently. Before carrying out the reinforcement procedure, first of all, local repairs of all cracks and damage are carried out. Next, a mesh of reinforcement of the same section is formed on the prepared surface so that the cell size does not exceed 15 x 15 mm.
In this case, the reinforcement can be connected with wire or welded, with the second method being more preferable. After the formation of the primary layer of reinforcing mesh, the entire surface covered with it is filled with cement mortar. If necessary, the reinforcement procedure must be repeated. As a rule, the most labor-intensive is to reinforce the lower part of the surface due to the difficulty of access, but in most cases this is the only option to preserve the slab and increase its strength.
Selection of materials for removing seams
To reliably seal seams, you will first need to select suitable materials. Among them, the following deserve trust among the masters:
- Primer with a high rate of penetration into the pores of the material. A concrete contact type product is best suited for concrete foundations. The main purpose of the primer composition is to improve the adhesive ability of the surfaces of the defect being repaired.
- Cement with the ability to increase volume when hardening. As a rule, a product of the NC brand is used. Used to fill the deepest joint cavities.
- Foamed material with high thermal insulation characteristics. This is primarily foamed polyethylene or polyurethane. Also, in the absence of suitable materials, it is permissible to use polyurethane foam, plaster or tow.
- Acrylic sealant.
- Elastic putty based on latex. Two options are needed - starting for preliminary putty and finishing to complete the procedure.
- Reinforcing mesh to strengthen the connection between slabs.
Reinforcing stack for durable filling of cracks between slabs Source wp.com
Note! In order to reliably seal the seams on the ceiling between the slabs in the house, basement or garage, you need to select a set of tools suitable for this type of work. The correctness of all procedures, as well as the strength, durability and aesthetic characteristics of the result will depend on this.
Restoration of slabs of residential and industrial buildings
Floor slabs in residential or industrial buildings are structurally horizontal reinforced concrete products manufactured in a factory.
They are intended for the construction of load-bearing structures of objects that can withstand heavy loads and evenly transfer them to the vertical elements of the building.
Today, in the construction of objects for various purposes, the following options for floor slabs are used:
- Void;
- Solid reinforced concrete;
- Lightweight multi-hollow;
- Ribbed.
Each of these types can be successfully repaired, strengthened and restored. The main thing is to correctly identify the cause of the defect, calculate the parameters and carry out the installation work efficiently.
What to do if joints are visible on the ceiling: final leveling of the surface
It does not matter how defects on the ceiling of floor slabs are eliminated. What is important is a high quality finish. For this, it is recommended to use abrasive mixtures.
Using non-woven fabric will help you get a perfectly flat and smooth surface. It is glued to the ceiling before applying the finishing layer of putty.
It must be taken into account that after the last layer, the surface is treated with primer. Having completed sequential operations, begin painting the finished surface or gluing wallpaper. Many people prefer a “fresh” whitewashed ceiling.
When is it necessary to restore floor slabs?
Restoration of slabs is required in cases where there is every reason to believe that they are in a pre-failure or emergency condition. This can happen due to the destruction to which all reinforced concrete structures are subject. Most often, destruction is presented in the form of cracks, the causes of which can be:
- Mechanical, corrosive, chemical influences;
- Deflections of floor slabs;
- Deformation changes that appeared during the operation of the building.
Destruction of slabs can also be local in nature and visually look like chips and potholes. There are also cases when it is necessary to restore up to 50% of the entire floor slab. Therefore, before starting work, it is worth conducting a thorough examination of the damaged structure, based on the results of which you can choose the most suitable repair method.
Briefly about the main thing
Sealing of seams between floor slabs on the ceiling is carried out using the following materials:
- Deep penetrating soil.
- NC type cement.
- Foamed thermal insulation material.
- Acrylic sealant.
- Elastic putty.
- Mesh for reinforcement.
Before starting the sealing procedure, the seam cavity and the surrounding ceiling surface are properly prepared - expanded, cleaned, primed. At the same time, there are three most common types of cracks between ceiling slabs - wide shallow, wide deep and narrow deep. In each case, its own technology and set of materials are used. Upon completion of the main work, the seams are strengthened, associated defects are eliminated, and the ceiling surface is finished.
Ratings 0
Elimination of minor defects
Hollow and lightweight hollow-core floor slabs are most susceptible to various deformations. Various environmental factors have the strongest negative impact on them, which leads to thinning of concrete and the appearance of deep defects, including exposure of reinforcement and the formation of voids.
In addition, various overloads, soil subsidence, errors in the creation of structures and mechanical damage can lead to serious cracks in the slab. Its restoration directly depends on the degree of damage - if the crevice is small (up to 2 mm), then in order to avoid its spread it is enough to carry out a regular seal with putty. If desired, you can prepare the material yourself by mixing chalk and plaster, but a factory-made ready-made mixture is also good for repairing minor cracks.
Before starting work, it is necessary to remove the decorative layer from the entire area of the defect. Then carefully clean the crack with a knife or spatula and moisten it. Afterwards, using a wide spatula, fill the hole with putty, and wait until it dries completely, level the surface.
Deeper cracks are repaired using a more labor-intensive but reliable method. Additional tools you will need are a construction syringe, a cement solution or a syringe. The crack area also needs to be cleaned and then filled completely using a syringe. After complete drying, the defect must be well puttied and sanded, bringing the surface texture to a perfectly smooth state.
Joint between wall and ceiling: sealing methods
Defects may appear between the walls and ceiling. To eliminate the problem, teams of professional builders use:
- Polyurethane foam.
- Gypsum based solution.
- A putty that is better made on a synthetic basis.
- Putty designed for outside use.
At home, it is easier to use polyurethane foam, which will completely cover the void. A prudent owner will prevent cracks from appearing between the ceiling and the wall in the future: he uses reinforcing mesh.
Effective and alternative materials include cotton and linen-based fabrics. They are pre-treated (impregnated) with an adhesive composition. Close the joint and apply the prepared plaster mixture.
Major Damage Repair
When the slab is severely damaged and there is a possibility of a break occurring before the reinforcement, restoration is aimed at protecting it from corrosion. The reason that the slab burst, and as a result, the concrete sagged, could be overload or targeted mechanical impact. In such situations, one should not exclude the possibility of reinforcement rupture, after which more serious and labor-intensive work will be required - not only local repair of the defect, but also strengthening of the entire floor.
You also need to be prepared for the fact that in some cases, the restoration of slabs in residential and industrial buildings may not give the expected result. The reason for this is sagging of the slab and the formation of cracks up to 20 mm in size. The only way out is a complete replacement of the structure, which is not always possible due to the physical parameters of the slab. Most often, in such situations, specialists begin radical repairs and carry out reinforcement - a procedure that allows you to increase the strength of the structure without the use of heavy equipment.
Partial or complete stress relief from the slab can be achieved by sandwich reinforcement. It involves adding a layer of reinforcement on both sides of the structure. Its cross-section can be from 8 to 15 mm depending on the size of the slab load. It is also necessary to take into account the thickness of the ceiling - if it is less than 150 mm, then reinforcement in one layer may be quite sufficient. Otherwise, it is recommended to add a layer on both the bottom and top sides of the slab.
The reinforcement procedure is preceded by a thorough repair of all existing cracks and other damage to the floor structure. After this, a mesh of reinforcement of the same section is formed onto the prepared surface. The size of each cell should not exceed 15x15 mm. In this case, the reinforcement must be welded, forming one integral metal structure. In cases where it is not possible to use welding, tying the reinforcement with wire is allowed.
Cement mortar is completely poured onto the primary layer of the reinforcing mesh. If the situation requires it and there is no confidence that the reinforcement has reached a sufficient level, repetition of the reinforcement is allowed.
It is important to consider that reinforcing the bottom of a slab is often the only reliable way to increase its strength and maintain its integrity. Therefore, no matter how labor-intensive it is, you should not refuse it.
It is almost impossible to carry out reinforcement on your own, so it is better to entrust it to specialists. Highly qualified specialists with extensive experience in carrying out such work are always ready to restore, strengthen and restore slabs of residential buildings and industrial structures.
Finishing, steaming and heat treatment
Special tunnels (walk-throughs), the height of which does not exceed 1 m, allow you to create a continuous cycle of work. Inside, a conveyor with molded floor slabs moves slowly, which are evenly treated with steam. The length of the chambers and the speed of movement of reinforced concrete products are designed so that the panels undergo high-quality processing. As a rule, this takes at least a day. After a day, the finished floor slabs can be sent to the warehouse.
Supporting the floor slab on the wall is one of the indicators of the reliability, safety and long service life of the building. A lot depends on the proper installation of slabs, therefore all norms and rules are regulated by government agencies. There is a special document - SNiP, which has compiled a set of these standards.
Restoration of old slabs
Consisting of I-beams and concrete, “aged” floors rarely require repair or additional reinforcement - during their design, a fairly large margin of safety was created, several times exceeding the required level. However, the metal components of the slab can be subject to corrosion in the event of prolonged leaks, resulting in transverse cracks. They do not pose any danger to human life or to the integrity of the structure.
Longitudinal cracks are the result of mechanical influences, for example, punching holes during communications. These damages are eliminated by removing sections of structures and replacing them with monolithic ones made of reinforced concrete. In case of serious corrosion damage, a channel or a new drutaur is sometimes installed as a support.
What to do if the columns are overloaded
Strengthening floor slabs, beams, and crossbars using this method is quite controversial, and sometimes even ineffective. However, the method is quite suitable for strengthening overloaded centrally compressed columns in the presence of vertical cracks that coincide with the projection of the working reinforcing bars of the frame.
This is solved by spirally wrapping the column body in several layers, either with strands based on carbon fiber, or with strips of the same fabric, which increases the load-bearing capacity of the structure and stops the further development of defects.
Repair and restoration of facade slabs
Several defects at once can significantly spoil the appearance of the façade of a building, the elimination of which can take quite a long time.
- Minor cracks - eliminated by slightly expanding, rubbing with a special solution and smoothing with felt.
- Stains of various origins are easily removed by treating the desired area with a lime mixture.
- Mold – when mold fungi appear on the surface of the facade, it is worth treating it with completely specialized preparations. This is the only way to prevent mold from growing in the future.
- Peeling of plaster - in this case, the defective piece of material is cut out, the extraction site is completely cleaned, wetted and filled with mortar. After it has completely dried, a primer layer and finishing material are applied. The restoration process is completed by leveling the surface with felt. The main difficulty in this method of repairing damage is to choose the shade of the finishing material to match the color of the building facade.
Closing the hole
If work is done in violation of SNIP, holes may appear on the surface in the future. You can remove seams on the ceiling using one of the following methods.
Option 1:
The surface of the plate and the hole must be carefully processed. We work with a brush with a long handle. Further:
- Dust that falls is removed. We work with a spray bottle with soil and apply a thin layer of the mixture to the problem area.
- Next, close the hole with foam.
- We give the material time to dry. After which the remaining foam must be cut off. We work with a sharp knife.
- After which a cone-shaped hole (recess) is made. Height is within 40-50 mm.
- NTs brand cement is introduced and time is given for it to set.
- After this, it is necessary to level the putty layer. We work with a spatula with a narrow blade. A sickle mesh is first placed inside the gap.
The subsequent steps are similar to the methods described above.
Option #2:
When sealing the joints of floor slabs, the algorithm is as follows:
- At the preliminary stage, you can create a frame using metal wire.
- A sealant is used for fixation.
- After it hardens, a lattice should appear in the cavity.
- A mixture is prepared based on NTs brand cement. To improve adhesion, it is recommended to use various additives.
- A plywood sheet is installed, which is secured from below with a support.
- Time is given for the cement to dry and only after that the fixing sheet is removed.
After this, you can begin finishing.
Company advantages
Restoring slabs is a responsible process that requires certain skills and experience. The main difficulty in this case lies in a competent examination of the damage and determining the cause of its occurrence. Our employees have high competence in this matter and provide quality services in:
- Sealing of interpanel seams and their insulation;
- Repair of facades of all types;
- Inspection of facades;
- Restoration of slabs of residential and industrial buildings;
- Drawing up projects for repair work and their implementation.
Carrying out work of this range requires not only the skill of employees, but also the availability of special equipment. fully equipped with all the necessary tools and transport that may be needed during repair work. Owned equipment eliminates the need to rent it from other organizations, which significantly affects the cost of the services provided. Prices are significantly reduced, but the quality of work remains at the same high level.
For more than 10 years, it has positioned itself as a reliable contractor for carrying out complex work on the restoration and repair of structures of various types and purposes. More than three hundred regular customers, several dozen awards and thanks were received in the process of implementing projects of varying complexity. You can read numerous reviews on our website - there you can also find a full list of services that our company provides. " Stroy MD " provides a guarantee for all work performed.
You can contact us and get advice on the possibility and method of solving your problem, the cost and timing of the work by calling the phone number listed on the website, as well as by leaving a request on it in the feedback form or by email. Our specialist will contact you shortly and provide information regarding further cooperation.
Plastering
The plastering process is identical for all surfaces. In our case, you will need to install a mesh and use various dry mixtures.
Experts recommend working with a mixture that includes cement or gypsum.
The preparation order and ratio of components are indicated on the outside of the package. First, the ceiling is treated with soil - this is concrete contact.
Methods of strengthening floor slabs
Floor slabs of buildings and structures operate under conditions of high mechanical loads and are often exposed to the harmful effects of a number of harmful factors: explosion, settlement, earthquake, fire, high humidity, freezing, sudden mechanical load, exposure to chemically aggressive substances, etc.
The main material and reinforcement of the product are partially destroyed. Therefore, to enable further operation of the structure, it is necessary to strengthen the floor slab in various ways.
Tools and materials
Sealing seams between floor slabs involves the use of a certain material and working tools.
Materials.
We will need:
- Deep penetration primer. Concrete contact is best suited for the job. The primer will improve the adhesion of the working surface.
- Cement brand "NTs", which is designed to eliminate deep recesses.
- If the cracks are deep, we will need thermal insulation material. This can be polyurethane (construction) foam, polyurethane and other materials.
- Latex putty will be used in the work.
- Sealant.
- Reinforced mesh. Width 40-50 mm.
Let's now look at which tool should be prepared.
Tools.
The range of assistants includes:
- Basic electrical appliances.
- Set of spatulas.
- A brush designed for working on metal.
- Spray.
- Construction knife.
- Hammer. If you don't have one, you can use a drill with an impact mechanism.
- In addition, you need to stock up on sandpaper.
A few words about security measures.
Before sealing the seam joints between floor slabs, you need to take care of your personal safety. Do not neglect the well-known and proven rules for conducting construction work. It is important to protect your eyes and respiratory tract by using safety glasses and a respirator. Processing floor slabs involves the use of gloves and comfortable clothing made of thick fabric.
Having prepared the materials and tools, you can begin the preparatory stage.
Features of strengthening floor slabs
In the construction of buildings and structures, various types of floor slabs are used: hollow-core, monolithic and ribbed. Depending on the type of slab, operating conditions and nature of destruction, the civil engineer decides which type or types of reinforcement to use. The decision is made in each specific case, a strength calculation of the reinforcement of the floor slab is made, and a technical design is drawn up and agreed upon.
At this point in time, the designer has the following technologies for strengthening a damaged floor slab in his arsenal: strengthening floor slabs with carbon fiber, strengthening floor slabs with metal beams, as well as strengthening the floor slab from above or below by building up reinforcement and a layer of concrete. Let's consider technologies for restoring the load-bearing capacity of floor slabs in more detail.
Strengthening hollow core slabs
The technology for strengthening and repairing hollow-core floor slabs is one of the simplest and most cost-effective. The essence of the technology is to release the slab from all mechanical loads (equipment, furniture, etc.). Next, mechanical opening of the voids is carried out, installation of reinforcement and forced, under pressure, filling of the voids with high-strength concrete mortar.
Strengthening monolithic floor slabs
The type of reinforcement of reinforced concrete products of this type is accepted by the designer on the basis of an examination of a competitive structure and calculation of the magnitude of mechanical loads. In the vast majority of cases, a decision is made to strengthen the floor slab from below, in the area of bending loads. Two technologies for strengthening a monolithic slab from below have been developed and are used.
In both options, there is an additional reinforcing belt, onto which additional concrete material is “thrown” using the gunite method. The difference is that in the first option, an additional reinforcing belt is attached to the reinforced slab through special bends welded to the exposed reinforcement of the reinforced slab. And in the second case, the armored belt is attached to a steel strip mounted on through anchor bolts.
In some cases, top reinforcement technology is used with the installation of reinforced concrete dowels, top extension in the form of an additional monolithic reinforced slab and other technologies. In any case, when strengthening a monolithic slab, the following problems are solved:
- Effective fastening of the reinforcing belt to the surface being repaired.
- Installation of formwork.
- Pouring concrete mortar and maintaining the poured structure.
Strengthening ribbed floor slabs
Repair of ribbed floor slabs involves the use of three technologies. Additional reinforcement and concreting as in the case of monolithic slabs. Installation of supporting columns and strengthening the load-bearing capacity of the slab using truss reinforcement.
Truss reinforcement is arranged along the diagonals of the reinforced structure and forming mutually intersecting planes (stiffening ribs) provide the necessary reinforcement and rigidity of the reinforced floor slab
Strengthening U-shaped floor slabs
Work to increase the load-bearing capacity of U-shaped floor slabs can be carried out either by building up a new mass of reinforced concrete, as in previous cases, or by strengthening the floor slabs with a channel. In this option, the bending loads on the slab will be redistributed to the channel beams and load-bearing walls. Due to the unesthetic appearance of reinforcement, this method is used for the repair and reconstruction of production workshops and warehouses.
A similar effect is obtained when monolithic floor slabs are reinforced on top with metal beams. This technology binds the emergency slab with a kind of “corset” of welded channels or I-beams and prevents its destruction.
Strengthening reinforced concrete floor slabs with carbon fiber
This is the most modern technology that allows you to significantly increase the load-bearing capacity of floor tiles of any type and type of structure. The essence and technical meaning of the technology lies in gluing carbon tape and lamellas to the upper or lower surfaces of the slab.
Carbon fibers act as additional reinforcement and increase the load-bearing capacity of the structure. Considering the low relative strength of carbon fiber, we can say that using this method it is impossible to radically increase the load-bearing capacity of floor slabs.
Obtaining a PP form
Various reinforced concrete products are created by molding a concrete mass. Floor panels are no exception. However, here, as in any production process, there are exceptions and peculiarities. This technology for the production of floor slabs is characterized by the use of many mechanisms. This is convenient when workshops or factories operate with a limited assortment.
The mold for manufacturing PP is installed on a special vibrating table and fixed using an electromagnet in a stationary state. A reinforcement mesh is placed in the prepared metal pallet, which is the key to the strength and rigidity of the future product.
On one side of the equipment there are holes through which special pipes - poissons - enter. They are needed to create voids inside the slabs. A reinforcing mesh is also placed on top, and the entire structure is carefully filled with concrete mortar. It should be mentioned that the bottom layer of reinforcement is denser and the metal rods are thicker.
After the metal tray is covered with a lid, a vibrating table forces the mold to move, resulting in the mixture being compacted tightly. At the end of the process, the poissons are returned to their place and voids remain in the slab. It is very convenient to use such a machine for the production of floor slabs, since the main process is performed quickly and efficiently, which is very important when producing large quantities of identical reinforced concrete products.
Prices for waterproofing floors
| Name of works | Unit _ | Price in Rubles |
| Installation of built-up waterproofing in 1 layer | m2 | from 300 |
| Installation of adhesive membrane in 1 layer | m2 | from 280 |
| Installation of PVC membrane on the horizon | m2 | from 480 |
| Applying bitumen mastic in 1 layer | m2 | from 120 |
| Installation of polyurethane mastic in 1 layer | m2 | from 200 |
| Spraying liquid rubber | m2 | from 250 |
| Manual application of liquid rubber | m2 | from 300 |
| Application of polymer-cement compositions | m2 | from 400 |
| Device of penetrating compounds | m2 | from 600 |
| Primer device | m2 | from 50 |
Calculator for independently calculating the cost of waterproofing
Open calculator
Waterproofing cost calculation
Floor on joists
Massive and parquet boards, laminate are often laid on logs. These are horizontal wooden supports. They are made from beams with a thickness of 40 to 70 mm and a length equal to the length of the room. There are three options for attaching them to concrete:
- Standard - with screws or anchor bolts.
- Using special glue or mastic based on bitumen. This method is used if there is a high risk of damage to communications located under the subfloor when drilling holes for screws or anchors. With this option, waterproofing is not required, since it is replaced by glue.
- On adjustable supports. The support consists of an external plastic thread and a dowel-nail inside. To install the logs on such supports, holes are drilled in the slab and beams.
Adjustable feet
Important! Sometimes it is impossible to attach joists using any of the available methods. Then take the thickest bars.
Installation of floors on joists (step by step):
- Use a building level to check the slope. Its maximum permissible value is 0.2% of the length or width of the room. If the deviation is greater, it is recommended to fill the concrete floor with a self-leveling mixture.
- Create a waterproofing layer. To do this, use a film, polymer or profiled membrane, mastic, roofing felt or other bitumen-based roll materials.
- Before installation, soak the joists with an antibacterial compound.
- Install the beams at a distance of 50 cm from each other (if the flooring is made of thick material, then this distance may be greater).
- Create a heat and sound insulating layer. To do this, place insulation in the gaps between the joists.
- Create a second layer of waterproofing.
Why do you need to prepare the floor for cement-sand screed?
Cement-sand screed when wet contains a large amount of water. As the screed dries, it gradually contracts and changes volume. The screed is a connected screed, that is, its solution reacts with the base of the installation and the walls of the room. When the screed is compressed, it begins to “pull” the walls and the floor slab. Poor adhesion to the base and walls leads to ruptures of the screed, cracks and detachment of the screed from the base.
For better adhesion to the floor slab and walls and for uniform drying of the screed, the concrete floor slab must be primed. The primer will improve the adhesion of the subfloor to the screed.
But before priming, the surface must be brought into working condition.
Subfloor
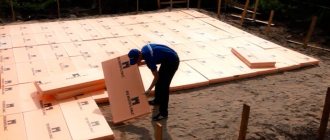
The most inconspicuous, but at the same time the most important part of the renovation is the floors. Therefore, it is very important to properly prepare the subfloor and lay the finishing coating.
One of the stages of preparing the base is the subfloor.
The subfloor, or as it is also called, the preliminary screed, is poured directly onto the sand or concrete floor. It is a kind of foundation for the future floor and is performed in order to get rid of large unevenness, but, unlike a semi-dry screed, it does not create a perfectly smooth coating.
Before you start pouring, you need to level the walls of the room. A prerequisite for pouring this type of screed is its additional reinforcement.
Why is a subfloor needed:
- for preliminary leveling of the floor;
- to hide floor communications;
- to prepare the base for laying heated floors and sound insulation;
The procedure for pouring subfloors is divided into the following stages:
- preparation of the base - we level the soil, fill it with sand and spill it with water, giving additional density, and then compact it. If the subfloor is planned to be made on a concrete base, then it must be cleared of large and small debris, and the cement deposit must be removed;
- installation of beacons and fittings - this will give us a level and strengthen our floor;
- preparation of the mortar - for rough floor screed, a classic sand-cement mortar is used, in a ratio of 1 to 3 - one part cement and three parts sand. Water must be added 0.5 liters per 1 kilogram of cement;
- pouring the solution - the solution is poured between two guides. After this, using the rule, we distribute it evenly over the entire floor area. There are a few tips that will make your work faster and better - prepare the mixture in small portions so that it does not have time to harden. Also try to fill one room within one day, then the floor will be uniform;
- floor control - in order to prevent your floor from shrinking, you need to remember a few rules: isolate the room in which the pouring was done as much as possible, a day after pouring, cover the floor with film - this will prevent cracks from appearing when the screed dries.
Subfloor or semi-dry screed? The choice is yours.
The subfloor itself does not have to be perfectly level. If you need to prepare the surface in the shortest possible time, then our semi-dry screed technology is suitable for you. This is a more modern floor leveling technology, after which you can immediately begin laying the flooring. A semi-dry screed can serve as both a rough preliminary floor and a finishing one, on which the flooring can be immediately laid without additional leveling and preparation.
Filling a subfloor is not so difficult, you can do it yourself, but if you need a high-quality foundation in an extremely short time, it is better to resort to our semi-dry floor screed service. We will do all the work quickly, with high quality and inexpensively. Contact us any day of the week and you will receive an excellent, smooth, clean screed for the price of rough floors!
Why can't you make a screed that is too thin?
You can save on materials for the screed by making it as thin as possible, but you need to keep in mind a few important points:
- Too small a layer as a result of rapid evaporation of moisture can lead to cracking or poor adhesion to the base.
- A thin screed can be damaged if massive objects fall on the floor.
- Insufficient fill thickness when installing heated floors will not be able to ensure high-quality heat distribution.
Tip: you can reduce the thickness of the screed without loss of quality by adding plasticizers to the solution. For these purposes, you can use tile adhesive, PVA, detergents and lime.