The main load in any warehouse falls primarily on the floors. It’s no wonder - no matter how high the goods are placed, no matter what designs of shelves and racks are invented, in the end their weight still takes on the floor. Moreover, loads are not the only type of negative impact - mechanical damage, instantaneous and long-term (such as abrasion), effects of temperature, humidity, etc. should also be taken into account. Fortunately, these days all these problems are completely solvable and do not require any kind of space investments. Let's first decide on the load.
Types of floor loads
The reinforced concrete slab itself has a certain weight. When resting on two or three walls, the slab should support it over the entire area without sagging or deflection. In addition to its own weight, the ceiling experiences static (constant) and dynamic (variable) loads. The latter are created by people moving along the upper floors, and static ones act on the upper and lower planes of the slab. These include:
- insulation and sound insulation of floors;
- floor screed and its decorative finishing;
- ceiling design of the underlying floor;
- partitions;
- furniture and equipment;
- pendant lamps and communications mounted on the ceiling or in the slab itself;
The load on the lower part of the slab can be very noticeable Source sev-elektrik.rf
In turn, the static load is divided into distributed and concentrated. Furniture, interior walls, and screed create a distributed load, while heavy chandeliers or a hammock suspended from the ceiling create a point load. When performing calculations, increasing factors are applied to point loads.
The permissible load on the floor slab should not exceed its load-bearing capacity. When designing buildings, slabs with a decent margin of safety are selected to eliminate any risks when the load increases.
See also: Catalog of companies that specialize in redevelopment of country houses of any complexity
Seam cutting
It is no secret that the concrete used in screeds is a fairly fragile material and can be subject to cracking. To prevent this process, expansion joints are cut.
In total, the following types are distinguished:
Cutting joints should be carried out immediately after the concrete has reached a certain strength, but before cracks appear on the surface. Chalk is used for marking, and the order of work is determined by the sequence of concrete laying.
Cutting seams with a diamond blade
In this case, such seams should extend approximately to a third of the depth of the screed. To make them easier to care for and strengthen the edges, sealing is used.
Features of floor panels with voids
The ability of slabs to withstand loads depends on their design and the brand of cement used for production. For example, if the slab is made of M500 cement, then the finished product can support a point weight of 500 kg per square centimeter. This is the maximum short-term load on a hollow-core floor slab, while the permanent load is much less than this value.
However, these data would only be true for slabs made of concrete without reinforcement. In fact, their load-bearing capacity is much higher due to the reinforcing steel frame made of high-quality reinforcement.
Scheme of reinforced concrete slabs Source profundamenti.ru
Reinforcement of the slabs is carried out in all directions with reinforcement of the ends resting on the walls with a double belt. This is necessary to increase the load-bearing capacity of the edges on which the walls of the upper floors and the roof structure rest.
It is important! If a building built from lightweight cellular concrete or ceramic blocks is covered with reinforced concrete slabs, an armored belt is installed along the top of the load-bearing walls.
Heavy floors can only be laid on a monolithic reinforced concrete belt Source mdolgih.ru
Types of slabs for flooring
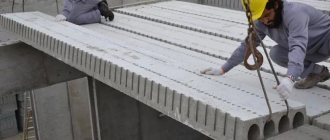
Before trying to determine what load a hollow-core floor slab of 6 meters or another length can withstand, it is worth understanding the types of such slabs. They are flat panels with longitudinal internal cavities of round, oval or octagonal cross-section.
In addition to them, reinforced concrete factories also produce monolithic ribbed and U-shaped slabs. The absence of holes in them increases the load-bearing capacity to 2000-3000 kg/m2, but the large weight of such products puts a serious load on the foundation and walls of buildings. Therefore, in residential, and especially private housing construction, preference is given to hollow core slabs. Their additional advantages are better noise insulation and the possibility of hidden installation of communications in hollow channels.
They differ from each other in dimensions, shape and size of voids. The most common are panels with circular cross-section cavities; they are designated PC, and the number preceding this abbreviation indicates the cross-sectional diameter of the channels.
- 1PC – the diameter of the cylindrical voids is 15.9 cm.
- 2pcs – 14 cm.
- 3pk – 12.7 cm.
- 7pk – 11.4 cm.
The slabs may have different external dimensions and void sizes Source studfile.net
In private and low-rise construction, it is recommended to use 7PK floor slabs with a reduced void cross-section.
The abbreviation PB for hollow core slabs indicates the method of its formation without formwork.
The external overall dimensions of the slab are regulated by standards. There are many standard sizes, differing:
- thickness (from 160 to 400 mm);
- length (from 2.4 to 15.5 m);
- width (from 1.0 to 3.6 m).
These data, as well as the calculated load on the floor slab, are recorded in the product labeling.
Laying the finishing base
This process also consists of several stages:
Reinforcement In this case, a road mesh is quite suitable. However, if the floor is subject to significant loads, the best option would be a metal frame with a diameter of at least 8 mm. Pouring the mixture The concrete mixture must be poured evenly and quickly enough, so it is better to use special equipment. Installation of beacons Most often, a distance of 2 meters is maintained between the beacon slats, this allows you to rest the ends of the rule on them. Filling the floor is carried out 15 mm above the installed beacons. Compaction The best option is to use a vibrator, followed by leveling the surface.
Finishing polymer base
How to calculate the load yourself
To calculate the floor load, you need to determine the position of the slab in the building structure, which requires a project or floor plan. The weight per slab depends on the finish of the floor and ceiling, the presence of partitions on it, furniture and equipment of the room.
The calculation can be carried out over the area of the entire floor, summing up the loads of the entire floor and dividing the resulting value by the number of panels required to construct the interfloor partition. But more accurate data is obtained by calculating the loads room by room or on an individual slab, because for a bedroom with light finishing and a bathroom with a heated floor in a concrete screed and heavy equipment, it can be very different.
The load on the slabs in different parts of the house differs Source mdv63.ru
For example, let's take the same PK40.12-8 slab. With a thickness of 220 mm, its weight is 1420 kg (this parameter is indicated in the technical documentation). You will also need to calculate the area of the concrete panel. In our case, it is equal to 4.8 m2.
The calculation is carried out under the condition that the slab is supported on two end sides. If it is additionally supported by internal load-bearing walls or columns, the load is reduced.
Note! The ceiling should not rest on interior partitions. A gap equal to 1/150 of the length of the slab is left between their upper edge and the slab - this is the amount of permissible deflection without compromising the integrity and load-bearing capacity of the slab. In our example, the gap is 3.2 cm; it is filled with polyurethane foam or insulation.
The technological gap is necessary to ensure the integrity of the partition when the slab bends Source homemasters.ru
Finishing
Upon completion of the last stage, you need to wait a little until the concrete gains sufficient strength. The time of the technological break is affected by the ambient temperature, as well as air humidity. Depending on these conditions, the time can range from 3 to 7 hours.
Grouting work with machines
When the depth of the mark on the surface does not exceed 2-3 mm, it is necessary to carry out its primary (rough) grouting using discs or trowels. The final (finishing) grouting is carried out with a mark depth on the surface of 1 mm.
Tip: If you need to make your floor even more durable, use a topping. This is a special mixture consisting of cement and additives that is rubbed into concrete.
Video description
An example of calculating the load from partitions is shown in this video:
It is important! When making repairs, try not to load the floors with building materials piled in one place, especially dry mixtures that have a lot of weight with a small volume.
This cannot be done, materials should be evenly distributed over the entire area or delivered in parts Source prostostroy.com
If, as a result of calculations, the total load turns out to be higher than the permissible load indicated in the marking, then more powerful slabs are chosen for the floor installation or heavy floor structures, partitions and decorative structures are abandoned elements, replacing them with lighter ones.
Thickness of concrete cellar walls
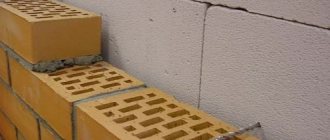
An underground vegetable storage facility built from concrete is one of the most budget-friendly options, all other things being equal: durability and functionality.
So, if the construction of a brick cellar may require the services of a qualified mason, you can build a concrete cellar with your own hands and thereby save on expensive hired labor.
At the same time, a very important issue on which the final cost of building a structure depends is the question of the optimal thickness of the walls of the vegetable storage.
The optimal thickness of the walls of an underground cellar built in dry soil with low groundwater is 150 mm with mandatory vertical reinforcement. In this case, the walls do not experience serious mechanical loads, so the value of 150 mm is taken based on design considerations and ease of pouring.
When arranging a structure in moist soils with high groundwater levels, the walls of the cellar in winter experience quite a serious load from soil heaving. In this case, the wall thickness must be at least 250 mm, also with mandatory vertical reinforcement.
The indicated values are confirmed by practical experience in the construction and operation of domestic underground structures with dimensions from 2x2 to 4x4 meters in plan.
Briefly about the main thing
To find out how long the floor slab included in the house design can withstand, you need to understand the markings of these reinforced concrete products. The maximum load is indicated in it by the third number in kilograms per square decimeter of area. To determine its load-bearing capacity, all loads falling on the slab from its own weight, the structure of the floor and ceiling, partitions, furniture, people are summed up, and the data obtained is compared with the parameters of the product. The total design load must be less than the maximum permissible.
Ratings 0
General information
As with any product, there is also SNiP for concrete floors, which must comply with certain norms and standards, based on such characteristics as:
- life time;
- level of resistance to aggressive environments;
- the load on the concrete floor must correspond to that specified in the project.
As-built survey of a concrete floor is carried out using a laser level
Obtaining a surface that will ideally meet all of the above requirements is preceded by two main requirements:
- All materials used must be of good quality.
- During the concrete manufacturing process, technology must be carefully followed.
How to measure thickness?
Many private developers who ordered the construction of the structures discussed in this article to companies or individuals, and who do not have the opportunity to observe the work personally, are interested in the issue of quality control of work in terms of contractors’ compliance with the designed concrete thickness.
In this case, you will need a device to measure the thickness of concrete. Considering the high cost of such equipment (250-260 thousand rubles), it makes sense to rent it during acceptance tests.
Concrete thickness gauge TC300
One of the optimal equipment options for monitoring the thickness of concrete structures is the TC300 Concrete Thickness Gauge device. The cost of renting such devices is affordable and ranges from 300-500 rubles per day with an appropriate refundable deposit.
Marking
Each type of hollow floor slabs is equipped with markings that meet quality standards. Thanks to this, the customer and designer can determine the required parameters. At the end of the structure, the consumer can see the markings, date of manufacture, weight and QC stamp.
The standard marking contains several letters that indicate the series, as well as 3 groups of numbers that determine the dimensions and load-bearing capacity. Both groups have the form of two numbers, which are considered to indicate length and width in decimeters. These figures are rounded up to whole numbers. The last group is presented as a single figure; it determines the uniformity of load distribution in kPa.
Example of marking: PC 23-5-8. Its interpretation is as follows: the slab has round voids, it is characterized by a length of 2280, a width of 490 millimeters, and the structure has a load-bearing capacity of 7.85 kPa. There are types of products that are equipped with markings, supplemented by Latin symbols, which determine the types of rods. One example of marking: PC .5 indicates that the frame was manufactured from prestressed reinforcement. In addition, hollow structures have the following symbols:
- t – heavy type concrete;
- a – presence of liners for sealing;
- e – formation using the extrusion method.
Instructions for an online calculator for calculating floors made of wood, laminate or parquet boards
Specify the required scale of drawings.
Fill in all dimensions in millimeters:
X – The width of the floor depends on the size of your room.
Y – Floor length, determined by the length of the room in which the flooring needs to be installed.
Building materials:
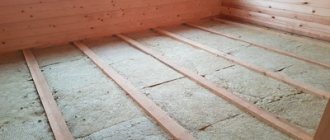
S1 – Log width (sometimes this parameter is also called height, since a rectangular log is installed on an edge). The S1 value is taken from 100 mm depending on the load on the floor and the distance between adjacent supports (span length).
S2 – Thick joists. According to the manual for SNiP 3.04.01-87 “Recommendations for the installation of floors”, the thickness of the logs is taken from 40-50 mm (provided that the entire lower surface is supported by floor slabs or a soundproofing layer).
It is optimal if the value of S1 exceeds approximately 1.5 times the value of S2.
Approximate sections of floor beams depending on the span length are given in the table.
| Span length, mm | Log section, mm |
| 2000 | 100x60 |
| 3000 | 150x80 |
| 4000 | 180x100 |
| 5000 | 200x150 |
| 6000 | 220x180 |
For logs, it is necessary to use unplaned boards that meet the requirements of GOST 2695-83*, GOST 8486-86* grades 1, 2 and 3 from healthy wood of coniferous and soft hardwood, except linden and poplar. Lumber with a blunt wane without bark is allowed. Wood for logs must have a moisture content of up to 18% and must be antiseptic. Most often, due to the low price, spruce and pine timber is used. If there is high humidity in the room and there is a risk of rot, the use of larch or aspen is justified. It is necessary to install waterproofing between the joists and the supports underneath them.
It is important to provide a gap of 20-30 mm between the joists and the walls to compensate for possible expansion of the wood during temperature fluctuations
S3 – The distance between adjacent logs (step) is selected taking into account the thickness of the floor board (the thicker the board, the less frequently the logs are placed). When choosing parameter S3, it is recommended to take into account the requirements of SNiP 3.04.01-87. The approximate pitch of load-bearing floor beams (joists) is taken according to the table.
| Distance between lags, mm | Floor board thickness, mm |
| 30 | 20 |
| 40 | 24 |
| 50 | 30 |
| 60 | 35 |
| 70 | 40 |
| 80 | 45 |
| 100 | 50 |
Enter the parameters of the planned floor covering (boards, laminate or parquet).
O1 – Width of the floor covering. This parameter depends on the type of material used. For example, the width of a laminate is 90-330 mm (the most popular sizes are from 185 to 195 mm), a parquet board is from 140 to 250 mm, a wooden floorboard is 80-135 mm (optimally 100-105 mm).
L – Length of material for flooring. The length of a laminated floor board varies from 85 to 1845 mm, a parquet board – 1100-2500 mm, a solid wooden board – 2000-6000 mm.
O2 – Thickness of the floor covering. For laminate from 6 to 12 mm (optimally 8 mm), for parquet boards 7-25 mm (optimal value 13-20 mm, sanding 2-3 times possible), thickness of floorboards made of natural wood - from 25 to 60 mm (optimum 30-40 mm).
O3 – The width of the subfloor boards is selected taking into account standard sizes of lumber and wood market offers in your region.
O4 – The thickness of the subfloor boards is selected based on the budget and availability from suppliers. Optimal thickness of boards, ch.p. 25-30 mm, more is possible, but this is often not justified.
R – The gap between the subfloor boards depends on the material used for the finished floor and can take values from 1 to 70 mm. For laminate and parquet boards, the R value is taken to be small; when using a solid wooden board, the run-up can be increased.
Click "Calculate"
An online calculator will help you calculate:
- how many logs are needed, their length and the volume of lumber for production;
- the volume of space between the joists (how many cubic meters of insulation for the floor will be needed);
- the number of rows of the rough board and its volume;
- how much material is needed to arrange a wooden floor (how many rows and volume of coverage for a given area of the room);
- Based on the area, calculate the required amount of wood, parquet boards or laminate for your floor.
Such information will help to more accurately estimate the amount of material needed and the financial costs of installing the floor. In excess of the calculated quantity, a supply of building materials should be made up to 10%. To obtain the expected quality of the floor, check the suppliers' products for compliance with regulatory documents: GOST 32304-2013 “Laminate flooring based on dry-process fiberboards”, GOST 8242-88 “Milled wooden parts for construction”, GOST 862.3-86 Parquet products. Parquet boards and GOST 862.4-87 “Parquet products. Parquet boards.”
Concrete pool wall thickness
A monolithic concrete pool is an expensive structure. At the same time, the price of concrete for pouring the bowl of a structure is one of the main items of construction cost. Correct calculation of the required amount of building material makes it possible to order the optimal amount of concrete and reduce the cost of filling the bowl to the lowest possible “minimum”, all other things being equal.
There are no regulatory requirements regarding the optimal thickness of the pool walls, as is the case with the thickness of concrete for the floor screed area. Therefore, we have to use empirical data obtained from experienced developers of such structures.
With mandatory horizontal and vertical reinforcement, the thickness of the pool walls, obtained empirically and tested by practice, must be at least 200-250 mm. Increasing the thickness of the pool wall above 250 mm leads to an unjustified, rather significant increase in construction costs.
Formulas and calculation elements
The calculator uses the following initial data for calculations:
- the length of the beam is a parameter that is specified by the project and depends on the distance between the load-bearing walls;
- cross-section of the beam - its width and height, and the height should always be greater for better resistance to specific bending loads;
- type of wood - the plasticity and depth of deflection of the beam, and accordingly, the maximum possible load, depend on it;
- expected load - taken from the standards and depends on the type of room and the number of residents.
A board is laid on the joists to form the floor
In addition to the initial data, the calculator contains a variable - timber pitch. By changing its value, you can choose the optimal placement of beams. The calculator contains reference values specific to each of the selected parameters:
- breaking force is the magnitude of the constant load on the beam, upon reaching which collapse will occur, depends on the dimensions of the beam;
- distributed force - depends on the magnitude of the expected load;
- deflection in millimeters - the maximum permissible amount of deformation, depends on the length of the beam, the value is given for comparison, it should not exceed the calculated deflection;
- calculated deflection in millimeters - depends on the type of wood.
As a result, after entering all the data, the calculator reports whether there is a margin of deflection and strength for the parameters specified by the user. If there is a reserve, the beam can be used; if the load is exceeded, one of the parameters should be adjusted. For reference, the calculator provides values such as torque and mass of the beam itself. The first parameter is interesting for general development, but the weight is useful to know, since the cost of delivering the timber to the construction site depends on it.
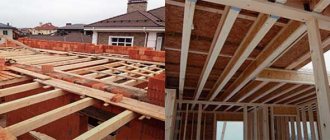
Panel house with wooden ceiling
Basic board parameters
Parquet laying diagram.
Typically, boards 20-40 mm thick are used. There is an opinion that floors made from thicker boards are stronger. It must be taken into account that the properties of such a natural material as wood depend on the degree of drying. An insufficiently dried thick board may, when drying naturally, tear out the screw with which it is secured. Therefore, it is more practical to use material with a thickness of 20-25 mm.
The width of the floorboard ranges from 100 to 200 mm. Considering the previous remark, it is better to opt for 100 mm.
At sawmills there are boards 6 in length; 4.5; 4.3 m. If you plan to lay it with an offset, then the length can not be taken into account. With this method, the labor intensity of the work will be higher due to the larger number of joints, but there will be less scraps left. If you are laying boards without offset, you should choose the length of the board according to the length or width of the room. Of course, the board must be tongue-and-groove.