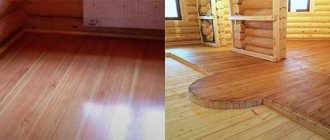
Benefits of wood
Floors are horizontal structural elements of buildings and structures that divide them into floors or separate them from technical rooms (attic or basement). Depending on what material the building is constructed from, the floors can be monolithic, prefabricated reinforced concrete or wood.
For the construction of a private house, floors on wooden beams are most suitable, since their weight is less than that of structures made from other materials, and constructing them with your own hands is cheaper and easier.
Wooden interfloor ceilings can be installed in houses made of any material, with the exception of monolithic reinforced concrete. They are erected simultaneously with the construction of the walls, as the latter are built to the height of the next floor. In frame wooden buildings, floors can be made simultaneously with the construction of the frame of the entire building, even before it is insulated and covered.
Correct floor design
Interfloor wooden floors are arranged on beams. They are usually used as timber. The size of the section depends on the size of the span that needs to be covered, as well as on the size of the expected load on the floor and the types of wood used. Most often, timber with a section width of 100 mm and a section height of 150-200 mm is used.
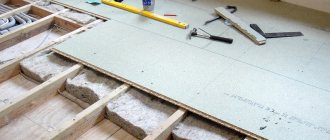
Next, the ceiling itself is formed by installing the floor boards of the upper floor and hemming the ceiling materials of the lower floor. You can often see that floor boards are laid directly on beams, but it is more correct to first install logs on the beams, and then make flooring from the boards over them. The second option is the most preferable, as it will allow for proper interfloor insulation along wooden beams.
The fact is that in the pie, which the filling of the interfloor ceiling is so similar to, there must be layers of vapor barrier.
They are made of a special membrane with a certain coefficient of vapor permeability, and the top layer of the membrane allows steam to pass in only one direction - from the insulation into the air. Therefore, an air gap is needed between the membrane and the plank floorboard, which will remove steam from under the boards. Otherwise, the latter will simply begin to rot.
In this case, the membrane is laid on the interfloor floor beams, and the air gap is formed due to the thickness of the logs laid perpendicular to the beams.
Steam is removed from under the boards through specially cut holes in the floor or slotted skirting boards used to edge the perimeter of the room.
Note! The bottom layer of the membrane must be made of a material with a very low vapor permeability coefficient.
This is necessary so that moisture from the lower rooms does not seep upward through the interfloor ceilings, and also does not linger in the layers of insulation. All air from the floor should be vented into the atmosphere only through ventilation ducts or windows for ventilation.
Noise insulation
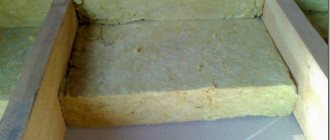
Interfloor sound insulation in wooden floors typically has a thickness of 15 cm. At the same time, the total thickness of the floor between floors is at least 25 cm. Specifically for the layer of fiber insulation, it is necessary to give a thickness of at least 10 cm with a sound insulation density of 50 kg/cub.m.
We recommend: Step-by-step instructions for performing cork sound insulation
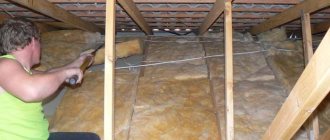
After installing the beams and laying the mineral wool slabs, you can additionally lay roll, cork or felt flooring on the floor. In cottages, a mineral membrane is often used. Rules for installing soft fibrous materials when laying interfloor sound insulation:
- Place 40x50 mm slats on the vertical part of the beam from below.
- Sew boards with a thickness of 25 mm or more to the slats.
- Wrap the beam with a vapor barrier, extend the edge of the vapor barrier beyond the junction of the beam with the wall by 10 cm.
- Stuff felt strips onto the beam; you can use metal, or preferably plastic, fasteners.
- Place fiber blocks tightly between the beams.
- Lay felt flooring over the base.
Regardless of the material or type of installation, wooden floors are treated with an antiseptic; before installation, the beams are covered with drying oil and dried at room temperature for 48 hours.
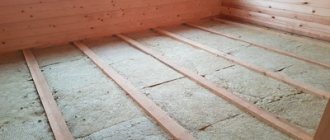
The main part of the sound insulation between floors has been laid. The bottom surface is ready for covering with plasterboard, clapboard, or other material. To arrange the floor, it is necessary to additionally lay thermal insulation on top of the layer of rolled insulation if the main floor is planned to be made of boards. When a laminate is used as the main floor, thermal insulation is not used; plywood is used as a substrate for laminate slabs.
Insulation layers
So, if you imagine a cross-section of the interfloor insulation cake, it will consist of the following layers:
- upper floor flooring boards;
- logs;
- floor vapor barrier;
- beams with a layer of heat and sound insulation laid between them;
- ceiling vapor barrier;
- ceiling cladding.
In multi-storey buildings, insulation of the interfloor floor is relevant only if this floor is made between the basement and the first floor, as well as in the case of the floor between the upper floor and an unheated attic.
If the ceiling separates two residential heated floors, then the role of insulating material for insulation is negligible. In this case, the soundproofing properties of the structure are much more important. Despite the fact that heat and sound insulating materials are included in the same group when classified according to purpose and technological characteristics, their properties may be different.
These differences must be taken into account when using this or that material in a specific interfloor covering.
Required Tools
Sound insulation of the floor, interfloor ceilings and ceilings should take into account the properties of the purchased materials
This is important to comply with regulations to prevent fires or other accidents. Also, materials purchased in specialized stores must have all the necessary certificates and documents confirming quality:
- Fire hazard. The category is indicated on the packaging of any building material.
- A coefficient that provides noise insulation.
- Availability of a certificate of sanitary and hygienic standards.
- The thickness of the coating itself.
To begin installing soundproofing floors in a wooden house, you should purchase all the necessary materials and tools:
- Nails or screws.
- Materials used to soundproof interfloor ceilings and floors in a wooden house. Their selection will depend on what exactly is planned to be protected from noise.
- Hammer or screwdriver to secure fastening.
- Plywood or boards.
During installation work, it is important to choose the right building materials and approach this work responsibly
Types of floor insulation
The logs are wide bars installed on an edge and running from wall to wall parallel to each other. Plastic or metal beams can also play their role. Next, the finished floor boards are attached to them, so it is very important to lay them correctly so that over time the floor does not begin to creak or deform.
The selected insulation option is placed between and sometimes under the joists. Let's try to figure out which material for floor insulation is better to give preference to, and which should be completely abandoned.
It is not necessary for the logs to be exactly boards. Often this is an ordinary beam, adjusted to the level in one plane. The main thing is to secure them well and level them so that subsequent laying of the floor does not bring problems to the homeowner.
We will consider the most popular types of insulation materials, which are distinguished by fairly high heat saving rates.
These included:
- sawdust or sawdust mixture;
- expanded clay;
- glass wool;
- mineral wool;
- ecowool;
- penoplex;
- expanded polystyrene.
All of the listed insulation materials are quite airy, which means they will let the cold through with great reluctance. In addition, a high-quality layer of insulation can prevent the appearance of high humidity in the house, which is also important.
Option No. 1 - budget sawdust
This material has the most unstable characteristics. Often, it becomes saturated with moisture, which significantly worsens its heat-protective properties.
In this case, the owner better take care of the bottom layer of waterproofing, since wet wood will begin to rot, and this can cause not only damage to the coating, but also a number of serious diseases.
Often, as a relatively inexpensive option, pellets or sawdust granules similar to pellets are used to insulate the floor. In them, sawdust is compressed and held in place by an adhesive base.
Such insulation will have slightly better thermal conductivity, but experts do not recommend insulating the floors of your home with such material. Its moisture resistance leaves much to be desired.
Of course, if you plan to insulate the floor in a country house or in an outbuilding, you can use sawdust, but they are completely unsuitable for insulating floors in a house. It is better not to save money, but to purchase more expensive and high-quality insulation.
According to experts, sawdust is one of the most undesirable materials for floor insulation. But the budgetary nature of the material often takes its toll. Experienced builders recommend using sawdust only when insulating the floor of outbuildings
Classification of noise and methods to combat its spread
To effectively reduce the volume of sound passing through ceilings, you should clearly understand what you have to fight with. In some cases, laying soundproofing material is sufficient, while in others it will be necessary to make changes to the structure of the ceiling structure.
According to standards in residential premises, a comfortable noise level is considered to be within 40 dB, and harmful to hearing - more than 80 dB
Sound pressure levels of various sound sources
Rules for sound insulation with soft materials
The effectiveness of soundproofing work depends on how correctly the technology is followed, since otherwise it can result in discomfort when using the finished room. Considering that each method is individual in terms of installation, they must also be considered separately.
Soundproofing with sand
The process of sound protection of a partition using sand is very labor-intensive, and there is a lot of controversy about this. In addition, sand creates a lot of pressure, which causes characteristic inconveniences. If we consider the basic rules of this method, they are as follows:
- The sand must be dry, since the moisture content of the substance not only adds weight, but also causes a violation of the hygiene of the finished insulation.
- It is necessary to make a cellular subfloor to fill each compartment separately with sand to prevent the spread of extraneous sounds and noises.
- You can make a “floating” floor on top of a layer of sand for a better effect.
Sand technology also has certain technological features that cannot be ignored:
- A lath is fixed to the underside of the beam, and the resulting gap must be sealed with solid plywood to avoid depressurization of the seams. Additionally, a vapor barrier is installed.
- To connect wooden partitions, it is recommended to make small slots under the beam, since this is how you can achieve the maximum “adhesion” effect. As a result, small blocks will be provided for subsequent filling with sand.
- When filling the cells with sand, it is recommended to retreat a couple of centimeters from the top to avoid overfilling if the sand’s moisture content increases. And a small gap creates optimal ventilation conditions.
- After filling the blocks with sand, you need to cover them with felt, and then lay plywood.
Such a “sandwich,” as experienced craftsmen say, allows you to avoid uneven sound insulation, since all the components and structures will be connected to each other as firmly as possible.
"Floating floor" for wooden floors
Technologies are provided in a wide range, so each client, depending on the need, will be able to choose the most practical and effective option. And the “floating” floor technology is considered one of the most effective techniques.
To create a “floating floor” you need to acquire the following components:
- Sealant.
- Elastic gasket for insulation.
- You can't do without lag.
- The flooring is created from chipboard or OSB panels.
- Acoustic mineral wool slabs are used as optimal sound insulation.
- You will also need insulating supports.
You can achieve the desired effect if you take into account the following recommendations:
- It is important to increase the mass of the top flooring.
- The logs must be installed on elastic supports with a low resonant frequency.
- The height of the logs increases to the maximum possible level.
- Mineral wool slabs, which have a high sound absorption coefficient, are suitable for arranging the insulating layer, thanks to which the desired effect can be achieved.
- The flooring between the floor and the walls must be separated using elastic insulating spacers.
As studies have shown, the presence of a “floating” floor in a soundproofing coating system makes it possible to create a comfortable space in terms of the absence of extraneous sounds.
Warm "floating floor"
In addition to the standard “floating floor,” warm technology can be used, which combines not only noise insulation, but also thermal insulation properties. The technology is very simple, but still combines certain design qualities that cannot be ignored:
- Before installing the insulation, the entire beam must be treated with an antiseptic agent to avoid subsequent deformation from high humidity.
- Between the beams, a rough flooring is prepared from boards 25-30 millimeters thick, and then the top layer is made and a vapor barrier is made to protect the structure.
- After the vapor barrier, insulation is laid, and here it is necessary to lay the product not only on top of the beam system, but also between them. This way, cold bridges are eliminated and the desired thermal insulation is formed. The technology is ideal for sound insulation.
- A vapor barrier is again laid on top of the insulation. This creates a greenhouse effect for maximum heat accumulation.
Important! All layers must be as tight and high quality as possible to avoid bridges of cold and humidity.
It is better to make the subfloor from boards 30 millimeters thick, but experts recommend using two layers of chipboard to avoid open joints.
Due to the fact that the structure is strong and dense, it will stay in place without additional fastenings. And also the absence of fastening elements eliminates the appearance of impact noise when using the upper floor.
General information
First of all, let’s understand the term “sound insulation” itself - what is it? This concept means reducing the noise level that comes through the ceiling or floor. This effect is achieved by installing special building materials.
It must be said that according to its structure, sound is divided into three types:
| Sound type | Peculiarities |
| Shock | Accompanies falling objects, steps, moving furniture, etc. Its conductors are solid building structures. |
| Acoustic (air) | Represents sound waves traveling through the air. The source can be a human voice, audio equipment, musical instruments, etc. |
| Structural | It is a type of impact noise. The conductors of this sound are the junctions of building structures. |
Different soundproofing materials are used to prevent the transmission of each of these types of sound. The main requirement that is placed on them is a high sound absorption coefficient.
Beams in a brick house
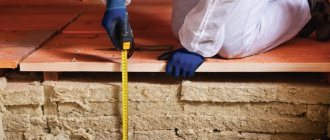
In a brick private house, before laying, the ends are wrapped in roofing felt or tarred. The space between the end of the beam and the brick is filled with insulation, more often with mineral wool. Be sure to leave a gap for ventilation so that the material does not rot or become covered with condensation. If grooves are not provided, then the beams are fixed with your own hands onto anchors previously embedded in brick or reinforced concrete.
The insulation is placed exactly between the joists and beams, no more and no less. It is allowed to leave 3-4 cm for ventilation . It is not advisable to use polystyrene foam and polystyrene in this case, as they have poor sound insulation.
Calculation of sections of beams between floors
Extruded polystyrene foam and material that suppresses rattling noise are allowed. Next, chipboard and flooring are laid out.
The role of sound insulation is performed by insulation from glassine sheets; any heat-insulating material is used.
When building interfloor wooden floors with your own hands, special attention is paid to the places where the pipe options pass: boiler rooms, chimney rooms, fireplace rooms. The gap between the beams and pipes must be at least 0.25 m. An asbestos gasket is installed around the pipes. Instead of asbestos, you can use basaltite.
Method of fastening wooden beams in wall grooves
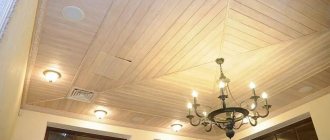
Stretch ceiling
Installation of a stretch ceiling is carried out in the traditional way. You can combine the use of a soundproofing coating on a wooden floor with the use of an acoustic stretch ceiling fabric.
The acoustic canvas is a perforated film material. Sound waves get stuck in holes filled with air. Having lost their main energy, the waves are reflected into the interceiling space, where they finally die out.
How to make sound insulation under a suspended ceiling.
Timber laying algorithm
During the construction of walls intended for laying timber, they are covered with their own hands in several layers of roofing material. 1 day before laying, the timber is treated with a fire retardant solution to protect it from fire .
At the ends, the timber is hewn at an angle of 60° and treated with an antiseptic solution, then with resin.
The ends of the wooden beams are wrapped in waterproofing material and placed in niches. The distance from the ends of the beam to the walls of the niche must remain at least 4 cm. This device is filled with foam plastic or mineral wool.
Do-it-yourself ceilings in a timber house
If the wall is brick and the thickness of the wall is less than two bricks, the space is filled with cement mortar. Every third beam is fixed with an anchor protruding from the wall by 20 cm, laid during the construction of the wall. First, a device for an anchor corresponding to the diameter and depth is drilled into the beam with your own hands.
In the wall, the beam is additionally secured with a bracket attached to wooden beams.
The beams are laid from the walls to the center, checking the evenness of the laying with a level. Having discovered an unevenness, it is eliminated using tarred boards adjusted to the width. It is forbidden to cut the timber or place it under wood chips, as this will lose the strength of the structure.
Beams are laid with your own hands strictly parallel to each other with the same spacing.
The outer beams are never placed close to the wall, leaving at least 10 cm. The beam is never installed directly next to the chimney pipe.
Secrets of Effective Sound Canceling
Insulation work begins with calculations of the effectiveness of a specific method and selected materials. The design that protects the room from background noise must meet several requirements:
- Multi-layering. Acoustic waves are quickly damped by several layers of protection.
- Plasticity, elasticity. Soft materials almost do not allow sound to pass through, and therefore provide better protection from it.
- Heaviness. Required for protection against low frequencies and vibrations.
- Correct installation of insulation on the ceiling. All materials must be used in strict accordance with specifications.
How to lay an interfloor ceiling on wooden beams?
Before installation begins, a calculation of the beam for deflection is made. You will need:
- beams;
- bars nailed to the lower parts of the joists (cranial wooden bars);
- materials for waterproofing;
- rolling shields,
- floor and joists.
The use of backfill is inappropriate, since it does not have the necessary noise insulation properties. It is undesirable to use polyurethane due to its high toxicity.
The structure of such an overlap on beams is multilayer. The comfort of living in a private home depends on its quality. The options used here are noise-insulating and heat-insulating materials.
Step-by-step installation on beams:
- A material that acts as a ceiling is attached to the beams: plywood, chipboard, boards, etc.
- A vapor barrier ceiling covering is laid one on top of the other, overlapping; if necessary, the film is secured to the beams with a construction stapler.
- Mineral mats are placed in the interfloor ceiling along the beams with special care.
The insulation must fit exactly onto the beams. The device serves as a sound insulator. If it is foam plastic, then it is best to fix it with wooden pegs between the beams and the foam plastic.
The insulation layer in the house is covered with a membrane that protects the structure from steam. The main purpose of this layer is to prevent mineral wool elements from penetrating into the room.
- The device between the beams and ceilings is filled with polyurethane foam, and the remains are cut off after hardening.
- Finally, waterproofing material is installed in the form of boards, chipboards, etc.
- All gaps between the walls and slabs are filled with felt, thereby reducing normal and impact sounds. On the top floor or attic, a rubber-cork track is laid on the ceiling, which provides ideal sound insulation. The entire perimeter is accompanied by a gap in the form of foamed polyethylene or damper tape. Ventilation holes are formed in the corners, which are included in the general ventilation system in a private house. They will help remove steam and moisture from the ceiling.
Expenses
In order to create an effective noise protection system for interfloor ceilings, professionals are usually invited who will carry out high-quality installation in the shortest possible time.
The cost of sound protection work depends on a number of factors : the type of acoustic material, its cost, working with imported material is more expensive, the area of floor slabs, installation location and configuration; average prices are presented in the table.
Average prices for materials and cost of work for installing sound and noise insulation of interfloor ceilings
| Material | index , Rw, dB | Cost of material , rub. per m2 | Cost of installation work RUB. m2 | Total RUR m2 |
| "ZIPS", 120 mm, full package | 26 | 2300 | 350 | 2650 |
| "Isotex", 12 mm | 23 | 3100 | 210 | 3310 |
| "Acoustic Butts", 50 mm | 60 | 170 | 220 | 390 |
| Membrane "Texound", 70 mm | 28 | 1838 | 190 | 2028 |
| "TechnoACOUSTIC" | 50 | 1050 | 270 | 1320 |
| "Shumanet" basalt slab | 45 | 310 | 250 | 560 |
| Frameless sound insulation “Isoplaat” | 26 | 671 | 310 | 981 |
How to check the quality of flooring using beams?
Check for distortions in the wooden beams; they should not be more than 1.5 cm vertically and 2 mm horizontally. The change in shape of the materials used should not exceed 0.7 mm per meter.
There should be no vibration or noise while walking.
If you plan to use putty in the future, stretch a polymer film over the foam. Next, the suspended ceiling, plasterboard or MDF sheets are fixed. At this stage, you can finish the ceiling.
Installation Tips
When choosing sound insulation for interfloor wooden floors, it is recommended to use fire-resistant mineral wool panels, basalt wool, expanded clay, and antiseptic-impregnated felt. Other recommendations:
- Use foil insulation if porous sound insulation is used.
- Insulating each wooden block from each other will prevent structural noise from occurring.
- Leave gaps between the walls, ceiling and floor, which are covered with roofing felt, this will avoid friction of the wood.
During installation, it should be taken into account that the greater the thickness of the total layer of insulating gaskets, the faster the sound wave of any range will be damped and dissipated.
Features of penetrating noise
All sound interference from which each floor must be isolated can be divided into two large groups:
- Shock (including structural noise and vibration)
- Acoustic (air)
The first type includes a working hammer drill, the sound of a child’s ball on the floor, the clicking of heels, or simply heavy steps. Acoustic waves include the sounds of a television or radio, voices, and music. Each of them requires its own protection option and therefore, insulation must be carried out comprehensively, taking into account all factors.
Calculation of the amount of material and its cost
Calculation of sound insulation between floors is made based on the following parameters:
- Sound insulation thickness, number of layers of base material.
- Installation technologies. If a roll sound insulator is used under the subfloor, then the size will be equal to the area of the interfloor floor. When felt is used on logs or beams, footage is added taking into account bends.
Installation of the ceiling at the construction stage requires one roll of roofing felt. When purchasing layers of mineral or basalt wool, the area for insulation is first calculated without taking into account the beam exits. The foil material, which is spread under the subfloor, is taken with a reserve, taking into account that the flooring must be carried out with the smell of the sheet.
Properly installed sound insulation between floors will ensure silence in the house and enhance heat conservation. The market offers a range of building materials for insulating floors during the construction stage and for finishing old interfloor floors, without dismantling the latter.
Conclusion
The technology of soundproofing floors for a wooden house, in contrast to brick and concrete buildings, has a number of features that are directly related to the design of the floors, their properties and sound-conducting characteristics. The methods described above will help to isolate or significantly reduce the penetration of sound waves between floors in frame cottages, as well as in houses made of rounded logs or timber.
Sources
- https://DrevoGid.com/zashhita/uteplenie/perekrytiya.html
- https://texnotoys.ru/otoplenie/mezhetazhnoe-uteplenie.html
- https://teploguru.ru/uteplenie/drugoe/mezhetazhnoe-uteplenie-ili-zvukoizolyaciya.html
- https://ProAntiShum.ru/shumoizolyatsiya-kvartiry/zvukoizolyatsiya-mezhetazhnogo-perekrytiya-po-derevyannym-balkam
- https://lestnitsygid.ru/kuda-vedut-lestnitsy/mansardy/shumoizolyaciya-derevyannogo-perekrytiya.html
- https://opotolkax.com/plita-perekrytiya/mezhetazhnoe-perekrytie-po-derevyannym-balkam.html
- https://obshum.ru/shumoizolyatsiya/mezhetazhnogo-perekrytiya
- https://moydomik.net/steny-i-perekrytiya/253-zvukoizolyaciya-derevyannyh-perekrytiy-chumoizolyaciya.html