4.8 / 5 ( 17 votes)
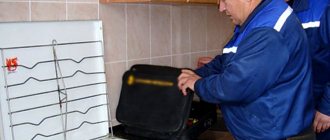
Installation and connection of a gas stove must be carried out under the supervision of the gas service. Gas is a source of increased danger; improper handling can lead to tragedy, including an explosion or death. Therefore, if you decide to install a gas stove in the kitchen yourself, you should adhere to the safety rules that we will discuss in our article. And also call the service so that it checks the reliability of the connection.
Dismantling the old device
Dismantling a gas stove and then installing a new one is not particularly difficult, but it also requires strict adherence to safety precautions.
- The first step is to turn off the gas supply valve on the lower side (you must make sure that this step is fulfilled, i.e. try to light the burner).
- Then the lock nut is unscrewed and the coupling is pushed down towards the device.
If the slab is old and was connected to the gas pipeline using a metal pipe, the nut or coupling may not budge due to the paint applied to it. Then this liner is cut off with a grinder (below the tap), and the remains are already unscrewed with a gas wrench.
- The kitchen appliance is moved a sufficient distance away from the wall.
- If repair work is planned, and the new slab will not be installed immediately, for safety reasons a plug is placed in the valve at the lower end.
Preparing tools
To install built-in equipment yourself, you will need the following tools:
- Construction level - needed in order to fix the hob perfectly evenly;
- a measuring device and a pencil - useful for marking the tabletop;
- electric jigsaw for “cutting” the hole;
- fastening elements - selected based on the model of equipment;
- a certified steel hose (up to 3 meters long) is an indispensable element when supplying gas;
- gas winding - will prevent fuel leakage at the junction of the hose and the gas pipeline;
- silicone sealant - will protect furniture from destruction by moisture and fungi.
Please note: the installation of gas equipment must be agreed upon with regulatory authorities, who must check the quality of the work done.
What do you need to know?
When installing a gas hob into a countertop, be sure to maintain a distance to the edges of the surface. It must be at least 5 cm on each side, otherwise when sawing it will be possible to destroy a wall that is too thin. The thickness of the tabletop itself also matters. It is not recommended to install embedded equipment in structures thinner than 38 mm due to low load-bearing capacity.
To check the tightness of connections when starting gas, a soap solution is used. Cover all nuts and joints thickly with it, checking these places for the presence of swelling bubbles - they indicate a leak.
Before starting full-scale operation of the stove, you should check its operation with different adjustment modes. The flame should not go out in any of them - this is very dangerous. If, when trying to check the change in combustion intensity, the adjustment does not change the supply of blue fuel, you need to turn off the stove, contact the service center or the seller. The product may be defective. Proper installation of a gas hob into a countertop in an apartment or private house allows you to comply with all regulations and ensure efficient operation of the equipment.
How to properly install a gas hob is described in the video below.
Sealing and sealing
Before installing a gas stove, you need to treat all cuts with nitro varnish or silicone sealant, which will protect the countertop from premature damage, getting wet, dirty, and swelling. You can also use a self-adhesive seal that performs the same functions. It is glued on top so that the edges of the hob rest on it.
To seal the edges, you can also use aluminum tape, which will also protect the tabletop from temperature changes. Remember that a high-quality seal can extend the life of the countertop, and it will not need repair or replacement.
How to build a gas stove into a countertop: step-by-step instructions
Built-in household appliances are no longer considered something extravagant and exotic. On the contrary, the choice of certain built-in kitchen appliances is much preferable for many, since it brings with it many advantages. A small kitchen, equipped to standard standards, often looks cluttered due to the large number of appliances. Hidden household appliances can make the interior harmonious and stylish.
Types of built-in slabs
@RemontSpravka.com
There are two types of stoves - gas and electric. Experts say that a gas-powered product is much more economical than an electric one. In addition, such a choice will help you cook faster, since heating occurs in a short time.
Electric stoves are installed on high floors in apartment buildings, are safer and come in a wide range of designs.
As for the oven, on the contrary, it is better to use electrical equipment. This model heats up quickly and distributes heat evenly throughout the food. You can bake, stew and dry in it. The only drawback of such an oven is its high cost. The price of built-in stove models really bites. But during operation you will realize that the costs were worth it.
Today you can find on sale combination hobs that combine two types of burners: electric and gas. This is a great help if there are frequent power outages and gas is used only in cylinders. The situation often arises among residents of villages and towns.
There are also types of built-in panels based on the type of material from which they are made:
- Enameled steel. It withstands high temperatures well, does not crack or become dirty from water drops and fingerprints. At the same time, it turns yellow over time.
- Stainless steel. More expensive than enameled ones, they are strong and resistant to high temperatures. But they show fingerprints, water stains and other dirt. Cleaning them is quite difficult.
- Glass ceramics. It looks chic and expensive, worth a lot of money. Requires daily care and is afraid of streaks of sweet food.
- Strained glass. In addition to its visual appeal, it is very strong, thick and durable. But it also requires daily care with special non-abrasive substances.
The choice depends only on the preferences and neatness of the hostess. The renovation budget also plays an important role.
Connection method: hose or pipe
Should I choose a hose or pipe?
There are two ways to install a gas stove at home and connect it to a gas source:
- With a hose.
- Pipe.
Today, the connection is most often made using a hose. At the same time, it is subject to requirements, which we will discuss below. When you buy a hose, you should immediately check its strength, flexibility and ask the seller for a quality certificate. After all, you are dealing with a source of increased danger - gas, and you cannot take risks.
The connection to the central gas pipeline is made directly. You do not build additional lines or nodes. If these are found during the check, you will be asked to reconnect.
Where to buy a hose? This can only be done in a special store or at branded points of sale. The seller must tell you about the characteristics and issue a receipt by which you can exchange the product. When purchasing, check the labeling; the labels should be yellow. Red and blue colors are used for water hoses. They are not so durable and if used when installing a gas stove in a kitchen unit, they will burn out.
Placement requirements: 4 prohibited places in the kitchen
The Code of Practice also sets standards for placement. Any unplastered wooden walls or other combustible structures must be insulated. The insulation layer should protrude beyond the dimensions of the slab by 10 centimeters on each side, and at least 80 centimeters on top. The distance between the device and the opposite side should be at least 1 meter. It is also necessary to observe the minimum distances to other household appliances specified by the manufacturer in the technical data sheet.
However, there are four places in the kitchen where installing a stove can lead to unpleasant consequences, and sometimes even to tragedy.
#1. By the refrigerator
We examined this case in detail in this article. Brief conclusions from it are as follows: you can put a gas stove next to the refrigerator, but then the refrigerator may break down. The stove will heat up its walls, so it will have to work constantly and at full power to maintain the optimal temperature inside. In addition, drops of fat will constantly accumulate on it, the handles and paint may turn yellow and crack, and when cooking you can only approach from one side.
This problem can be solved in several ways: place it at the recommended distance (it’s better to put a table between them, or design a cabinet), stick insulation on the refrigerator, hide it in a box, or take it out of the kitchen altogether.
#2. At the sink
It is advisable to place the stove at a distance of 50 centimeters from the sink. The explanation is easy: when using a sink, there is a high chance of extinguishing the flame. It is especially dangerous if this happens unnoticed: the gas will not be burned and will begin to fill the kitchen, which can lead to an explosion. Automation, the so-called “gas control”, can solve this problem, but it is better to be careful in advance.
#3. Near the window
In this case, the problem is similar to the previous point. If you install the stove next to a window, then any blow of wind may well blow out the flame, which will lead to a gas leak. Therefore, be sure to provide a distance of 50-60 centimeters from the window. And again, having “gas control” will help to cope with this problem, but it is better to avoid it in advance.
There is another nuisance: curtains and blinds on the windows. If there are strong gusts of wind, they can fall directly into the flame and a fire may occur.
#4. Microwave over stove
If the kitchen is compact, then you can often see microwaves or other household appliances placed above the stove. Although it looks beautiful and saves space, it is absolutely unsafe. All the hot air goes up, heating up the microwave very much, which can lead to its malfunction, rust or melting of the plastic parts of the case.
Do not place any household appliances above the stove. It’s better to install a more powerful hood there that can cope with hot air.
What is the difference between a built-in stove and a regular stove?
@vestnikao.ru
The first option, where the oven and stove are connected by wires, is more conservative. They are placed one above the other, as if an ordinary, free-standing slab was built into the wall. It is not possible to place them at a distance from each other.
Not many people like the outdated location option today. This difference significantly affects the choice of household appliances. Most new residents or people who have decided to undergo major renovations prefer built-in appliances. It can be arranged according to your taste and individual preferences, in advance, including in the project of the future kitchen.
The solid worktop and convenient location of the hob look aesthetically pleasing and provide comfort when cooking. In addition, pieces of food do not get stuck in the cracks, which in this case simply do not exist.