How to close the space under the bathroom with your own hands.
When the bathroom renovation is finally completed, the room finally begins to match the interior style that was chosen at the beginning. But in this case, one important problem arises - how to close the space under the bathroom. Yes, oddly enough, but free space under the bathroom can ruin all the creativity, originality and aesthetics of the design. Regardless of whether new equipment was installed or the old one remained, since it is quite functional and satisfies all the needs of the home owners, an original and beautiful screen, especially for steel and cast iron bathtubs, will be an ideal option for solving the problem and creating a unified composition.
Ways to close the space under plumbing fixtures
You can make a protective screen from the bottom of the bathroom from various materials. In this case, choose a stationary structure or a removable one. It is important to take into account that after installation there must be access to communications. This is necessary for pipeline repairs. Removable elements allow you to quickly gain unhindered access to them.
Manufacturers produce ready-made screens to cover the bathtub from below. They are made from moisture-resistant materials. This protects the panels from rotting when exposed to water.
Ready-made screens are produced in standard bath sizes. Installation of such an element is not difficult. The task can be completed by a person who does not have specialized knowledge and skills in construction. The parts are installed in accordance with the instructions supplied by the manufacturer.
You can make a stationary structure yourself. Tools will be required. Their list is different and is selected separately for each case. Before starting work, select the material with which you need to cover the bathtub from below. There are several options available for manufacturing.
Ready-made models
Often when renovating, owners wonder how to cover the bottom of the bathtub, and this question is very relevant, because there are several ways to design this area. Usually the finished version uses a classic curtain or screen to hide everything unnecessary from the eyes. Since the flooring and part of the basement space will be well hidden, you can store tools or chemicals for cleaning the room there.
Ease of installation and low cost allowed curtains to become the most popular. You can do this design yourself, thereby further reducing costs. Most often, plastic is used to make panels, as it is cheap and looks attractive. The curtain can also be made of metal, wood or glass. But these options will cost significantly more. Before you go shopping for a finished product, it is recommended to take measurements of the bathroom.
Stationary design
The partition is built in such a way that there is access to the space under the bathroom. An opening is left in the stationary structure. It is closed with a decorative door or false panel.
At the initial stage, an action plan is created. A drawing is attached to it. Markings are applied on vertical and horizontal surfaces. The correct location of the lines is controlled by level and plumb line.
Installation of stationary structures is possible from the following materials:
- Wood. To close the bathtub from below, wooden beams are used. They build a crate from them. The parts are connected to each other with threaded fasteners. To protect the wood from the negative effects of moisture, the beams are treated with deeply penetrating primer. The sheathing can be covered with plasterboard or plastic panels. Additional sound insulation may be required. The table below shows the sound insulation properties of different materials.
- Metal. The frame is assembled from a profile pipe or corner. The elements are connected by welding. This method requires the use of specialized equipment. Experience with a welding machine is required. The finished frame is covered with plasterboard. Installation of plastic or wooden panels is possible.
- Masonry material. You can close the bathtub from below with brick, cinder block, foam block, etc. It should be taken into account that this design has a large mass. When using this method in an apartment, an additional load occurs on the floor slab. The brick is laid on a cement-containing mortar. After it hardens, the finish is applied.
Installation of a stationary structure without an inspection hatch is unacceptable. If a leak occurs, access to the plumbing elements will be closed.
Thermal conductivity coefficient of various materials
Other options
In addition to screens of various designs, the space under the bathroom can be closed:
- ceramic tiles;
- podium;
- decorative curtain.
The bathroom looks much better if sewer lines and objects located under the bowl are not visible.
Tile finish
To cover the screen with tiles, you need to prepare the base.
To make it you will need brick or waterproof plasterboard. Many people prefer the second option.
Making a plasterboard base is easier and faster than laying a brick wall. Mount the material on a frame made of metal profile. The side and bottom horizontal strips are fixed with dowels.
Vertical racks are installed in increments of 50-60 cm. In the place where the inspection hatch will be, a kind of frame is made from the profiles, the dimensions of which correspond to the dimensions of the decorative grille.
Pieces of drywall are screwed with self-tapping screws. The finished structure is treated with a primer to increase the adhesion of the material. The tiles are laid on an adhesive mixture such as Ceresit.
To reduce the weight of the structure, you can use dispersion or polymer glue. Its main advantage is water resistance.
Laying begins from the most visible corner with a whole tile. It is better to use the material with which the walls are lined. Then the structure will be perceived as a single whole. You can cover the screen with mosaics. The rules for its installation are similar.
Bath podium
This design can be built in a large room
There are many options for arranging a podium. Here you can bring to life any ideas that are limited only by the dimensions of the structure.
The monolithic podium is made of brick or small blocks and lined with tiles, porcelain stoneware or mosaics. The steps are finished with anti-slip material.
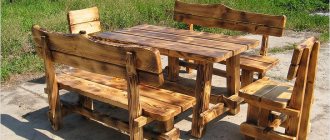
To make frames in the form of a podium, wooden beams are used. The structure is covered with wood, which is pre-treated with a special impregnation against rot. The top of the product is varnished.
The option with a podium does not provide the possibility of servicing communications, and in the event of a breakdown, dismantling of the structure will be necessary.
Curtain
You can cover the bottom of the bathtub with a cloth. Select a moisture-resistant fabric. This prevents the formation of mold due to regular splashes of water. Using a curtain, they provide free access to the space under the bathtub.
Before installation, measurements are taken and markings are placed on the canvas. Rings are sewn onto the edge of the fabric. They protect the canvas from damage when the curtain is regularly moved. When installing, a metal wire or thin tube is attached to the top of the bath. The curtain rings are hung on the guide.
Deaf
A blind screen is suitable for those owners who prefer to cover the bathtub with tiles. In this case, the structure cannot be disassembled or opened; it is completely closed, therefore it is very reliable. Usually the layout is made of brick, and after that finishing with tiled materials is used. But today it is very popular to leave the brick lining in its original form.
It is worth considering that with a solid structure, it is important to make a small opening, since humidity under the bathtub may increase, which will lead to an unpleasant odor. In addition, fungi and mold will begin to develop in the room. The opening is needed for air flow and ventilation.
Thanks to the brick lining, all communications will be carefully hidden, but it will not be possible to use the space under the bathroom.
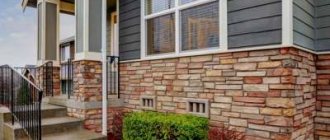
To finish the screen, you can use modern decorative stones, as well as colored mosaics and classic tiles, which were mentioned above.
Recommended reading: How to glue a ceramic border to a bathtub
How to properly cover a bathtub with panels
The screen can be made from plasterboard panels. For this purpose, moisture-resistant elements are used. After installation, it is possible to obtain a flat surface with the possibility of applying different finishes. This is how you cover the bottom of the bathtub with tiles. Installation is carried out in the following sequence:
- Marking. Use a construction pencil or marker. The correct location of the lines in the vertical and horizontal planes is checked with a level and plumb line.
- Frame assembly. Install a sheathing made of wooden beams or galvanized profiles. During assembly, an opening should be left for access to communications.
- Preparation of panels. Drywall sheets are cut to the required sizes. The material is cut with a construction knife with replaceable blades. The use of an angle grinder is unacceptable .
Violation of this rule will lead to the formation of a large amount of gypsum dust. If it enters the respiratory tract, it harms human health. - Installation of parts. The panels are screwed to the frame with self-tapping screws. To speed up the work, use a screwdriver.
- Application of primer. The layer is necessary to improve adhesion to the finish. The primer is applied with a roller or paint brush.
- Strengthening installation seams. At the junction of the panels covering the bathtub from below, a reinforcing mesh is installed. It is glued with gypsum putty. The composition is mixed with a construction mixer until the consistency of thick sour cream is obtained.
- Laying tiles. A specialized adhesive composition is used.
After installation, the tile seams are sealed. This eliminates the possibility of mold growing in the recesses.
Making a screen for a bathtub with shelves
Making and installing a screen under a bathtub is not that difficult. If everything is done correctly, such a multifunctional design will serve you well for many years.
Stage No. 1 – preparation of necessary materials
The wooden frame is made of timber with a section of 40x40 mm or a reinforced metal profile PN 27*28.
The standard parameters of a sliding screen are: length 148 or 168 cm, height, depending on the model, varies between 57-65 cm.
To carry out the work you need to prepare:
- carpentry tool set;
- building level;
- perforator;
- Bulgarian;
- sealant;
- polyurethane foam;
- "liquid Nails";
- construction knife;
- self-tapping screws and self-tapping screws.
When choosing the size of the screws, be guided by the thickness of the frame profile in order to prevent damage to the bowl during the installation process.
When planning to build a cabinet with sliding doors, it is also worth purchasing a U-shaped guide profile designed for sliding and wall-mounted systems
When planning to build a wooden frame, the wood blanks should be coated with 2-3 layers of special impregnation before installation. The primer will have a double effect: it will prevent the proliferation of microorganisms and protect the wood from moisture. In addition to wood, you can build a frame from other materials.
If you want to build a screen from plasterboard, use moisture-resistant sheets for the work. In places where there is likely to be contact with water, they must be additionally treated with a water-repellent primer or puttied.
Stage No. 2 - construction of the structure frame
The main mistake that some craftsmen make is that they make an error when determining the dimensions of the structure relative to the plumbing, and also do not take into account the material of the bathtub bowl when constructing the support.
Thus, an incorrectly calculated frame support can even lift a lightweight steel and acrylic bowl. As a result, the first time you try to draw water under the force of gravity, the structure simply deforms.
The construction of the frame is carried out in the following sequence:
- Markings are applied around the perimeter of the bath.
- Along the marked lines, the starting profile is fixed to the floor covering using dowels.
- Vertical profiles are mounted, maintaining an equidistant distance of 60 cm.
- An additional stand is made in the side supports and places where they plan to place a drawer or arrange a shelf.
The projection of the frame onto the floor is carried out using a plumb line.
The marking line for installing the frame should be laid along the entire length of the bowl; along the vertical plane it should be flush with the edge of the bathtub
When drawing a line for installing the frame, keep in mind that the finishing also has a certain thickness. So, when planning to cover the screen with ceramic tiles, it is necessary to “sink” the frame to the depth of the finishing layer.
It is much more convenient to wash the bathtub bowl or wash clothes in it if there is a recess for the feet on the outside. To provide a recess for the legs, the frame can be recessed under the front edge of the bowl by 10-15 cm. The width of such a recess should be about 30-35 cm.
The starting profile laid along the line is screwed onto self-tapping screws, fixing it both to the floor and to the adjacent walls. Approximately at the middle of the height of the side posts, horizontal jumpers are attached. They will add rigidity to the structure.
When planning to use a soft bendable material such as “lining” for cladding, in order to increase the rigidity of the structure, it is advisable to additionally secure the profile in the middle of the screen
To create a tight joint with the floor and prevent the penetration of moisture, the lower edge of the laid profile is sealed with sealant. In order not to damage the bowl with aggressive fastenings, it is advisable to blow out the top profile with polyurethane foam.
If you plan to install sliding doors, a guide profile is mounted along the top and bottom sides of the frame. Its length must strictly correspond to the width of the opening. The profile is fixed in such a way that there is no gap between the side wall and the rail.
Stage No. 3 – production of functional shelves
Built-in shelves can be built from chipboard panels left over from disassembled cabinets, the same plasterboard sheets or plywood.
A sketch or drawing will help determine their location and calculate the dimensions.
In order to make the most efficient use of every centimeter of space under the bathtub, the side shelves are made as deep as the entire width of the bowl
The width of the side shelves should correspond to the size of the niche formed between the wall of the room and the outer surface of the bottom of the bowl, minus the thickness of the limiting sections. When calculating, it is necessary to take into account the width of the metal frame profiles, which is at least 50 mm with a depth of 27 mm.
The dimensions of the frame and filling of the structure are determined by the dimensions of the niche. But the smoother the walls of the opening, the easier it is to equip a built-in wardrobe.
Water pipes can be hidden behind wall cladding, or located along the back wall of an improvised rack
Along the front wall from the floor to the side of the bowl, you can place a row of low modules of one or two shelves. When determining the number of shelves, make sure that the distance between them is sufficient to accommodate tall containers and bottles.
Having cut out the necessary fragments from the chipboards, they begin to assemble the structure. The cabinet shelves are connected in an open way. To do this, the top and bottom panels are fixed to the sidewalls with self-tapping screws. Before drilling holes for screws, it is advisable to perform preliminary markings.
In order to prevent the panels and sidewalls from moving during the process of tightening the screws, the connected parts are clamped with clamps or secured with masking tape
There can be any option for installing shelves. They can be attached to furniture corners, placed on dowels, or made removable by placing them on support rails. The back side of the structure can be left open, or it can be cut out of a thin sheet of MDF or plywood.
Stage No. 4 - installation of a drawer
The width of the drawer should be a couple of centimeters narrower than the internal width of the limiting sections. Otherwise, the retractable structure simply will not fit into the body.
To make a drawer, you will need guides. Their length is chosen based on the thickness of the walls of the box.
There are two types of systems on sale:
- samboxes - simple roller guides;
- tandemboxes are improved systems with a self-closer.
The simplest design option for a drawer is when the side walls are inserted between the front and back. Thanks to this solution, you can make the fittings invisible, and in addition there is no need to process the ends.
According to the dimensions of the side niche, you can also make a drawer, which can be conveniently used for storing bulky boxes and bags of detergents
The dimensions of the bottom should be 1-2 mm smaller than the dimensions of the box box. This assembled structure will have no protruding ends.
To prevent the bottom from sagging under the weight of the load, it is advisable to add a longitudinal or transverse stiffener to the bottom
The bottom of the box, most often made of fiberboard, is filled with 20 mm nails and “reinforced” with 16x4 mm self-tapping screws. When connecting parts, it is important to make sure that the diagonals are the same.
The roller system is installed on the bottom edge: first thin on the box itself, and then thick on the limiting sections.
Please note that the fastener head must securely fix the guide, but not rise above the bar
Having installed and secured the guides, the system is placed in its intended place.
Stage No. 5 - installation of closing sashes
The doors are done last. They are cut from MDF sheets according to the dimensions of the body. When planning to install hinged doors, you must purchase two hinges in advance for the top and bottom.
In the door, maintaining a distance of 7-10 cm from the edge, using a 35 mm cutter, make a hole 12 mm deep for installing the hinge “cup”
Having installed the “cup” of the hinge, screw in the screws. To attach the sash to the structure itself, the door is installed so that it does not extend beyond the edges of the hole made under it. Using the adjusting screws, the correct position is adjusted.
When installing hinged sashes, it is necessary to ensure that the edges of the sashes and the ends of the wall coincide. The gaps should be the same along the entire contour.
Some models use magnets to secure the doors. The master’s task is to unscrew the shutter screw and adjust the position of the door so that the magnets coincide.
Bathroom podium
The plumbing product can be installed on the podium. This option is suitable for rooms with a large area. You can make a podium of two types:
- Carrier. It is made in the form of a frame for installing sanitary ware. Reliably holds the walls of the bathroom. Pipelines of the water supply and sewerage systems are installed in a hidden way. During construction, an opening is made to provide access to communications. It is closed with a door or false panel.
- Decorative. The plumbing product is installed on a separate frame. The podium performs a decorative function. To assemble it, use a lathing made of wooden beams or a profile pipe. The outside of the frame is covered with plasterboard.
When making a podium in the bathroom, materials that are resistant to the negative effects of moisture are used.
Capital brick screens
A reliable brick foundation is inexpensive and, perhaps, the simplest of all options. The construction of the screen involves laying half a brick on cement mortar in a dressing. Next, the structure is covered with tiles or any other available material. Minor curvatures of the masonry can be easily corrected by increasing or decreasing the amount of tile adhesive layer.
Capital brick screen for bathtub Important! When installing a screen wall, you should always leave a technological hole for quick access to pipes and eliminating leaks.
Use of plastic
You can close the bathtub from below with a homemade screen. It is assembled from ceiling or wall plastic panels. Installation can be carried out by a person with minimal technical knowledge.
Guides for plastic are installed around the perimeter. They are fixed with self-tapping screws. Plastic panels are inserted into the guides. The elements fit together into a groove.
The plastic screen is resistant to the negative effects of moisture and is easy to clean. The surface is cleaned of dirt with a damp cloth. Do not use abrasive substances for cleaning.
You can close the bathtub from below yourself in different ways. When choosing, take into account the need for additional space and the availability of free access to communications. For installation, materials are selected that are not susceptible to the negative influence of a humid environment. Have you closed the bathtub from below yourself? Which method was used? Leave comments, bookmark the article and share it on social networks.
In the video below, the author of the video will tell you how to properly make a screen for a bathtub.
General information
In order to arrange such a box, it is not necessary to call specialists, since it is not difficult to make it yourself. There is always free space under the bowl that can be used wisely. Even if the bathroom was made in the same color scheme and completely matches the interior, the niche located under it can always be useful. This is especially true for small bathrooms, in which the screen below, which was built with your own hands, has drawers and even shelves.
Please note that an important aspect is that if the box is solid, then you should definitely make a door under the bathroom for inspection, as well as to make it more convenient to service the communication systems.
It turns out that the drain, bathtub legs, pipes, sides from old equipment, which do not have the most pleasant appearance, can be easily repainted and beautifully covered. There are several options for creating a functional space, and each of them can be brought to life with your own hands.
Method 2: Make a vertical drawer from the end of the bathtub
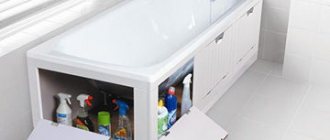
The free space between the bathtub and the wall can also be closed with a vertical storage box. You can order it or make it yourself from drywall and put it on wheels (that is, make it like a bottle bottle in the kitchen). This functional box can easily accommodate bottles of shampoo and household chemicals.
By the way, if the space between the bathroom and the wall is large enough, you can install a washing machine here by organizing a niche for it.
If you choose, then quality! Pay attention to Smeg washing machines with stainless steel drums. They have up to 15 washing programs, a foam suppression system, overflow protection, and some models have a special program for cleaning the machine from fabric fibers.
Smeg washing machine From RUB 122,590. +7
Smeg washing machine From RUB 113,820. +7
Construction of a removable screen
The factory-made removable screen has standard dimensions, which do not always correspond to the dimensions of the opening under the bathtub.
The owner of the premises can equip a homemade panel from OSB chipboard with a decorative covering of tiles or mosaics.
Additional materials for making the screen will require a wooden block with a cross-section of 20×40 or 40×40 mm and furniture racks with adjustable reach.
Algorithm for making a homemade removable screen:
- Cut a blank from the slab that matches the opening under the bathtub. The height of the panel is 40-50 mm less than the window, allowing the installation of supports.
- Attach a wooden block located on the lower edge to the rear of the screen. The elements are connected with screws, which are screwed through pre-drilled holes in the slab.
- Screw the legs to the body block. The resulting clearance allows you to stand right next to the bathtub, with your feet placed in a niche.
- Glue tiles or mosaics to the external surface; installation of inspection hatches is not required. The finishing uses silicone sealant, which protects the end edges of the decor from exposure to water.
- Grind the seams and then install the panel under the bathtub. Adjust the position of the structure using screw mechanisms in the supports. The screen is held in place by pressing the top edge firmly against the side of the tub. If the structure is unstable, then additional stiffening ribs will be installed on the rear of the panel.
What to do if the bathtub is of non-standard shape
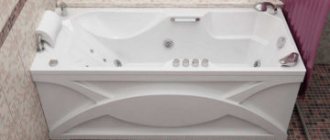
Acrylic bathtubs may have a complex geometric configuration of the front side, which does not allow attaching standard tiles. To decorate the surface, a mosaic on an elastic backing is used, which goes around the uneven contours of the protective bulkhead. The mosaic backing is not destroyed by moisture; the gaps between the tiles are filled with grout paste with antibacterial additives.
Frame assembly
Frame assembly algorithm:
- Determine the length of the curved line of the base of the frame.
- Cut a piece of a metal U-shaped profile that will be laid on the floor surface. To ensure bends, cuts are made every 25-30 mm on the side flange and the lower part of the profile.
- Place the cut element on the bottom edge of the bathtub; masking tape and silicone sealant are used to fix the position of the segments.
- Use a level or plumb line to transfer a curved line to the floor corresponding to the shape of the side.
- Make a floor section of a curved profile, which is secured with sealant or screws to the floor. The rail is installed deep into the niche at a distance corresponding to the total thickness of the screen, tiles and adhesive composition.
- Install end metal strips on the walls, connected to curved profiles with screws.
- Mount vertical reinforcements and provide a frame for mounting the inspection hatch.
Covering a curved frame
To install a decorative covering you need:
- Cut strips 150-200 mm wide from plasterboard or expanded polystyrene.
- Secure the panels in a vertical position using screws. When using plasterboard, it is necessary to cut the cardboard base into strips 30-40 mm wide, which allows the part to be bent in accordance with the curvature of the profile.
- Sew up the surface of the frame, providing a slot for the inspection hatch.
- Plaster the joints using a gypsum mixture; a synthetic fiber mesh (serpyanka) is used to reinforce the joint. When using polystyrene foam, the connection lines are filled with silicone sealant.
- Cover the surface of the screen with a moisture-resistant putty that smoothes out unevenness.
- Wait for the surface to dry, sand the putty layer and treat with an acrylic primer.
- After the moisture has evaporated, a mosaic is glued onto the surface of the screen.
After crystallization of the glue, the joints are grouted with mastic with the addition of antifungal additives. Folding or secret inspection hatches are installed in the cut-out windows. It is possible to install additional mirror elements that visually increase the size of the room. When arranging the screen, you can install metal coins to which magnetic shelves are attached for storing small items.