As we already wrote in the article about cast iron bathtubs, they are afraid of one thing - damage to the enamel. How to paint a cast-iron bathtub and what is the best way to do it if you have damaged its internal coating? In this article you will find 3 possible options with step-by-step instructions and all their pros and cons, as well as a description of the “bath in bath” method.
Painting a cast iron bathtub
The most logical method of restoration seems to the average person to be painting the bathroom.
The advantages of this method:
- the cheapest;
- quite simple;
- no need to dismantle the bathroom;
- can be painted any color.
Minuses:
- smell;
- dents and chips on the surface of the bathtub will still be noticeable;
- will last from 10 months to a couple of years if you use quality paint and apply it correctly.
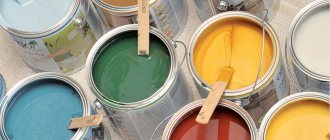
Paint selection
Not just any paint is suitable for restoring a bathroom by painting, since there will be constant contact with water, temperature changes and mechanical friction of the surface. You will need special paint and you can find it among the following manufacturers:
- Dulux (Great Britain) is a leader among manufacturers of paints and varnishes. To paint the bathtub, you should stop at “DuluxRealifeKitchen&Bathroom”;
- Tikkurila (Finland) is a paint manufacturer known for its quality. For the bathroom, take the Luja painting system (primer + paint);
- Jobi (Germany) – good quality at an affordable price. For bathroom painting, stop by JobiWaschFest. This paint is moisture-resistant and is intended for rooms with special conditions, which definitely include the bathroom.
You can, of course, paint it with regular paint, but such a coating will only last one or two weeks. It’s unlikely that you expect such a short-term effect from the restoration, so it’s better not to skimp on paint and buy high-quality paint right away.
Required Tools
To paint the bath you will need:
- roller or brush made of natural bristles 70-90 mm wide. If you prepare two, it will be even more convenient, since if during the painting process the brush gets dirty (especially with something greasy), then you cannot continue working with it;
- drill with grinding attachment;
- a paint knife and tweezers - for caring for the brush when bristles come out of it (this is quite normal for a new one);
- acetone or solvent No. 646. Do not use others!;
- rags made of cotton, calico, flannel or microfiber cloths. The main thing is that there is no lint.
Dyeing process
The dyeing process can be divided into 3 stages:
- Preparatory work.
- Direct coloring.
- Paint drying.
Preparing for coloring
Preparatory work for the restoration of the bathtub consists of removing contaminants from the surface. This is best done using alkaline household chemicals. After using it, the bath should be rinsed well and wiped dry.
Alkaline household chemicals burn the skin, so you should wear rubber gloves when handling them.
Next, degreasing is carried out with a special chemical composition. You can take a car. Alternatively, you can use regular Fairy dishwashing liquid, but you will need to leave it on the surface of the bath for a while (20-30 minutes) before rinsing. The procedure will need to be repeated 2-3 times.
You can check whether you have degreased it well using a stream of water. If, when watering the walls from the shower, you do not see any drops or streaks, then the fight against grease on the surface can be considered complete.
The preparatory work does not end there. You need to remove the layer of enamel or paint that currently covers your bathtub. This is done using an electric drill with a special grinding attachment. You can remove all the enamel or just the top layer - your choice.
Before applying paint to the surface, it must be cleaned of dust and dried. Drying can be done with a hair dryer or by waiting - the bath will dry itself in a few hours. After this, a primer is applied. It can be applied using a brush, roller or flexible spatula.
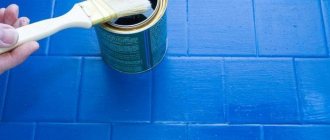
Painting a cast iron bathtub
The process of painting the bathtub should begin after the primer has completely dried. First you should paint the sides. The paint is applied in a thick layer and gradually flows down the sides. The sides of the bathtub are painted in the same way, but taking into account the paint already on its surface. Try to keep the layer as even as possible after dripping. Painting the bottom of the bathtub involves distributing the paint that has drained from the top.
Best answers
Irima:
buy a bath liner. or install a new one, minus all costs from the rent.
Evgenia Voldkova:
The main thing is that the hostess is pretty and doesn’t mind showering with the swami, but lying with her is not the main thing! ;-))
Bolshevik cats:
Well, degrease and paint with alkyd enamel.
Sergey Vasiliev:
We painted the shower tray with white enamel 3 times, several years passed, nothing happened, not even yellowed from the water...
647 acc:
It’s not worth the candle, don’t even think about it, especially in a rented apartment!! ! We hired bathtub enamel painters, the paint literally peeled off within a week, we called them to redo it, and history repeated itself. So we bought a new bathtub...
ENLIGHTENED:
To prevent the enamel from peeling off, you must first clean it well (sand the bathtub), then apply a layer of primer, sand it again and then apply the enamel. Moreover, you also need to know which enamel to cover. In short, hemorrhoids, but if you do everything correctly, the coverage will last for a long time
Restoring a bathtub using epoxy enamel
The oldest way to restore cast iron bathtubs is to apply new enamel. It has been widely used for more than 20 years. The process of applying enamel is somewhat reminiscent of the painting we discussed, but the composition is completely different. There are only 2 categories of compositions: professional and for self-restoration.
Professional epoxy enamel compositions are more liquid. They are applied in several layers, so the process is quite long and labor-intensive. Self-applied formulations are thicker and easier to work with.
Bath enamel, which comes in aerosol cans, is easy to apply but will last a maximum of a year.
Advantages of restoring bathtubs using epoxy enamel:
- quite a cheap way;
- no need to dismantle the bathroom;
- Suitable not only for cast iron, but also for steel bathtubs.
Disadvantages of this method:
- takes a long time to dry (up to a week);
- long and labor-intensive process;
- unpleasant odor;
- the coating is very sensitive to shock;
- the service life of new enamel rarely exceeds 5 years;
- does not cover dents and chips;
- Even if everything is fine with the enamel and you haven’t damaged it in any way, in a few years it will turn yellow.
Tools for restoring a bathtub with enamel
To restore a bathtub using epoxy enamel you will need:
- a spray gun or roller if professional enamel is used, or a flute brush if the enamel is for self-application;
- a paint knife and tweezers will be needed to carefully remove stray brush hairs;
- drill with grinding attachment.
Enameling process
The process of applying enamel to the surface of the bathroom can be divided into the following stages:
- Preparatory work.
- Direct application of enamel.
- Drying.
Preparatory work
The preparatory work is the same as when painting a bathroom, so we will not repeat it. You can read above.
Applying enamel
Before application, the enamel should be prepared according to the instructions on the package. There is no need to mix the entire composition at once, do it in portions, as it begins to set quite quickly (40-45 minutes), and application in 2 layers takes quite a long time.
If you apply a professional composition, then you can use a spray gun. But for home application, it is better to choose special mixtures that are thicker and suitable for application with a regular flute brush.
To apply enamel to the surface of the bathtub, wet the brush generously and draw a vertical stripe from the bottom to the edge. Then you should rub the enamel on the sides as hard as you can. The next strip should be drawn side by side so that its “rubbing” is enough to reach the already treated area and by repeated rubbing you will cover about half of the previous strip. So, overlapping, the first layer is applied. Wait 15-20 minutes and apply the next one.
The second layer is applied from the same place as the first. The direction of application must correspond exactly to the first layer. This is the only way the coating will turn out beautiful and uniform.
How to remove streaks and sagging enamel during application?
When applying enamel to the walls of the bathroom, drips and sagging of the material often form. Their occurrence should be controlled. They usually become noticeable within 10-15 minutes after application, so keep an eye on the areas covered as you work.
To remove streaks, you need to make a brush stroke without material upwards to the place of smearing. Sagging that forms on the edges of the drain holes must be removed after the enamel has hardened. To do this, use a painting or mounting knife.
When is the bathtub ready for use?
After applying the enamel, it is necessary to close the bathroom for 3-7 days until the new coating dries completely. The longer you pause before first use, the less chance that the enamel will peel off.
Surface preparation
To properly paint a bathtub with any type of enamel using pouring, spraying or classic brush/roller technology, you need to perform a number of steps to prepare the surface:
- grinding - with medium-grain sandpaper P-40 - P-60, the enamel layer is roughened for better adhesion to the repair compound;
Treatment of existing coating with abrasive material. - rust removal – areas with traces of corrosion must be cleaned down to the metal base; areas where the existing paint begins to peel/crack are treated in the same way;
- dust removal - abrasive, dust, dirt from previous work is removed with a vacuum cleaner;
- heating – pour hot water into a bowl for 10 minutes;
- dismantling - there is no need to remove the bathtub, you should unscrew the handles, headrests, drainage and overflow systems, faucets embedded in the side, shower head holders, and additionally treat these areas with sandpaper;
Dismantling of overflow and drain systems. - drying - a technical or regular hairdryer removes the remaining moisture on the inner surface;
Processing the bowl with hot air. - degreasing - in the instructions for enamels, each manufacturer must indicate which solvents can be used to degrease the surface.
Degreasing of sanitary ware from the inside.
The industry produces special preparations that convert rust into harmless chemical compounds. They can be used in the second stage instead of sanding.
Rust converter.
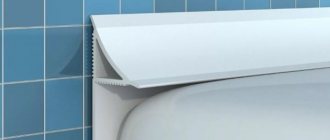
At the last stage, the junction of the bathroom walls with the side of the bowl is covered with masking tape.
Taping the bathtub around the perimeter with masking tape.
Place a container under the drain hole in case of paint leakage. It is enough to seal the remaining holes with several layers of tape on the reverse side so that the coating lies in the necks completely over the entire depth.
If there are deep scratches or chips of the factory enamel, these areas must be puttied. Otherwise, the depressions will be visible under the newly applied coating.
Bath putty.
For this purpose, automotive quick-hardening putties or special repair compounds for plumbing products are used.
Restoring a bathtub using acrylic
One of the most modern methods for restoring bathtub enamel is restoration with acrylic. You can find it on sale under the name “Stakryl”.
Advantages of the method:
- with proper application and careful use, such a coating can last you 10 years or more;
- a professional does this work in 2-3 hours. You will need more time, but the process itself is simpler than applying enamel;
- attractive appearance - after application and drying you will see a smooth glossy finish;
- no unpleasant odor.
Disadvantages of the method:
- if you scratch the acrylic layer to the bottom in some place, it will very quickly begin to collapse and lag behind the surface;
- the cost is higher than with enamel coating;
- Drying takes 2-3 days.
Tools for bathtub restoration with acrylic
To restore a bathtub using acrylic you will need:
- flute brush or roller;
- flexible spatula;
- a paint knife and tweezers for carefully removing stray brush hairs;
- drill with grinding attachment.
Acrylic application process
The process of applying acrylic can be divided into 3 stages:
- Preparatory work.
- Direct application of acrylic.
- Drying acrylic.
Preparatory work
Preparatory work is similar to the methods described above. Read more about this in the section on painting with paint.
Applying enamel
Acrylic is more liquid than enamel for home application, so it is most convenient to apply it using the pouring method in a tapering spiral from the edges of the bathtub to the drain. Be very careful! Unfilled fragments can be filled with material using a flexible spatula. With its help, the edges of the bathtub and its bottom are leveled.
If bubbles appear during the application process and do not burst on their own, then they must be carefully broken through with a brush.
The second method of applying acrylic is similar to painting. For application, use a brush or roller.
When is the bathtub ready for use?
After applying acrylic, it is necessary to close the bathroom for 2-3 days so that dust and other dirt do not get on the surface before drying.
Preparatory work
Practice has shown that restoration of enamel on a cast-iron bathtub occurs according to the same scheme: preparing the bathroom - cleaning the plumbing - washing the bathtub - dismantling the siphon - degreasing the surface - protecting the floor and walls from paint, acrylic, glue - restoring the enamel.
All points, except the last one, relate to preparatory work. Therefore, we will put this type of work into a separate section and consider it in detail.
Materials and tools
To carry out preparatory work you will need:
- old newspapers or packaging cardboard;
- polyethylene film;
- acetone or white spirit - degreaser;
- "Tsinkar" - rust converter;
- approximately 5 rolls of P60 sandpaper;
- 1-2 rolls of P600 sandpaper (people call it “zero”);
- scotch;
- masking tape.
Will help you with your work:
- electric drill or screwdriver with an attachment for grinding enamel;
Electric drill with grinding attachment.
- knife or scissors;
- slotted screwdriver;
- soft, lint-free rags - needed for work with grease solvent and rust converter;
- respirator.
Preparing the bathroom for work
In the room where the enamel of the cast-iron bathtub will be restored, there should be no unnecessary objects that could fall on the newly applied layer of paint, as well as household appliances - dust from the grinding wheel can get even into places protected by film. Therefore, personal hygiene products are taken out. The curtain and holder are removed. The washing machine is moved into the corridor or wrapped in film.
The ventilation hole is covered with paper - this prevents drafts that can carry dust from the apartment onto the undried paint. In a combined bathroom, metering devices are protected from dust with plastic film and tape.
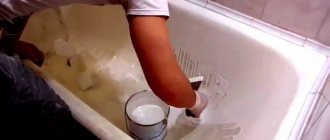
Cleaning the bathtub surface. The liquid consistency of the paint does not allow you to hide the slightest flaws in the surface being painted. Therefore, it must be perfectly smooth, while still clean and dry. It is difficult to achieve this condition of the enamel coating of an old bathtub. It takes significant effort and time.
First, the peeled parts of the coating, rust and dirt accumulated in microcracks are removed. Work is carried out either manually, using P60 sandpaper, or using a power tool with a grinding attachment.
Rusted areas are treated with a rust converter and then sanded. Chips and cracks are filled with car repair compounds. Cleaning should be carried out over the entire surface of the bowl, paying special attention to the curves of the bath.
Attention: when working manually, it may be difficult to hold the sandpaper in your hands. A simple small block of sandpaper around which you can wrap will help.
The process is completed by passing fine-grained sandpaper over the entire surface of the bath. The initial movements are rectilinear, the final ones are circular. After the operation is completed, the sides and bottom of the font are rubbed with the palm of your hand to reveal the smallest irregularities. If problem areas are found, work with sandpaper is resumed.
Washing sanitary equipment. Any grinding work is accompanied by the formation of a dust cloud, which settles on the ceiling, walls, and surface of the bathtub. It is imperative to remove dust - it may end up on fresh paint. Therefore, the ceiling, walls and plumbing (taps, mixer, sink) are washed with hot water from a shower hose. The bowl itself is thoroughly washed with liquid detergents.
Disassembling the siphon. It is unlikely that it will be possible to protect a drain with overflow from paint. It's easier to remove them. For this:
- All water supply taps to the bathroom are closed. If this is not possible, you need to make sure there are no leaks at the taps. If they exist, repair work is carried out;
- remove the drain with overflow using a screwdriver: unscrew the mounting screws. If they are rusty, you will have to use brute force and buy a new drain pipe. It is not necessary to remove the corrugated pipe from the sewer pipe. If an unpleasant odor appears, plug the drain and overflow holes with a rag.
Degreasing the bath. Paint does not adhere to a greasy surface - work is required to degrease the enamel. To do this, wipe the bottom, walls and sides of the bathtub with a rag soaked in acetone or white spirit.
In this way, it is possible not only to remove fatty deposits, but also to remove remaining dust and dirt. After wiping, wipe the surface with a well-washed but dry palm. Hand pass along the sides and walls from top to bottom, driving the remaining fibers to the bottom. The dust particles are removed from the bottom into the drain hole.
Protecting the room from paint drops. You can paint the bathtub with a brush or using a spray can. In both cases, there will be tiny droplets of paint on the wall and floor that are difficult to remove. You can protect them using old newspapers and plastic film. The paper is laid overlapping on the floor and secured with masking tape (adhesive tape), the walls are covered with film. The sink and faucet with taps are also closed.
The walls are covered with polyethylene.
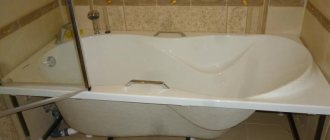
Restoration “bath within a bath”
The “bathtub-to-bathtub” restoration method involves installing a new acrylic liner inside an old cast-iron bathtub, which completely matches its shape.
Advantages of the method:
- perfectly smooth coating;
- durable acrylic;
- service life – about 15 years;
- no unpleasant odor;
- can be used already on the first day after installation;
- the surface will not turn yellow.
Disadvantages of the method:
- high price. Especially if your bathtub is of non-standard sizes and requires custom-made liners;
- impossible to do on your own;
- the mounting foam with which the insert is attached may move and then cracks will appear;
- the liner may peel off and an unpleasant musty odor may appear due to the constant formation of condensation between the liner and the bathtub;
- it will not be possible to do repeated restoration or repair;
- When installing, you will have to remove part of the wall covering at the edges of the bathtub.
Paint selection
To carry out the work, you need more than ordinary paint, so it is important to know how to paint a bathtub at home. Specialized compounds are represented very widely on our market. (see also: bath paint) When purchasing one of these, try to carefully study the instructions and consult with specialists.
Manufacturers of coloring compounds:
- Tikkurila is a well-known Finnish manufacturer. Its compositions make it easy to carry out work. They are made from moisture-proofing primer and dyes. The resulting tone depends on the dye used. It can be glossy or more matte.
- Dulux is one of the leaders in the creation of paint and varnish compositions. They produce special paint coatings for the bathroom, which they use for restoration.
- Jobi is a German manufacturer. He is distinguished by a pedantic approach to the quality of his product. The price of the product is acceptable for the average consumer. There is a separate brand for wet rooms, the surface can be washed, and is used in difficult conditions.
In addition to various manufacturers, the modern market offers compositions that differ in color. In addition to the usually snow-white paint, blue, pink and light green shades are increasingly common. And many buyers pay attention to the latest tones.
This is due to the fact that with their help it is possible to better disguise the resulting darkening. In addition, the question of how to paint the outside of a cast-iron bathtub is being resolved. In this case, the bath will look much brighter and more unusual. And with the help of its new look you can completely transform the interior of the room.
Why can't you use regular paints?
When wanting to paint a bathtub, some people make the grave mistake of choosing ordinary paints. They are not only not resistant to wet environments, but also have a low degree of adhesion. This subsequently leads to paint peeling off the treated surface.
Moreover, a similar situation will happen in a very short time. That is why, when answering the question of how you can paint a cast-iron bathtub yourself, all experts pay attention to professional compositions.
The mixture consists of individual components that must be mixed together immediately before starting work. During application, the curing process begins. This occurs because the solvent begins to evaporate from the solution.
In other words, a chemical reaction takes place.
Tips and tricks
- To clean the bathtub during the preparation stage, do not use chlorine compounds.
- It is better to paint and enamel the bathtub in the warm season, so that the apartment or house can be ventilated.
- Before applying paint, primer, enamel or acrylic, you must remove the cuffs and seal the hole with masking tape.
- During the painting process, do not touch the bristles of the brush with your hands. The paint will come off faster from any fat in the future. Better stock up on several brushes for work.
- Never touch the bathtub with your hands while applying paint, enamel or acrylic!
- After restoring a bathtub using enamel or acrylic, it is necessary to replace the cuffs and gaskets, as the drain holes will become narrower and the walls of the bathtub will become thicker.
- To make your bathtub with acrylic coating last longer, apply 2 layers of the material. Then it will be more difficult to scratch it through.
- The acrylic liner can only be installed in high-quality cast iron bathtubs. It is not suitable for bathtubs made of “light cast iron” with thin walls.
Whether it is worth restoring the bathtub and how exactly to do it is decided by the owner of the bathroom and the plumbing item. Of course, no restoration lasts forever, but if you don’t have the money to buy a new one, but you want to take hygiene procedures in comfort, then you should definitely do it!
How to paint a bathtub with waterproof paint yourself. Advantages and disadvantages
To use the method it is not necessary to have a specific set of professional skills.
Pros:
- Cheaper than acrylic and epoxy enamel;
- There are no restrictions on the choice of paint color;
- Easy to use.
Minuses:
- The need for a primer;
- The presence of an unpleasant odor;
- Does not remove chips and dents, provides visual color;
- Long drying time - from 3 days.
Benefits of coloring
How to cover a bathtub with liquid acrylic: pouring and restoration
Painting has such advantages over other cladding methods, such as:
- Acceptable price. Tiles, PVC panels or textured plaster are more expensive than paint. The purchase of related products (glue, guides for the frame, grout) increases costs. For painting you will need a roller, putty, primer, and painting tools. Even taking into account the need to repaint after 3-5 years, such repairs are cheaper.
- Easy to use. Laying tiles requires some skill. It is difficult for a person without experience to install the facing material accurately. It is easier to cover a bathroom with panels, but precise markings and frame assembly are required. The most difficult stage of painting is preparing the surface.
- A large number of design options. Modern coloring compositions are distinguished not only by good performance characteristics, but also by a variety of colors and textures. Designers are developing many ways to apply the facing. Stencils and textured rollers make the process of wall repair easier.
- Practicality and durability. The coating formed by the paint is easy to clean, does not fade, and does not turn yellow. When applied correctly, the layer does not crack or move away from the base. Defects arising from mechanical stress are removed with putty, and the paint layer is replaced.
Repairing Damage
Of course, you may be lucky if you don't have to fix anything, but in this case you would hardly think about restoration. Since worn cabinets won't always be in fashion, I recommend repairing any structural damage. Today you can find replacement cabinet doors in specialized stores, but if you want doors that cannot be repaired to be replaced with ones made in a different style, use a little plywood, cotter pins, wood glue and, of course, imagination. This will help give the furniture a more modern look.
Why men become infected with COVID-19 faster: Dr. Myasnikov’s explanation
Experts: every fifth schoolchild in Russia is overweight
Chinese rover provides first high-definition footage of Mars