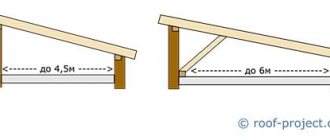
The popularity of acrylic bathtubs varies over time. From their first appearance, they were in quite high demand among users, the main reason for this state was the successful advertising campaign of the manufacturers. But then users began to realize that the actual disadvantages were much greater than the advantages. Moreover, only bathtubs were sold; no special frames were included in the kit. The plumbers themselves solved the problems by increasing their stability, using various brick linings under the bottom, strengthening the sides with masonry, etc.
Now the strength of acrylic bathtubs has increased slightly due to metal frames. The frame increases mechanical stability, but greatly complicates the installation process. And it not only complicates it, but also puts forward additional requirements for wall finishing materials.
Installing an acrylic bathtub on a frame
Acrylic bathtub on frame
Before buying a bathtub of this type and starting installation of equipment, it would be useful to find out the actual performance indicators of the product. What do manufacturers promise consumers and what really is?
| Indicator of acrylic bathtubs | Actual Specifications |
Excellent heat retention | Indeed, the thermal conductivity of acrylic is slightly lower than that of metal. But due to the small thickness of the walls, this advantage is actually neutralized. Heat transfer can be reduced by additionally foaming the reverse side with polyurethane foam. Exactly the same operation and with the same effect can be done for metal baths. The conclusion is that the advantage is insignificant. |
High performance characteristics of the external coating, environmental friendliness of the material | This is a myth; high-quality enamel used for metal bathtubs is superior to acrylic coatings in all respects. There is another drawback - absolutely all polymers release chemical compounds into the air, and the amount of emissions especially increases with increasing temperature. Safety indicators are regulated by decisions of local regulatory authorities and, depending on their integrity, differ significantly from country to country. What is considered unacceptable in Europe is completely permitted at the official level in China, etc. Conclusion - there cannot be completely safe acrylic bathtubs in principle. As for color stability, innovative fillers only increase the resistance of acrylic to harsh ultraviolet rays, but cannot completely protect against their harmful effects. |
Maintainability | With great effort, bathtubs produce cracks that can be repaired. The work is quite complex, but accessible. This is true. It is also true that metal bathtubs do not suffer any damage at all from the same loads and, accordingly, there is no need to repair them. And today all users can do the restoration of old enamel to eliminate natural wear or mechanical damage on their own. |
Load-bearing characteristics | According to this indicator, acrylic bathtubs are inferior to absolutely all analogues. It is for their enhancement that metal frames are used. But they cannot completely insure products against critical deformations. |
Variety of shapes | This is true. The production technology is so simple that it makes it possible to give bathtubs various geometric shapes. Only one question arises - why, with simple technology and low cost, manufacturers set such a high price. |
There is another very unpleasant feature of acrylic bathtubs. They can only be installed in rooms that have a concrete base under the floor and brick walls. It is not recommended to attach bathtubs to walls made of foam blocks and it is strictly forbidden to fix plumbing fixtures to walls made of moisture-resistant plasterboard slabs. These conditions must be met without fail.
Bathtub fixing
We will explain the reasons for such strict requirements in the installation instructions.
Install the legs
The first step is to attach the legs, which are usually included in the kit. To do this, turn the bathtub upside down without removing the packaging from the sides, and assemble the brackets according to the instructions. Depending on the material of the bathtub, the legs and their fastenings differ.
Acrylic bath
YouTube channel Cersanit Romania
These bathtubs have a special reinforcement insert made of plywood in the lower part, onto which the mounting plates are attached with screws, and the threaded rods of the legs are screwed to them.
You need to mark the mounting points in accordance with the instructions, then drill holes for the screws to the specified depth and tighten them with a screwdriver. To avoid making holes in the bathtub, use only the supplied self-tapping screws that have the calculated length.
Steel bath
YouTube channel “Alexander Cherepitsa”
Steel analogues are equipped with a pair of support-lodgments, which are glued with double-sided tape and pressed down with the weight of the bathtub. Another fastening option is four separate legs, fixed with special hooks on the bottom.
YouTube channel “Ruslan Viktorovich”
In the first case, it is necessary to degrease the surface with white spirit or another solvent and stick the supports. In the second, put the legs on the hooks and tighten them together with studs and nuts.
Cast iron bath
YouTube channel Craftstroy
Cast iron bowls also have four separate legs, which are attached to protrusions specially cast on the bottom with holes for bolts.
To install, you need to align the legs with the protrusions, secure them with bolts and nuts and tighten them with a wrench.
Do-it-yourself technologies for installing an acrylic bathtub
When deciding how to properly install an acrylic bathtub with your own hands, they use modern technologies used when carrying out work by repair and construction firms and organizations. For self-installation, no specialized construction tools are required, except for a hammer drill, which is used to drill and install grooves, and any homeowner will have screwdrivers, a hammer and a hacksaw. For proper installation, a building level is required; for certain work, a grinder with a disc for concrete and metal, and a screwdriver, if available, will not hurt.
Assemble drain fittings
The siphon and overflow system have the same design, regardless of the type of bathtub. As a rule, fittings are supplied with it. Otherwise, you need to immediately purchase the missing product in the store.
YouTube channel "Alexander Cherepitsa"
Study the assembly diagram specified in the instructions. Put the pipes in place and tighten the union nuts, having previously installed O-rings on all connections. Next, a rubber gasket is put on the siphon and the entire structure is pressed to the drain hole with a screw through the protective grill.
YouTube channel “Ruslan Viktorovich”
In the same way, the upper pipe is attached to the overflow hole on the bathtub. If the siphon has a drain valve rather than a regular plug on a chain, then a rotary handle is installed on the overflow grid according to the assembly instructions.
Special models
Corner
Assembly and installation of corner fonts follows the same rules. The only thing is that such products must be placed only on the frame that comes with the kit, this is due to the peculiarities of the shape of each model. As a rule, the manufacturer completes its product with detailed instructions. Therefore, any man should be able to handle the assembly and installation of corner bathtubs.
Hydromassage
But hot tubs are not so easy to assemble. This will require much more time and effort. Indeed, in addition to the direct installation, it is also necessary to connect the pump system and configure everything correctly. But don’t be afraid of this, because we have described all the nuances in detail in this article:
Try on and display the bathtub
YouTube channel Cersanit Romania
After installing the drain fittings, the bathtub is ready for installation. But before you finally fix it, you need to level the product and mark the border of the side on the wall for subsequent fastening.
To do this, move the bathtub into its place and, adjusting the height of the legs, check the horizontal position using a level. There is no need to make any slopes towards the drain: they are already provided by the manufacturer.
The height of the bathtub is selected according to location. As a rule, the distance from the top of the side to the finished floor is approximately 60 cm. The main thing is that the siphon is 3–5 cm higher than the sewer socket, otherwise the drain will quickly become clogged.
YouTube channel Cersanit Romania
After preliminary alignment along the sides of the wall, you need to draw a line with a pencil. This mark is useful for mounting wall brackets and stops.
Mount the wall mount
Massive cast iron bathtubs stand confidently on legs and do not require additional fixation. But light steel and especially acrylic ones are also attached to the wall for reliability.
Acrylic and steel bathtubs
YouTube channel Cersanit Romania
Such bathtubs are most often fixed with brackets in the form of hooks on which the bowl is hung. Homemade metal profile stops for drywall are also used, which perform the same function.
YouTube channel "Alexander Cherepitsa"
In both cases, the fastenings are installed on dowels, for which holes are drilled. Using the line of the top of the bathtub, mark the holes for the stops so that they are strictly under the edge of the sides and evenly distribute the load.
Cast iron bath
Products made of cast iron weigh from 80 to 200 kg, so they stand reliably and do not require additional fastening.
What types of tile floors are found in bathrooms?
| Type of tiled floor | Description of technical characteristics |
On a concrete base | The most durable coatings that can withstand significant forces. Only on such floors is it recommended to install heavy cast iron or stone bathtubs. The tiles are laid on a leveling cement-sand screed on concrete; there is no insulating layer. If various insulation materials were used to reduce thermal conductivity, then installing heavy containers is not recommended. |
On a wooden base | Ceramic tiles are installed on sheets of plywood or OSB. Wooden beams are used as load-bearing elements. Such a base does not have high levels of physical strength; it is not recommended to install heavy bathtubs on them. The fact is that wooden structures change linear dimensions due to fluctuations in relative humidity. As a result of such movements, the degree of adhesion of tiles and adhesive significantly decreases. Loads from the legs of the bathtub speed up this process and increase the risk of tiles peeling off. |
Heated | In terms of strength they occupy an average position. The thickness and strength of the screed above the heating system cannot guarantee the integrity of the coating; sharp loads from the legs of the bathtub can cause critical damage to the coating. |
Be sure to consider the features and technical specifications of the floors before purchasing a bathtub.
Install mortgages
If the bathtub comes with a factory-installed screen, then the design already includes all the necessary fasteners. If not, you will have to install embedded parts into the front side, to which the screen frame is then attached.
YouTube channel “Ruslan Viktorovich”
To do this, you need to cut a piece of a wooden block and glue it to the inside of the side with silicone sealant or polyurethane foam. If the bowl is adjacent not to three walls, but to only two, another block should be secured to one of the free sides.
Some acrylic bathtubs already have ready-made embeds in the form of pieces of timber along the perimeter of the sides. If you see such pieces of wood, it means you can do without additional inserts.
Practical recommendations
Inexperienced builders find it difficult to perform some operations. In order to reduce the likelihood of errors, we provide several professional answers to frequently asked questions.
How to improve the sealing of the contact areas of the facing tiles to the side of the bathtub?
Joint between tiles and edge
It is not necessary to make additional sealing of the joints. The sides of the bathtub are pressed tightly against the wall, the thickness of the adhesive is approximately 5 mm, to this value you should add 2-3 mm for the thickness of the tile, and it turns out that the lining covers the sides by about 7-9 mm. This is quite enough to prevent water from entering the space between the bathtub and the wall. But if you are not sure, you can additionally seal the joints. This is done very carefully, the seam will be completely invisible. How? Apply sealant to the end of the tile before gluing it. The thickness of the sealant is approximately 1–2 mm, level it with your finger. Glue the prepared tiles using cement adhesive and place them against the side of the bathtub until it stops. If any excess sealant appears, remove it immediately with a clean cloth.
It is better to apply sealant to the end of the tile while gluing it.
This method has several advantages over the usual one:
- the putty is completely invisible;
- sealant consumption is significantly reduced;
- work is accelerated;
- the risk of sealant detachment from surfaces is reduced;
- the color of the sealant does not change throughout the entire period of operation - it is not affected by ultraviolet rays;
- eliminates the possibility of mechanical damage to the sealant;
- minor deflections of the sides of the bathtub are compensated.
How to reduce the risk of mistakes when marking tiles? If the tiles do not lie as we described above, then one of the significant advantages of installing an acrylic bathtub under the tiles will be eliminated. To prevent errors, we advise beginners to use two methods.
- Do not do the final fixation of the bathtub with side stops and adjust the height yet, but start tiling one of the adjacent walls of the bathroom. Adjust the rows of tiles to the height of the bathtub and only then use the legs to gradually change its position. At the same time, carefully monitor the horizontalness of all sides, check the distance between the floor and the sides. After each change in height, apply the tiles around the perimeter of the bathtub without glue and look at the correct position. Everything is fine - fix the height of the legs with locknuts and continue finishing the walls.
The quality of finishing depends on the accuracy of the markings
Important. Avoid mechanical damage to the internal surfaces of the bathtub. It is strictly prohibited to remove the protective whip until the work is completed. Cover the film with a thick cloth; use only rubber containers to prepare adhesive under the tiles. Do not work in the bathroom wearing shoes with hard soles or heels.
Protect the bathtub surface until finishing work is completed
- When marking horizontal lines for the position of rows of ceramic tiles, use a water level rather than an ordinary building level. An ordinary level may have insignificant deviations; this is not critical for masonry, but they will have a negative impact on the quality of tile finishing. Use a simple, reliable and cheap hydraulic level. With its help, you can accurately transfer marks from one wall around the entire perimeter of the room. Mark the position of the rows of tiles in the most convenient place, and then transfer the level of the top line to the walls adjacent to the bathtub.
How to use a hydraulic level
Which screen is best for an acrylic bathtub? There is no definite answer; too many subjective and objective factors influence the choice. We'll give you some tips to help you make your decision. What should you keep in mind when selecting screens?
- Bath dimensions. The larger the size of the acrylic bathtub, the more water it holds, which means the greater the load. We have already mentioned that a significant disadvantage of acrylic products is considered to be low physical strength. It is better for large bathtubs, in addition to the factory stops, to make additional ones using durable decorative screens. In these cases, it is recommended to make the screen from masonry building materials.
Brick screen
- Bath geometry. If the bathtub has a curved shape, then it is better to install the screen at the factory, or make it from plasterboard and cover it with mosaic ceramic tiles. These elements do not have the same strength as brick ones, but they are much easier to manufacture. If you have the skills to lay bricks with curved surfaces, then use durable materials.
Brick screen under the corner bath
Factory screen
Is it necessary to make a hatch to inspect the condition of the drain? Yes, this is mandatory for all types of bathtubs, not just acrylic ones. Place it next to utility lines. If you are sure that there are no leaks, then you can not install noticeable opening hatches, and in certain places provide for the dismantling of the facing tiles without damaging them. This is achieved simply: apply glue to the tile only in a narrow strip around the perimeter, this will reduce the degree of adhesion and, if necessary, allow it to be undermined. Of course, in the places where such tiles are attached, the load-bearing surfaces must have special holes.
Inspection plastic hatch
Sliding hatch for bathtub
Hatch under the bathroom under the tiles
How to test connections for leaks? And there is a very effective method here. The fact is that it is very difficult to notice drops of water under the bathtub. It's dark there, and you have to watch for a long time, which is very inconvenient. Professionals place sheets of paper under all connections, fill and drain water, and then remove the paper from under the bathtub. All leaks are clearly visible on it; by the location of the wet areas you can easily determine where the problem occurred. Find out about plumbing drains by following the link.
Make thermal insulation
Acrylic and cast iron bathtubs retain heat well and do not require a layer of thermal insulation. Steel ones, on the contrary, cool quickly and are also very noisy when drawing water. Therefore, before installation, polyurethane foam, spray insulation or automotive sound insulation is applied to the bottom and walls of such bathtubs.
YouTube channel “Ruslan Viktorovich”
To do this, turn the bathtub over, wipe it with a damp cloth and cover it with foam, moving like a snake from bottom to top. The average consumption per bowl is 2–3 cylinders. The foam hardening time is 3–4 hours. After this, you can install the bath.
YouTube channel Valiev Andrey DIY
Sometimes, before applying insulation, the bathtub is pre-pasted with automotive sound insulation. The surface is degreased with a solvent, then the protective film is removed from the adhesive base of the sheets. After heating with a hairdryer, the sound insulation is glued to the bottom and walls of the bathtub, and then rolled with a roller.
Preparatory stage
Before starting installation, you should properly prepare the room and stock up on the necessary tools and materials.
First, remove the old bathtub, dismantle the old drain, clean the sewer pipe, and insert a piece of corrugated hose into it. After this, it is recommended to immediately treat all joints with sealant.
During the installation of an acrylic bathtub, its surface should be protected from accidental scratches and other damage, for example, with a layer of packaging cardboard
In addition to these necessary works, you may need to level the floor of the bathroom or the area where the bath will be installed. It should be remembered that it is better to turn off the water before starting preparatory work, and after completing the preparation, remove all debris from the bathroom.
In addition, the place where the bathtub will stand before installation must be covered with soft, shock-absorbing material to protect it from damage.
Experts advise purchasing an acrylic bathtub immediately before installation. Long-term storage of an acrylic product in unsuitable conditions can lead to its deformation.
Place the bathtub in place and secure it
YouTube channel “Pavel Sidorik”
Now you can finally install the bathtub in the prepared place and fix it using the selected fastener option, as well as seal the joint with the wall.
To do this, silicone sealant is applied to the wall just below the previously marked side line with a snake. Then the bathtub is carefully pushed into place. The sides adjacent to the walls are placed on installed brackets or profile stops. The bowl is pressed for a tight fit so that the sealant is slightly squeezed out.
Connect to the sewer
YouTube channel “Repair in detail”
After installing the bathtub, the siphon is connected to the sewer pipe using a corrugated pipe or a rigid pipe with corner fittings. The latter option is preferable: dirt accumulates much less on smooth pipes.
The rubber seals of the fittings are treated with a special lubricant or ordinary detergent, and then simply connected to each other. If there are doubts about their quality, the joints can be coated with silicone sealant to be sure. But keep in mind that disassembling them in case of replacement will not be easy.
Do not forget about the slope necessary for good drainage! The siphon should be 3–5 cm higher than the sewer entrance. With a smaller drop, the water will drain, but due to blockages the drain will have to be cleaned more often.
Final works
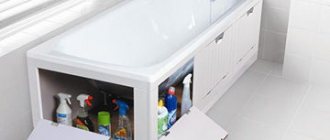
The space below is often covered with a screen. You can make it yourself - from moisture-resistant plasterboard, MDF, plastic panels or brick. The materials are painted on top, tiled, mosaiced, covered with film, and covered with decorative plaster. If the screen is monolithic, not sliding, it is necessary to provide a technical hatch in it - in case you need to clean the siphon. The photo shows an example of such overlays.
Instagram @remont_sanyzel_krd
Instagram @remont_sanyzel_krd
Instagram @deniskorneliuk
Instagram @deniskorneliuk
Make a support pillow
Cast iron bathtubs have sufficient rigidity, while lightweight acrylic and steel ones can bend slightly under heavy weight. And although manufacturers allow installation exclusively on legs, for greater reliability, many craftsmen install a support cushion made of brick or gas blocks under the base of such bowls.
YouTube channel "Pavel Sidorik"
To do this, take a full bath of water. Then the floor is slightly wetted, bricks or gas blocks are laid under the bottom. They are attached to the floor and to each other using cement mortar. There should be about 5–7 mm from the top of the pillow to the bathtub - this space is filled with polyurethane foam. If the layer is larger, then over time it may sag and the support will stop working.
Complete hardening of the polyurethane foam takes about a day. All this time, the bath must be filled with water, otherwise the foam, as it expands, may raise the bowl.
Mount the screen
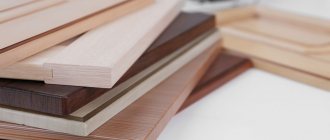
After the work is completed, the space under the bathroom is covered with a screen. This can be a ready-made complete decorative panel, a purchased universal screen, PVC panels, as well as tiles on plasterboard mounted on a frame.
YouTube channel Cersanit Romania
The factory screen is attached to the walls and sides with latches, like a bathtub: holes for fasteners are marked according to the diagram in the instructions and fixed with dowels. The screen is then placed on the hooks and held in place.
For homemade versions, a frame is pre-built from wooden beams or metal profiles. The upper part of the frame is attached to wooden embedded sides, the lower part is attached to dowels or silicone sealant to the floor. Next, racks are installed between them in increments of 40–50 cm.
YouTube channel "Alexander Cherepitsa"
When laying tiles, the frame is pre-sheathed with sheets of moisture-resistant plasterboard. A screen made of PVC panels and other linear materials is attached directly to the frame.
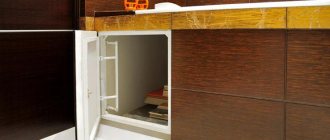
If the screen is not removable, it is necessary to install an inspection hatch in the siphon area for maintenance. It is important to position the window so that access to it is not blocked, for example, by a washbasin cabinet.
We select a convenient design
Screens consist of a frame (usually aluminum) and panels. They can be blind or equipped with doors for access to communications and items stored under the bathroom.
There are also models with removable panels; they are usually installed under acrylic bathtubs.
The advantages of blind panels are high aesthetics and durability. The smooth surface can be decorated in any way or left plain.
It will look nice regardless of the presence or absence of additional decor. Due to the absence of moving parts, these bath screens last much longer.
The disadvantages of solid stationary structures include the inconvenience that arises in the event of breakdowns of the plumbing system. To access it you will have to remove the entire panel.
This takes a lot of time, which can cause problems if a leak develops and water accumulates under the bathtub.
In some interiors, screens perform a style-forming function. A luxurious bright model looks very attractive if the rest of the design elements are monochromatic or made in the same style
Designs with doors are more practical than blind ones. The doors themselves can be hinged or sliding. Both options have their own advantages and disadvantages.
In most cases, bathroom owners opt for sliding models.
Hinged doors conveniently open and close, providing access to shelves with necessary small items.
However, you should not choose a screen with such doors for a small bathroom. Open, they occupy useful space and make it difficult to manipulate the elements of the plumbing system.
The doors of the sliding screens for the bathtub open, sliding along the guides. When purchasing such a system, you should pay special attention to the quality of the metal.
The stronger it is, the longer the bath screen will last. It is better to give preference to steel or aluminum.
There are models with plastic frames. They are less reliable, but are quite suitable for apartment owners who do not intend to store frequently used items such as washcloths, towels, shampoos, hygiene products, and household chemicals under the bathroom.
If doors are needed only for access to communications, then you can buy a plastic system.
Doors can swing open not only to the left or to the right. There are models with folding elements. They have the same advantages and disadvantages as swing screens
Design the side joint along the contour
YouTube channel Cersanit Romania
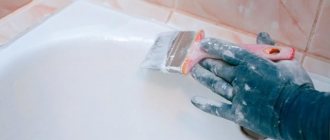
The final touch in installing the bathtub is sealing the joints using silicone sealant. It is better to choose a white composition to match the color of the bath. Transparent will not look very neat.
Apply a layer of sealant along the contour of the bathtub, and then lubricate the sides and wall with soapy water so that the silicone does not smear when leveling. The excess is removed with a special spatula or a plastic card with a cut corner.
Required Tools
At the first stage of installing the structure, you should prepare all the necessary fixtures and tools, namely:
- a hammer drill with a drill of the required cross-section and length - for making holes in the wall;
- screwdriver - for tightening fasteners when assembling the structure; in addition, it can be used to drill holes in the bathtub itself, if necessary;
- an open-end wrench of the appropriate size - to adjust the height of the legs of the bathroom frame;
- construction corner - inspect corners;
- roulette;
- building level - to level the structure horizontally;
- pencil or construction marker - for marking.
It is also worth taking care of additional consumables in advance: sealing tape or a plumbing corner - to seal the joints between the wall and the bathroom. But you can also use simple silicone sealant if the walls in the room are perfectly smooth.