Unlike traditional floor-mounted plumbing fixtures, the height of a wall-hung toilet can be adjusted to a minimum of 20 cm. The main criterion for correctly determining this size is familiarity and ease of use. GOST standards, construction standards SP and SNiP regulate the installation height of sinks, shower trays, bidets and other plumbing fixtures with the exception of toilets.
SNiP Residential buildings on distance standards
The rules contained in the regulatory document are mandatory for the construction of any type of building - industrial, public, medical, educational and residential. However, there is an unspoken opinion that owners of premises in residential buildings and private buildings can deviate from the dictated standards if they themselves carry out their maintenance and operation.
Basically, such a retreat is made by the owners of premises with bathrooms, combined or frankly small. If the toilet is spacious enough, it is better to adhere to the established rules in order to use special rooms with convenience and safety:
- to the front (front) wall or wall with a door, if we are talking about a small toilet, the minimum distance is 53 cm. This is enough to not feel tightness in the knee joint;
- the maximum required distance from the frontal plane located in front of the seated person is 76 cm;
- the maximum distance from the front does not particularly need to be regulated, and if possible, the functional zone for a person can be more than a meter;
- from the middle axis of the toilet to the side wall, the established minimum is 40 cm. In some sources it is defined as 38 cm;
- the optimal distance from the central axis of the toilet is 45 cm. This is enough for comfortable operation of the plumbing fixture. But no one forbids installing at a greater distance, if the parameters of the allocated room allow it;
- in a separate toilet, the distance between the toilet and the wall on the left in standard buildings is usually equal to the distance to the wall on the right side;
- The location of the toilet in the toilet room is usually the center of the room, because the sewer pipe is supplied here. This also determines the position of the remaining toilets on the riser on the floors above and below;
- The second option for placing plumbing equipment is closer to the back wall. This does not make it possible to equip some kind of shelves or rack, but it is typical for the minimum dimensions of the toilet in apartments of standard construction, where the bathroom is separate;
- The toilet stall in Soviet-era houses was built according to size, when the central placement provided the necessary distances to the side wall and front surface with the entrance door located in it.
When arranging a shared bathroom, there are certain conditions that must be observed. These are standards for the distance of the toilet from other interior items that should be adhered to, even minimally.
But this is not a suitable option if the dimensions of one of the family members do not correspond to the average figures for which the building codes and standards are calculated.
What are the standard sizes of bathrooms and the minimum according to snip
Size, whatever one may say, matters... especially when it comes to what the size of the bathroom should be. The legislation of all countries has clear standards regulating the area of the bathroom and toilet.
In this article we will tell you what standard bathroom sizes exist, discuss the minimum possible dimensions, and tell you how to correctly determine the area of the sanitary room in your future home.
Dimensions – SNiP and DIN
The current technical regulations, reflected in SNiP and DIN 18022, clearly define the dimensions of a bathroom for residential premises:
- minimum floor/ceiling height – 2500 mm;
- depth – not less than 1200 mm;
- in the attic, the distance from the toilet to the roof slope is 1050 mm;
- The minimum width of the bathroom is 800 mm.
Important: Doors must open exclusively outward, and exit only to the hallway and corridor, to living rooms and to the kitchen; exit from the bathroom and toilet is prohibited. The height of the ceilings in the corridor at the exit should not be less than 2100 mm.
SNiP also regulates the standard dimensions of a bathroom, a combined toilet with a bathtub, and the installation of plumbing fixtures in it:
SNiP also regulates the standard dimensions of a bathroom, a combined toilet with a bathtub, and the installation of plumbing fixtures in it:
- there must be at least 700 mm of free space in front of the bathtub and shower, and 600 mm of free space in front of the toilet;
- the bidet is installed 250 mm from the toilet, unless otherwise provided by the model;
- There should be 250 mm of free space on the sides of the plumbing point.
Reminder about plumbing placement standards
Typical bathrooms in residential buildings
The standard sizes of toilets in standard apartment buildings are 1200 * 800 mm, 1500 * 800 mm, and with an improved layout - 100 * 1500 mm, which can accommodate a sink or a narrow washing machine.
Minimum bathroom sizes allowed during the construction of standard multi-apartment residential buildings
As for the bathroom, its average size is 1650-2000 * 1200-2500 m. The combined room in Khrushchev is 3.3 - 3.8 m2.
Standard sizes with ergonomic layout (sheet 1)
In new economy class buildings, restrooms are already somewhat larger - from 4 sq.m., and in improved series of houses there are rooms of 5-6 sq.m. m.
In luxury apartments, the area is rarely less than 7 sq.m. The optimal size of a bathroom in a private house is from 9 square meters.
m, here you can already organize a full-fledged oasis of relaxation.
Standard rooms with ergonomic layout (sheet 2)
Minimal bathroom
The smallest restrooms measure 1.8-2.0 square meters. found in small apartments. But even such areas can be decorated with proper comfort.
The photo shows a small bathroom 1800*1200 mm with a shower (before and after renovation)
Of course, you will have to give up the bathtub in favor of a cheap cabin or panel, but with the correct arrangement of plumbing, you can fit even a narrow washing machine.
Narrow mini bathroom, dimensions 1700*1200 m, single material for floor and walls optically expands the boundaries of the room
Photo of a shared small bathroom
How to choose a size
When it becomes possible to independently set the size of the bathroom without any restrictions on space, many people who have had their fill of narrow and cramped standard rooms begin to dream of a large space where they do not have to save every centimeter. Let’s make a reservation right away: a huge bathroom is a complete waste, so here you need to look for a middle ground.
If you follow the laws of ergonomics, then an area of 1.7-2.5 square meters is required for a shower stall, 2.7-3.5 square meters for a comfortable bath, and 1.2-1.8 square meters for a toilet.
for a sink is about 1 m. Thus, the optimal area of a restroom for a family of 4-6 people is 7-9 sq. m.
It is better if it is a rectangular room: the width of the bathroom is 2.5 m and the length is 3.5 m.
For proper bathroom planning, it is useful to know:
- height of a standard bathtub with legs - 640 mm, without - 480-510 mm, bath sizes 750-800x1600 mm, 750-800x1700 mm, corner models - 1500x1500 mm and 1600x1600 mm;
- shower cabins - 800×800, 900×900 and 1000×1000 mm; for small rooms it is recommended to choose a shower panel with a tray;
- To make it easy to reach, the heated towel rail should be 500-700 mm away from the bath or shower;
- depending on the model, the sizes of toilet bowls may differ - 440x650, 400x600, 360x650;
- bidet - 370x540 and 400x600 mm;
- The minimum washbasin size is about 400 mm wide.
Comfortable bathroom in a private house with an area of 7 square meters.
It is important to know
The dimensions of restrooms for people with disabilities are calculated based on the dimensions of a wheelchair.
So, the minimum size of the bathroom should be at least 2.3 square meters. m, toilet with washbasin from 1.6 sq.m., without washbasin 1.2 sq.m. is allowed.
, for wheelchair users, the width of the bathroom is 1650 mm, the depth is 1800 mm.
Recommendations you need
Let us allow ourselves to give the reader some advice on the installation and selection of the plumbing fixture that interests us.
Choice
Like floor-mounted, wall-hung toilets can be made from various materials. Let's try to evaluate them.
Polished stainless steel is virtually dirt-free due to its smooth surface. If deposits still remain on it, they can be easily removed using any household chemical.
Why does stainless steel occupy a much smaller market share than competing solutions?
- Pair of breech type metal plumbing fixtures. It has become familiar as anti-vandal equipment for public restrooms and evokes corresponding associations among many potential clients.
- In addition, the price of stainless steel toilets is much higher than that of ceramic analogues, and starts from approximately 20,000 rubles.
Glass is not much inferior to stainless steel in practicality; but viewing through the translucent walls what remains on the walls of the bowl below the water level is a rather dubious pleasure.
The main disadvantage of polymer concrete is its limited resistance to aggressive cleaning scratches and cleaning agents. Removing lime deposits and urinary stone from it without disturbing the appearance of the surface is not an easy task.
The main value of sanitaryware is its low cost. It is precisely on this basis that it is the undoubted favorite of the plumbing market. The downside is that its large-porous surface actively collects dirt and quite often lacks cleaning.
Finally, the material that is optimal in terms of functionality and cost combination is porcelain. The walls of the toilet will remain white as snow for a long time; If the need for cleaning does arise, you can safely use acidic and alkaline preparations.
Installation
Are there any subtleties to installing a wall-hung toilet yourself?
The installation stages themselves are comprehensively outlined in the accompanying documentation:
- The placement of the installation frame is marked by level or plumb.
- It is anchored to the wall and/or floor.
- Water is supplied to the tank, and a sewer pipe is supplied to the location of the toilet flare.
- The hole in the tank for the drain button is closed with a special membrane or simple polyethylene, after which the communications and installation are hidden behind a false wall. In most cases, it is laid out from moisture-resistant plasterboard over a galvanized profile and laid out with tiles.
- Once the tiles have firmly set, the toilet is hung on the studs of the installation, and a flush button is installed in the tank. A damper gasket is needed between the wall and the toilet to distribute the load on the tile and prevent chips from occurring.
By the way: in the absence of a gasket, silicone sealant can play its role.
There are a couple of nuances here:
- It is better to place the tiles away from the drain button, so that the seams are located symmetrically relative to the center of the button. Asymmetry does not look very careful.
- The smaller the sewerage drain to the riser, the less likely it is to become clogged. Do not forget about the slope: for pipes with a diameter of 90 and 110 mm used for hidden installation, it is equal to 2 cm per linear meter.
- It is better to collect the sewerage using sealant. The instructions are due to the fact that rubber seals can lose elasticity over time and allow leaks.
- Forget about flexible eyeliners. Water is supplied to the tank by a solid pipe. The service life of a braided rubber hose rarely exceeds 5 years.
- Despite the fact that the tank fittings in most cases allow you to shut off the water through the service hatch behind the drain button, it is better to provide the supply to the tank with a valve and leave a hatch in the false wall to access it.
Installation of wall hung toilets
How to install a wall-mounted toilet so that the system works properly and does not cause any complaints? The first step you need to take when starting to install a wall-hung toilet with your own hands. There will be installation of a steel frame, called installation. Using dowels, the installation is attached to the wall and floor surface. A 110 mm sewer pipe and water supply must be connected to the place where the toilet will be located. The installation of toilet bowls must be carried out in compliance with horizontal and vertical levels. The installation process itself is quite simple: the design includes special rods and studs that allow you to attach the frame to the wall.
The height of the bowl is adjusted taking into account the height of the residents who will most often use the toilet, so the selection of this indicator should be done in a practical way. As a rule, the installation height of the toilet from the floor is about 40 cm. Further installation of the wall-mounted toilet involves connecting the water supply to the flush cistern. It is advisable to use reliable pipes that can last much longer than flexible hoses. When installing the liner, it is necessary to close the valve located in the tank.
The next step is to connect the toilet outlet to the sewer, for which you will need a corrugation (read: “How to install a corrugation on a toilet correctly”). To check the functionality of the system, the bowl must be placed on the installation and drained. There is no need to securely fasten the bowl, since its final installation is done last. The installed frame is covered with pre-purchased plasterboard, which is attached directly to the frame and to the wall.
To make the correct cuts on drywall, you should use the instructions for the attachment: it usually contains a diagram that greatly facilitates the process of creating technological holes. When the frame is installed and covered with plasterboard, you can begin cladding, for which ceramic tiles are used. When choosing a tile, you need to take into account its aesthetic qualities and the planned interior of the bathroom. The installation of the wall-hung toilet is complete and it can now perform its functions.
Advantages and disadvantages
The advantages of toilet models with horizontal (parallel to the floor) outlet include the following features and factors:
- fits even where previously there was a toilet with an oblique type outlet (that is, there is versatility);
- it is possible to connect not only to a horizontal sewer pipe, but also directly to a vertical riser using adapters;
- mounted close to the wall without taking up extra space;
- low cost;
- wide model range.
There are also many disadvantages:
- attachment of the installation site to one of the walls of the room - the one where the sewer pipeline passes;
- relative complexity of installation, especially in terms of connecting the outlet to the sewer;
- careful sealing of the connection points between the outlet and the sewer main, the need to monitor for leaks during the first time after installation;
- Possibility of clogging of the outlet channel.
Height of installation of the toilet from the floor
According to statistics, a person spends almost 2 years of his life on the toilet. In order for him to feel comfortable during this period, hundreds of models of these devices were invented. These can be structures consisting of a cistern and bowl, drainage systems, or hanging models.
Toilets - types and sizes
– console type. Hanging models are becoming more and more popular every year. This is due, first of all, to their miniature size. Outwardly, such a device seems much smaller, because the drain barrel is installed in the wall, and only the thicket is visible to the eye. If we are talking about a block installation, then during installation it is walled up in the main wall; as for a frame installation, it is built under a plasterboard panel. A wall-hung toilet with installation is practically no different in size from a floor-mounted one.
Standard dimensions of the hanging device:
– width – 30-40 cm
– the height of the wall-hung toilet is 50-60 cm (this means the height of the bowl itself).
There are models with increased length - up to 700 mm. If the structure is made of porcelain, its weight can reach 25 kg, if made of earthenware - up to 27 kg.
– compact toilets. Today this is the most popular variety, consisting of a bowl and a flush barrel, as well as the necessary fittings. The bowl is located on a special leg that rests on the floor. The barrel can be mounted separately (on the wall or to an installation system) or placed on a solid-cast shelf with a bowl. Such models are extremely easy to install, but are more demanding to maintain, since you have to wash not only the bowl, but also the leg, barrel and communication system.
– width – up to 38 cm,
– length – up to 67.5 cm,
– the height of the compact toilet from the floor together with the tank is up to 80 cm,
– seat height – up to 40 cm.
The weight of the device depends on the material from which it is made. The porcelain model will weigh up to 28 kg, the earthenware model - up to 31 kg.
– corner toilets. Designed for rooms of non-standard shape, where it is impossible to install a conventional model. The dimensions of such devices are as follows:
– width – up to 36 cm,
– length – up to 76 cm,
– height including barrels – up to 81.5 cm,
– seat height – 40 cm.
- children's model. Used in houses with several bathrooms. Dimensions of the hanging type device are 33 x 54 x 30 cm, floor-standing options are 31.5 x 51 x 69 cm. Dimensions include the tank.
Installation of a wall-hung toilet
It makes sense to install a floor-standing model only where there is no possibility of hidden wall-mounted installation of pipelines. In all other cases, you can install a suspended model.
To install a hanging device, you will need an outlet for the riser and connection components, studs, Teflon tape, a flexible hose with an angle valve (needed to connect the flush tank and the water supply pipe).
Installation stages
The presence of an installation system greatly simplifies the installation process, since all that is required is to hang it on the studs and tighten the nuts on them. But before you begin installation, you need to determine the installation height of the toilet from the floor. Hanging models should be mounted so that their top is located at a distance of 40 cm from the floor covering, and at the bottom - 5 cm from the floor surface. You can check the installation height of suspended equipment by adjusting the installation system. For children, you can install the equipment lower, for tall people - a little higher.
So, the equipment is hung on 2 studs, which are wrapped in an installation frame. Next, use the nuts to turn the studs until they stop. After the distance from the cut of the pipe in the wall to the surface of the tile is determined, the waste and water supply pipes are cut.
We connect the toilet to the pipes, then the final tightening of the nuts on the studs is carried out. The hooks are inserted from below and from the side with the bent part into the holes in the lower and upper parts of the lid. The lid is turned over, a hook is inserted into the holes, and nuts are screwed from below.
We are installing a drain button. Considering the fact that today there are a huge number of models of flush buttons, during installation you should follow the instructions and charters. Before proceeding with the installation of the button, open the water supply tap and insert the cables located inside the drain tank into the hole on the button. We check the functionality of the design and snap the button.
Plumbing with non-standard bowls
The previously developed standards satisfied the needs of the average European person. Over the past few decades, the height of people has increased, so appropriate adjustments have been made to ensure comfortable use of plumbing fixtures. Over 130 years, the height of the average person has increased by 15 cm , and the distance from foot to knee - by 6 cm . The current standards are not suitable for everyone, so for comfort in the toilet room, non-standard models with a high or low bowl are used.
A tall (royal) toilet is an ideal solution for people who are dissatisfied with the mass supply on the plumbing market.
Unlike the standard height, here the bowl is located at a level of 46-50 cm from the floor. Comfort for tall people is guaranteed. As a rule, the bathroom is complemented by a sink and furniture of non-standard sizes.
An excellent option is the Kolo Nova Pro M39045000 compact toilet with a bowl height of 460 mm and a total of 845 mm .
Low models are used in the opposite case. People with short stature or limited mobility reduce the distance between the floor and the bowl to protect themselves and ensure a comfortable environment in the bathroom.
This option is also suitable for saving space. As an example, you can use the Spanish plumbing fixtures ROCA Gap A34947800W with a height of 385 mm .
Height of toilets with a tank from the floor: norms up to 70 cm
When choosing models with a tank, you should pay attention not only to the height of the bowl, but also to the size of the entire structure. Correctly selected parameters help to facilitate the repair process and better think through the design of the room. For example, a boiler is often installed above a plumbing product, and in order to combine both devices, you need to know the dimensions in advance .
Standard parameters on the Russian market:
- width - 350-380 mm ;
- length - 620-600 mm ;
- height - 700-730 mm .
Photo 2. Turkish compact toilet IDEVIT Alfa Rimless SETK3104-0315-001-1-6200 with a height of 89.5 cm.
Tall models are, in most cases, used in bathrooms with a lot of free space. The devices are characterized by an increased distance from the floor to the bowl, the overall size of the structure and width. The height of non-standard products starts from 77 cm . As a rule, manufacturers do not create toilets higher than 90 cm , but there may be exceptions. As an example, you can pay attention to the Turkish compact toilet IDEVIT Alfa Rimless SETK3104-0315-001-1-6200 with a height of 89.5 cm .
Low models are also in demand. Compact products are purchased when it is necessary to save space in all planes. The distance from the floor to the top of the tank is up to 69 cm . Models from some manufacturers may be lower, up to 60 cm . For example, the ROCA Inspira Square A342537000 together with the tank occupies only 64.5 cm .
Important! It should be taken into account that for non-standard toilets the height of the bowl has been changed up or down.
Dimensions of built-in high toilets: what should they be
Hanging models have been in great demand lately. This is due to the aesthetics and ease of maintenance of the device.
to install the installation during a rough renovation , because it requires the installation of a special box or hiding plumbing communications in the walls. In this case, the tank is hidden, and all you see is the bowl and the button mounted on the wall. Standard parameters:
- width - 350-370 mm ;
- depth - 480-700 mm ;
- height - 500-600 mm .
In addition to standard dimensions, the installation height should be taken into account. The metal structure occupies from 110 to 130 cm . Therefore, the option is not suitable for bathrooms with limited space.
Important! Installations are recommended to be used only if the rough plumbing can be hidden in a wall or false box .
There are also non-standard installations, the height of which reaches up to 130 cm . In this case, it is almost impossible to place anything above the structure. The distance from the floor can only be adjusted using specific bowl designs.
Reference! When choosing a built-in bowl, consider the distance between the mounting bolts. As a rule, two main sizes - 15 or 18 cm .
Advantages and disadvantages
In general, the installation has the following advantages:
- beautiful appearance, accordingly, this is reflected in the overall design of the room;
- convenient to clean the room;
- takes up little space;
- good sound insulation;
- Warranty period – from 10 years.
The Geberit brand has many obvious advantages. The main ones are: ease of maintenance of the equipment, as well as the use of structures made of high-quality and reliable materials.
Here are a number of advantages of the installation from the manufacturer Geberit, namely:
- the structure is made of steel;
- toilets are tested - they are loaded with a load of up to 500 kg;
- the tank is made of HDPE, it is a one-piece, seamless tank;
- the unit is 100 percent sealed;
- the flush elbow is welded three times;
- functional units have comfortable access;
- spare parts will be supplied under warranty for 25 years;
- The device is easy to install.
It is worth noting such negative aspects in using the installation as:
- high price;
- complex installation;
- it is difficult to immediately understand that there is a leak, since all hoses are covered with false panels;
- legal component - utility services do not allow closing the riser, so you have to get the approval of these services so that there are no problems in the future.
On the floor or above the floor
In advertising brochures talking about the advantages of wall-hung toilets, the following main points are given:
- Hanging plumbing does not interfere with cleaning, leaving the entire floor area accessible.
- It makes a compact toilet spacious, allowing you to save space due to the tank.
- It allows you to completely hide communications, thereby improving the appearance of the bathroom.
Let's try to find out how much truth there is in marketers' statements.
Free floor
The statement is true without any qualifications. Installation - the frame to which the toilet is attached is hidden behind a false wall, leaving the entire floor area accessible.
This indicates that in your bathroom there will no longer be black and damp places under the tank, that the base of the toilet bowl will not really interfere with cleaning, and to change the tiles you will not need to dismantle it. In addition: the vacated floor will give more scope to your imagination when choosing a flooring pattern.
Compactness
Console plumbing will indeed make the room more spacious, but only visually. The dimensions of a wall-hung toilet with a concealed cistern and installation are at least no smaller than the floor structure: due to the thickness of the false wall, they are likely to be larger.
Visual space will be associated with the highlights of a person’s perception of the size of the room. They are unconsciously assessed by the area of two planes - the floor and the ceiling. Because the floor in our case is not cluttered, the toilet, regardless of the actual reduction in floor area, will begin to seem less cramped.
Hidden communications
Yes, they really will be completely hidden. In addition to the toilet bowl, only the flush button will remain visible. Yes, it will be beautiful, but defiantly impractical.
You see, dear reader, the creator of this article, over a decade of working as a plumber, became convinced that every structure certainly lacks repair, be it a water supply system, a sewer system, a drain tank or a valve. Making communications difficult to access is guaranteed to create difficulties for yourself in the future. Even if it happens in 10 or 20 years.
In addition: in a compact municipal apartment, the back wall of the toilet, which in most cases is hidden by a false wall along with the installation, is decorated with sewerage and water supply risers. In addition, if you are not too lazy to first replace them with durable polymer or metal-polymer pipes, who can guarantee that they will not be damaged during a pressure surge? Or, as an option, there will be no need to replace a section of the riser in the ceiling (which more than happens)?
Conclusions? Anyone can make them for themselves. Let's put it this way: the author never once had the thought of choosing something other than the classic floor design.
Which to choose?
The width of the sofas is standard. What are the standard sofa sizes? what is the standard height of a sofa from the floor
There are two main types of toilets: floor-mounted and wall-hung. From the name you can understand that these types of toilets differ in the installation method. The floor-mounted toilet has a relatively low cost and is very easy to install. In addition, it is easy to maintain, because all the necessary components are always available for sale
The advantages of a wall-hung toilet include accessibility of the entire area, which is very important when cleaning the bathroom. Also, when installing such a toilet, all communications are hidden in the wall and do not spoil the appearance of the room, as is the case with floor-standing toilets
The last point at the same time complicates the maintenance of such a toilet, because getting to the structure becomes much more difficult if it is walled up in the wall.
If we talk about the installation height, then with a floor-standing toilet, of course, no questions arise, since it already has a fixed height and all that can be done is to place it on a pedestal. But when installing a wall-hung toilet, you need to comply with some standards prescribed by the specific features of use. In order to understand the principle of correct installation, you need to study the communications structure of a wall-hung toilet.
Installation
How to choose a stove for a summer house
The most convenient stoves for cottages made of cast iron are considered to be convector options. However, choosing one oven from the entire huge range of convection ovens is not as easy as the others.
- Water-heated furnace - the best furnaces and schemes with a water circuit. Tips for choosing and do-it-yourself installation features (95 photos)
- Exhaust furnace - installation, selection and necessary equipment for exhaust furnaces (85 photos and videos)
- Ceramic kiln - review of the best models and tips for using them at home (130 photos)
To make the right choice, you need to determine several different parameters.
In addition, you need to pay attention to the size and purpose of the stove
Another selection rule is to determine the additional functions that the stove should have. For example, the presence of an oven or hob. Thus, choosing a cast iron stove for your home or cottage is not at all difficult.
No splashing
Water splashes very often interfere with the comfortable use of the toilet, not to mention the fact that this phenomenon is very unhygienic. Toilet manufacturers offer a variety of solutions to this problem. Toilet models with an anti-splash system are one of the relatively new engineering developments.
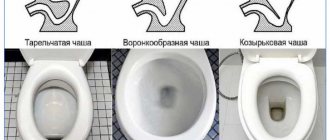
“Anti-splash” is a design feature of the toilet, which is designed to compensate for splashes that occur during its operation. Labeling about the presence of this system often deceives the buyer. To determine the presence of “anti-splash” yourself, look into the bowl of the toilet model you like. To suppress water movement, the drain hole should be very narrow and located as low as possible. Also make sure that the drain hole is offset from the center and that the water level in it is low enough. The drain hole should be surrounded by a special rim. If all these factors are present, then you have a toilet model equipped with an anti-splash system.
How to choose?
There is no strictly defined standard for the dimensions of installation frames. In each specific case, the choice is made taking into account the dimensions and design features of the toilet room. If you have enough free space, you can think about installing larger structures, including even a bidet.
If there is a solid wall in the room, it is worth considering block models of installation frames. It is often necessary to equip a non-standard room in limited space. In such cases, experts recommend studying the dimensions of corner structures.
It turns out that choosing a box for subsequent installation of plumbing must take into account not only personal preferences. In this case, we are also talking about the installation and connection features of all products. So, for example, the installation dimensions for a built-in toilet are selected taking into account the distance from the bowl to the wall or pieces of furniture. This value must be at least 60 cm, otherwise using the toilet will be uncomfortable, since your feet will rest against the mentioned obstacles.
Standard systems are suitable for equipping larger rooms. In such cases, the bowl is installed 18-20 cm from the box. And it is recommended to maintain the distance mentioned above on all sides of the plumbing fixture.
Before purchasing and starting installation, you should carefully study the plan of the toilet or bathroom. This will allow you to choose the most convenient and most suitable place for the plumbing and its dimensions
It is worth paying special attention to the following points
- With standard installation of the frame near the walls of the toilet room, you can choose both block and frame models. Their sizes are selected taking into account the dimensions of the plumbing and the room.
- If you need to install a plumbing system in a small room, in the attic or under a window, then you should consider small-sized models. Their height should not exceed 85 cm.
- For installation of plumbing fixtures on both sides of the duct, installations with appropriate fasteners (double-sided) and dimensions are provided.
- When equipping premises in which it is necessary to install several wall-hung toilets at once, special installations are chosen. We are talking about linear structures with a height of 115 cm.
The vast majority of frames are rectangular in shape. At the same time, they should be selected taking into account the commensurability of the parameters of the product itself and the niche. In cases where the box is larger, the voids are usually filled with materials that have soundproofing properties.
The standard dimensions of built-in toilet models are as follows:
- height – from 35 to 45 cm;
- depth – from 50 to 60 cm;
- width – from 30 to 40 cm.
Although the parameters given are standard, they may vary.
It should be remembered that now manufacturing companies offer more than a wide range of models. We can talk about special children's toilets, as well as products with enlarged bowls. In addition, plumbing fixtures are produced for people with disabilities and heavy weight. Naturally, all these factors will determine the choice of installation structures and their dimensions.
In addition to all of the above, you should take into account the size of the cistern. In the vast majority of cases, the thickness of hanging plastic devices is 9.5 cm and their width is 0.5 m
The height of such tanks, as a rule, is slightly higher than the similar parameters of conventional models. This size varies from 55 to 60 cm.
When choosing a frame for installing built-in plumbing, you need to remember the design features of various types of systems. Thus, frame options have a depth of 15-30 cm (more often we are talking about the minimum parameter). The height of such models can be from 85 to 140 cm, and their maximum width is 60 cm.
The following dimensions must also be taken into account:
- the center of the sewer pipe is located 22 cm from the level of the floor covering;
- The distance between mounting holes is 18 to 23 cm.
The minimum dimensions of block installations are, as a rule, identical to the similar parameters of frame structures. Their depth can be from 10 to 15 cm, and their height can be up to 1 meter. It is also necessary to consider the possibility of separate installation of the built-in cistern and toilet bowl. The latter in such cases is not attached to a niche, but directly to the wall.
For more information about the installation for the toilet, see the video below.
No splashing
Water splashes very often interfere with the comfortable use of the toilet, not to mention the fact that this phenomenon is very unhygienic. Toilet manufacturers offer a variety of solutions to this problem. Toilet models with an anti-splash system are one of the relatively new engineering developments.
“Anti-splash” is a design feature of the toilet, which is designed to compensate for splashes that occur during its operation. Labeling about the presence of this system often deceives the buyer. To determine the presence of “anti-splash” yourself, look into the bowl of the toilet model you like. To suppress water movement, the drain hole should be very narrow and located as low as possible. Also make sure that the drain hole is offset from the center and that the water level in it is low enough. The drain hole should be surrounded by a special rim. If all these factors are present, then you have a toilet model equipped with an anti-splash system.
Selecting a location
The standard installation of a wall-hung toilet with installation is done near a niche with communications. If the tank does not fit into it, the pipes inside must be moved to the sides.
The mounted tank and installation are often covered with a false wall.
The marking is done in advance. A line is drawn on the wall that coincides with the central axis of the device, and the distance from the frame to the wall is measured (standard - 13.5 mm). The location of the toilet cistern is marked. The installation is aligned to the building level, after which marks are made for installation holes at the mounting points.
Technical conditions for good installation
- The release of a new toilet must be the same as the release of an old one, otherwise you will need to carry out extensive work related to construction.
- Calculate the distance from the toilet cistern to the cold water supply point. Water is supplied using special flexible hoses.
- If your outdated toilet was built into the floor and secured with cement, after removing it, clean the screed residue from the floor base before installing the new toilet.
- Installation rules differ for different toilet models, and therefore we advise you to definitely follow the installation instructions provided by the manufacturer.
https://youtube.com/watch?v=pGDenqlEpkI
Frame
The installation scheme for a wall-hung toilet provides for a separate and hidden placement of the tank and fixation of the bowl on a steel frame (installation), which, in turn, is attached to the floor and main wall. The installation is installed after the water pipes have been laid and brought out. High-quality installation of a wall-hung toilet primarily depends on the correct installation of the frame.
The installation is leveled.
- The height of the wall-hung toilet from the floor may be greater if family members are tall. The remaining parameters are selected according to the instructions.
- The frame is attached to the floor and wall with anchor bolts so that the structure is stationary. If necessary, additional fastening is made, which the instructions may not provide for.
- After assembling the structure, the tank with communications is sealed with plasterboard or decorative panels. The material should be moisture resistant.
- The bowl is attached to special pins at the last stage of installation.
Recommendations you need
Let us allow ourselves to give the reader some advice on the installation and selection of the plumbing fixture that interests us.
Choice
Like floor-mounted, wall-hung toilets can be made from various materials. Let's try to evaluate them.
Polished stainless steel is virtually dirt-free due to its smooth surface. If deposits still remain on it, they can be easily removed using any household chemical.
Why does stainless steel occupy a much smaller market share than competing solutions?
Two circumstances:
- Pair of breech type metal plumbing fixtures. It has become familiar as anti-vandal equipment for public restrooms and evokes corresponding associations among many potential clients.
- In addition, the price of stainless steel toilets is much higher than that of ceramic analogues, and starts from approximately 20,000 rubles.
Glass is not much inferior to stainless steel in practicality; but viewing through the translucent walls what remains on the walls of the bowl below the water level is a rather dubious pleasure.
The main disadvantage of polymer concrete is its limited resistance to aggressive cleaning scratches and cleaning agents. Removing lime deposits and urinary stone from it without disturbing the appearance of the surface is not an easy task.
The main value of sanitaryware is its low cost. It is precisely on this basis that it is the undoubted favorite of the plumbing market. The downside is that its large-porous surface actively collects dirt and quite often lacks cleaning.
Finally, the material that is optimal in terms of functionality and cost combination is porcelain. The walls of the toilet will remain white as snow for a long time; If the need for cleaning does arise, you can safely use acidic and alkaline preparations.
Installation
Are there any subtleties to installing a wall-hung toilet yourself?
The installation stages themselves are comprehensively outlined in the accompanying documentation:
- The placement of the installation frame is marked by level or plumb.
- It is anchored to the wall and/or floor.
- Water is supplied to the tank, and a sewer pipe is supplied to the location of the toilet flare.
- The hole in the tank for the drain button is closed with a special membrane or simple polyethylene, after which the communications and installation are hidden behind a false wall. In most cases, it is laid out from moisture-resistant plasterboard over a galvanized profile and laid out with tiles.
- Once the tiles have firmly set, the toilet is hung on the studs of the installation, and a flush button is installed in the tank. A damper gasket is needed between the wall and the toilet to distribute the load on the tile and prevent chips from occurring.
There are a couple of nuances here:
- It is better to place the tiles away from the drain button, so that the seams are located symmetrically relative to the center of the button. Asymmetry does not look very careful.
- The smaller the sewerage outlet to the riser, the less likely it is to become clogged. Do not forget about the slope: for pipes with a diameter of 90 and 110 mm used for hidden installation, it is equal to 2 cm per linear meter.
- It is better to collect the sewerage using sealant. The instructions are due to the fact that rubber seals can lose elasticity over time and allow leaks.
- Forget about flexible eyeliners. Water is supplied to the tank by a solid pipe. The service life of a braided rubber hose rarely exceeds 5 years.
- Despite the fact that the tank fittings in most cases allow you to shut off the water through the service hatch behind the drain button, it is better to provide the supply to the tank with a valve and leave a hatch in the false wall to access it.
Installation features
You can only say specifically how to install a hygienic shower for a toilet on the spot. There are too many different nuances that are simply impossible to take into account. The connection principle is simple: you supply cold and hot water to the corresponding inputs. That's all. How to do this, with pipes or flexible hoses, is your choice. Of course, pipes are more reliable, but high-quality flexible hoses in good braid can last for years.
There is only one nuance that is worth remembering. When connecting a hygienic shower to hot and cold water (centralized system), be sure to install ball valves and check valves. Taps are almost always installed, but check valves are often forgotten.
This is a check valve. During installation, turn it so that the arrow on the body coincides with the direction of water flow
They are needed so that water from the “cold” riser does not mix with hot water and vice versa. Usually, just the opposite happens - you open cold water, and boiling water pours out, but the opposite cases also happen - hot water periodically becomes not hot at all. This is all because someone did not install a check valve on your riser when connecting a hygienic shower to the toilet.
The tap is opened, the shower is not being used yet, and through the open mixer water from one riser is mixed into another. Which water goes where depends on where the pressure is higher. Usually higher in hot risers (almost twice), which is why such cases are more common. But cold addition is also possible. In general, do not forget to install shut-off valves. They cost mere pennies (compared to the cost of the equipment), but they prevent unpleasant situations and disputes with the operating company and “happy” neighbors.
Exceptions to the rules
There are exceptions to the norms that determine the optimal location of the toilet. Their presence is determined by the technical characteristics of the room.
The reason for this may be: insufficient free space, the location of communications or the personal desire of the owner.
Violation of technical regulations for the location of a toilet is not a violation of the provisions of any law if this sanitary point is located in a non-state institution or outside a special purpose facility: hospital, kindergarten, school, military unit and the like. The owner of the premises is free to determine the location of the bathroom.
On the floor or above the floor
In advertising brochures talking about the advantages of wall-hung toilets, the following main points are given:
- Hanging plumbing does not interfere with cleaning, leaving the entire floor area accessible.
- It makes a compact toilet spacious, allowing you to save space due to the tank.
- It allows you to completely hide communications, thereby improving the appearance of the bathroom.
Let's try to find out how much truth there is in marketers' statements.
Free floor
The statement is true without any qualifications. Installation - the frame to which the toilet is attached is hidden behind a false wall, leaving the entire floor area accessible.
This indicates that in your bathroom there will no longer be black and damp places under the tank, that the base of the toilet bowl will not really interfere with cleaning, and to change the tiles you will not need to dismantle it. In addition: the vacated floor will give more scope to your imagination when choosing a flooring pattern.
Compactness
Console plumbing will indeed make the room more spacious, but only visually. The dimensions of a wall-hung toilet with a concealed cistern and installation are at least no smaller than the floor structure: due to the thickness of the false wall, they are likely to be larger.
See: the back wall of the toilet room will move forward by about 20 centimeters, thereby depriving you of the opportunity to use the space behind the toilet for shelves or a small cabinet.
Visual space will be associated with the highlights of a person’s perception of the size of the room. They are unconsciously assessed by the area of two planes - the floor and the ceiling. Because the floor in our case is not cluttered, the toilet, regardless of the actual reduction in floor area, will begin to seem less cramped.
By the way: mezzanines also visually make the room smaller. If you want to use part of the space in a small bathroom to store rarely used items, it is better to build a flat cabinet that spans the entire wall and equip it with mirrored doors.
Hidden communications
Yes, they really will be completely hidden. In addition to the toilet bowl, only the flush button will remain visible. Yes, it will be beautiful, but defiantly impractical.
You see, dear reader, the creator of this article, over a decade of working as a plumber, became convinced that every structure certainly lacks repair, be it a water supply system, a sewer system, a drain tank or a valve. Making communications difficult to access is guaranteed to create difficulties for yourself in the future. Even if it happens in 10 or 20 years.
In addition: in a compact municipal apartment, the back wall of the toilet, which in most cases is hidden by a false wall along with the installation, is decorated with sewerage and water supply risers. In addition, if you are not too lazy to first replace them with durable polymer or metal-polymer pipes, who can guarantee that they will not be damaged during a pressure surge? Or, as an option, there will be no need to replace a section of the riser in the ceiling (which more than happens)?
Conclusions? Anyone can make them for themselves. Let's put it this way: the author never once had the thought of choosing something other than the classic floor design.