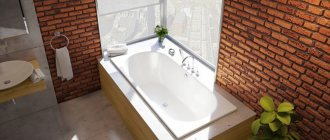
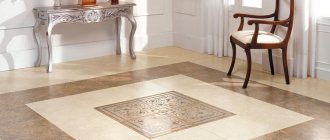
When renovating a bathroom, the question arose about choosing tiles. The stores have a huge selection, but the cost of floor tiles is much higher than wall tiles. For example, we liked Lasselberger tiles; they are identical in appearance to both walls and floors.
And really, how can you tell the difference between wall and floor tiles? Look more closely at the markings; if a palm is depicted, this is for wall coverings; if it is a leg, then it is for the floor. It's simple.
Then I had another question: is it possible to lay wall tiles on the floor? The consultant in the store first fell into a stupor for a few seconds, and then said that these two types of tiles have differences that are important to understand when gluing.
Types of combs for laying tiles
Notched trowels are made from:
- stainless steel (the most common and durable option);
- metal with a colored coating (the top layer comes off over time and ceases to protect the instrument from corrosion);
- plastics (break easily and are too flexible).
The following types are produced in the form:
- trapezoidal with a handle on the side, in the same plane as the working surface;
- rectangular with a perpendicular handle;
- with teeth of different sizes, but without a holder.
The latter type is sold as a universal one. But working with such a trowel is inconvenient. Masters prefer one of the first two options. Among them, a spatula with a handle perpendicular to the surface has a slight advantage. With this tool you can apply the solution (with the smooth side) and remove excess (with the serrated side).
The dimensions of the tile comb, namely the width of the working surface, are from 10 to 45 cm.
Features: The Rubi company produces tools in which the teeth are bent at an angle of 45° to the main plane. This makes it more convenient to make a high ridge of glue on the tile.
Sometimes one of the teeth (at the corner of the spatula) is cut off. When laying, there will be no glue at the very edge. This way the mixture will not go beyond the tiles, and you won’t have to remove it. As a result, time and adhesive solution are saved. In addition, when filled, the grout mixture forms joints in the shape of the letter “T” and holds better.
A similar effect is obtained from another trowel design. The corner tooth is made so that it protrudes in both directions. When moving, the masonry mortar is removed from the edge of the slab.
Main news
Modern designs have little in common with older models, which are fragile, brittle and difficult to install. Manufacturers strive for environmental friendliness, efficiency and practicality. Ceramic tile designs become more aesthetically pleasing.
Increase in size
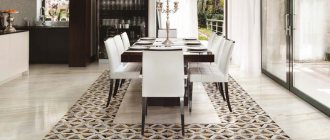
The area of the elements increases. This allows for quick installation. The masonry looks more aesthetically pleasing due to the reduction in the number of joints. This same feature allows you to save on putty. Fewer gaps save time on cleaning the surface.
Increasing the size makes it possible to use large, bold patterns in modern tile design without fear of spoiling the integrity of the picture.
Thickness reduction
The finishing material becomes thinner and lighter. This makes laying easier and increases service life.
Increased service life
This is an excellent material for cladding surfaces in places with high humidity and strong temperature changes. Modern models can easily withstand the most intense heat. They don't break when hit.
Variety of textures
Unusual textures have become popular. They are artificially “aged” by adding cracks. This material looks great in retro and classic designs. New this season are “velvet” samples that imitate velor fabric. Interesting specimens with a combined surface.
Non-standard forms
In addition to the usual squares or rectangles of “bricks”, this year designers are actively using types made in the form of hexagons “honeycombs”. Arabesque tiles have received a second wind. In the photo of new tile designs for 2021, you can even see such a bold solution as ceramics in the shape of fish scales.
Shapes and sizes of spatula teeth
The purpose of the trowel depends on this. The shape of the spaces is indicated by a letter. Triangular ones distribute the glue in a thinner layer; they are used for PVC tiles or mosaics. Marked with letters:
- A - standard;
- B - with wide teeth;
- S - closely spaced (the edge resembles a saw).
The square shape is indicated by the letter "C". Using these spatulas, medium-sized tiles are laid. For large-format slabs or on uneven bases, choose combs with rectangular or irregularly shaped teeth. Marked with the symbol “R”.
“M” - semicircle, used for:
- cement mixtures (for example, when installing heated floors);
- synthetic ones that spread a lot.
The comb that is formed with this type of teeth holds its shape better.
The glue consumption depends on the size of the teeth. This parameter is selected depending on the dimensions of the tile:
- 0.6 and 1.2 mm - for the thinnest layer;
- 3 mm - for glass mosaics;
- 4 mm - for tiles no larger than 10x10 cm;
- 6 mm - up to 15x20 or 20x20 cm;
- 8 mm - 30x30 cm;
- 10 mm - for a larger size than the previous one, or the same, but thick (from 10 mm);
- 12.5x20 mm - for large-format slabs.
Attention! If the surface is uneven or porous, more masonry mixture may be needed. Then take a tool that is designed for larger tiles.
Deyak osoblivost podlogi ta stn ceramic tiles
Depending on the value, ceramic wall tiles are available as substrates.
First of all, before choosing ceramic tiles, it is necessary to carefully consider the performance of the facing material and the characteristics of the location where they are planned to be installed. Particularly pay attention to such factors as:
- temperature conditions and humidity in the middle of the room;
- rhubarb, wool-clay tiles;
- intensity of the wash and durability before erasing;
- m_tsnіst.
Today, the classification of ceramic tiles is carried out according to the following parameters:
- method of preparation (extruded and pre-cured);
- vologopolinnyanya.
The infection is present in all major groups (European classification). Before choosing a tile, you need to be especially careful, if for any reason you have decided to place tiles on the wall tile. Here you need to follow the following rules:
- The larger the tile, the less valuable it is.
- The severity of coughing is an important factor, with increased progress and reliability.
- When purchasing, it is necessary to carefully check the leather of the clothing material, not only visually, but also by cleaning it.
The larger the ceramic tile, the less expensive it is.
The surface of the casing must be level and smooth, with even edges and a regular geometric surface. All tiles in one package are identical in color, size and size.
Also, consider ceramic tiles for which location. The greatest value is due to the material that is placed on the frame in the lobbies, corridors, restrooms, and also in public places.
You also need to increase your respect for durability to contamination, value and cleanability. For the kitchen and bath, an important factor when choosing ceramic tiles is their moisture resistance.
Important: almost all the information about the tiles is located on the packaging, tiles for walls are marked with the image of a hand, and for the background - a step depicted on a black background or shaded. Another option means that the tile has increased wear resistance.
Frost resistance is indicated by a snowflake, and the amount of baked goods is indicated by half-shaped pellets with the numbers 1 or 2 printed on them. Also on the packaging there are images of two new babies - this is a sign that the vibrator has a displaced yakist. Yu. The following information must be included in the box for over-insurance:
- size (indicated in inches and centimeters);
- tovshchina (mm);
- quantity and area (in pieces and meters);
- caliber, tone and grade, name, trademark, factory and country of origin.
How to choose the right notched spatula
Even instruments with a similar shape and size and made from the same material differ from each other. The more expensive one is not necessarily better. When choosing, experts advise paying attention to the following things:
- The length of the working plane must be equal to or greater than the width of the tile. This makes installation easier.
- For combs with a perpendicular handle, it can be metal or plastic. The last option is better, since the tool is lighter.
- The spatula should be easy to use. Before purchasing, it is recommended to check how it fits in your hand with different movements.
- If the handle is wooden, it is better to choose a varnished one to avoid splinters.
- To lay tiles on the floor, use a trowel with larger teeth.
- The tool should not be too rigid, but not too flexible. The first one will break quickly, and the second one is inconvenient to use.
Tip: To check the correct choice of comb for laying tiles, apply the solution to the wall. Run the toothed side over the surface and then apply the tile. The glue should not extend beyond the edges. It is best if the mixture does not reach them a little. In this case, the back side of the tile should be almost completely covered with mortar.
Tool preparation
To lay tiles you will need not only a toothed comb, but also several available tools:
- at the preparatory stage - hammer, chisel, wire brush, terry brush;
- when priming - a roller or paint brush, a square, a building level, markings;
- for applying glue - a trowel, a rubber mallet, a ruler, a glass marker, a tape measure, a tile cutter or a special cutting machine;
- when finishing and cleaning seams - a grater, a foam sponge, a rubber spatula.
Before using glue, it must be diluted in a plastic container. The basic rule when working with a toothed scraper is that the glue is applied in straight lines, without curls. This will avoid the formation of voids. The choice of adhesive base depends on the operating conditions of the tile. The adhesive mass is intended:
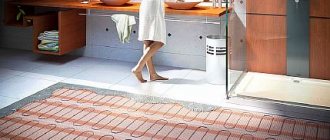
- for heated floors;
- for deformable surfaces and gypsum fiber sheets;
- The basic design is a conventional DSP screed.
Amounts of tile adhesive for a specific area
Recommendations from tile adhesive manufacturers
One of the important characteristics of masonry mortar is adhesion to the base. It shows how tightly the glue holds. The adhesion strength depends on parameters such as:
- mixture composition;
- layer thickness.
And the last indicator depends precisely on the size and shape of the teeth. Therefore, manufacturers indicate on glue packages not only the dimensions of the tiles, but also which spatula is best to use, for example:
- for tiles with a side up to 7 cm - you need a comb with 3 mm teeth;
- up to 10 cm - 4 mm;
- 10-20 cm - 6 mm;
- 20-30 cm - 8 mm;
- 30-50 cm - 10 mm;
- more than 50 cm - 12 mm.
Attention! If the cloves are too small, the solution will be less than necessary. The tile will stick worse and will come off over time. And if they are too large, more mixture will be needed, in other words, repair costs will increase.
Different types of glue differ in composition, setting time and shrinkage coefficient. The manufacturer's recommendations regarding one of them may differ from the average. Tips for choosing combs for the most common brands of tile adhesive are given in the table.
| Name | Tile size (cm) | Teeth height (mm) |
| Ceresit CM11 Plus | up to 5 /10 /15 /25 /30 | 3 /4/ 6 / 8 /10 |
| Ceresit CM12 | up to 30/60 | 10 /12 /18 |
| Ceresit CM 14 Extra | up to 15 /25 /30 /45 | 6 /8 /10 /12 |
| Ceresit CM17 | up to 10 /15 /25 /30 /45 | 4 /6 /8 /10 /12 |
| Plitonite A | up to 10 / 20 /25 /30 | 4 /6 /8 /10 |
| Plitonit B | up to 10 /20 / 25 / 30 / more than 30 | 4 /6 /8 /10 /12 |
| Plitonit Superpol | 10-20 / 20-25 /25-30 /from 30 / from 40 | 6 /8 /10 /12 /15 |
| Lithoacryl Plus | 5 /15 / 25 / 33 /45 | 4 /6 / 6-8 / 8 /10 |
| LitoGres K44 ECO | 10 /20-25 30 | 6 /8 /10 |
| Litoelastic | 5 /10 /15 /25 | 4 /6 /6 /6-8 |
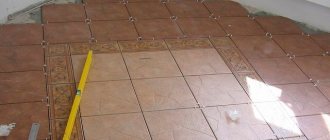
Features of laying wall tiles on the floor
Wall tiles laid on the floor, must have a sufficient thickness.
If you are going to perform a laying wall tiles on the floor, be sure to take into account that it is less vicious than the floor, because it has a soft texture and a fairly high rate of moisture absorption. Therefore, you need to choose a more solid can be, what you can do even visually:
- Firstly, it should be homogeneous and with a more compact structure;
- secondly, have a greater thickness.
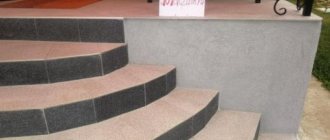
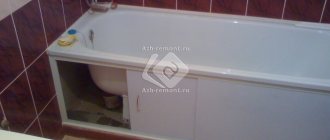
We now turn to the process of its installation. It should be noted immediately that the tile for the walls can be laid on the floor. The main conditions are no voids and perfectly flat floor surface. This is usually achieved by making ties and made cement-sand mortar.
The second option is the use of water-resistant plywood or gypsum fiber board (gypsum fiber boards), which are much stronger than drywall and well suited to the base under floor tiles. If properly put on a floor tile for walls, then it will serve for a long time and is very reliable.
How to apply adhesive when laying tiles under the comb
The procedure is as follows:
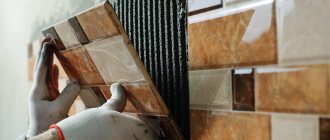
- Apply the mortar to the wall or floor using a flat trowel.
- Distribute the glue with a notched trowel with the required parameters.
- Press the tile tightly. Sometimes, for better grip, the tiles are tapped with a rubber mallet.
In the next 15-20 minutes, the position of the tile can be slightly adjusted. Then the solution will set.
Important: It is necessary to apply straight grooves with a comb. If you make twists of a complex shape, voids will form in these places, and the tile will not hold up as well.
Sometimes the mixture is applied to ceramic tiles and pressed against the surface. But this method takes longer.
If particularly strong adhesion is required, the following technology is used:
- Apply the solution to the wall.
- Remove excess.
- Spread on the tile.
- Remove the glue. The remaining 1-2 mm acts as a primer and the tile holds on more firmly.
Features: After installation, the spatula must be thoroughly washed. If this is not done, the remaining solution will dry on the surface and between the teeth. The gaps will decrease and the tool will do the job worse. To prevent the solution from drying out, the spatula can be kept in a container of water.
Grouting joints
The tile must remain in its untouched position for the time recommended by the manufacturer of the adhesive mixture.
Grouting is also carried out according to the instructions. Treat it carefully, as a separate process, so as not to spoil the quality result already obtained.
What if you lay tiles without a comb?
In order for the tile or porcelain tile to hold firmly, it is important to evenly distribute the solution over the surface. Due to large voids, the slabs will peel off. And if a warm floor is installed under them, it can overheat and fail.
Using only a regular spatula, it is difficult to achieve an even application, especially on an uneven surface. Hidden air voids may occur.
If you apply glue in a thick layer, it will be difficult to remove the excess. When pressing and tapping, a lot of mixture will come out. If adjacent tiles do not adhere, the edges rise. The result is noticeable differences in the level of the wall or floor.
Laying tiles without a comb increases the mixture consumption. At the same time, a layer that is too thick impairs the strength of the fastening.